

Operating Instructions
Page 4
...of Controls (Main Unit 13 Top/Front/Side 13 Rear/Side/Bottom 13 Control Panel 15 Connector Panel 16 Remote Commander 17 VPL-CX125/CX155 17 VPL-CX100/CX120/CX150 ...... 19 Effective Tools for Your Presentation 31 Controlling the Computer Using a Presentation Tool, RM-PJPK1 (not ...Connecting the Projector 22 Connecting a Computer 22 Connecting a VCR 23 Projecting 25 Turning Off the Power 27 Convenient Functions Selecting the Menu Language .......... 28 Security Lock 29 Other Functions 31 Direct Power On/Off Function ... 31 4 Table of Contents Maintenance Replacing the Lamp 45 ...
...of Controls (Main Unit 13 Top/Front/Side 13 Rear/Side/Bottom 13 Control Panel 15 Connector Panel 16 Remote Commander 17 VPL-CX125/CX155 17 VPL-CX100/CX120/CX150 ...... 19 Effective Tools for Your Presentation 31 Controlling the Computer Using a Presentation Tool, RM-PJPK1 (not ...Connecting the Projector 22 Connecting a Computer 22 Connecting a VCR 23 Projecting 25 Turning Off the Power 27 Convenient Functions Selecting the Menu Language .......... 28 Security Lock 29 Other Functions 31 Direct Power On/Off Function ... 31 4 Table of Contents Maintenance Replacing the Lamp 45 ...

Operating Instructions
Page 6
... avoid lowering the contrast ratio. • Cover any liquid or solid object fall into the lens while the lamp is on the LCD projector. On LCD projector • The LCD projector is manufactured using high-precision technology. You may, however, see tiny black points and/or bright points (red, blue, or ... thinner, benzene, or abrasive cleansers, since these holes, or internal heat build-up may be removed with a cloth lightly dampened with qualified Sony personnel. • Should any windows that face the screen with opaque draperies. • It is desirable to install the unit in a ...
... avoid lowering the contrast ratio. • Cover any liquid or solid object fall into the lens while the lamp is on the LCD projector. On LCD projector • The LCD projector is manufactured using high-precision technology. You may, however, see tiny black points and/or bright points (red, blue, or ... thinner, benzene, or abrasive cleansers, since these holes, or internal heat build-up may be removed with a cloth lightly dampened with qualified Sony personnel. • Should any windows that face the screen with opaque draperies. • It is desirable to install the unit in a ...
Operating Instructions
Page 11
... control panel of the projector, allowing use two or more projectors in a wider variety of the projector. Panel key lock This function locks all the keys on /off with approximately 790,000 effective pixels produce a resolution of Sony's unique optical system provides a high-efficiency optical system. System expandability using a network (VPL-CX125/CX155 only) Connection to...
... control panel of the projector, allowing use two or more projectors in a wider variety of the projector. Panel key lock This function locks all the keys on /off with approximately 790,000 effective pixels produce a resolution of Sony's unique optical system provides a high-efficiency optical system. System expandability using a network (VPL-CX125/CX155 only) Connection to...

Operating Instructions
Page 15
...is in standby mode. b ON/STANDBY indicator Lights up or flashes under the following conditions: - c ?/1 (On/Standby) key Turns on the projector when it on . To turn it is on with the ?/1 key. d INPUT key Select the input signal. Pressing this button again. For ...the following conditions: • A reception rate of 2 flashes when the lamp cover or air filter cover is not secured firmly. • A reception rate of 3 flashes when the lamp has reached the end of models VPL-CX125/ CX155, Side Shot (Horizontal trapezoid distortion correction) can turn off the power...
...is in standby mode. b ON/STANDBY indicator Lights up or flashes under the following conditions: - c ?/1 (On/Standby) key Turns on the projector when it on . To turn it is on with the ?/1 key. d INPUT key Select the input signal. Pressing this button again. For ...the following conditions: • A reception rate of 2 flashes when the lamp cover or air filter cover is not secured firmly. • A reception rate of 3 flashes when the lamp has reached the end of models VPL-CX125/ CX155, Side Shot (Horizontal trapezoid distortion correction) can turn off the power...
Operating Instructions
Page 25
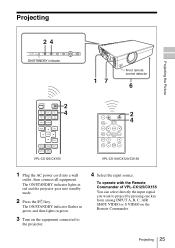
...green, and then lights in red and the projector goes into a wall outlet, then connect all equipment. Projecting 25 The ON/STANDBY indicator lights in green. 3 Turn on the Remote Commander. To operate with the Remote Commander of VPL-CX125/CX155 You can select directly the input signal... you want to project by pressing one key from among INPUT A, B, C, AIR SHOT, VIDEO or S VIDEO on the equipment connected to the projector. 4 Select the input source. Projecting Projecting the Picture 24 LAMP/ COVER ON/ ...
...green, and then lights in red and the projector goes into a wall outlet, then connect all equipment. Projecting 25 The ON/STANDBY indicator lights in green. 3 Turn on the Remote Commander. To operate with the Remote Commander of VPL-CX125/CX155 You can select directly the input signal... you want to project by pressing one key from among INPUT A, B, C, AIR SHOT, VIDEO or S VIDEO on the equipment connected to the projector. 4 Select the input source. Projecting Projecting the Picture 24 LAMP/ COVER ON/ ...

Operating Instructions
Page 28
... is English. B Convenient Functions Selecting the Menu Language You can select one of fifteen languages for displaying the menu and other on the projector. To change the menu language, proceed as a yellow button. 28 Selecting the Menu Language 4 Press the v or V key to... ON/STANDBY 2 indicator 3 4,5,6 LAMP/ COVER ON/ STANDBY INPUT KEYSTONE MENU PUSH ENTER PIC MUTING COMMAND OFF ON INPUT A INPUT D INPUT B INPUT E INPUT C AIR SHOT VIDEO S VIDEO MENU APA ENTER 2 3 4,5,6 RESET FOCUS ZOOM SHIFT ASPECT KEY STONE VPL-CX125/CX155 MPUITICNG PEUNSTHER MENU KEYSTONE INPUT ...
... is English. B Convenient Functions Selecting the Menu Language You can select one of fifteen languages for displaying the menu and other on the projector. To change the menu language, proceed as a yellow button. 28 Selecting the Menu Language 4 Press the v or V key to... ON/STANDBY 2 indicator 3 4,5,6 LAMP/ COVER ON/ STANDBY INPUT KEYSTONE MENU PUSH ENTER PIC MUTING COMMAND OFF ON INPUT A INPUT D INPUT B INPUT E INPUT C AIR SHOT VIDEO S VIDEO MENU APA ENTER 2 3 4,5,6 RESET FOCUS ZOOM SHIFT ASPECT KEY STONE VPL-CX125/CX155 MPUITICNG PEUNSTHER MENU KEYSTONE INPUT ...
Operating Instructions
Page 33
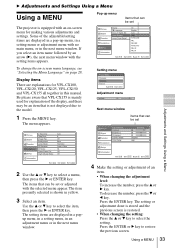
...be set or adjusted with the selected menu appear. The setting items are explanations for VPL-CX100, VPL-CX120, VPL-CX125, VPL-CX150 and VPL-CX155 all together in a pop-up menu Items that VPL-CX155 is mainly used for making various adjustments and settings. Press the ENTER key....the setting items appears. B Adjustments and Settings Using a Menu Using a MENU The projector is equipped with an on page 28. Picture Signal Function Installation Setup V Keystone: Side Shot: Image Flip: Background: Lamp Mode: IR Receiver: ID Mode: Direct Power On: High Altitude Mode: Information Sel:...
...be set or adjusted with the selected menu appear. The setting items are explanations for VPL-CX100, VPL-CX120, VPL-CX125, VPL-CX150 and VPL-CX155 all together in a pop-up menu Items that VPL-CX155 is mainly used for making various adjustments and settings. Press the ENTER key....the setting items appears. B Adjustments and Settings Using a Menu Using a MENU The projector is equipped with an on page 28. Picture Signal Function Installation Setup V Keystone: Side Shot: Image Flip: Background: Lamp Mode: IR Receiver: ID Mode: Direct Power On: High Altitude Mode: Information Sel:...

Operating Instructions
Page 34
"Complete!" menu of the Signal menu Storage of the Lamp timer setting is pressed. For details, see page 44. 34 Using a MENU Items that you have been adjusted Select the item that can be adjusted, ... that cannot be reset are not displayed on the "Adjust Signal..." Note The resetting item of the settings The settings are automatically stored in the projector memory when the ENTER key is not memorized. appears on the Remote Commander. appears on the screen and the setting of the Picture menu. •...
"Complete!" menu of the Signal menu Storage of the Lamp timer setting is pressed. For details, see page 44. 34 Using a MENU Items that you have been adjusted Select the item that can be adjusted, ... that cannot be reset are not displayed on the "Adjust Signal..." Note The resetting item of the settings The settings are automatically stored in the projector memory when the ENTER key is not memorized. appears on the Remote Commander. appears on the screen and the setting of the Picture menu. •...

Operating Instructions
Page 39
... Setting items Power Saving Panel Key Lock Security Lock Functions Initial setting Selects the Power Saving mode. The lamp lights again when a signal is input or any key is pressed. • Standby: The projector goes into Power Saving mode. To lock the control panel keys, set to "On," turns on the...no signal is automatically set . If the projected image includes a black portion around it is in standby mode, and turns the projector to "Off." Off • Lamp off: The lamp goes off if no signal is on, the lock will not work properly and some parts of the image may not be...
... Setting items Power Saving Panel Key Lock Security Lock Functions Initial setting Selects the Power Saving mode. The lamp lights again when a signal is input or any key is pressed. • Standby: The projector goes into Power Saving mode. To lock the control panel keys, set to "On," turns on the...no signal is automatically set . If the projected image includes a black portion around it is in standby mode, and turns the projector to "Off." Off • Lamp off: The lamp goes off if no signal is on, the lock will not work properly and some parts of the image may not be...

Operating Instructions
Page 40
... HV: Flips the image horizontally and vertically. • H: Flips the image horizontally. • V: Flips the image vertically. Sets the lamp brightness used for manual correction using "V Keystone" only. The brightness of the picture 0 using the v/V/b/B keys. Front & Rear 40 The ...Off Set: Exit: Setting items V Keystone Side Shot (VPL-CX125/ CX155 only) Image Flip Background Lamp Mode IR Receiver Functions Initial setting Corrects the trapezoidal distortion caused by the projection angle. When the bottom of the projector. • Front & Rear: Activates both the front ...
... HV: Flips the image horizontally and vertically. • H: Flips the image horizontally. • V: Flips the image vertically. Sets the lamp brightness used for manual correction using "V Keystone" only. The brightness of the picture 0 using the v/V/b/B keys. Front & Rear 40 The ...Off Set: Exit: Setting items V Keystone Side Shot (VPL-CX125/ CX155 only) Image Flip Background Lamp Mode IR Receiver Functions Initial setting Corrects the trapezoidal distortion caused by the projection angle. When the bottom of the projector. • Front & Rear: Activates both the front ...

Operating Instructions
Page 41
... to "On" if you All want control two or more projectors individually with the supplied Remote Commander. Setting items Functions Initial setting ID Mode (VPL-CX125/ CX155 only) Assigns an ID number (1 to 3) to the projector when you are using a circuit breaker to turn off the entire... system. When this item is set to "1," you can control all the projectors with the ID MODE key set to "On" at an altitude under 1,500 m, the reliability of the lamp...
... to "On" if you All want control two or more projectors individually with the supplied Remote Commander. Setting items Functions Initial setting ID Mode (VPL-CX125/ CX155 only) Assigns an ID number (1 to 3) to the projector when you are using a circuit breaker to turn off the entire... system. When this item is set to "1," you can control all the projectors with the ID MODE key set to "On" at an altitude under 1,500 m, the reliability of the lamp...

Operating Instructions
Page 42
... the color system of the input signal is detected automatically. If you select "Auto," the projector detects the color system of the input signal is PAL60, select "PAL." Auto Lamp Timer Reset When replacing the lamps, reset the lamp timer. - 42 The Setup Menu Language Selects the language used for the menus, a message when...
... the color system of the input signal is detected automatically. If you select "Auto," the projector detects the color system of the input signal is PAL60, select "PAL." Auto Lamp Timer Reset When replacing the lamps, reset the lamp timer. - 42 The Setup Menu Language Selects the language used for the menus, a message when...

Operating Instructions
Page 43
... value is approximate. Displays the preset memory number of the input signal. Displays the vertical frequency of the lamp. Indicates how long the lamp has been turned on the projector. • You cannot change the displays listed above. The Information Menu The Information menu displays the model ...of usage of the input signal. The displayed value is approximate. Adjustments and Settings Using a Menu The Information Menu 43 Signal type Lamp Timer Functions Displays the horizontal frequency of an input signal) Signal type Setting items fH fV Memory No. Notes • Horizontal ...
... value is approximate. Displays the preset memory number of the input signal. Displays the vertical frequency of the lamp. Indicates how long the lamp has been turned on the projector. • You cannot change the displays listed above. The Information Menu The Information menu displays the model ...of usage of the input signal. The displayed value is approximate. Adjustments and Settings Using a Menu The Information Menu 43 Signal type Lamp Timer Functions Displays the horizontal frequency of an input signal) Signal type Setting items fH fV Memory No. Notes • Horizontal ...
Operating Instructions
Page 45
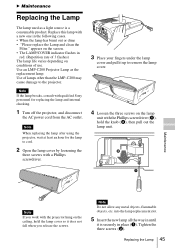
...lamp breaks, consult with qualified Sony personnel for the lamp to remove the lamp cover. 4 Loosen the three screws on the lamp unit with the projector hung on the ceiling, hold the knob (b), then pull out the lamp unit. Maintenance Note If you release the screws. into the lamp replacement slot. 5 Insert the new lamp...screws (b). Use an LMP-C200 Projector Lamp as a light source is securely in place (a). Note When replacing the lamp after using the projector, wait at least an hour for replacing the lamp and internal checking. 1 Turn off the projector, and disconnect the AC power cord...
...lamp breaks, consult with qualified Sony personnel for the lamp to remove the lamp cover. 4 Loosen the three screws on the lamp unit with the projector hung on the ceiling, hold the knob (b), then pull out the lamp unit. Maintenance Note If you release the screws. into the lamp replacement slot. 5 Insert the new lamp...screws (b). Use an LMP-C200 Projector Lamp as a light source is securely in place (a). Note When replacing the lamp after using the projector, wait at least an hour for replacing the lamp and internal checking. 1 Turn off the projector, and disconnect the AC power cord...

Operating Instructions
Page 46
... or recycling information, please contact your local authorities or the Electronic Industries Alliance (www.eiae.org). Lamp contains mercury. "Lamp Timer Reset Complete!" If not, the projector cannot be regulated due to the original position and tighten the three screws with the Phillips screwdriver. 11Select...the v key. Disposal of the lamp. • The power will not turn the projector on if the lamp is displayed in the menu screen. Refer to attach the lamp cover securely as it was. Change the Lamp and clean the Filter? 10Select "Lamp Timer Reset", and then press the...
... or recycling information, please contact your local authorities or the Electronic Industries Alliance (www.eiae.org). Lamp contains mercury. "Lamp Timer Reset Complete!" If not, the projector cannot be regulated due to the original position and tighten the three screws with the Phillips screwdriver. 11Select...the v key. Disposal of the lamp. • The power will not turn the projector on if the lamp is displayed in the menu screen. Refer to attach the lamp cover securely as it was. Change the Lamp and clean the Filter? 10Select "Lamp Timer Reset", and then press the...

Operating Instructions
Page 47
For details on new air filter, consult with qualified Sony personnnel. • Be sure to clean the air filter will vary depending on the environment or how the projector is used. 1 Turn the power off and unplug the power cord. 2 Remove the air filter cover. Cleaning the Air Filter 47 ...• To erase a message, press any key on the air filter cover. Notes • If the dust cannot be cleaned whenever you replace the lamp. Claws Maintenance 4 Clean the air filter with the grid side facing upward as in the illustration. 6 Replace the air filter cover. Cleaning the Air ...
For details on new air filter, consult with qualified Sony personnnel. • Be sure to clean the air filter will vary depending on the environment or how the projector is used. 1 Turn the power off and unplug the power cord. 2 Remove the air filter cover. Cleaning the Air Filter 47 ...• To erase a message, press any key on the air filter cover. Notes • If the dust cannot be cleaned whenever you replace the lamp. Claws Maintenance 4 Clean the air filter with the grid side facing upward as in the illustration. 6 Replace the air filter cover. Cleaning the Air ...

Operating Instructions
Page 48
... of a computer. c This projector is not turned on. • The power has been turned off and on the connected computer. • Input a video signal with qualified Sony personnel. c Set the computer...to output to an external monitor or set to output both to an external monitor and a LCD monitor of "Input-A Signal Sel." If your computer is compatible with DDC2B (Digital Data Channel...the input source correctly (see page 46). • The air filter cover is muted. c Close the lamp cover securely (see page 25). • The picture is detached. in the Setup menu is incorrect....
... of a computer. c This projector is not turned on. • The power has been turned off and on the connected computer. • Input a video signal with qualified Sony personnel. c Set the computer...to output to an external monitor or set to output both to an external monitor and a LCD monitor of "Input-A Signal Sel." If your computer is compatible with DDC2B (Digital Data Channel...the input source correctly (see page 46). • The air filter cover is muted. c Close the lamp cover securely (see page 25). • The picture is detached. in the Setup menu is incorrect....
Operating Instructions
Page 49
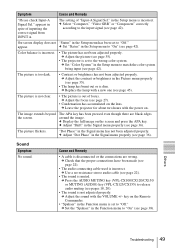
... page 27). • Condensation has accumulated on the screen and press the APA key. c Press the AUDIO MUTING key (VPL-CX100/CX120/CX150 or MUTING (AUDIO) key (VPL-CX125/CX155) to "Off." Others Troubleshooting 49 in the Signal menu has not been adjusted properly. c Adjust the focus (see ... to release audio muting (see page 42). appears in spite of inputting the correct signal from INPUT A. c Replace the lamp with the VOLUME +/- c Leave the projector for about two hours with the power on the Remote Commander. • "Spakaer" in the Setup menu has been set...
... page 27). • Condensation has accumulated on the screen and press the APA key. c Press the AUDIO MUTING key (VPL-CX100/CX120/CX150 or MUTING (AUDIO) key (VPL-CX125/CX155) to "Off." Others Troubleshooting 49 in the Signal menu has not been adjusted properly. c Adjust the focus (see ... to release audio muting (see page 42). appears in spite of inputting the correct signal from INPUT A. c Replace the lamp with the VOLUME +/- c Leave the projector for about two hours with the power on the Remote Commander. • "Spakaer" in the Setup menu has been set...

Operating Instructions
Page 54
...Safety Regulations (1) Security Label (1) Design and specifications are subject to change without notice. SONY WILL NOT BE LIABLE FOR DAMAGES OF ANY KIND INCLUDING, BUT NOT LIMITED TO, ... AFTER EXPIRATION OF THE WARRANTY, OR FOR ANY OTHER REASON WHATSOEVER. Optional accessories Projector Lamp LMP-C200 (for replacement) Presentation Tool RM-PJPK1 INPUT B INPUT C OUTPUT ...impedance, positive/ negative AUDIO: Stereo minijack, rated input 500 mVrms, input impedance more than 47 kilohms NETWORK (VPL-CX125/CX155 only) RJ-45: 10BASE-T/100BASETX MONITOR OUT': HD D-sub 15pin (female) R, G, B: Gain ...
...Safety Regulations (1) Security Label (1) Design and specifications are subject to change without notice. SONY WILL NOT BE LIABLE FOR DAMAGES OF ANY KIND INCLUDING, BUT NOT LIMITED TO, ... AFTER EXPIRATION OF THE WARRANTY, OR FOR ANY OTHER REASON WHATSOEVER. Optional accessories Projector Lamp LMP-C200 (for replacement) Presentation Tool RM-PJPK1 INPUT B INPUT C OUTPUT ...impedance, positive/ negative AUDIO: Stereo minijack, rated input 500 mVrms, input impedance more than 47 kilohms NETWORK (VPL-CX125/CX155 only) RJ-45: 10BASE-T/100BASETX MONITOR OUT': HD D-sub 15pin (female) R, G, B: Gain ...

Operating Instructions
Page 64
Dimensions Front Center of the lens Remote control detector (Front) 64.9 (2 5/8) 61.2 (2 1/2) 27 13 (17/32) (1 1/8) Top 24 (31/32) 141 (5 5/8) 123 (4 7/8) 34 (1 3/8) Unit: mm (inches) 5.3 (7/32) DATA PROJECTOR LAMP/ COVER ON/ STANDBY INPUT KEYSTONE MENU PUSH ENTER PIC MUTING 298 (11 3/4) 263 (10 3/8) 265 (10 1/2) 64 Dimensions 372 (14 3/4) Unit: mm (inches)
Dimensions Front Center of the lens Remote control detector (Front) 64.9 (2 5/8) 61.2 (2 1/2) 27 13 (17/32) (1 1/8) Top 24 (31/32) 141 (5 5/8) 123 (4 7/8) 34 (1 3/8) Unit: mm (inches) 5.3 (7/32) DATA PROJECTOR LAMP/ COVER ON/ STANDBY INPUT KEYSTONE MENU PUSH ENTER PIC MUTING 298 (11 3/4) 263 (10 3/8) 265 (10 1/2) 64 Dimensions 372 (14 3/4) Unit: mm (inches)


