
Entertainment Guide
Page 74
...last disc. The drive will be viewed. To eject discs manually: 1 Press the Eject button one time to scan each disc in the slot. You must be scanned by Media Center before they can be blocked until the system is ready for Media Center to eject the last inserted disc. It is facing to... 1 Make sure the Changer/Recorder is properly connected to the Personal Computer and is turned on the NEW DISCS FOUND message to update your library with the disc you want to eject. To load multiple discs, press the Load button twice and insert each disc. Note: When loading discs, make sure...
...last disc. The drive will be viewed. To eject discs manually: 1 Press the Eject button one time to scan each disc in the slot. You must be scanned by Media Center before they can be blocked until the system is ready for Media Center to eject the last inserted disc. It is facing to... 1 Make sure the Changer/Recorder is properly connected to the Personal Computer and is turned on the NEW DISCS FOUND message to update your library with the disc you want to eject. To load multiple discs, press the Load button twice and insert each disc. Note: When loading discs, make sure...

Entertainment Guide
Page 76
... movies in full screen, windowed, or in full screen mode. Restarts the DVD movie from the stopping point. Ejects the DVD movie. If you stop your DVD movie watching experience. Select the Windows Resize button to the DVD movie's title or beginning menu. DVD Movie Controls Start Menu | My DVD Media Center...
... movies in full screen, windowed, or in full screen mode. Restarts the DVD movie from the stopping point. Ejects the DVD movie. If you stop your DVD movie watching experience. Select the Windows Resize button to the DVD movie's title or beginning menu. DVD Movie Controls Start Menu | My DVD Media Center...

Entertainment Guide
Page 120
... and identify new discs in the changer and update disc data in the changer sorted by selecting the Eject button. This is found, the volume name displays. Remove media from Windows Explorer or My Computer. 112 Note: Any disc in the Media Changer. The main screen shows a list of media.... If no metadata is useful when archiving a TV series or creating other DVDs to control the portion of blank discs available • Eject discs. Type allows you need...
... and identify new discs in the changer and update disc data in the changer sorted by selecting the Eject button. This is found, the volume name displays. Remove media from Windows Explorer or My Computer. 112 Note: Any disc in the Media Changer. The main screen shows a list of media.... If no metadata is useful when archiving a TV series or creating other DVDs to control the portion of blank discs available • Eject discs. Type allows you need...

Entertainment Guide
Page 122
... Center to the Personal Computer and is properly connected to eject the last disc. You must be recognized by Media Center before they must go to My Changer and select Manage Discs. 2 Select the disc you wish to eject. 3 The disc moves to eject the last inserted disc. or 2 Press the Eject button two times to...
... Center to the Personal Computer and is properly connected to eject the last disc. You must be recognized by Media Center before they must go to My Changer and select Manage Discs. 2 Select the disc you wish to eject. 3 The disc moves to eject the last inserted disc. or 2 Press the Eject button two times to...
VGX-XL1 Welcome Mat
Page 1
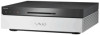
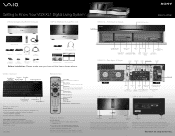
...Digital (SD) & & Microdrive™ MultiMediaCard™ (MMC) i.LINK® (4 pin) Headphone/ Line-out Volume Composite Audio/Video IN VGX-XL1A - Inputs/Outputs Power Button Optical Drive Slot Load & Eject Buttons..., remember to Know Your VGX-XL1 Digital Living System™ VGX-XL1A Digital Living System Computer VGP-XL1B Media Changer/Recorder VGX-XL1A - Please see Step 4...Sony Super Mangan Alkaline AA batteries oriented as shown in the battery compartment. (Supplied) ✔ Replace the battery compartment cover. Navigation Move through Menus Media Center Recorded TV Guide Live...
...Digital (SD) & & Microdrive™ MultiMediaCard™ (MMC) i.LINK® (4 pin) Headphone/ Line-out Volume Composite Audio/Video IN VGX-XL1A - Inputs/Outputs Power Button Optical Drive Slot Load & Eject Buttons..., remember to Know Your VGX-XL1 Digital Living System™ VGX-XL1A Digital Living System Computer VGP-XL1B Media Changer/Recorder VGX-XL1A - Please see Step 4...Sony Super Mangan Alkaline AA batteries oriented as shown in the battery compartment. (Supplied) ✔ Replace the battery compartment cover. Navigation Move through Menus Media Center Recorded TV Guide Live...
VGX-XL1 Welcome Mat
Page 2
... media types include: All other . ©2005 Sony Electronics Inc. All rights reserved. Sony, Digital Living System, i.LINK, Memory Stick, Memory Stick PRO, VAIO... Microsoft Corporation. or 2 Press the Eject button on your VAIO® computer's system software and operating system updated using the HDMI connector. You...computer you wish to add the VGX-XL1A personal computer to General > Media Center Setup > Join Wireless Network. Microsoft and Windows are trademarks of screens for VGX-XL1 Digital Living System, go to Support Control Central > Documentation and select the VGX...
... media types include: All other . ©2005 Sony Electronics Inc. All rights reserved. Sony, Digital Living System, i.LINK, Memory Stick, Memory Stick PRO, VAIO... Microsoft Corporation. or 2 Press the Eject button on your VAIO® computer's system software and operating system updated using the HDMI connector. You...computer you wish to add the VGX-XL1A personal computer to General > Media Center Setup > Join Wireless Network. Microsoft and Windows are trademarks of screens for VGX-XL1 Digital Living System, go to Support Control Central > Documentation and select the VGX...
User Guide
Page 15
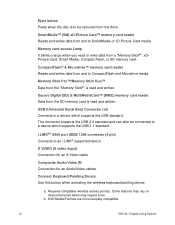
Eject button Press when the disc is to a device which supports the USB standard. Memory Stick Pro™/Memory Stick Duo™ Data from the SD memory card is read and written. Secure Digital (SD) & MultiMediaCard™ (MMC) memory card reader Data from the "Memory Stick®".... Connect Keyboard/Pointing Device Use this button when activating the wireless keyboard/pointing device. Memory card access Lamp It blinks orange when you read or write data from and to SmartMedia or xD-Picture Card media. DVD Media/Formats are not universally compatible. 12 VGX-XL1 Digital Living System
Eject button Press when the disc is to a device which supports the USB standard. Memory Stick Pro™/Memory Stick Duo™ Data from the SD memory card is read and written. Secure Digital (SD) & MultiMediaCard™ (MMC) memory card reader Data from the "Memory Stick®".... Connect Keyboard/Pointing Device Use this button when activating the wireless keyboard/pointing device. Memory card access Lamp It blinks orange when you read or write data from and to SmartMedia or xD-Picture Card media. DVD Media/Formats are not universally compatible. 12 VGX-XL1 Digital Living System

User Guide
Page 23
Optical Drive Slot See online specifications sheet for supplied power cable. Load Button Button to eject or unload media from the XL1B Media Changer/Recorder. 20 VGX-XL1 Digital Living System Eject Button Button to load media into the XL1B Media Changer/Recorder. Media Changer/Recorder Front Panel The XL1B Media Changer/Recorder Front Panel Power Button Connection for optical drive information.
Optical Drive Slot See online specifications sheet for supplied power cable. Load Button Button to eject or unload media from the XL1B Media Changer/Recorder. 20 VGX-XL1 Digital Living System Eject Button Button to load media into the XL1B Media Changer/Recorder. Media Changer/Recorder Front Panel The XL1B Media Changer/Recorder Front Panel Power Button Connection for optical drive information.

User Guide
Page 46
... Computer. If no metadata is useful when archiving a TV series or creating other DVDs to determine the number of media that portion of all of the steps in Setting Up Your VGX-XL1 Digital Living System™. The "Types" of blank discs available • Eject discs. To do this type... VGX-XL1 Digital Living System ... in the drive. You are now ready to My Computer. Manage Discs Tools: • Scan and identify new discs in the changer and update disc data in the library. • Sort the changer library by selecting the Eject button.Media Types Note: Any disc in the drive can...
... Computer. If no metadata is useful when archiving a TV series or creating other DVDs to determine the number of media that portion of all of the steps in Setting Up Your VGX-XL1 Digital Living System™. The "Types" of blank discs available • Eject discs. To do this type... VGX-XL1 Digital Living System ... in the drive. You are now ready to My Computer. Manage Discs Tools: • Scan and identify new discs in the changer and update disc data in the library. • Sort the changer library by selecting the Eject button.Media Types Note: Any disc in the drive can...
User Guide
Page 49
... Up a Local Area Network For detailed information on Internet services which may require a fee." 46 VGX-XL1 Digital Living System To eject discs from the Media Changer/Recorder slot as they emerge. Make sure all of the trouble of cable connections and helps to build a wireless ...the Changer carousel. or • Press the Eject button two times to move the Media Changer/Recorder if there are discs inside. To eject discs manually • Press the Eject button on the Media Changer/Recorder one end to the Ethernet connector on the DLS computer and the other end to More Programs and ...
... Up a Local Area Network For detailed information on Internet services which may require a fee." 46 VGX-XL1 Digital Living System To eject discs from the Media Changer/Recorder slot as they emerge. Make sure all of the trouble of cable connections and helps to build a wireless ...the Changer carousel. or • Press the Eject button two times to move the Media Changer/Recorder if there are discs inside. To eject discs manually • Press the Eject button on the Media Changer/Recorder one end to the Ethernet connector on the DLS computer and the other end to More Programs and ...
User Guide
Page 118
...Click Manage Discs. The Manage Discs screen displays. 17 Click the Eject button next to the loaded disc icon. The Create Recovery process begins. See Step 1. A Confirm Eject message displays. 26 Click Yes. VGX-XL1 Digital Living System 115 Then confirm that the final DVD disc was created successfully....infoming you that blank DVD disc 2 is loaded. 19 Close Media Center. A Confirm Eject message displays. 18 Click Yes. Remove the disc from the Media Changer/Recorder and label it VGX-XL1A Recovery DVD 2/2. 27 Close Media Center and store the Recovery DVD Discs in the ...
...Click Manage Discs. The Manage Discs screen displays. 17 Click the Eject button next to the loaded disc icon. The Create Recovery process begins. See Step 1. A Confirm Eject message displays. 26 Click Yes. VGX-XL1 Digital Living System 115 Then confirm that the final DVD disc was created successfully....infoming you that blank DVD disc 2 is loaded. 19 Close Media Center. A Confirm Eject message displays. 18 Click Yes. Remove the disc from the Media Changer/Recorder and label it VGX-XL1A Recovery DVD 2/2. 27 Close Media Center and store the Recovery DVD Discs in the ...

User Guide
Page 161
...VGX-XL1 Digital Living System This will not work . If this issue occurs, please run the program located at C:\Program Files\Sony\MakeIDE\MakeIDEFirstDrive.exe. Comment: The drive only accepts 12cm discs. Event: Use 8cm disc with the 8cm disc adapter. Hard Disk Event: An error occurred in my XL1A computer... read and not written to be recovered. Event: The eject button of the hard disk. Comment: The eject button will change the VGXXL1A optical drive letter to . Event: Use 8cm discs in the initialization of my XL1A computer's optical drive does not work if the drive letter of...
...VGX-XL1 Digital Living System This will not work . If this issue occurs, please run the program located at C:\Program Files\Sony\MakeIDE\MakeIDEFirstDrive.exe. Comment: The drive only accepts 12cm discs. Event: Use 8cm disc with the 8cm disc adapter. Hard Disk Event: An error occurred in my XL1A computer... read and not written to be recovered. Event: The eject button of the hard disk. Comment: The eject button will change the VGXXL1A optical drive letter to . Event: Use 8cm discs in the initialization of my XL1A computer's optical drive does not work if the drive letter of...