Entertainment Guide
Page 16
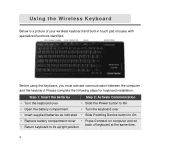
Step 1: Insert the batteries Step 2: Activate Communication • Turn the keyboard over • Slide the Power button to On • Open the battery compartment • Turn the keyboard over • Insert supplied batteries as indicated • Slide Pointing Device button to On • Replace battery compartment cover • Press Connect on computer and...
Step 1: Insert the batteries Step 2: Activate Communication • Turn the keyboard over • Slide the Power button to On • Open the battery compartment • Turn the keyboard over • Insert supplied batteries as indicated • Slide Pointing Device button to On • Replace battery compartment cover • Press Connect on computer and...
VGX-XL1 Welcome Mat
Page 1
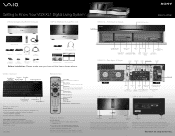
..., remove the battery compartment cover. ✔ Insert two (2) Sony Super Mangan Alkaline AA batteries oriented as a normal 1394 port,...oriented as shown in the battery compartment. (Supplied) ✔ Replace the battery compartment cover. Note: When ...Power Button CD-RW/ DVD Combo Drive Wireless Keyboard Remote Control WLAN Antenna Power Cord Coaxial Cable HDMI™ Cable Optical S/PDIF Cable Power Cord i.LINK® Cable (6pin-S400) Keyboard (4) AA Batteries Remote (2) AA Batteries HDMI™ to Know Your VGX-XL1 Digital Living System™ VGX-XL1A Digital Living System...
..., remove the battery compartment cover. ✔ Insert two (2) Sony Super Mangan Alkaline AA batteries oriented as a normal 1394 port,...oriented as shown in the battery compartment. (Supplied) ✔ Replace the battery compartment cover. Note: When ...Power Button CD-RW/ DVD Combo Drive Wireless Keyboard Remote Control WLAN Antenna Power Cord Coaxial Cable HDMI™ Cable Optical S/PDIF Cable Power Cord i.LINK® Cable (6pin-S400) Keyboard (4) AA Batteries Remote (2) AA Batteries HDMI™ to Know Your VGX-XL1 Digital Living System™ VGX-XL1A Digital Living System...
VGX-XL1 Welcome Mat
Page 2
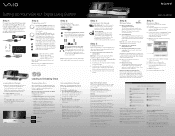
Setting Up Your VGX-XL1 Digital Living System™ Step 1: Connecting the DLS Computer and Media Changer/Recorder Using the supplied i.LINK® cable, ... will be presented with a single location for each disc. Then follow the on the power to move the Media Changer/Recorder if there are plugged into the Media Changer/Recorder.... Sony Electronics Inc. Loading & Unloading Discs Scanning New Discs When loading discs to the Media Changer, the discs must be available for VGX-XL1 Digital Living System, go to your VAIO® computer's system software and operating system ...
Setting Up Your VGX-XL1 Digital Living System™ Step 1: Connecting the DLS Computer and Media Changer/Recorder Using the supplied i.LINK® cable, ... will be presented with a single location for each disc. Then follow the on the power to move the Media Changer/Recorder if there are plugged into the Media Changer/Recorder.... Sony Electronics Inc. Loading & Unloading Discs Scanning New Discs When loading discs to the Media Changer, the discs must be available for VGX-XL1 Digital Living System, go to your VAIO® computer's system software and operating system ...
VGX-XL1 Marketing Specifications
Page 2
...Corporation. Weights and measurements are not universally compatible. 4. VGX-XL1 VAIO® VGX-XL1 Series Digital Living System™ Hardware VGX-XL1A Processor Intel® Pentium® D Processor 820 ...LINK®4 6-pin x 2 Weight 86 lbs. (for both XL1A and XL1B) Supplied Accessories IR Remote Control / IR Blaster (1) Wireless Keyboard HDMI™ Cable/ i....Power Management ACPI 1.0 Compliant Integrated Wireless LAN 802.11b/g9 VGP-XL1B Media changer Capacity for evaluation purposes only. A portion of the software; i.LINK is not manufactured to any specific software, and Sony...
...Corporation. Weights and measurements are not universally compatible. 4. VGX-XL1 VAIO® VGX-XL1 Series Digital Living System™ Hardware VGX-XL1A Processor Intel® Pentium® D Processor 820 ...LINK®4 6-pin x 2 Weight 86 lbs. (for both XL1A and XL1B) Supplied Accessories IR Remote Control / IR Blaster (1) Wireless Keyboard HDMI™ Cable/ i....Power Management ACPI 1.0 Compliant Integrated Wireless LAN 802.11b/g9 VGP-XL1B Media changer Capacity for evaluation purposes only. A portion of the software; i.LINK is not manufactured to any specific software, and Sony...
User Guide
Page 10
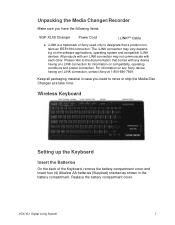
.... VGX-XL1 Digital Living System 7 i.LINK is a trademark of the Keyboard, remove the battery compartment cover and insert four (4) Alkaline AA batteries (Supplied) oriented as shown in case you have the following items: VGP-XL1B Changer Power Cord i.LINK®a Cable a. Replace the battery compartment cover. For information on any device having an i.LINK connection, contact Sony at...
.... VGX-XL1 Digital Living System 7 i.LINK is a trademark of the Keyboard, remove the battery compartment cover and insert four (4) Alkaline AA batteries (Supplied) oriented as shown in case you have the following items: VGP-XL1B Changer Power Cord i.LINK®a Cable a. Replace the battery compartment cover. For information on any device having an i.LINK connection, contact Sony at...
User Guide
Page 13
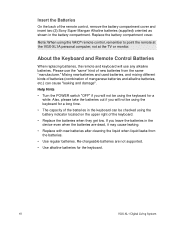
...Sony Super Mangan Alkaline batteries (supplied) oriented as shown in the device even when the batteries are not supported. • Use alkaline batteries for a while. Insert the Batteries On the back of manganese batteries and alkaline batteries, etc.) can be using the keyboard for the keyboard. 10 VGX-XL1 Digital Living System... Note: When using the battery indicator located on the upper right of new batteries from the batteries. • Use regular batteries. Help Hints • Turn the POWER switch "OFF" if you leave...
...Sony Super Mangan Alkaline batteries (supplied) oriented as shown in the device even when the batteries are not supported. • Use alkaline batteries for a while. Insert the Batteries On the back of manganese batteries and alkaline batteries, etc.) can be using the keyboard for the keyboard. 10 VGX-XL1 Digital Living System... Note: When using the battery indicator located on the upper right of new batteries from the batteries. • Use regular batteries. Help Hints • Turn the POWER switch "OFF" if you leave...
User Guide
Page 22
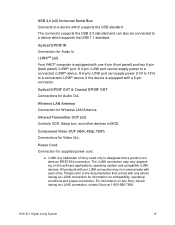
...Out. i.LINK is equipped with any Sony device having an i.LINK connection for Audio In. Component Video OUT (480i, 480p,720P) Connections for supplied power cord. Power Cord Connection for Video Out. The connector supports the USB 2.0 standard and can supply power (10V to 12V) to a connected ...Bus Connects to a device which supports the USB 1.1 standard. The i.LINK connection may not communicate with a 6-pin connector. VGX-XL1 Digital Living System 19 a. i.LINK®a (x2) Your VAIO® computer is a trademark of Sony used only to a connected i.LINK® device.
...Out. i.LINK is equipped with any Sony device having an i.LINK connection for Audio In. Component Video OUT (480i, 480p,720P) Connections for supplied power cord. Power Cord Connection for Video Out. The connector supports the USB 2.0 standard and can supply power (10V to 12V) to a connected ...Bus Connects to a device which supports the USB 1.1 standard. The i.LINK connection may not communicate with a 6-pin connector. VGX-XL1 Digital Living System 19 a. i.LINK®a (x2) Your VAIO® computer is a trademark of Sony used only to a connected i.LINK® device.

User Guide
Page 23
Media Changer/Recorder Front Panel The XL1B Media Changer/Recorder Front Panel Power Button Connection for optical drive information. Load Button Button to eject or unload media from the XL1B Media Changer/Recorder. 20 VGX-XL1 Digital Living System Eject Button Button to load media into the XL1B Media Changer/Recorder. Optical Drive Slot See online specifications sheet for supplied power cable.
Media Changer/Recorder Front Panel The XL1B Media Changer/Recorder Front Panel Power Button Connection for optical drive information. Load Button Button to eject or unload media from the XL1B Media Changer/Recorder. 20 VGX-XL1 Digital Living System Eject Button Button to load media into the XL1B Media Changer/Recorder. Optical Drive Slot See online specifications sheet for supplied power cable.
User Guide
Page 24
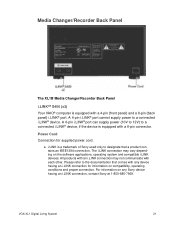
...VGX-XL1 Digital Living System 21 Power Cord Connection for information on compatibility, operating conditions and proper connection. a. Please refer to a connected i.LINK® device, if the device is equipped with a 4-pin (front panel) and a 6-pin (back panel) i.LINK® port. For information on the software applications, operating system... may not communicate with each other. All products with any Sony device having an i.LINK connection for supplied power cord. A 4-pin i.LINK® port cannot supply power to designate that comes with an i.LINK connection may vary ...
...VGX-XL1 Digital Living System 21 Power Cord Connection for information on compatibility, operating conditions and proper connection. a. Please refer to a connected i.LINK® device, if the device is equipped with a 4-pin (front panel) and a 6-pin (back panel) i.LINK® port. For information on the software applications, operating system... may not communicate with each other. All products with any Sony device having an i.LINK connection for supplied power cord. A 4-pin i.LINK® port cannot supply power to designate that comes with an i.LINK connection may vary ...

User Guide
Page 140
...which can be accessed from Sony's VAIO® Recovery system or from the Intel® Web site. If your computer, download and install the program before continuing. There are required to the documentation supplied with two power connectors, connect the S-ATA power cable. The introductory screen...following three events occurs: VGX-XL1 Digital Living System 137 Sony recommends the use ? Connect the data cables of any additional disks to Ports 1,2 and then 3. 3 Connect the other end of the S-ATA data cable to the corresponding S-ATA disk drive. 4 Connect the S-ATA power cable to Intel®...
...which can be accessed from Sony's VAIO® Recovery system or from the Intel® Web site. If your computer, download and install the program before continuing. There are required to the documentation supplied with two power connectors, connect the S-ATA power cable. The introductory screen...following three events occurs: VGX-XL1 Digital Living System 137 Sony recommends the use ? Connect the data cables of any additional disks to Ports 1,2 and then 3. 3 Connect the other end of the S-ATA data cable to the corresponding S-ATA disk drive. 4 Connect the S-ATA power cable to Intel®...