Entertainment Guide
Page 2
...AGREEMENT TO APPLICABLE END USER AGREEMENTS AND FULL COMPLIANCE WITH APPLICABLE PRODUCT ACTIVATION PROCEDURES. ii All rights reserved. PROVIDES NO WARRANTY WITH REGARD TO THIS MANUAL, THE SOFTWARE, OR OTHER INFORMATION CONTAINED HEREIN AND HEREBY EXPRESSLY DISCLAIMS ANY IMPLIED WARRANTIES OF MERCHANTABILITY OR FITNESS FOR ANY PARTICULAR PURPOSE WITH REGARD ...in whole or in part, may not be identical to online service providers may include features such as copy protection and content management technology. NOTICE VGX-XL1 Disclaimers, Notes, Warnings © 2005 Sony Electronics Inc.
...AGREEMENT TO APPLICABLE END USER AGREEMENTS AND FULL COMPLIANCE WITH APPLICABLE PRODUCT ACTIVATION PROCEDURES. ii All rights reserved. PROVIDES NO WARRANTY WITH REGARD TO THIS MANUAL, THE SOFTWARE, OR OTHER INFORMATION CONTAINED HEREIN AND HEREBY EXPRESSLY DISCLAIMS ANY IMPLIED WARRANTIES OF MERCHANTABILITY OR FITNESS FOR ANY PARTICULAR PURPOSE WITH REGARD ...in whole or in part, may not be identical to online service providers may include features such as copy protection and content management technology. NOTICE VGX-XL1 Disclaimers, Notes, Warnings © 2005 Sony Electronics Inc.

Entertainment Guide
Page 38
... option. Press the OK button to download and view additional CD and DVD information. 30 Media Changer/Recorder Note: Make sure you listen to download manually. Learn interesting new details about the music and movies you select the Retrieve media information... This option must be selected to select (add a check mark...
... option. Press the OK button to download and view additional CD and DVD information. 30 Media Changer/Recorder Note: Make sure you listen to download manually. Learn interesting new details about the music and movies you select the Retrieve media information... This option must be selected to select (add a check mark...

Entertainment Guide
Page 52
Set Up TV Signal Start Menu | Settings | TV Set Up TV Signal Media Center makes it easy to set up your TV Signal for additional instructions. 44 Just read the on-screen information and answer a few questions-Media Center does the rest! TV. Please go to use Automatic TV If you are required to Confirm Your Region and decide whether to Media Center Help for viewing. As you answer the questions and progress through the screens, you are notified that Media Center cannot Signal Setup (recommended) or detect a TV signal, you cannot watch or record complete a Manual Setup.
Set Up TV Signal Start Menu | Settings | TV Set Up TV Signal Media Center makes it easy to set up your TV Signal for additional instructions. 44 Just read the on-screen information and answer a few questions-Media Center does the rest! TV. Please go to use Automatic TV If you are required to Confirm Your Region and decide whether to Media Center Help for viewing. As you answer the questions and progress through the screens, you are notified that Media Center cannot Signal Setup (recommended) or detect a TV signal, you cannot watch or record complete a Manual Setup.

Entertainment Guide
Page 74
.... For additional information, go to eject the last disc. or 2 Press the Eject button two times to My DVDs 4 Click Yes on . To eject discs manually: 1 Press the Eject button one at a time. Go to More Programs and select Manage Discs or to eject all scan one after the other. To... is ready for Media Center to eject the last inserted disc. You must be scanned by Media Center before they can be blocked until the system is facing to the right of To eject discs using Media Center: 1 From Media Center, go to eject. It is turned on the NEW DISCS...
.... For additional information, go to eject the last disc. or 2 Press the Eject button two times to My DVDs 4 Click Yes on . To eject discs manually: 1 Press the Eject button one at a time. Go to More Programs and select Manage Discs or to eject all scan one after the other. To... is ready for Media Center to eject the last inserted disc. You must be scanned by Media Center before they can be blocked until the system is facing to the right of To eject discs using Media Center: 1 From Media Center, go to eject. It is turned on the NEW DISCS...

Entertainment Guide
Page 95
... scheduled to watch now or later. Set Media Center to automatically update the program guide, or manually update whenever you are connected to pause, rewind, fast forward, or continue viewing your live program in progress. Use the Media Center buffer feature to the Internet. Plus, view a list... of recorded programs by date or title, a list of current television programming from your favorite TV show or movie LIVE. Search Quickly find a TV program or a series to be recorded, play a recorded program, find out why a program wasn't recorded, or add a...
... scheduled to watch now or later. Set Media Center to automatically update the program guide, or manually update whenever you are connected to pause, rewind, fast forward, or continue viewing your live program in progress. Use the Media Center buffer feature to the Internet. Plus, view a list... of recorded programs by date or title, a list of current television programming from your favorite TV show or movie LIVE. Search Quickly find a TV program or a series to be recorded, play a recorded program, find out why a program wasn't recorded, or add a...

Entertainment Guide
Page 98
Repeat to add all countries or regions. Select Add Channels and enter the name of Download for media and Method of the missing channel. Manually - Add Missing Channels From Media Center, select Settings, TV, Guide, and then Add Missing Channels. From Media Center, select Settings, General, TV, Guide, and then ...
Repeat to add all countries or regions. Select Add Channels and enter the name of Download for media and Method of the missing channel. Manually - Add Missing Channels From Media Center, select Settings, TV, Guide, and then Add Missing Channels. From Media Center, select Settings, General, TV, Guide, and then ...

Entertainment Guide
Page 99
... and Schedule Programs Main Menu | My TV Media Center lets you record the program you are watching, one scheduled to define search criteria. • Record manually by selecting a program, then select Record. • Record from the Search menu, which allows you are watching by pressing REC on the remote control. •...
... and Schedule Programs Main Menu | My TV Media Center lets you record the program you are watching, one scheduled to define search criteria. • Record manually by selecting a program, then select Record. • Record from the Search menu, which allows you are watching by pressing REC on the remote control. •...

Entertainment Guide
Page 122
... the Load button twice and insert each disc in the changer drive. Then select the arrow to eject the last inserted disc. To eject discs manually: 1 Press the Eject button one at a time. 3 Once the discs have been inserted, they must go to My Changer and select Manage Discs. 2 Select the...: When loading discs, make sure that the label if facing to the Personal Computer and is properly connected to the right of To eject discs manually. 114 This will not eject the last disc in the slot one time to eject the disc.
... the Load button twice and insert each disc in the changer drive. Then select the arrow to eject the last inserted disc. To eject discs manually: 1 Press the Eject button one at a time. 3 Once the discs have been inserted, they must go to My Changer and select Manage Discs. 2 Select the...: When loading discs, make sure that the label if facing to the Personal Computer and is properly connected to the right of To eject discs manually. 114 This will not eject the last disc in the slot one time to eject the disc.
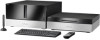
VGX-XL1 Welcome Mat
Page 2
... discs before viewing in the changer slots. Sony, Digital Living System, i.LINK, Memory Stick, Memory Stick PRO, VAIO, and like.no.other are the only size and shape that power cables are registered trademarks of Microsoft Corporation. Setting Up Your VGX-XL1 Digital Living System™ Step 1: Connecting the DLS Computer ...to the S/PDIF Optical OUT connector on the back panel of their respective owners. If your sound system has more than 1.2 mm are discs inside. To eject discs manually: 1 Press the Eject button on your cable or DSL modem. Click the new menu command. Do...
... discs before viewing in the changer slots. Sony, Digital Living System, i.LINK, Memory Stick, Memory Stick PRO, VAIO, and like.no.other are the only size and shape that power cables are registered trademarks of Microsoft Corporation. Setting Up Your VGX-XL1 Digital Living System™ Step 1: Connecting the DLS Computer ...to the S/PDIF Optical OUT connector on the back panel of their respective owners. If your sound system has more than 1.2 mm are discs inside. To eject discs manually: 1 Press the Eject button on your cable or DSL modem. Click the new menu command. Do...
VGX-XL1A Safety Information
Page 2
...FOR ANY PARTICULAR PURPOSE WITH REGARD TO THIS MANUAL, THE SOFTWARE, OR SUCH OTHER INFORMATION. IN NO EVENT SHALL SONY ELECTRONICS INC. WEB SITE INFORMATION IS OBTAINED FROM VARIOUS SOURCES AND MAY BE INACCURATE. Sony Electronics Inc. Use of license agreements enclosed with...software described herein is prohibited. Certain product(s) included with participating financial institutions. Important information for Canadian customers: Your new VAIO VGX-XL1A includes certain software versions or upgrades, and Internet services or offers that are subject to current retail versions. Intel and...
...FOR ANY PARTICULAR PURPOSE WITH REGARD TO THIS MANUAL, THE SOFTWARE, OR SUCH OTHER INFORMATION. IN NO EVENT SHALL SONY ELECTRONICS INC. WEB SITE INFORMATION IS OBTAINED FROM VARIOUS SOURCES AND MAY BE INACCURATE. Sony Electronics Inc. Use of license agreements enclosed with...software described herein is prohibited. Certain product(s) included with participating financial institutions. Important information for Canadian customers: Your new VAIO VGX-XL1A includes certain software versions or upgrades, and Internet services or offers that are subject to current retail versions. Intel and...

VGX-XL1A Safety Information
Page 6
... be installed and operated with FCC radiation exposure limits set forth for a Class B digital device, pursuant to which can radiate radio frequency energy and, if not installed and ... an experienced radio/TV technician for the Wireless LAN is likely to result in this manual could void your body (excluding extremities: hands, writs, and feet). Safety Information Model...any changes or modifications not expressly approved in interference to radio and television reception. Sony assumes no guarantee that any interference received, including interference that may arise from supplied ...
... be installed and operated with FCC radiation exposure limits set forth for a Class B digital device, pursuant to which can radiate radio frequency energy and, if not installed and ... an experienced radio/TV technician for the Wireless LAN is likely to result in this manual could void your body (excluding extremities: hands, writs, and feet). Safety Information Model...any changes or modifications not expressly approved in interference to radio and television reception. Sony assumes no guarantee that any interference received, including interference that may arise from supplied ...
User Guide
Page 2
... manual or the information contained herein at any machinereadable form without notice. IN NO EVENT SHALL SONY ELECTRONICS INC. Sony Electronics Inc. Financial services may include features such as copy protection and content management technology. Sony, VAIO, the VAIO logo, VAIO Digital ...available to the terms and conditions of the software may not be completed by third parties. VAIO® VGX-XL1 Disclaimers, Notes, Warnings NOTICE © 2005 Sony Electronics Inc. customers only. Reproduction in whole or in part, may not necessarily be reproduced, translated, ...
... manual or the information contained herein at any machinereadable form without notice. IN NO EVENT SHALL SONY ELECTRONICS INC. Sony Electronics Inc. Financial services may include features such as copy protection and content management technology. Sony, VAIO, the VAIO logo, VAIO Digital ...available to the terms and conditions of the software may not be completed by third parties. VAIO® VGX-XL1 Disclaimers, Notes, Warnings NOTICE © 2005 Sony Electronics Inc. customers only. Reproduction in whole or in part, may not necessarily be reproduced, translated, ...
User Guide
Page 49
... manually • Press the Eject button on the Media Changer/Recorder one end to the Ethernet connector on the DLS computer and the other end to your Wireless LAN1, see Appendix A, "Setting up a Wireless LAN." Setting Up a Local Area Network For detailed information on Internet services which may require a fee." 46 VGX-XL1 Digital Living System...
... manually • Press the Eject button on the Media Changer/Recorder one end to the Ethernet connector on the DLS computer and the other end to your Wireless LAN1, see Appendix A, "Setting up a Wireless LAN." Setting Up a Local Area Network For detailed information on Internet services which may require a fee." 46 VGX-XL1 Digital Living System...
User Guide
Page 55
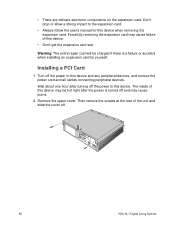
... off . 52 VGX-XL1 Digital Living System Then remove the screws at the rear of this device. Warning: The entire repair cost will be hot right after turning off and may cause failure of the unit and slide the cover off the power to the expansion card. • Always follow the user's manual for this device...
... off . 52 VGX-XL1 Digital Living System Then remove the screws at the rear of this device. Warning: The entire repair cost will be hot right after turning off and may cause failure of the unit and slide the cover off the power to the expansion card. • Always follow the user's manual for this device...

User Guide
Page 57
Warning: Touching other parts when installing the expansion card may cause a failure. 7 Install the clip. Insert the clip and tighten the screw. 54 VGX-XL1 Digital Living System Refer to damage the circuit board and cables inside of this device. Be careful not to the card's user's manual for details. 5 Remove the slot cover from the inside . 6 Install the PCI card in the open slot.
Warning: Touching other parts when installing the expansion card may cause a failure. 7 Install the clip. Insert the clip and tighten the screw. 54 VGX-XL1 Digital Living System Refer to damage the circuit board and cables inside of this device. Be careful not to the card's user's manual for details. 5 Remove the slot cover from the inside . 6 Install the PCI card in the open slot.
User Guide
Page 59
... on the screen and in the PCI expansion card user's manual once the message "Windows has found new hardware and is installing the software for it can be upgraded using the expansion memory slot inside this device. A driver may cause a failure. 56 VGX-XL1 Digital Living System displays after starting Windows. There are susceptible to catch...
... on the screen and in the PCI expansion card user's manual once the message "Windows has found new hardware and is installing the software for it can be upgraded using the expansion memory slot inside this device. A driver may cause a failure. 56 VGX-XL1 Digital Living System displays after starting Windows. There are susceptible to catch...
User Guide
Page 62
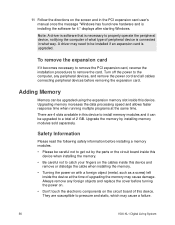
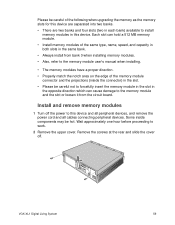
... to the memory module and the slot or loosen it from bank 0 when installing memory modules. • Also, refer to the memory module user's manual when installing. • The memory modules have a proper direction. • Properly match the notch area on the edge of the same type, name,.... • Always install from the circuit board. Remove the screws at the rear and slide the cover off the power to this device. VGX-XL1 Digital Living System 59 Install and remove memory modules 1 Turn off . Please be careful of the following when upgrading the memory as the memory slots for this...
... to the memory module and the slot or loosen it from bank 0 when installing memory modules. • Also, refer to the memory module user's manual when installing. • The memory modules have a proper direction. • Properly match the notch area on the edge of the same type, name,.... • Always install from the circuit board. Remove the screws at the rear and slide the cover off the power to this device. VGX-XL1 Digital Living System 59 Install and remove memory modules 1 Turn off . Please be careful of the following when upgrading the memory as the memory slots for this...

User Guide
Page 78
... and a wireless LAN access point (sold separately) can be connected using the following procedure. For details, please refer to the manual included with the access point you have connected the Wireless LAN Antenna to the Wireless LAN Antenna connector located on the back panel of... access point. The wireless LAN is not displayed in the taskbar notification area on and the WLAN (wireless LAN) lamp turns green. VGX-XL1 Digital Living System 75 Communicate Using Infrastructure Mode Wireless LAN Access Point Note: Before setting up your wireless LAN access point, make sure you use.
... and a wireless LAN access point (sold separately) can be connected using the following procedure. For details, please refer to the manual included with the access point you have connected the Wireless LAN Antenna to the Wireless LAN Antenna connector located on the back panel of... access point. The wireless LAN is not displayed in the taskbar notification area on and the WLAN (wireless LAN) lamp turns green. VGX-XL1 Digital Living System 75 Communicate Using Infrastructure Mode Wireless LAN Access Point Note: Before setting up your wireless LAN access point, make sure you use.

User Guide
Page 88
This is a data key for encrypting the wireless LAN communication between the wireless LAN access points and computers which use same key information. VGX-XL1 Digital Living System 85 The network key is changed after purchasing to Infrastructure Mode. 1 Click Start from the Preferred Network list and click Delete. 8 Click...If you don't know the network key, please refer to Access and click Close. 7 Select the network selected in Network to the manual that the network key setting is pre-set in each access point (please confirm that came with the access point or check with the ...
This is a data key for encrypting the wireless LAN communication between the wireless LAN access points and computers which use same key information. VGX-XL1 Digital Living System 85 The network key is changed after purchasing to Infrastructure Mode. 1 Click Start from the Preferred Network list and click Delete. 8 Click...If you don't know the network key, please refer to Access and click Close. 7 Select the network selected in Network to the manual that the network key setting is pre-set in each access point (please confirm that came with the access point or check with the ...
User Guide
Page 91
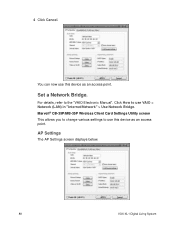
AP Settings The AP Settings screen displays below. 88 VGX-XL1 Digital Living System Set a Network Bridge. For details, refer to use this device as an access point. You can now use this device as an access point. Marvell® CB-35P/MB-35P Wireless Client Card Settings Utility screen This allows you to change various settings to use VAIO > Network (LAN) in "Internet/Network" > Use Network Bridge. Click How to the "VAIO Electronic Manual". 4 Click Cancel.
AP Settings The AP Settings screen displays below. 88 VGX-XL1 Digital Living System Set a Network Bridge. For details, refer to use this device as an access point. You can now use this device as an access point. Marvell® CB-35P/MB-35P Wireless Client Card Settings Utility screen This allows you to change various settings to use VAIO > Network (LAN) in "Internet/Network" > Use Network Bridge. Click How to the "VAIO Electronic Manual". 4 Click Cancel.
