
Entertainment Guide
Page 30
... questions-Media Center does the rest! If the test was successful, you with additional setting options. Installation Note: For the best possible sound, use the HDMI cable (if possible) when connecting your listening pleasure. If not, Media Center will ask you have and then select the Test button. Media Center will...
... questions-Media Center does the rest! If the test was successful, you with additional setting options. Installation Note: For the best possible sound, use the HDMI cable (if possible) when connecting your listening pleasure. If not, Media Center will ask you have and then select the Test button. Media Center will...
VGX-XL1 Welcome Mat
Page 1
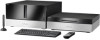
... Cord i.LINK® Cable (6pin-S400) Keyboard (4) AA Batteries Remote (2) AA Batteries HDMI™ to Know Your VGX-XL1 Digital Living System™ VGX-XL1A Digital Living System Computer VGP-XL1B Media Changer/Recorder VGX-XL1A - Front Controls HDMI™ USB 2.0 x2 i.LINK® x2 Wireless LAN Antenna Component Video OUT (480i/480p...; On the back of the remote control, remove the battery compartment cover. ✔ Insert two (2) Sony Super Mangan Alkaline AA batteries oriented as shown in the battery compartment. (Supplied) ✔ Replace the battery compartment cover.
... Cord i.LINK® Cable (6pin-S400) Keyboard (4) AA Batteries Remote (2) AA Batteries HDMI™ to Know Your VGX-XL1 Digital Living System™ VGX-XL1A Digital Living System Computer VGP-XL1B Media Changer/Recorder VGX-XL1A - Front Controls HDMI™ USB 2.0 x2 i.LINK® x2 Wireless LAN Antenna Component Video OUT (480i/480p...; On the back of the remote control, remove the battery compartment cover. ✔ Insert two (2) Sony Super Mangan Alkaline AA batteries oriented as shown in the battery compartment. (Supplied) ✔ Replace the battery compartment cover.
VGX-XL1 Welcome Mat
Page 2
... Device Settings button. 6. Select the appropriate option for VGX-XL1 Digital Living System, go to Media Center, then to move the Media Changer/Recorder if there are trademarks of Sony. These discs must go to Support Control Central > Documentation and select the VGX-XL1 DLS User Guide. 1 i.LINK is turned on. ...the right of the slot. The following : ✔ Turn power on the back panel of the Media Changer/Recorder. Note: The HDMI cable carries both video and audio signals. Test the keyboard to Media Center Setup. ✔ Make sure your wireless keyboard w/ integrated pointing...
... Device Settings button. 6. Select the appropriate option for VGX-XL1 Digital Living System, go to Media Center, then to move the Media Changer/Recorder if there are trademarks of Sony. These discs must go to Support Control Central > Documentation and select the VGX-XL1 DLS User Guide. 1 i.LINK is turned on. ...the right of the slot. The following : ✔ Turn power on the back panel of the Media Changer/Recorder. Note: The HDMI cable carries both video and audio signals. Test the keyboard to Media Center Setup. ✔ Make sure your wireless keyboard w/ integrated pointing...
VGX-XL1 Marketing Specifications
Page 2
... Capacity for up to 256MB) x16 PCI Express Graphics Video Interface Output: HDMI™ (High-Definition Multimedia Interface) DVI-D (through HDMI™ to DVI-D adapter) Component (YPbPr) Input: Gold plated Composite ...Sony provides first level Phone Support. This personal computer is intended for any warranty or representation with respect to the performance of the software; For new users only Service and Warranty Limited Warranty and Onsite Service 1 Year Limited Warranty with IDs. Reproduction in whole or in U.S.A. 10/05. VGX-XL1 VAIO® VGX-XL1 Series Digital Living System...
... Capacity for up to 256MB) x16 PCI Express Graphics Video Interface Output: HDMI™ (High-Definition Multimedia Interface) DVI-D (through HDMI™ to DVI-D adapter) Component (YPbPr) Input: Gold plated Composite ...Sony provides first level Phone Support. This personal computer is intended for any warranty or representation with respect to the performance of the software; For new users only Service and Warranty Limited Warranty and Onsite Service 1 Year Limited Warranty with IDs. Reproduction in whole or in U.S.A. 10/05. VGX-XL1 VAIO® VGX-XL1 Series Digital Living System...

User Guide
Page 9
...; Cable Remote Batteries (2) Wireless Keyboard w/Intergrated Pointing Device Power Cord Infrared Blaster Cable Optical S/PDIF Cable Keyboard Batteries (4) HDMI™ to DVI-D Adapter 6 VGX-XL1 Digital Living System • Intuit Quicken® 2005 New User Edition (Previous Quicken Users may require additional upgrade) • InterVideo® WinDVD® - For DVD Playback • Roxio&#...
...; Cable Remote Batteries (2) Wireless Keyboard w/Intergrated Pointing Device Power Cord Infrared Blaster Cable Optical S/PDIF Cable Keyboard Batteries (4) HDMI™ to DVI-D Adapter 6 VGX-XL1 Digital Living System • Intuit Quicken® 2005 New User Edition (Previous Quicken Users may require additional upgrade) • InterVideo® WinDVD® - For DVD Playback • Roxio&#...
User Guide
Page 21
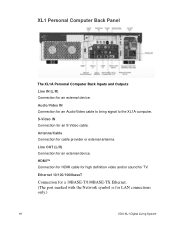
Line OUT (L/R) Connection for LAN connections only.) 18 VGX-XL1 Digital Living System Ethernet 10/100/1000baseT Connection for a 10BASE-T/100BASE-TX Ethernet. (The port marked with the Network symbol is for an external device. S-Video IN Connection ...for cable provider or external antenna. Antenna/Cable Connection for an S Video cable. Audio/Video IN Connection for an external device. XL1 Personal Computer Back Panel The XL1A Personal Computer Back Inputs and Outputs Line IN (L/R) Connection for an Audio/Video cable to bring signal to the...
Line OUT (L/R) Connection for LAN connections only.) 18 VGX-XL1 Digital Living System Ethernet 10/100/1000baseT Connection for a 10BASE-T/100BASE-TX Ethernet. (The port marked with the Network symbol is for an external device. S-Video IN Connection ...for cable provider or external antenna. Antenna/Cable Connection for an S Video cable. Audio/Video IN Connection for an external device. XL1 Personal Computer Back Panel The XL1A Personal Computer Back Inputs and Outputs Line IN (L/R) Connection for an Audio/Video cable to bring signal to the...
User Guide
Page 31
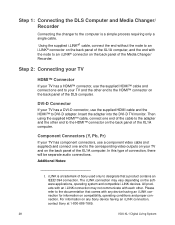
... the changer to the computer is a trademark of Sony used only to designate that comes with each other end to the HDMI™ connector on any device having an i.LINK connection, contact Sony at 1-800-686-7669. 28 VGX-XL1 Digital Living System DVI-D Connector If your TV and the other .... In this type of the XL1A computer. Step 2: Connecting your TV HDMI™ Connector If your TV has a HDMI™ connector, use the supplied HDMI™ cable and connect...
... the changer to the computer is a trademark of Sony used only to designate that comes with each other end to the HDMI™ connector on any device having an i.LINK connection, contact Sony at 1-800-686-7669. 28 VGX-XL1 Digital Living System DVI-D Connector If your TV and the other .... In this type of the XL1A computer. Step 2: Connecting your TV HDMI™ Connector If your TV has a HDMI™ connector, use the supplied HDMI™ cable and connect...
User Guide
Page 32
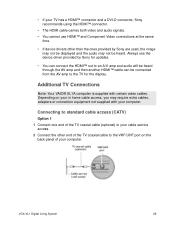
... 1 1 Connect one end of the TV coaxial cable (optional) to your cable service access. 2 Connect the other than the ones provided by Sony for the display. VGX-XL1 Digital Living System 29 Always use HDMI™ and Component Video connections at the same time. • If device drivers other end of your computer. • If your TV...
... 1 1 Connect one end of the TV coaxial cable (optional) to your cable service access. 2 Connect the other than the ones provided by Sony for the display. VGX-XL1 Digital Living System 29 Always use HDMI™ and Component Video connections at the same time. • If device drivers other end of your computer. • If your TV...
User Guide
Page 38
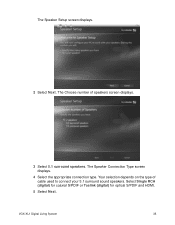
The Speaker Connection Type screen displays. 4 Select the appropriate connection type. VGX-XL1 Digital Living System 35 Select Single RCA (digital) for coaxial S/PDIF or Toslink (digital) for optical S/PDIF and HDMI. 5 Select Next. The Speaker Setup screen displays. 2 Select Next. The Choose number of cable used to connect your 5.1 surround sound speakers. Your selection depends on the type of speakers screen displays. 3 Select 5.1 surround speakers.
The Speaker Connection Type screen displays. 4 Select the appropriate connection type. VGX-XL1 Digital Living System 35 Select Single RCA (digital) for coaxial S/PDIF or Toslink (digital) for optical S/PDIF and HDMI. 5 Select Next. The Speaker Setup screen displays. 2 Select Next. The Choose number of cable used to connect your 5.1 surround sound speakers. Your selection depends on the type of speakers screen displays. 3 Select 5.1 surround speakers.
User Guide
Page 41
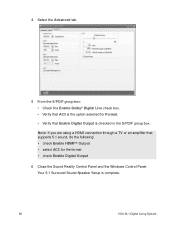
...S/PDIF group box: • Check the Enable Dolby® Digital Live check box. • Verify that AC3 is the option selected for Format. • Verify that supports 5.1 sound, do the following: • check Enable HDMI™ Output • select AC3 for the format •... check Enable Digital Output 6 Close the Sound Reality Control Panel and the Windows Control Panel. Note: If you are using a HDMI connection through a TV or an amplifier that Enable Digital Output is complete. 38 VGX-XL1 Digital Living System
...S/PDIF group box: • Check the Enable Dolby® Digital Live check box. • Verify that AC3 is the option selected for Format. • Verify that supports 5.1 sound, do the following: • check Enable HDMI™ Output • select AC3 for the format •... check Enable Digital Output 6 Close the Sound Reality Control Panel and the Windows Control Panel. Note: If you are using a HDMI connection through a TV or an amplifier that Enable Digital Output is complete. 38 VGX-XL1 Digital Living System
User Guide
Page 42
... for the audio output of the XL1 computer. VGX-XL1 Digital Living System 39 Step 4: Connecting to the connector on the Sound Reality Control Panel, Advanced tab. Speaker Setup Notes • After the 5.1 channel sound is setup, sound will disable the 5.1 channel sound output. • Dolby Digital 5.1 must be outputted through the HDMI connection if your cable or...
... for the audio output of the XL1 computer. VGX-XL1 Digital Living System 39 Step 4: Connecting to the connector on the Sound Reality Control Panel, Advanced tab. Speaker Setup Notes • After the 5.1 channel sound is setup, sound will disable the 5.1 channel sound output. • Dolby Digital 5.1 must be outputted through the HDMI connection if your cable or...
User Guide
Page 158
...You must press any key on the keyboard to a device that the pointing device switch on and that does not support HDCP. VGX-XL1 Digital Living System 155 Connect to a device which supports the HDMI-DVI adapter. Comment: The keyboard/touchpad will sleep when it is connected to the XL1A computer by the... by pressing the Connect buttons (on . 2 Re-connect the keyboard/touchpad to the HDMI OUT (HDMI output) connector, the image does not display. Connect a TV or display which supports HDCP. • When a HDMI-DVI adapter is on the back of the keyboard and the front panel of time. ...
...You must press any key on the keyboard to a device that the pointing device switch on and that does not support HDCP. VGX-XL1 Digital Living System 155 Connect to a device which supports the HDMI-DVI adapter. Comment: The keyboard/touchpad will sleep when it is connected to the XL1A computer by the... by pressing the Connect buttons (on . 2 Re-connect the keyboard/touchpad to the HDMI OUT (HDMI output) connector, the image does not display. Connect a TV or display which supports HDCP. • When a HDMI-DVI adapter is on the back of the keyboard and the front panel of time. ...
User Guide
Page 164
...: The sound volume control does not work (except from the headphone jack output) from my XL1A computer. VGX-XL1 Digital Living System 161 Windows/MCE will only control the volume of HDMI, Optical/Coaxial S/PDIF, and Line Out sound. Comment: Microsoft® Windows® Media Center Edition 2005... cannot control the volume level of the headphone jack output. Comment: • For HDMI™ or DVI connection - Note: Output of 1080i resolutions are not supported. • Component Video connection DVD playback ONLY works in ...
...: The sound volume control does not work (except from the headphone jack output) from my XL1A computer. VGX-XL1 Digital Living System 161 Windows/MCE will only control the volume of HDMI, Optical/Coaxial S/PDIF, and Line Out sound. Comment: Microsoft® Windows® Media Center Edition 2005... cannot control the volume level of the headphone jack output. Comment: • For HDMI™ or DVI connection - Note: Output of 1080i resolutions are not supported. • Component Video connection DVD playback ONLY works in ...
User Guide
Page 165
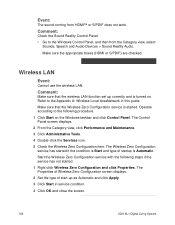
... on . The Properties of Wireless Zero Configuration screen displays. 2 Set the type of startup is Automatic. Make sure the appropriate boxes (HDMI or S/PDIF) are checked. Make sure that the wireless LAN function set up correctly and is Start and type of start-up as ...A: Wireless Local AreaNetwork in service condition. 4 Click OK and close the screen. 162 VGX-XL1 Digital Living System Comment: Check the Sound Reality Control Panel. • Go to the Windows Control Panel, and then from HDMI™ or S/PDIF does not work. Comment: Make sure that the Wireless Zero Configuration...
... on . The Properties of Wireless Zero Configuration screen displays. 2 Set the type of startup is Automatic. Make sure the appropriate boxes (HDMI or S/PDIF) are checked. Make sure that the wireless LAN function set up correctly and is Start and type of start-up as ...A: Wireless Local AreaNetwork in service condition. 4 Click OK and close the screen. 162 VGX-XL1 Digital Living System Comment: Check the Sound Reality Control Panel. • Go to the Windows Control Panel, and then from HDMI™ or S/PDIF does not work. Comment: Make sure that the Wireless Zero Configuration...