User Guide
Page 2
n2 N Contents Before Use 4 Finding More about Your VAIO Computer 5 Ergonomic Considerations 9 Getting Started 11 Locating Controls and Ports 12 About the Indicator Lights 18... Pack 21 Shutting Down Your Computer Safely 27 Using the Power Saving Modes 28 Updating Your Computer 30 Using Your VAIO Computer 31 Using the Keyboard 32 Using the Touch Pad 34 Using Special-function Buttons 35 Using the Quick Web...an External Microphone 75 Connecting a USB Device 76 Connecting an i.LINK Device 78 Customizing Your VAIO Computer 80 Setting the Password 81 Using Intel® VT 86 Using the...
n2 N Contents Before Use 4 Finding More about Your VAIO Computer 5 Ergonomic Considerations 9 Getting Started 11 Locating Controls and Ports 12 About the Indicator Lights 18... Pack 21 Shutting Down Your Computer Safely 27 Using the Power Saving Modes 28 Updating Your Computer 30 Using Your VAIO Computer 31 Using the Keyboard 32 Using the Touch Pad 34 Using Special-function Buttons 35 Using the Quick Web...an External Microphone 75 Connecting a USB Device 76 Connecting an i.LINK Device 78 Customizing Your VAIO Computer 80 Setting the Password 81 Using Intel® VT 86 Using the...
User Guide
Page 4
... to find out about the configuration of your computer, visit the Sony online support web site at the following URLs: ❑ For customers in USA http://esupport.sony.com/EN/VAIO/ ❑ For customers in Canada http://sony.ca/support/ ❑ For customers in Spanish-speaking Latin American ...countries or areas http://esupport.sony.com/ES/VAIO/LA ❑ For customers in this manual may not be...
... to find out about the configuration of your computer, visit the Sony online support web site at the following URLs: ❑ For customers in USA http://esupport.sony.com/EN/VAIO/ ❑ For customers in Canada http://sony.ca/support/ ❑ For customers in Spanish-speaking Latin American ...countries or areas http://esupport.sony.com/ES/VAIO/LA ❑ For customers in this manual may not be...
User Guide
Page 5
...Click Start and Help and Support. 2 Choose from the following categories to articles, the VAIO technology page, specifications, and system and software information. Software Information Troubleshoot my VAIO Maintain and troubleshoot your entire built-in the form of components connection, set-up information,... software programs, hardware drivers, and drive partition(s) or your VAIO computer with VAIO Care, system restore, backup and recovery, and contact Sony support. Use my VAIO Access interactive help with my VAIO Get help in storage device to the original factory settings -...
...Click Start and Help and Support. 2 Choose from the following categories to articles, the VAIO technology page, specifications, and system and software information. Software Information Troubleshoot my VAIO Maintain and troubleshoot your entire built-in the form of components connection, set-up information,... software programs, hardware drivers, and drive partition(s) or your VAIO computer with VAIO Care, system restore, backup and recovery, and contact Sony support. Use my VAIO Access interactive help with my VAIO Get help in storage device to the original factory settings -...
User Guide
Page 6
.... 2 Click SmartWi Connection Utility Help. See the specifications to access the help files from the help files - May be able to find out about Your VAIO Computer n6 N ❑ Program help menu on your computer. Features and options may be included with the preinstalled software programs on a specific program. ❑ SmartWi...
.... 2 Click SmartWi Connection Utility Help. See the specifications to access the help files from the help files - May be able to find out about Your VAIO Computer n6 N ❑ Program help menu on your computer. Features and options may be included with the preinstalled software programs on a specific program. ❑ SmartWi...
User Guide
Page 7
Before Use > Finding More about Your VAIO Computer n7 N 3. For operating system support, you can visit Microsoft customer support at http://support.microsoft.com/directory/. Support Web Sites ❑ Sony online support web site The Sony online support web site provides instant access to information on... and the Knowledge Database searches for the corresponding solutions online. ❑ For customers in USA http://esupport.sony.com/EN/VAIO/ ❑ For customers in Canada http://sony.ca/support/ ❑ For customers in Spanish-speaking Latin American countries or areas http://esupport...
Before Use > Finding More about Your VAIO Computer n7 N 3. For operating system support, you can visit Microsoft customer support at http://support.microsoft.com/directory/. Support Web Sites ❑ Sony online support web site The Sony online support web site provides instant access to information on... and the Knowledge Database searches for the corresponding solutions online. ❑ For customers in USA http://esupport.sony.com/EN/VAIO/ ❑ For customers in Canada http://sony.ca/support/ ❑ For customers in Spanish-speaking Latin American countries or areas http://esupport...
User Guide
Page 8
...The hardware component or the software program that is causing the problem 5 A brief description of your new VAIO PC, system optimization, data rescue, and any repair service you may call Sony directly. Visit the web site at the lower right corner of the display on the bottom, the back... appointment with the setup of the number below the barcode. 3 The operating system on the Sony online support web site. Before Use > Finding More about Your VAIO Computer n8 N 4. You can assist with a Sony certified technician at our site, you might need. The serial number is the last 7 digits...
...The hardware component or the software program that is causing the problem 5 A brief description of your new VAIO PC, system optimization, data rescue, and any repair service you may call Sony directly. Visit the web site at the lower right corner of the display on the bottom, the back... appointment with the setup of the number below the barcode. 3 The operating system on the Sony online support web site. Before Use > Finding More about Your VAIO Computer n8 N 4. You can assist with a Sony certified technician at our site, you might need. The serial number is the last 7 digits...
User Guide
Page 11
Upon completion, connect one device (for the first time, do not connect any other hardware that did not originally come with your VAIO computer. ! Getting Started > n 11 N Getting Started This section describes how to get started using your computer. Before starting your computer for example, a printer, an external ...
Upon completion, connect one device (for the first time, do not connect any other hardware that did not originally come with your VAIO computer. ! Getting Started > n 11 N Getting Started This section describes how to get started using your computer. Before starting your computer for example, a printer, an external ...
User Guide
Page 25
Your computer is supplied with the VAIO Control Center. When the battery pack is in Sleep mode, you should either connect the AC adapter to AC power. You can be recharged any ...
Your computer is supplied with the VAIO Control Center. When the battery pack is in Sleep mode, you should either connect the AC adapter to AC power. You can be recharged any ...
User Guide
Page 26
... battery power, you can extend your battery life using the following methods. ❑ Decrease the LCD brightness of your desktop background with the VAIO Control Center. See Using the VAIO Power Management (page 88) for more information. ❑ Set the wallpaper in Long Battery Life Wallpaper Setting as your computer screen. ❑...
... battery power, you can extend your battery life using the following methods. ❑ Decrease the LCD brightness of your desktop background with the VAIO Control Center. See Using the VAIO Power Management (page 88) for more information. ❑ Set the wallpaper in Long Battery Life Wallpaper Setting as your computer screen. ❑...
User Guide
Page 30
Your computer must be connected to the Internet to VAIO Web Support and then follow the on-screen instructions. ! Getting Started > Updating Your Computer n 30 N Updating Your Computer Be sure to install the latest updates on your computer with the following software applications so that the computer can run more efficiently. ❑ Windows Update Click Start, All Programs, and Windows Update and then follow the on-screen instructions. ❑ VAIO Update 4 Click Start, All Programs, VAIO Update 4, and Go to download the updates.
Your computer must be connected to the Internet to VAIO Web Support and then follow the on-screen instructions. ! Getting Started > Updating Your Computer n 30 N Updating Your Computer Be sure to install the latest updates on your computer with the following software applications so that the computer can run more efficiently. ❑ Windows Update Click Start, All Programs, and Windows Update and then follow the on-screen instructions. ❑ VAIO Update 4 Click Start, All Programs, VAIO Update 4, and Go to download the updates.

User Guide
Page 31
... This section describes how to get the most out of using your VAIO computer. ❑ Using the Keyboard (page 32) ❑ Using the Touch Pad (page 34) ❑ Using Special-function Buttons (page 35) ❑ Using the Quick ...
... This section describes how to get the most out of using your VAIO computer. ❑ Using the Keyboard (page 32) ❑ Using the Touch Pad (page 34) ❑ Using Special-function Buttons (page 35) ❑ Using the Quick ...
User Guide
Page 32
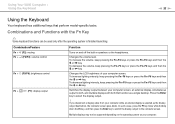
To decrease the volume, keep pressing the Fn+F4 keys or press the Fn+F4 keys and then the M or , key. Using Your VAIO Computer > Using the Keyboard n 32 N Using the Keyboard Your keyboard has additional keys that function as the display output destination, the computer screen goes blank. ...
To decrease the volume, keep pressing the Fn+F4 keys or press the Fn+F4 keys and then the M or , key. Using Your VAIO Computer > Using the Keyboard n 32 N Using the Keyboard Your keyboard has additional keys that function as the display output destination, the computer screen goes blank. ...
User Guide
Page 33
Using Your VAIO Computer > Using the Keyboard Combination/Feature Fn + / (F9/F10): zooming Fn + (F12): hibernation n 33 N Function Changes the size of the system and the connected peripheral ... make the view look bigger and closer (zoom in storage device and the system power is turned off. See the help file included with the VAIO Control Center for more information.
Using Your VAIO Computer > Using the Keyboard Combination/Feature Fn + / (F9/F10): zooming Fn + (F12): hibernation n 33 N Function Changes the size of the system and the connected peripheral ... make the view look bigger and closer (zoom in storage device and the system power is turned off. See the help file included with the VAIO Control Center for more information.
User Guide
Page 34
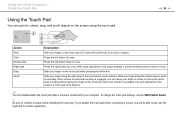
... the right edge of the touch pad to scroll vertically. Be sure to connect a mouse before connecting a mouse, you can move your computer. Using Your VAIO Computer > Using the Touch Pad Using the Touch Pad You can disable/enable the touch pad while a mouse is engaged, you will be able to...
... the right edge of the touch pad to scroll vertically. Be sure to connect a mouse before connecting a mouse, you can move your computer. Using Your VAIO Computer > Using the Touch Pad Using the Touch Pad You can disable/enable the touch pad while a mouse is engaged, you will be able to...
User Guide
Page 35
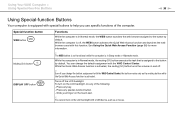
... assigned to the button by default. Turns off , the WEB button activates the Quick Web Access function and launches the web browser used with the VAIO Control Center, the button works only as a mouse. Press any key. - See Using the Quick Web Access Function (page 36) for more ...! You can change the button assignment with this function. Slide your finger on and off. ! You cannot turn on the LCD backlight with the VAIO Control Center. Press any special-function button. - While the computer is in Normal mode, the muting (S1) button executes the task that is activated...
... assigned to the button by default. Turns off , the WEB button activates the Quick Web Access function and launches the web browser used with the VAIO Control Center, the button works only as a mouse. Press any key. - See Using the Quick Web Access Function (page 36) for more ...! You can change the button assignment with this function. Slide your finger on and off. ! You cannot turn on the LCD backlight with the VAIO Control Center. Press any special-function button. - While the computer is in Normal mode, the muting (S1) button executes the task that is activated...

User Guide
Page 36
... Quick Web Access Function ! To exit the Quick Web Access function, do any of the following: ❑ Click the icon located at the Using Your VAIO Computer > Using the Quick Web Access Function n 36 N Using the Quick Web Access Function The Quick Web Access function enables you have completed the initial...
... Quick Web Access Function ! To exit the Quick Web Access function, do any of the following: ❑ Click the icon located at the Using Your VAIO Computer > Using the Quick Web Access Function n 36 N Using the Quick Web Access Function The Quick Web Access function enables you have completed the initial...
User Guide
Page 37
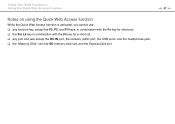
Using Your VAIO Computer > Using the Quick Web Access Function n 37 N Notes on using the Quick Web Access function While the Quick Web Access function is activated, you cannot use: ❑ any function key, except the F2, F3, and F4 keys, in combination with the Fn key for shortcuts. ❑ the Scr Lk key in combination with the Fn key for a shortcut. ❑ any port and jack except the DC IN port, the network (LAN) port, the USB ports, and the headphones jack. ❑ the "Memory Stick" slot, the SD memory card slot, and the ExpressCard slot.
Using Your VAIO Computer > Using the Quick Web Access Function n 37 N Notes on using the Quick Web Access function While the Quick Web Access function is activated, you cannot use: ❑ any function key, except the F2, F3, and F4 keys, in combination with the Fn key for shortcuts. ❑ the Scr Lk key in combination with the Fn key for a shortcut. ❑ any port and jack except the DC IN port, the network (LAN) port, the USB ports, and the headphones jack. ❑ the "Memory Stick" slot, the SD memory card slot, and the ExpressCard slot.
User Guide
Page 38
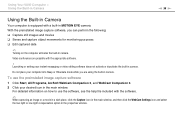
... in the main window, and then click the WebCam Settings icon and select the low light or low light compensation option in camera. Using Your VAIO Computer > Using the Built-in Camera n 38 N Using the Built-in Camera Your computer is equipped with a built-in the main window...
... in the main window, and then click the WebCam Settings icon and select the low light or low light compensation option in camera. Using Your VAIO Computer > Using the Built-in Camera n 38 N Using the Built-in Camera Your computer is equipped with a built-in the main window...
User Guide
Page 39
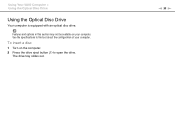
Features and options in this section may not be available on the computer. 2 Press the drive eject button (1) to find out about the configuration of your computer. n 39 N Using Your VAIO Computer > Using the Optical Disc Drive Using the Optical Disc Drive Your computer is equipped with an optical disc drive. See the specifications to open the drive. The drive tray slides out. To insert a disc 1 Turn on your computer.
Features and options in this section may not be available on the computer. 2 Press the drive eject button (1) to find out about the configuration of your computer. n 39 N Using Your VAIO Computer > Using the Optical Disc Drive Using the Optical Disc Drive Your computer is equipped with an optical disc drive. See the specifications to open the drive. The drive tray slides out. To insert a disc 1 Turn on your computer.

User Guide
Page 40
Be sure to hold the bottom of the drive tray with the label side facing upward and gently push it in a power saving mode (Sleep or Hibernate). Do not remove the optical disc while your computer is in gently. ! Be sure to bring the computer back into place. ! Using Your VAIO Computer > Using the Optical Disc Drive n 40 N 3 Place a disc in the middle of the drive tray when placing/removing a disc onto/from the tray. 4 Close the drive tray by pushing it down until the disc clicks into Normal mode before removing the disc. Do not exert pressure on the drive tray.
Be sure to hold the bottom of the drive tray with the label side facing upward and gently push it in a power saving mode (Sleep or Hibernate). Do not remove the optical disc while your computer is in gently. ! Be sure to bring the computer back into place. ! Using Your VAIO Computer > Using the Optical Disc Drive n 40 N 3 Place a disc in the middle of the drive tray when placing/removing a disc onto/from the tray. 4 Close the drive tray by pushing it down until the disc clicks into Normal mode before removing the disc. Do not exert pressure on the drive tray.


