
User Guide
Page 3
......58 Connecting External Speakers ...59 Connecting an External Display ...60 Selecting Display Modes...63 Using the Multiple Monitors Function ...64 Connecting an External Microphone ...66 Connecting a Universal Serial Bus (USB) Device...67 Connecting a Printer ...70 Connecting an i.LINK Device ...71 Connecting to a Network (LAN) ...73 Customizing Your VAIO Computer ...74 Setting the Password ...75 Setting Up Your Computer with VAIO Central ...78 Using the Power Saving Modes ...79 Managing Power with VAIO Power Management ...83 Upgrading Your VAIO Computer...85 Adding and Removing Memory...86
......58 Connecting External Speakers ...59 Connecting an External Display ...60 Selecting Display Modes...63 Using the Multiple Monitors Function ...64 Connecting an External Microphone ...66 Connecting a Universal Serial Bus (USB) Device...67 Connecting a Printer ...70 Connecting an i.LINK Device ...71 Connecting to a Network (LAN) ...73 Customizing Your VAIO Computer ...74 Setting the Password ...75 Setting Up Your Computer with VAIO Central ...78 Using the Power Saving Modes ...79 Managing Power with VAIO Power Management ...83 Upgrading Your VAIO Computer...85 Adding and Removing Memory...86

User Guide
Page 7
... the online Specifications: 1 Connect to the Internet. 2 Go to the original factory installed settings. The online Specifications describe the hardware and software configuration of your computer, as well as information on -screen guide: 1 Click Start and Help and Support. 2 Click Manuals & Specifications. 3 Click VAIO Recovery Guide. It also includes information about restoring individual software programs, software drivers, and drive partition(s) or your VAIO computer. To access this manual) - Contains features of your entire hard disk drive to the Sony online support Web site...
... the online Specifications: 1 Connect to the Internet. 2 Go to the original factory installed settings. The online Specifications describe the hardware and software configuration of your computer, as well as information on -screen guide: 1 Click Start and Help and Support. 2 Click Manuals & Specifications. 3 Click VAIO Recovery Guide. It also includes information about restoring individual software programs, software drivers, and drive partition(s) or your VAIO computer. To access this manual) - Contains features of your entire hard disk drive to the Sony online support Web site...

User Guide
Page 8
... contact information, and various links to VAIO online support Web sites. ❑ Backup & Recovery Find information on how to back up and restore your operating system, system software, and your computer running efficiently with updates and maintenance programs from the following categories to wireless tutorials. ❑ Security Keep your data safe and your personal data. ❑ Wireless & Network Learn about wireless connections including Bluetooth Wireless technology and Wireless LAN.
... contact information, and various links to VAIO online support Web sites. ❑ Backup & Recovery Find information on how to back up and restore your operating system, system software, and your computer running efficiently with updates and maintenance programs from the following categories to wireless tutorials. ❑ Security Keep your data safe and your personal data. ❑ Wireless & Network Learn about wireless connections including Bluetooth Wireless technology and Wireless LAN.

User Guide
Page 11
... external hard disk drive, a scanner, and so on) at a time, following the manufacturers' instructions. ❑ Locating Controls and Ports (page 12) ❑ About the Indicator Lights (page 17) ❑ Connecting a Power Source (page 18) ❑ Using the Battery Pack (page 20) ❑ Shutting Down Your Computer Safely (page 25) Make sure to get started using your computer. Upon completion, connect one device (for the first time, do not connect any other hardware...
... external hard disk drive, a scanner, and so on) at a time, following the manufacturers' instructions. ❑ Locating Controls and Ports (page 12) ❑ About the Indicator Lights (page 17) ❑ Connecting a Power Source (page 18) ❑ Using the Battery Pack (page 20) ❑ Shutting Down Your Computer Safely (page 25) Make sure to get started using your computer. Upon completion, connect one device (for the first time, do not connect any other hardware...
User Guide
Page 17
... Lock key to turn off the computer when this indicator is on.) When the indicator is on . Indicator Power 1 Battery e Media Access Optical disc drive Hard disk drive Num lock Caps lock Scroll lock Wireless LAN Functions Illuminates when the power of power, and double-blinks when the battery pack is charging. Illuminates when the computer is read from or written to a memory card. (Do not enter Sleep mode or turn off the indicator. Illuminates when data is using and does not work with the following indicator lights...
... Lock key to turn off the computer when this indicator is on.) When the indicator is on . Indicator Power 1 Battery e Media Access Optical disc drive Hard disk drive Num lock Caps lock Scroll lock Wireless LAN Functions Illuminates when the power of power, and double-blinks when the battery pack is charging. Illuminates when the computer is read from or written to a memory card. (Do not enter Sleep mode or turn off the indicator. Illuminates when data is using and does not work with the following indicator lights...

User Guide
Page 27
... ,, or keep pressing Fn+F4. Adjusts the built-in speakers and the headphones. Combinations and Functions with the Fn Key ✍ Some functions are not available before the operating system launches. Combinations/Feature Fn + % (F2): speaker switch Fn + 2 (F3/F4): speaker volume Fn + 8 (F5/F6): brightness control Fn + /T (F7): display output Fn + (F10): zoom Functions Turns on and off the built-in...
... ,, or keep pressing Fn+F4. Adjusts the built-in speakers and the headphones. Combinations and Functions with the Fn Key ✍ Some functions are not available before the operating system launches. Combinations/Feature Fn + % (F2): speaker switch Fn + 2 (F3/F4): speaker volume Fn + 8 (F5/F6): brightness control Fn + /T (F7): display output Fn + (F10): zoom Functions Turns on and off the built-in...

User Guide
Page 32
... CDs, DVDs, or Blu-ray Discs, depending on your optical disc drive supports. CDROM DVD±RW/ P ±R DL/RAM CD-RW/ P DVD-ROM DVD-ROM P Blu-ray Disc P Video Music CD CD-R/ DVD- BDVideo ROM P - P P P P - - P - P - Check your specifications for the type of media your model. RW RW DL DL RAM BD-R*9/ RE*10 PR*1 *2 PR PR*5 PR*6 PR*3 *4 - Use the table below to see which types of optical disc drive installed on the model you...
... CDs, DVDs, or Blu-ray Discs, depending on your optical disc drive supports. CDROM DVD±RW/ P ±R DL/RAM CD-RW/ P DVD-ROM DVD-ROM P Blu-ray Disc P Video Music CD CD-R/ DVD- BDVideo ROM P - P P P P - - P - P - Check your specifications for the type of media your model. RW RW DL DL RAM BD-R*9/ RE*10 PR*1 *2 PR PR*5 PR*6 PR*3 *4 - Use the table below to see which types of optical disc drive installed on the model you...

User Guide
Page 55
... model supports the Bluetooth functionality and/or the IEEE 802.11a/b/g standard. n 55 N Using Your VAIO Computer To communicate without an access point (ad-hoc) ! The Set up a connection or network window appears. 5 Select an option to specify the ad-hoc network settings and click Next. 6 Follow the on the left pane. The Wireless LAN indicator lights up a connection or network on -screen instructions. * See the online Specifications to display the Wireless Device Switch window. On models that support the Bluetooth functionality...
... model supports the Bluetooth functionality and/or the IEEE 802.11a/b/g standard. n 55 N Using Your VAIO Computer To communicate without an access point (ad-hoc) ! The Set up a connection or network window appears. 5 Select an option to specify the ad-hoc network settings and click Next. 6 Follow the on the left pane. The Wireless LAN indicator lights up a connection or network on -screen instructions. * See the online Specifications to display the Wireless Device Switch window. On models that support the Bluetooth functionality...

User Guide
Page 57
... N Using Your VAIO Computer To connect to a wireless network 1 Make sure an access point is set up . On models that came with your model supports the Bluetooth functionality and/or the IEEE 802.11a/b/g standard. Select your desired wireless option(s) and click OK. 3 Click Start and Control Panel. 4 Click View network status and tasks under Network and Internet. 5 Click Manage wireless networks. 6 Click Add. 7 Follow the on-screen instructions. * See the online Specifications to see whether your access...
... N Using Your VAIO Computer To connect to a wireless network 1 Make sure an access point is set up . On models that came with your model supports the Bluetooth functionality and/or the IEEE 802.11a/b/g standard. Select your desired wireless option(s) and click OK. 3 Click Start and Control Panel. 4 Click View network status and tasks under Network and Internet. 5 Click Manage wireless networks. 6 Click Add. 7 Follow the on-screen instructions. * See the online Specifications to see whether your access...
User Guide
Page 58
... functionality to your VAIO computer by using the various ports on the computer. ❑ Connecting External Speakers (page 59) ❑ Connecting an External Display (page 60) ❑ Selecting Display Modes (page 63) ❑ Using the Multiple Monitors Function (page 64) ❑ Connecting an External Microphone (page 66) ❑ Connecting a Universal Serial Bus (USB) Device (page 67) ❑ Connecting a Printer (page 70) ❑ Connecting an i.LINK Device (page 71) ❑ Connecting to a Network (LAN) (page 73) n 58 N Using Peripheral Devices
... functionality to your VAIO computer by using the various ports on the computer. ❑ Connecting External Speakers (page 59) ❑ Connecting an External Display (page 60) ❑ Selecting Display Modes (page 63) ❑ Using the Multiple Monitors Function (page 64) ❑ Connecting an External Microphone (page 66) ❑ Connecting a Universal Serial Bus (USB) Device (page 67) ❑ Connecting a Printer (page 70) ❑ Connecting an i.LINK Device (page 71) ❑ Connecting to a Network (LAN) (page 73) n 58 N Using Peripheral Devices

User Guide
Page 60
... end of the display's power cord (1) into your display, and the other cables. On the Windows operating system, you can also use the computer with a computer display or a projector. ✍ Connect the power cord after connecting all other end into an AC outlet. 2 Plug the display cable (2) (not supplied) into the monitor (VGA) port (3) a on the computer. For example, you can use an external display to set up multiple...
... end of the display's power cord (1) into your display, and the other cables. On the Windows operating system, you can also use the computer with a computer display or a projector. ✍ Connect the power cord after connecting all other end into an AC outlet. 2 Plug the display cable (2) (not supplied) into the monitor (VGA) port (3) a on the computer. For example, you can use an external display to set up multiple...

User Guide
Page 73
...) Do not plug a telephone cable into the network port. For detailed settings and devices needed to connect to the network, ask your network administrator. ✍ Your computer can connect your computer. Public telephone subscriber line - Connect one end of a network cable (not supplied) to the network (Ethernet) port on your computer to 100BASE-TX/10BASE-T-type networks with the default settings. ! If the network (LAN) connector is connected to the telephone lines...
...) Do not plug a telephone cable into the network port. For detailed settings and devices needed to connect to the network, ask your network administrator. ✍ Your computer can connect your computer. Public telephone subscriber line - Connect one end of a network cable (not supplied) to the network (Ethernet) port on your computer to 100BASE-TX/10BASE-T-type networks with the default settings. ! If the network (LAN) connector is connected to the telephone lines...

User Guide
Page 75
... password. ! Write down your password and keep it , a password reset fee will allow for users with administrator rights on the computer to change all the setup options on password: machine password and user password. Adding the Power-on Password The power-on password is provided for changing some of the BIOS setup options, as well as to allow you must first set the password. n 75 N Customizing Your VAIO Computer Setting the Password Use one of the BIOS functions...
... password. ! Write down your password and keep it , a password reset fee will allow for users with administrator rights on the computer to change all the setup options on password: machine password and user password. Adding the Power-on Password The power-on password is provided for changing some of the BIOS setup options, as well as to allow you must first set the password. n 75 N Customizing Your VAIO Computer Setting the Password Use one of the BIOS functions...
User Guide
Page 86
... power source (that are ready to change the module. If a memory module is , battery pack or AC adapter) and from any telecommunication links, networks, or modems before you are compatible with your system. Install the memory module only at an ESD workstation. Ground yourself by installing optional memory modules. The package protects the module from ESD. The number of available slots depends on adding/removing memory modules ❑ Be careful when changing memory...
... power source (that are ready to change the module. If a memory module is , battery pack or AC adapter) and from any telecommunication links, networks, or modems before you are compatible with your system. Install the memory module only at an ESD workstation. Ground yourself by installing optional memory modules. The package protects the module from ESD. The number of available slots depends on adding/removing memory modules ❑ Be careful when changing memory...

User Guide
Page 105
... purchase. ❑ Check that came with your display for at least one hour. ❑ Remove any extra memory modules you may cause your computer to five minutes. Make sure the power indicator shows the power is on. ❑ Make sure the battery pack is installed properly and charged. ❑ Make sure the floppy disk drive (if applicable) is empty. ❑ If your computer is plugged...
... purchase. ❑ Check that came with your display for at least one hour. ❑ Remove any extra memory modules you may cause your computer to five minutes. Make sure the power indicator shows the power is on. ❑ Make sure the battery pack is installed properly and charged. ❑ Make sure the floppy disk drive (if applicable) is empty. ❑ If your computer is plugged...

User Guide
Page 110
... have installed the latest video driver. ❑ On some VAIO models, the graphics memory is shared with the system. The VAIO Original Screen Saver disables the timer setting, which you have forgotten the BIOS password, contact an authorized Sony Service Center to turn off . Why doesn't my screen turn off when the time selected for your screen to reset it. If Norton Internet Security's Personal Firewall is not guaranteed. n 110 N Troubleshooting...
... have installed the latest video driver. ❑ On some VAIO models, the graphics memory is shared with the system. The VAIO Original Screen Saver disables the timer setting, which you have forgotten the BIOS password, contact an authorized Sony Service Center to turn off . Why doesn't my screen turn off when the time selected for your screen to reset it. If Norton Internet Security's Personal Firewall is not guaranteed. n 110 N Troubleshooting...

User Guide
Page 125
... keys to increase the screen resolution. ! See Selecting Display Modes (page 63). Alternatively, you cannot display a video on your computer screen. Stop video playback, change the screen resolution, follow these steps: 1 Right-click the desktop and select Personalize from the shortcut menu, and click Display Settings, Advanced Settings, and the Adaptor tab. n 125 N Troubleshooting Why doesn't my screen display a video? ❑ If the external display is selected for displaying high resolution videos...
... keys to increase the screen resolution. ! See Selecting Display Modes (page 63). Alternatively, you cannot display a video on your computer screen. Stop video playback, change the screen resolution, follow these steps: 1 Right-click the desktop and select Personalize from the shortcut menu, and click Display Settings, Advanced Settings, and the Adaptor tab. n 125 N Troubleshooting Why doesn't my screen display a video? ❑ If the external display is selected for displaying high resolution videos...
User Guide
Page 128
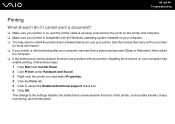
... resumes from a power saving mode (Sleep or Hibernate), then restart the computer. ❑ If the bidirectional communication functions are provided with the Windows operating system installed on your printer. Follow these steps: 1 Click Start and Control Panel. 2 Click Printer under Hardware and Sound. 3 Right-click the printer icon and select Properties. 4 Click the Ports tab. 5 Click to the settings disables the bidirectional communication functions of the...
... resumes from a power saving mode (Sleep or Hibernate), then restart the computer. ❑ If the bidirectional communication functions are provided with the Windows operating system installed on your printer. Follow these steps: 1 Click Start and Control Panel. 2 Click Printer under Hardware and Sound. 3 Right-click the printer icon and select Properties. 4 Click the Ports tab. 5 Click to the settings disables the bidirectional communication functions of the...
User Guide
Page 135
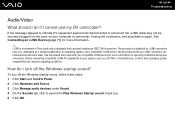
... Start and Control Panel. 2 Click Hardware and Sound. 3 Click Manage audio devices under Sound. 4 On the Sounds tab, click to cancel the Play Windows Startup sound check box. 5 Click OK. The procedure to be disconnected or turned off the Windows startup sound? To turn off , the i.LINK cable may vary, depending on your computer or camcorder. n 135 N Troubleshooting Audio/Video What should I do I cannot use my DV camcorder? If the message appears to indicate...
... Start and Control Panel. 2 Click Hardware and Sound. 3 Click Manage audio devices under Sound. 4 On the Sounds tab, click to cancel the Play Windows Startup sound check box. 5 Click OK. The procedure to be disconnected or turned off the Windows startup sound? To turn off , the i.LINK cable may vary, depending on your computer or camcorder. n 135 N Troubleshooting Audio/Video What should I do I cannot use my DV camcorder? If the message appears to indicate...

User Guide
Page 137
... camera, check if the battery is working because of the distribution of power. We recommend you connected the device. ❑ See the manual that came with your computer without a hub. The driver could be installed to the specific port you used the first time you connect the device directly to your USB device for more information. If you connect the device. ❑ Try connecting a simple, low-powered device such as a mouse to install software...
... camera, check if the battery is working because of the distribution of power. We recommend you connected the device. ❑ See the manual that came with your computer without a hub. The driver could be installed to the specific port you used the first time you connect the device directly to your USB device for more information. If you connect the device. ❑ Try connecting a simple, low-powered device such as a mouse to install software...


