
User Guide
Page 4
n4 N Precautions ...92 On Handling the LCD Screen ...93 On Using the Power Source ...94 On Handling Your Computer...95 On Handling Floppy Disks ...97 On Handling Discs ...98 On Using the Battery Pack...99 On Using Headphones...100 On Handling Memory Stick Media...101 On Handling the Hard Disk ...102 On Updating Your Computer ...103 Troubleshooting ...104 Computer ...105 System Security ...112 Battery...113 Internet ...115 Networking ...117 Optical Discs ...120 Display ...124 Printing ...128 Microphone ...129 Mouse ...130 Speakers ...131 Touch Pad...132
n4 N Precautions ...92 On Handling the LCD Screen ...93 On Using the Power Source ...94 On Handling Your Computer...95 On Handling Floppy Disks ...97 On Handling Discs ...98 On Using the Battery Pack...99 On Using Headphones...100 On Handling Memory Stick Media...101 On Handling the Hard Disk ...102 On Updating Your Computer ...103 Troubleshooting ...104 Computer ...105 System Security ...112 Battery...113 Internet ...115 Networking ...117 Optical Discs ...120 Display ...124 Printing ...128 Microphone ...129 Mouse ...130 Speakers ...131 Touch Pad...132

User Guide
Page 12
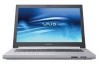
Front A Num lock indicator (page 17) B Caps lock indicator (page 17) C Scroll lock indicator (page 17) D Power button E LCD screen (page 93) F Keyboard (page 27) G Touch pad (page 29) H Power indicator (page 17) I Battery indicator (page 17) J Hard disk drive indicator (page 17) K WLAN (...
Front A Num lock indicator (page 17) B Caps lock indicator (page 17) C Scroll lock indicator (page 17) D Power button E LCD screen (page 93) F Keyboard (page 27) G Touch pad (page 29) H Power indicator (page 17) I Battery indicator (page 17) J Hard disk drive indicator (page 17) K WLAN (...

User Guide
Page 20
Installing the Battery Pack To install the battery pack 1 Turn off the computer and close the LCD screen lid. 2 Slide the battery lock switch (1) to the UNLOCK position. 3 Slide the battery pack into the battery compartment until it clicks into place. Using the Battery Pack The battery pack supplied with your computer is not fully charged at the time of purchase. n 20 N Getting Started
Installing the Battery Pack To install the battery pack 1 Turn off the computer and close the LCD screen lid. 2 Slide the battery lock switch (1) to the UNLOCK position. 3 Slide the battery pack into the battery compartment until it clicks into place. Using the Battery Pack The battery pack supplied with your computer is not fully charged at the time of purchase. n 20 N Getting Started

User Guide
Page 24
To remove the battery pack 1 Turn off the computer and close the LCD screen lid. 2 Slide the battery lock switch (1) to the AC adapter or if you remove the battery pack while your computer is on and not connected to the UNLOCK position. 3 Slide and hold the battery release latch (2) and slide the battery pack away from the computer. You may lose data if you remove the battery pack while the computer is in Sleep mode. n 24 N Getting Started Removing the Battery Pack !
To remove the battery pack 1 Turn off the computer and close the LCD screen lid. 2 Slide the battery lock switch (1) to the AC adapter or if you remove the battery pack while your computer is on and not connected to the UNLOCK position. 3 Slide and hold the battery release latch (2) and slide the battery pack away from the computer. You may lose data if you remove the battery pack while the computer is in Sleep mode. n 24 N Getting Started Removing the Battery Pack !

User Guide
Page 27
n 27 N Using Your VAIO Computer Using the Keyboard Your keyboard is very similar to a desktop computer keyboard, but has additional keys that perform model-specific tasks. To decrease the ...
n 27 N Using Your VAIO Computer Using the Keyboard Your keyboard is very similar to a desktop computer keyboard, but has additional keys that perform model-specific tasks. To decrease the ...

User Guide
Page 62
n 62 N Using Peripheral Devices Connecting a Projector You can connect a projector (for example, the Sony LCD projector) directly to your projector into an AC outlet. 2 Plug an RGB signal cable (2) (not supplied) into the monitor (VGA) port (3) a on the computer. 3 Plug an audio cable (4) (not supplied) into the headphones jack (5) i. 4 Plug the RGB signal cable and the audio cable into the jack and port on the projector (6). To connect a projector 1 Connect the power cord (1) of your computer.
n 62 N Using Peripheral Devices Connecting a Projector You can connect a projector (for example, the Sony LCD projector) directly to your projector into an AC outlet. 2 Plug an RGB signal cable (2) (not supplied) into the monitor (VGA) port (3) a on the computer. 3 Plug an audio cable (4) (not supplied) into the headphones jack (5) i. 4 Plug the RGB signal cable and the audio cable into the jack and port on the projector (6). To connect a projector 1 Connect the power cord (1) of your computer.

User Guide
Page 79
n 79 N Customizing Your VAIO Computer Using the Power Saving Modes When you use . In addition to the normal operating mode, which allows you to turn off specific devices, your ... 10 percent, you select. ! Using Normal Mode This is the normal state of the computer when it is on in use a battery pack as the LCD screen or the hard disk. To save power while not working, you can take advantage of the power management setting you should be aware that...
n 79 N Customizing Your VAIO Computer Using the Power Saving Modes When you use . In addition to the normal operating mode, which allows you to turn off specific devices, your ... 10 percent, you select. ! Using Normal Mode This is the normal state of the computer when it is on in use a battery pack as the LCD screen or the hard disk. To save power while not working, you can take advantage of the power management setting you should be aware that...

User Guide
Page 80
... the power button for more power than out of Sleep mode quicker than Hibernate mode. ! Your computer comes out of Hibernate mode. n 80 N Customizing Your VAIO Computer Using Sleep Mode Sleep mode turns off automatically. Going back to the Lock button, and Sleep. To activate Sleep mode Click Start, the arrow... next to the previous work state is in this mode. You will turn off the LCD screen and places the hard disk and the CPU into a low power consumption mode.
... the power button for more power than out of Sleep mode quicker than Hibernate mode. ! Your computer comes out of Hibernate mode. n 80 N Customizing Your VAIO Computer Using Sleep Mode Sleep mode turns off automatically. Going back to the Lock button, and Sleep. To activate Sleep mode Click Start, the arrow... next to the previous work state is in this mode. You will turn off the LCD screen and places the hard disk and the CPU into a low power consumption mode.

User Guide
Page 92
n 92 N Precautions Precautions This section describes safety guidelines and precautions to help you protect your VAIO computer from potential damage. ❑ On Handling the LCD Screen (page 93) ❑ On Using the Power Source (page 94) ❑ On Handling Your Computer (page 95) ❑ On Handling Floppy Disks (page 97) ❑ On Handling Discs (page 98) ❑ On Using the Battery Pack (page 99) ❑ On Using Headphones (page 100) ❑ On Handling Memory Stick Media (page 101) ❑ On Handling the Hard Disk (page 102) ❑ On Updating Your Computer (page 103)
n 92 N Precautions Precautions This section describes safety guidelines and precautions to help you protect your VAIO computer from potential damage. ❑ On Handling the LCD Screen (page 93) ❑ On Using the Power Source (page 94) ❑ On Handling Your Computer (page 95) ❑ On Handling Floppy Disks (page 97) ❑ On Handling Discs (page 98) ❑ On Using the Battery Pack (page 99) ❑ On Using Headphones (page 100) ❑ On Handling Memory Stick Media (page 101) ❑ On Handling the Hard Disk (page 102) ❑ On Updating Your Computer (page 103)

User Guide
Page 93
... defects arising out of the manufacturing process and does not indicate a malfunction. ❑ Avoid rubbing the LCD screen. This is displayed for a long period of time. You may produce a residual image on the LCD screen. Sony assumes no liabilities for selection, as it may appear on it. Be careful when using high-precision...
... defects arising out of the manufacturing process and does not indicate a malfunction. ❑ Avoid rubbing the LCD screen. This is displayed for a long period of time. You may produce a residual image on the LCD screen. Sony assumes no liabilities for selection, as it may appear on it. Be careful when using high-precision...

User Guide
Page 96
...hand and gently lift the LCD screen lid with both hands. ❑ Use a carrying case specially designed to carry your computer is brought directly from a cold location to malfunction. To find the nearest center or agent, see Sony Support Information (page 138) or visit the Sony online support Web site.... ❑ Make sure you disconnect the power cord before turning on the LCD screen or its edges when opening the LCD screen lid or lifting your computer. To carry ...
...hand and gently lift the LCD screen lid with both hands. ❑ Use a carrying case specially designed to carry your computer is brought directly from a cold location to malfunction. To find the nearest center or agent, see Sony Support Information (page 138) or visit the Sony online support Web site.... ❑ Make sure you disconnect the power cord before turning on the LCD screen or its edges when opening the LCD screen lid or lifting your computer. To carry ...

User Guide
Page 124
... (page 27) for more information. ❑ Make sure your computer is using battery power, make sure the battery pack is installed properly and is in LCD (Video) Sleep mode, press any key to the external display, press the Fn+F7 keys. See Using the Power Saving Modes (page 79) for more...
... (page 27) for more information. ❑ Make sure your computer is using battery power, make sure the battery pack is installed properly and is in LCD (Video) Sleep mode, press any key to the external display, press the Fn+F7 keys. See Using the Power Saving Modes (page 79) for more...

User Guide
Page 125
... the left to reduce or to the right to the computer screen, and then restart video playback. In this case, lower the resolution of the LCD screen. Press the Fn+F6 keys to change the display output. To change the screen resolution, follow these steps: 1 Right-click the desktop and select...
... the left to reduce or to the right to the computer screen, and then restart video playback. In this case, lower the resolution of the LCD screen. Press the Fn+F6 keys to change the display output. To change the screen resolution, follow these steps: 1 Right-click the desktop and select...

User Guide
Page 126
... of my screen changes? The Power Options window appears. 4 Select the Advanced settings tab. 5 Double-click Display. 6 Adjust the LCD brightness setting in the item for the brightness, follow these steps: 1 Right-click the power status icon on the taskbar and select Power .... 3 Click Change advanced power settings. Then, try the Fn+F7 keys to detect the external display. The LCD brightness setting, adjusted with VAIO Central. To change the settings, launch the VAIO Central, click the System Information tab and select the control item for the external display, and then click to...
... of my screen changes? The Power Options window appears. 4 Select the Advanced settings tab. 5 Double-click Display. 6 Adjust the LCD brightness setting in the item for the brightness, follow these steps: 1 Right-click the power status icon on the taskbar and select Power .... 3 Click Change advanced power settings. Then, try the Fn+F7 keys to detect the external display. The LCD brightness setting, adjusted with VAIO Central. To change the settings, launch the VAIO Central, click the System Information tab and select the control item for the external display, and then click to...


