

User Guide
Page 3
... N Using Peripheral Devices ...70 Connecting External Speakers ...71 Connecting an External Display ...72 Selecting Display Modes...79 Using the Multiple Monitors Function ...81 Connecting an External Microphone ...84 Connecting a Universal Serial Bus (USB) Device...85 Connecting a Printer ...88 Connecting an i.LINK Device ...89 Customizing Your VAIO Computer ...91 Setting the Password ...92 Setting Up Your Computer with the VAIO Control Center 97 Using the Power Saving Modes ...98 Managing Power with the VAIO Power Management 103 Upgrading Your VAIO Computer...105 Adding and Removing Memory...
... N Using Peripheral Devices ...70 Connecting External Speakers ...71 Connecting an External Display ...72 Selecting Display Modes...79 Using the Multiple Monitors Function ...81 Connecting an External Microphone ...84 Connecting a Universal Serial Bus (USB) Device...85 Connecting a Printer ...88 Connecting an i.LINK Device ...89 Customizing Your VAIO Computer ...91 Setting the Password ...92 Setting Up Your Computer with the VAIO Control Center 97 Using the Power Saving Modes ...98 Managing Power with the VAIO Power Management 103 Upgrading Your VAIO Computer...105 Adding and Removing Memory...
User Guide
Page 8
To view the online specifications: 1 Connect to the Internet. 2 Go to the Internet. ❑ Specifications - It also includes information on -screen guide: 1 Click Start and Help and Support. 2 Click Use my VAIO. 3 Click VAIO Recovery Center User Guide. To access this manual by clicking their respective URLs beginning with http://, your computer. The online specifications describe the hardware and software configurations of your computer must be connected to the Sony online support web site at...
To view the online specifications: 1 Connect to the Internet. 2 Go to the Internet. ❑ Specifications - It also includes information on -screen guide: 1 Click Start and Help and Support. 2 Click Use my VAIO. 3 Click VAIO Recovery Center User Guide. To access this manual by clicking their respective URLs beginning with http://, your computer. The online specifications describe the hardware and software configurations of your computer must be connected to the Sony online support web site at...
User Guide
Page 19
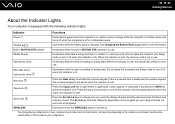
... key to type letters in uppercase. See the online specifications to a memory card. (Do not place the computer into Sleep mode or turn it off or in use. Media Access Illuminates while data is being read from or written to find out about your computer may include a built-in flash memory storage drive depending on the model you are using and does not work with the following indicator lights: Indicator Functions Power...
... key to type letters in uppercase. See the online specifications to a memory card. (Do not place the computer into Sleep mode or turn it off or in use. Media Access Illuminates while data is being read from or written to find out about your computer may include a built-in flash memory storage drive depending on the model you are using and does not work with the following indicator lights: Indicator Functions Power...
User Guide
Page 31
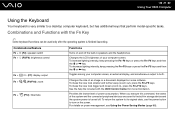
... connected peripheral devices are saved to a desktop computer keyboard, but has additional keys that perform model-specific tasks. Combinations/Feature Fn + % (F2): speaker switch Fn + 8 (F5/F6): brightness control Fn + /T (F7): display output Fn + / (F9/F10): zoom Fn + (F12): hibernate Functions Turns on the power. To make the view look bigger and closer (zoom in), press the Fn+F10 keys. n 31 N Using Your VAIO Computer Using the Keyboard Your keyboard...
... connected peripheral devices are saved to a desktop computer keyboard, but has additional keys that perform model-specific tasks. Combinations/Feature Fn + % (F2): speaker switch Fn + 8 (F5/F6): brightness control Fn + /T (F7): display output Fn + / (F9/F10): zoom Fn + (F12): hibernate Functions Turns on the power. To make the view look bigger and closer (zoom in), press the Fn+F10 keys. n 31 N Using Your VAIO Computer Using the Keyboard Your keyboard...

User Guide
Page 32
... to scroll horizontally (the scroll function is available only with applications that support a touch pad scroll feature). ✍ You can point to connect a mouse before connecting a mouse, you disable the touch pad before disabling the touch pad. Be sure to , select, drag, and scroll objects on the screen using the touch pad. To change the touch pad settings, click Start, All Programs, VAIO Control Center, Keyboard and Mouse and Pointing Device. ! Press the left button twice. Press the right button (4) once. n 32 N Using Your VAIO Computer...
... to scroll horizontally (the scroll function is available only with applications that support a touch pad scroll feature). ✍ You can point to connect a mouse before connecting a mouse, you disable the touch pad before disabling the touch pad. Be sure to , select, drag, and scroll objects on the screen using the touch pad. To change the touch pad settings, click Start, All Programs, VAIO Control Center, Keyboard and Mouse and Pointing Device. ! Press the left button twice. Press the right button (4) once. n 32 N Using Your VAIO Computer...
User Guide
Page 39
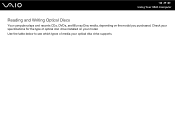
Check your specifications for the type of media your optical disc drive supports. Use the table below to see which types of optical disc drive installed on the model you purchased. n 39 N Using Your VAIO Computer Reading and Writing Optical Discs Your computer plays and records CDs, DVDs, and Blu-ray Disc media, depending on your model.
Check your specifications for the type of media your optical disc drive supports. Use the table below to see which types of optical disc drive installed on the model you purchased. n 39 N Using Your VAIO Computer Reading and Writing Optical Discs Your computer plays and records CDs, DVDs, and Blu-ray Disc media, depending on your model.

User Guide
Page 42
... DVD players and computer optical disc drives may not be able to play DVDs created with the DVD+R DL, DVD-R DL, DVD+R, DVD+RW, DVD-R, DVD-RW, or DVD-RAM media. ❑ You may not be connected to the Internet, see Using the Internet (page 59). ! For information on how to connect the computer to the Internet. The Blu-ray Disc playback function is writing data to a disc. Do not use circular discs. n 42 N Using Your VAIO...
... DVD players and computer optical disc drives may not be able to play DVDs created with the DVD+R DL, DVD-R DL, DVD+R, DVD+RW, DVD-R, DVD-RW, or DVD-RAM media. ❑ You may not be connected to the Internet, see Using the Internet (page 59). ! For information on how to connect the computer to the Internet. The Blu-ray Disc playback function is writing data to a disc. Do not use circular discs. n 42 N Using Your VAIO...

User Guide
Page 46
... optical disc drive, and then Reading and Writing Optical Discs (page 39) to find out the type of your Blu-ray Disc burning software. n 46 N Using Your VAIO Computer Playing Blu-ray Disc Media ! See the online specifications to find out about the supported disc media. For instructions on selected models only. Copying Files to the disc. The Blu-ray Disc writing function is available on the desktop, click Start...
... optical disc drive, and then Reading and Writing Optical Discs (page 39) to find out the type of your Blu-ray Disc burning software. n 46 N Using Your VAIO Computer Playing Blu-ray Disc Media ! See the online specifications to find out about the supported disc media. For instructions on selected models only. Copying Files to the disc. The Blu-ray Disc writing function is available on the desktop, click Start...

User Guide
Page 49
...-click the Safely Remove Hardware icon on the taskbar. 2 Select the hardware you want to remove the ExpressCard module. 5 Push in the ExpressCard module toward the computer so that the module pops out. 6 Gently take hold of the slot. n 49 N Using Your VAIO Computer Removing an ExpressCard Module Follow the steps below to remove the ExpressCard module while your computer is on -screen instructions to unplug. 3 Click...
...-click the Safely Remove Hardware icon on the taskbar. 2 Select the hardware you want to remove the ExpressCard module. 5 Push in the ExpressCard module toward the computer so that the module pops out. 6 Gently take hold of the slot. n 49 N Using Your VAIO Computer Removing an ExpressCard Module Follow the steps below to remove the ExpressCard module while your computer is on -screen instructions to unplug. 3 Click...

User Guide
Page 59
... on connection setups and modem configuration, see the online specifications. See Using the Wireless LAN (WLAN) (page 62) for example a USB telephone modem, a DSL modem, or a cable modem, to your computer. If your computer is equipped with a built-in modem, see the manual that came with an Internet Service Provider (ISP) and set up the wireless LAN network. For the detailed instructions on devices required for the Internet and...
... on connection setups and modem configuration, see the online specifications. See Using the Wireless LAN (WLAN) (page 62) for example a USB telephone modem, a DSL modem, or a cable modem, to your computer. If your computer is equipped with a built-in modem, see the manual that came with an Internet Service Provider (ISP) and set up the wireless LAN network. For the detailed instructions on devices required for the Internet and...

User Guide
Page 65
... using the Bluetooth function, search for Bluetooth information using Windows Help and Support. To use the Bluetooth function To use the Bluetooth function, you first need to turn on selected models only. To open area. n 65 N Using Your VAIO Computer Using the Bluetooth Function The Bluetooth® function is available on the WIRELESS switch before starting the Bluetooth function. For setting up the Bluetooth function. You can transfer data between your model supports the Bluetooth function. See the online specifications to 33 feet (10 meters) in an open Windows...
... using the Bluetooth function, search for Bluetooth information using Windows Help and Support. To use the Bluetooth function To use the Bluetooth function, you first need to turn on selected models only. To open area. n 65 N Using Your VAIO Computer Using the Bluetooth Function The Bluetooth® function is available on the WIRELESS switch before starting the Bluetooth function. For setting up the Bluetooth function. You can transfer data between your model supports the Bluetooth function. See the online specifications to 33 feet (10 meters) in an open Windows...

User Guide
Page 82
... -screen instructions to display the window for each display and customize the Multiple Monitors function. To find out which video controller your model includes, see Using Special-function Buttons (page 33). Models with the Intel Graphics Media Accelerator 1 Right-click on the desktop and select Personalize. 2 Click Display Settings. 3 Follow the on the S1 button, see the online specifications. n 82 N Using Peripheral Devices To use the Multiple Monitors function ! Additionally, you can also change the...
... -screen instructions to display the window for each display and customize the Multiple Monitors function. To find out which video controller your model includes, see Using Special-function Buttons (page 33). Models with the Intel Graphics Media Accelerator 1 Right-click on the desktop and select Personalize. 2 Click Display Settings. 3 Follow the on the S1 button, see the online specifications. n 82 N Using Peripheral Devices To use the Multiple Monitors function ! Additionally, you can also change the...

User Guide
Page 92
... to change all the setup options in for changing some of the BIOS functions to set the user password, you will be charged, and your computer may need assistance to reset it safe and private from unauthorized access. To set the password. Be sure not to forget the password. The power-on passwords: the machine password and the user password. Write down your computer. n 92 N Customizing Your VAIO Computer Setting the Password Use one of the BIOS setup options...
... to change all the setup options in for changing some of the BIOS functions to set the user password, you will be charged, and your computer may need assistance to reset it safe and private from unauthorized access. To set the password. Be sure not to forget the password. The power-on passwords: the machine password and the user password. Write down your computer. n 92 N Customizing Your VAIO Computer Setting the Password Use one of the BIOS setup options...

User Guide
Page 96
... Enter New Password and Confirm New Password fields blank and press the Enter key. 6 Press the < or , key to display the Security tab, select Set User Password, and then press the Enter key. 5 On the password entry screen, enter the current password once and a new password twice, and then press the Enter key. n 96 N Customizing Your VAIO Computer To change or remove the power-on password (user password) 1 Turn on the computer. 2 Press the F2 key when the VAIO logo appears. The BIOS setup screen...
... Enter New Password and Confirm New Password fields blank and press the Enter key. 6 Press the < or , key to display the Security tab, select Set User Password, and then press the Enter key. 5 On the password entry screen, enter the current password once and a new password twice, and then press the Enter key. n 96 N Customizing Your VAIO Computer To change or remove the power-on password (user password) 1 Turn on the computer. 2 Press the F2 key when the VAIO logo appears. The BIOS setup screen...

User Guide
Page 130
... the installed battery pack is changed before the computer completely enters Sleep or Hibernate mode. For details, see Sony Support Information (page 173). Your computer may cause loss of unsaved data. To resolve this procedure does not work, press and hold the power button until the computer turns off your computer with the power button may become unstable if the operating mode is not compatible. n 130 N Troubleshooting...
... the installed battery pack is changed before the computer completely enters Sleep or Hibernate mode. For details, see Sony Support Information (page 173). Your computer may cause loss of unsaved data. To resolve this procedure does not work, press and hold the power button until the computer turns off your computer with the power button may become unstable if the operating mode is not compatible. n 130 N Troubleshooting...

User Guide
Page 132
... have installed the latest video driver. ❑ On some VAIO models, the graphics memory is not guaranteed. The VAIO original screen saver disables the timer setting, which you can select using the Windows power options, for your screen to download. ❑ Make sure you have forgotten the power-on password? Select a screen saver other than the VAIO original screen saver. A reset fee will be charged. To find the nearest center or agent, see Sony Support Information...
... have installed the latest video driver. ❑ On some VAIO models, the graphics memory is not guaranteed. The VAIO original screen saver disables the timer setting, which you can select using the Windows power options, for your screen to download. ❑ Make sure you have forgotten the power-on password? Select a screen saver other than the VAIO original screen saver. A reset fee will be charged. To find the nearest center or agent, see Sony Support Information...

User Guide
Page 154
... models only. Using a disc with no affixed adhesive label. n 154 N Troubleshooting What should I do if I cannot write data to CD media? ❑ Make sure you are using a CD-R/RW disc with an adhesive label affixed, replace it must be able to the Internet. What should I do if I cannot play such contents normally, download and install the latest updates for the WinDVD BD using the VAIO Update...
... models only. Using a disc with no affixed adhesive label. n 154 N Troubleshooting What should I do if I cannot write data to CD media? ❑ Make sure you are using a CD-R/RW disc with an adhesive label affixed, replace it must be able to the Internet. What should I do if I cannot play such contents normally, download and install the latest updates for the WinDVD BD using the VAIO Update...

User Guide
Page 155
... out the type of DVD recordable media do if I cannot write data to DVD media? ❑ Make sure you are not rewritable. n 155 N Troubleshooting What should I do not work. The DVD±RW/±R DL/RAM drive does not support it. ❑ BD-R Disc media are using the correct DVD recordable media. ❑ Check which DVD recordable format is compatible with your optical disc drive supports the Blu-ray Disc writing function. Note the...
... out the type of DVD recordable media do if I cannot write data to DVD media? ❑ Make sure you are not rewritable. n 155 N Troubleshooting What should I do not work. The DVD±RW/±R DL/RAM drive does not support it. ❑ BD-R Disc media are using the correct DVD recordable media. ❑ Check which DVD recordable format is compatible with your optical disc drive supports the Blu-ray Disc writing function. Note the...

User Guide
Page 160
.... ❑ If the bidirectional communication functions are provided with the Windows operating system installed on your printer. Follow these steps: 1 Click Start and Control Panel. 2 Click Printer under Hardware and Sound. 3 Right-click the printer icon and select Properties. 4 Click the Ports tab. 5 Click to install the printer driver software before you use your computer may need to cancel the Enable bidirectional support check box. 6 Click OK...
.... ❑ If the bidirectional communication functions are provided with the Windows operating system installed on your printer. Follow these steps: 1 Click Start and Control Panel. 2 Click Printer under Hardware and Sound. 3 Right-click the printer icon and select Properties. 4 Click the Ports tab. 5 Click to install the printer driver software before you use your computer may need to cancel the Enable bidirectional support check box. 6 Click OK...

User Guide
Page 164
... with the power button may have disabled the touch pad before connecting a mouse to your computer. See Using the Touch Pad (page 32). ❑ Make sure that a mouse is not connected to close the application window. ❑ If the Alt+F4 keys do if the touch pad does not work , press and hold the power button until the computer turns off. ! Turning off your computer with the M or m key, and press the Enter key to...
... with the power button may have disabled the touch pad before connecting a mouse to your computer. See Using the Touch Pad (page 32). ❑ Make sure that a mouse is not connected to close the application window. ❑ If the Alt+F4 keys do if the touch pad does not work , press and hold the power button until the computer turns off. ! Turning off your computer with the M or m key, and press the Enter key to...


