User Guide
Page 9
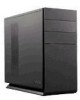
...All proPdaugcets9 i.LINK is a trademark of Sony used only to a Secure Digital (SD) or MultiMediaCard (MMC). 13 Hard disk drive access indicator Light is amber while the hard disk drive is reading and writing data. 14 Power button The power button turns the computer on/off. 15... tFlas h®/M ic rodrive s lots . 5 Media access indicator1 Light is amber when reading or writing data to a memory card reader. 6 Power indicator (VAIO) Light is white when the computer is on the software programs, operating system, and compatible i.LINK devices. The light turns off when the computer ...
...All proPdaugcets9 i.LINK is a trademark of Sony used only to a Secure Digital (SD) or MultiMediaCard (MMC). 13 Hard disk drive access indicator Light is amber while the hard disk drive is reading and writing data. 14 Power button The power button turns the computer on/off. 15... tFlas h®/M ic rodrive s lots . 5 Media access indicator1 Light is amber when reading or writing data to a memory card reader. 6 Power indicator (VAIO) Light is white when the computer is on the software programs, operating system, and compatible i.LINK devices. The light turns off when the computer ...

User Guide
Page 11
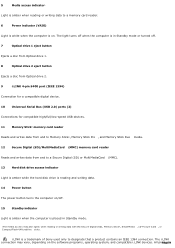
Page 11 See your computer. Back panel 1 AC Input port Connection for the supplied power cord. 2 Mouse port Connection for a PS/2® mouse. 3 Keyboard port Connection for a PS/2 keyboard. 4 Printer port Connection for supplied and optional accessories. The icons on ...
Page 11 See your computer. Back panel 1 AC Input port Connection for the supplied power cord. 2 Mouse port Connection for a PS/2® mouse. 3 Keyboard port Connection for a PS/2 keyboard. 4 Printer port Connection for supplied and optional accessories. The icons on ...
User Guide
Page 12
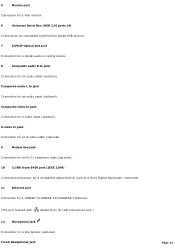
... cable (optional). 9 Modem line jack3 Connection for an RJ-11 telephone cable (optional). 10 i.LINK 6-pin S400 port (IEEE 1394) Connection and power for a compatible digital device, such as a Sony Digital Handycam® camcorder. 11 Ethernet port Connection for a 10BASE-T/100BASE-TX/1000BASE-T Ethernet. (The port marked with (Network) is for LAN...
... cable (optional). 9 Modem line jack3 Connection for an RJ-11 telephone cable (optional). 10 i.LINK 6-pin S400 port (IEEE 1394) Connection and power for a compatible digital device, such as a Sony Digital Handycam® camcorder. 11 Ethernet port Connection for a 10BASE-T/100BASE-TX/1000BASE-T Ethernet. (The port marked with (Network) is for LAN...
User Guide
Page 16
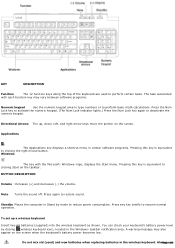
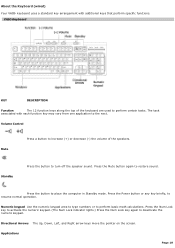
... mouse button. Standby Places the computer in Stand by clicking (wireless keyboard icon), located in the wireless keyboard. Press again to reduce power consumption. You can check your keyboard's battery power level by mode to restore sound. Pressing this key is equivalent to perform certain tasks. To set up , down, left, and... batteries (supplied) into the wireless keyboard as shown. Windows The key with each function key may also appear on the screen when the keyboard's battery power becomes low. Mute Turns the sound off. AlwPaaygseu1s6e
... mouse button. Standby Places the computer in Stand by clicking (wireless keyboard icon), located in the wireless keyboard. Press again to reduce power consumption. You can check your keyboard's battery power level by mode to restore sound. Pressing this key is equivalent to perform certain tasks. To set up , down, left, and... batteries (supplied) into the wireless keyboard as shown. Windows The key with each function key may also appear on the screen when the keyboard's battery power becomes low. Mute Turns the sound off. AlwPaaygseu1s6e
User Guide
Page 18
Volume Control Mute Press a button to increase (+) or decrease (-) the volume of the keyboard are used to restore sound. Press the Power button or any key briefly, to turn off the speaker sound. Applications Page 18 Standby Press the button to resume normal operation. The task ... basic math calculations. Numeric keypad Use the numeric keypad area to type numbers or to deactivate the numeric keypad. About the Keyboard (wired) Your VAIO® keyboard uses a standard key arrangement with each function key may vary from one application to place the computer in Standby mode...
Volume Control Mute Press a button to increase (+) or decrease (-) the volume of the keyboard are used to restore sound. Press the Power button or any key briefly, to turn off the speaker sound. Applications Page 18 Standby Press the button to resume normal operation. The task ... basic math calculations. Numeric keypad Use the numeric keypad area to type numbers or to deactivate the numeric keypad. About the Keyboard (wired) Your VAIO® keyboard uses a standard key arrangement with each function key may vary from one application to place the computer in Standby mode...

User Guide
Page 20
Wireless m ouse (Side and bottom ) 1 Power switch Slide power switch to turn the mouse on the LCD screen. 3 Right mouse button Press to enable communication between your computer, see the section, Connecting the Wireless Optical Mouse. About the Wireless Mouse Your VAIO® computer may be supplied with your VAIO® computer and the wireless...
Wireless m ouse (Side and bottom ) 1 Power switch Slide power switch to turn the mouse on the LCD screen. 3 Right mouse button Press to enable communication between your computer, see the section, Connecting the Wireless Optical Mouse. About the Wireless Mouse Your VAIO® computer may be supplied with your VAIO® computer and the wireless...

User Guide
Page 21
... notification area. When your wireless mouse does not operate properly, the batteries may need to avoid possible damage from battery leakage. 1See your mouse's battery power level by clicking (wireless mouse icon), located in the wireless mouse. Insert two AA batteries (supplied) into the wireless m ouse If your wireless mouse is...
... notification area. When your wireless mouse does not operate properly, the batteries may need to avoid possible damage from battery leakage. 1See your mouse's battery power level by clicking (wireless mouse icon), located in the wireless mouse. Insert two AA batteries (supplied) into the wireless m ouse If your wireless mouse is...

User Guide
Page 22
About the Wireless Mouse Your VAIO® computer may be supplied with your VAIO® computer and the wireless mouse. Before attempting to scroll up the wireless mouse Page 22 Wireless m ouse (top) 1 Left mouse button Press to perform ... a wireless optical mouse1. To set up or down on or off. 2 CONNECT button Press to perform specific mouse functions. Wireless m ouse (Side and bottom ) 1 Power switch Slide power switch to turn the mouse on the LCD screen. 3 Right mouse button Press to enable communication between your computer, see the section, Connecting the...
About the Wireless Mouse Your VAIO® computer may be supplied with your VAIO® computer and the wireless mouse. Before attempting to scroll up the wireless mouse Page 22 Wireless m ouse (top) 1 Left mouse button Press to perform ... a wireless optical mouse1. To set up or down on or off. 2 CONNECT button Press to perform specific mouse functions. Wireless m ouse (Side and bottom ) 1 Power switch Slide power switch to turn the mouse on the LCD screen. 3 Right mouse button Press to enable communication between your computer, see the section, Connecting the...

User Guide
Page 23
... being used for extended periods of battery. You can damage the mouse. Insert two AA batteries (supplied) into the wireless m ouse If your mouse's battery power level by clicking (wireless mouse icon), located in the wireless mouse.
... being used for extended periods of battery. You can damage the mouse. Insert two AA batteries (supplied) into the wireless m ouse If your mouse's battery power level by clicking (wireless mouse icon), located in the wireless mouse.
User Guide
Page 26
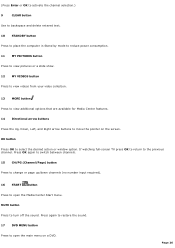
... channel selection.) 9 CLEAR button Use to backspace and delete entered text. 10 STANDBY button Press to place the computer in Stand by mode to reduce power consumption. 11 MY PICTURES button Press to view pictures or a slide show. 12 MY VIDEOS button Press to view videos from your video collection. 13...
... channel selection.) 9 CLEAR button Use to backspace and delete entered text. 10 STANDBY button Press to place the computer in Stand by mode to reduce power consumption. 11 MY PICTURES button Press to view pictures or a slide show. 12 MY VIDEOS button Press to view videos from your video collection. 13...

User Guide
Page 28
About the i.LINK Port Your VAIO® computer is equipped with a 4-pin and a 6-pin i.LINK® port. A 6-pin i.LINK port can supply power (10V to 12V) to a connected i.LINK device, if the device is equipped with a 6-pin connector. Plug the i.LINK cable connector into the ...corresponding 4- Connecting an i.LINK (IEEE 1394) device 1. or 6-pin i.LINK port on your computer. The total power supplied by the 6-pin i.LINK port does not exceed 6 watts. Plug the other end of the cable into this port. 2. Page 28 A 4-pin i.LINK...
About the i.LINK Port Your VAIO® computer is equipped with a 4-pin and a 6-pin i.LINK® port. A 6-pin i.LINK port can supply power (10V to 12V) to a connected i.LINK device, if the device is equipped with a 6-pin connector. Plug the i.LINK cable connector into the ...corresponding 4- Connecting an i.LINK (IEEE 1394) device 1. or 6-pin i.LINK port on your computer. The total power supplied by the 6-pin i.LINK port does not exceed 6 watts. Plug the other end of the cable into this port. 2. Page 28 A 4-pin i.LINK...

User Guide
Page 29
... Keyboard and Mouse Connecting 5.1 (6-Channel) Speaker Systems Configuring Software for Your Speaker System Configuring Software for Your Speaker System Connecting the Power Cords Turning On Your Computer Page 29 Setting Up Your Computer Your computer may vary from the illustrations shown in the section. The location...
... Keyboard and Mouse Connecting 5.1 (6-Channel) Speaker Systems Configuring Software for Your Speaker System Configuring Software for Your Speaker System Connecting the Power Cords Turning On Your Computer Page 29 Setting Up Your Computer Your computer may vary from the illustrations shown in the section. The location...

User Guide
Page 30
Connecting a Display (Monitor) The location, availability, and type of an emergency. Plug the display's cable into the rear of the display. See the specifications sheet for your computer on the Sony Online Support Web site at http://www.sony.com/pcsupport, for details about your equipment so that you can easily reach the power outlet in the event of the monitor port may vary, depending on the model purchased. To connect a display Install your computer's hardware configuration 1. If necessary, plug the display's cable into the appropriate monitor port. 2. Page 30
Connecting a Display (Monitor) The location, availability, and type of an emergency. Plug the display's cable into the rear of the display. See the specifications sheet for your computer on the Sony Online Support Web site at http://www.sony.com/pcsupport, for details about your equipment so that you can easily reach the power outlet in the event of the monitor port may vary, depending on the model purchased. To connect a display Install your computer's hardware configuration 1. If necessary, plug the display's cable into the appropriate monitor port. 2. Page 30

User Guide
Page 35
... your mouse to the ON position. 3. Connecting the Wireless Optical Mouse Your VAIO® computer may be within 2 feet of the VAIO® computer. Confirm that the supplied AA batteries are properly inserted... into the mouse before your computer is free of obstructions that may prevent proper operation. Avoid using a wireless optical mouse A wireless optical mouse requires unobstructed communication with a wireless mouse1. Turn the wireless mouse over and slide the power...
... your mouse to the ON position. 3. Connecting the Wireless Optical Mouse Your VAIO® computer may be within 2 feet of the VAIO® computer. Confirm that the supplied AA batteries are properly inserted... into the mouse before your computer is free of obstructions that may prevent proper operation. Avoid using a wireless optical mouse A wireless optical mouse requires unobstructed communication with a wireless mouse1. Turn the wireless mouse over and slide the power...

User Guide
Page 41
Plug the power cord into a grounded AC wall outlet or a power strip. To connect the power cords Page 41 Plug both the display and computer power cords into the back of the computer. 2. Connecting the Power Cords 1.
Plug the power cord into a grounded AC wall outlet or a power strip. To connect the power cords Page 41 Plug both the display and computer power cords into the back of the computer. 2. Connecting the Power Cords 1.

User Guide
Page 42
... to turn on the power. 3. Press the power button on the display to turn on the computer. Turning On Your Computer When you start your computer for the first time, your computer may detect new equipment and display a dialog box that prompts you turn on the power. 2. Respond to restart... your com puter Page 42 Press the power button on the right speaker to use these features before you to this prompt immediately. See the section, Setting...
... to turn on the power. 3. Press the power button on the display to turn on the computer. Turning On Your Computer When you start your computer for the first time, your computer may detect new equipment and display a dialog box that prompts you turn on the power. 2. Respond to restart... your com puter Page 42 Press the power button on the right speaker to use these features before you to this prompt immediately. See the section, Setting...

User Guide
Page 54
To turn off automatically-the power indicator light turns off the computer. Respond to any peripheral devices connected to your computer does...The Turn Off Computer dialog box appears. 2. To avoid loss of data, do not use the Power button to turn off your computer for more than six seconds to force your computer stops responding, press and hold the... Power button for an extended period of time. About the Power button If your system to shut down on the first attempt. Turning Off Your Computer ...
To turn off automatically-the power indicator light turns off the computer. Respond to any peripheral devices connected to your computer does...The Turn Off Computer dialog box appears. 2. To avoid loss of data, do not use the Power button to turn off your computer for more than six seconds to force your computer stops responding, press and hold the... Power button for an extended period of time. About the Power button If your system to shut down on the first attempt. Turning Off Your Computer ...

User Guide
Page 63
...not available, do not work in a carpeted area and do not handle materials that may need to remove. Page 63 Always turn the power off before you open the computer or connect your computer from the illustrations, depending on cards, and other components that produce or hold ... circuits. Follow the procedures described here only at an ESD workstation. Before upgrading your computer Disconnect the computer from its power source may vary from its power source and from telecommunications links, networks, or modems before you open the unit or follow any procedures described in this ...
...not available, do not work in a carpeted area and do not handle materials that may need to remove. Page 63 Always turn the power off before you open the computer or connect your computer from the illustrations, depending on cards, and other components that produce or hold ... circuits. Follow the procedures described here only at an ESD workstation. Before upgrading your computer Disconnect the computer from its power source may vary from its power source and from telecommunications links, networks, or modems before you open the unit or follow any procedures described in this ...

User Guide
Page 67
See Replacing the cover. 8. See the instructions supplied with the add-on the computer. Reconnect the power cord and all peripheral devices. 9. Page 67 Attach any internal cables that the card requires. Replace the side cover. Turn on card. 7. 6.
See Replacing the cover. 8. See the instructions supplied with the add-on the computer. Reconnect the power cord and all peripheral devices. 9. Page 67 Attach any internal cables that the card requires. Replace the side cover. Turn on card. 7. 6.

User Guide
Page 72
.... Do not overtighten these screws when securing the new drive to the drive holder with the drive. 5. Configure the jumpers on its side. Detach the power and drive cables from the chassis by removing the drive holder screw(s). 7. 3. Remove the side cover and place the unit on your computer. 6. Slide the...
.... Do not overtighten these screws when securing the new drive to the drive holder with the drive. 5. Configure the jumpers on its side. Detach the power and drive cables from the chassis by removing the drive holder screw(s). 7. 3. Remove the side cover and place the unit on your computer. 6. Slide the...

