
User Guide
Page 13
speeds. J Base stand (page 143) * Support high-/full-/low- Back n 13 N Getting Started A Power button B DISPLAY OFF button Press this button also turns off the LCD backlight. E CONNECT ... 110) G OPTICAL OUT port (page 105) (Output Sampling Rate: 44.1 KHz/48.0 KHz/96.0 KHz) H Hi-Speed USB (USB 2.0) ports* (page 107) I Base stand cover Remove the base stand cover to bundle cables to access the ports and jacks behind it (page 18). While the HDMI input is selected (page 76), pressing...
speeds. J Base stand (page 143) * Support high-/full-/low- Back n 13 N Getting Started A Power button B DISPLAY OFF button Press this button also turns off the LCD backlight. E CONNECT ... 110) G OPTICAL OUT port (page 105) (Output Sampling Rate: 44.1 KHz/48.0 KHz/96.0 KHz) H Hi-Speed USB (USB 2.0) ports* (page 107) I Base stand cover Remove the base stand cover to bundle cables to access the ports and jacks behind it (page 18). While the HDMI input is selected (page 76), pressing...
User Guide
Page 18
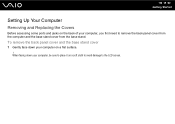
When facing down your computer, you first need to remove the back panel cover from the computer and the base stand cover from the base stand. n 18 N Getting Started Setting Up Your Computer Removing and Replacing the Covers Before accessing some ports and jacks on a soft cloth to avoid damage to the LCD screen. To remove the back panel cover and the base stand cover 1 Gently face down your computer, be sure to place it on the back of your computer on a flat surface. !
When facing down your computer, you first need to remove the back panel cover from the computer and the base stand cover from the base stand. n 18 N Getting Started Setting Up Your Computer Removing and Replacing the Covers Before accessing some ports and jacks on a soft cloth to avoid damage to the LCD screen. To remove the back panel cover and the base stand cover 1 Gently face down your computer, be sure to place it on the back of your computer on a flat surface. !

User Guide
Page 20
n 20 N Getting Started 3 Slide the base stand cover (3) in the direction of the arrow and remove it from the base stand.
n 20 N Getting Started 3 Slide the base stand cover (3) in the direction of the arrow and remove it from the base stand.

User Guide
Page 21
n 21 N Getting Started To replace the back panel cover and the base stand cover 1 Put the base stand cover (1) back on the base stand and slide it in the direction of the arrow.
n 21 N Getting Started To replace the back panel cover and the base stand cover 1 Put the base stand cover (1) back on the base stand and slide it in the direction of the arrow.

User Guide
Page 22
Keep the back panel cover and the stand cover on the back of the computer and push in the cover toward the computer. 2 ! n 22 N Getting Started 2 Put the back panel cover (2) so as to fit the projections inside the cover into the respective holes on the computer unless access to the back panel is necessary.
Keep the back panel cover and the stand cover on the back of the computer and push in the cover toward the computer. 2 ! n 22 N Getting Started 2 Put the back panel cover (2) so as to fit the projections inside the cover into the respective holes on the computer unless access to the back panel is necessary.

User Guide
Page 24
Be sure to push the plug into the AC In port all the way to the guide (5). See Removing and Replacing the Covers (page 18) for the procedure. 2 Plug one end of the power cord (1) into the AC outlet (2), put the other cables 1 Remove the back panel cover and the base stand cover from the computer. n 24 N Getting Started To connect the power cord and other end through the hole (3) in the base stand, and plug it into the AC In port (4) on the computer as illustrated below. !
Be sure to push the plug into the AC In port all the way to the guide (5). See Removing and Replacing the Covers (page 18) for the procedure. 2 Plug one end of the power cord (1) into the AC outlet (2), put the other cables 1 Remove the back panel cover and the base stand cover from the computer. n 24 N Getting Started To connect the power cord and other end through the hole (3) in the base stand, and plug it into the AC In port (4) on the computer as illustrated below. !
User Guide
Page 25
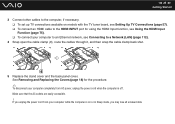
.... n 25 N Getting Started 3 Connect other cables to the computer, if necessary. ❑ To set up TV connections available on or in Sleep mode, you unplug the power cord from AC power, unplug the power cord when... the computer is on models with the TV tuner board, see Setting Up TV Connections (page 57). ❑ To connect an HDMI cable to the HDMI INPUT port for...route the cables through it, and then snap the cable clamp back shut. 5 Replace the stand cover and the back panel cover. Make sure that the AC outlets are easily accessible. !
.... n 25 N Getting Started 3 Connect other cables to the computer, if necessary. ❑ To set up TV connections available on or in Sleep mode, you unplug the power cord from AC power, unplug the power cord when... the computer is on models with the TV tuner board, see Setting Up TV Connections (page 57). ❑ To connect an HDMI cable to the HDMI INPUT port for...route the cables through it, and then snap the cable clamp back shut. 5 Replace the stand cover and the back panel cover. Make sure that the AC outlets are easily accessible. !

User Guide
Page 31
See Removing and Replacing the Covers (page 18) for the procedure. 2 Unscrew the six screws (1) and remove the base stand (2). n 31 N Getting Started To reveal the mounting holes 1 Remove the back panel cover from the computer.
See Removing and Replacing the Covers (page 18) for the procedure. 2 Unscrew the six screws (1) and remove the base stand (2). n 31 N Getting Started To reveal the mounting holes 1 Remove the back panel cover from the computer.

User Guide
Page 50
... with DVD-RAM Version 1.0 is not supported on the models with certain types of the Blu-ray Disc drive. *9 BD-R stands for Blu-ray Disc-Recordable in Version 1.1 format. *10 BD-RE stands for General Version 2.0/2.1. *2 Supports writing data to DVD-RW discs compliant with DVD-RW Version 1.1/1.2. *3 The DVD±RW... TYPE media is not supported on the models with a removable cartridge. *4 Writing data to Ultra Speed CD-RW discs is not supported. n 50 N Using Your VAIO Computer PR: playable and recordable P: playable but not recordable -: not playable or recordable CD-
... with DVD-RAM Version 1.0 is not supported on the models with certain types of the Blu-ray Disc drive. *9 BD-R stands for Blu-ray Disc-Recordable in Version 1.1 format. *10 BD-RE stands for General Version 2.0/2.1. *2 Supports writing data to DVD-RW discs compliant with DVD-RW Version 1.1/1.2. *3 The DVD±RW... TYPE media is not supported on the models with a removable cartridge. *4 Writing data to Ultra Speed CD-RW discs is not supported. n 50 N Using Your VAIO Computer PR: playable and recordable P: playable but not recordable -: not playable or recordable CD-
User Guide
Page 57
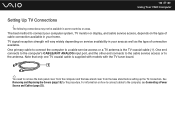
... board. ✍ You need to remove the back panel cover from the computer and the base stand cover from the base stand before setting up the TV connection. One end connects to the computer's CABLE/ANT ANALOG input port, and the other end connects to the cable service access or to the computer, ... (page 23). See Removing and Replacing the Covers (page 18) for the procedure. For information on the type of connection available. n 57 N Using Your VAIO Computer Setting Up TV Connections ! The best method to connect your area as well as the type of cable connection available in your home...
... board. ✍ You need to remove the back panel cover from the computer and the base stand cover from the base stand before setting up the TV connection. One end connects to the computer's CABLE/ANT ANALOG input port, and the other end connects to the cable service access or to the computer, ... (page 23). See Removing and Replacing the Covers (page 18) for the procedure. For information on the type of connection available. n 57 N Using Your VAIO Computer Setting Up TV Connections ! The best method to connect your area as well as the type of cable connection available in your home...

User Guide
Page 77
... in green. ✍ Unless you have enabled the Auto Input Sensing feature with an HDMI cable to display the HDMI input from the base stand before setting up the HDMI connection. If you do not need to turn on your computer with the OSD menu, turning on how to enable... or disable the Auto Input Sensing feature, see Connecting a Power Source and Cables (page 23). n 77 N Using Your VAIO Computer Connecting and Using the HDMI-Compatible Device You need to connect the HDMI-compatible device to your computer to switch the display input. 3 Press...
... in green. ✍ Unless you have enabled the Auto Input Sensing feature with an HDMI cable to display the HDMI input from the base stand before setting up the HDMI connection. If you do not need to turn on your computer with the OSD menu, turning on how to enable... or disable the Auto Input Sensing feature, see Connecting a Power Source and Cables (page 23). n 77 N Using Your VAIO Computer Connecting and Using the HDMI-Compatible Device You need to connect the HDMI-compatible device to your computer to switch the display input. 3 Press...

User Guide
Page 80
... to the computer, see Connecting a Power Source and Cables (page 23). See Removing and Replacing the Covers (page 18) for the procedure. n 80 N Using Your VAIO Computer Viewing TV Programs with the HDMI Input Function If you are using a set-top box with an HDMI output port to view... TV programs, you can display them on how to connect cables to remove the back panel cover from the computer and the base stand cover from the base stand before connecting an HDMI cable. You cannot record the HDMI input, such...
... to the computer, see Connecting a Power Source and Cables (page 23). See Removing and Replacing the Covers (page 18) for the procedure. n 80 N Using Your VAIO Computer Viewing TV Programs with the HDMI Input Function If you are using a set-top box with an HDMI output port to view... TV programs, you can display them on how to connect cables to remove the back panel cover from the computer and the base stand cover from the base stand before connecting an HDMI cable. You cannot record the HDMI input, such...

User Guide
Page 143
n 143 N Precautions ❑ To avoid losing data when your computer is a risk of the main unit with your waist belt buckle, if you hold your computer, grasp the bottom corners of scratching the LCD screen, for example with both hands from its front. There is damaged, back up your data regularly. ❑ Do not grasp the base stand to lift your computer as the stand may break and cause the main unit to fall, resulting in damage to the computer or personal injuries. ❑ To lift or move your computer from behind the computer to avoid any damage to the LCD screen.
n 143 N Precautions ❑ To avoid losing data when your computer is a risk of the main unit with your waist belt buckle, if you hold your computer, grasp the bottom corners of scratching the LCD screen, for example with both hands from its front. There is damaged, back up your data regularly. ❑ Do not grasp the base stand to lift your computer as the stand may break and cause the main unit to fall, resulting in damage to the computer or personal injuries. ❑ To lift or move your computer from behind the computer to avoid any damage to the LCD screen.