User Guide
Page 3
... Connecting a Printer ...100 Connecting an i.LINK Device ...101 Connecting to a Network (LAN) ...103 Customizing Your VAIO Computer ...105 Setting the Password ...106 Setting Up Your Computer with VAIO Central ...109 Using the Power Saving Mode...110 Upgrading Your VAIO Computer...112 Adding and Removing Memory...113 Adding the Hard Disk Drive...119 Precautions ...125...
... Connecting a Printer ...100 Connecting an i.LINK Device ...101 Connecting to a Network (LAN) ...103 Customizing Your VAIO Computer ...105 Setting the Password ...106 Setting Up Your Computer with VAIO Central ...109 Using the Power Saving Mode...110 Upgrading Your VAIO Computer...112 Adding and Removing Memory...113 Adding the Hard Disk Drive...119 Precautions ...125...

User Guide
Page 112
For assistance, contact an authorized Sony Service Center. n 112 N Upgrading Your VAIO Computer Upgrading Your VAIO Computer Your VAIO computer and memory modules use high precision components and electronic connectors technology. To find the nearest center or agent, see the ...dealer to install a new memory module. ❑ You should not install it yourself, if you are not familiar with upgrading memory on a computer. ❑ You should contact your model, see Sony Support Information (page 175). ❑ Adding and Removing Memory (page 113) ❑ Adding the Hard Disk Drive (page...
For assistance, contact an authorized Sony Service Center. n 112 N Upgrading Your VAIO Computer Upgrading Your VAIO Computer Your VAIO computer and memory modules use high precision components and electronic connectors technology. To find the nearest center or agent, see the ...dealer to install a new memory module. ❑ You should not install it yourself, if you are not familiar with upgrading memory on a computer. ❑ You should contact your model, see Sony Support Information (page 175). ❑ Adding and Removing Memory (page 113) ❑ Adding the Hard Disk Drive (page...

User Guide
Page 113
Before you upgrade your computer's memory, read the notes and procedures in a carpeted area, and do not handle materials that produce or hold static electricity (cellophane wrappers, for ... work in the following : ❑ The procedures described in personal injury or equipment damage. ❑ ESD can damage memory modules and other components. n 113 N Upgrading Your VAIO Computer Adding and Removing Memory If you want to expand the functionality of your computer, you can damage electronic components. Improper installation of memory modules...
Before you upgrade your computer's memory, read the notes and procedures in a carpeted area, and do not handle materials that produce or hold static electricity (cellophane wrappers, for ... work in the following : ❑ The procedures described in personal injury or equipment damage. ❑ ESD can damage memory modules and other components. n 113 N Upgrading Your VAIO Computer Adding and Removing Memory If you want to expand the functionality of your computer, you can damage electronic components. Improper installation of memory modules...

User Guide
Page 114
... of more than 95°F (35°C) or less than 41°F (5°C) ❑ High humidity ❑ Handle the memory module with care. n 114 N Upgrading Your VAIO Computer ❑ Use the special bag delivered with the memory module or wrap the module in aluminum foil to protect it from ESD. ❑ Introducing...
... of more than 95°F (35°C) or less than 41°F (5°C) ❑ High humidity ❑ Handle the memory module with care. n 114 N Upgrading Your VAIO Computer ❑ Use the special bag delivered with the memory module or wrap the module in aluminum foil to protect it from ESD. ❑ Introducing...

User Guide
Page 115
n 115 N Upgrading Your VAIO Computer Removing and Installing a Memory Module To change or add a memory module 1 Shut down . 5 Unscrew the screw (1) and remove the memory module compartment cover (2). 6 Touch a ...
n 115 N Upgrading Your VAIO Computer Removing and Installing a Memory Module To change or add a memory module 1 Shut down . 5 Unscrew the screw (1) and remove the memory module compartment cover (2). 6 Touch a ...

User Guide
Page 116
n 116 N Upgrading Your VAIO Computer 7 Remove the currently installed memory module as follows: ❑ Pull the latches in the direction of the arrows (1). The memory module is released. ❑ Make sure that the memory module tilts up and then pull it out in the direction of the arrow (2).
n 116 N Upgrading Your VAIO Computer 7 Remove the currently installed memory module as follows: ❑ Pull the latches in the direction of the arrows (1). The memory module is released. ❑ Make sure that the memory module tilts up and then pull it out in the direction of the arrow (2).

User Guide
Page 117
.... 13 Plug the computer to insert the connector edge of the peripheral devices. 14 Turn on all peripheral devices and then the computer. n 117 N Upgrading Your VAIO Computer 8 Remove the new memory module from its packaging. 9 Slide the memory module into the memory module slot and push it clicks into the slot...
.... 13 Plug the computer to insert the connector edge of the peripheral devices. 14 Turn on all peripheral devices and then the computer. n 117 N Upgrading Your VAIO Computer 8 Remove the new memory module from its packaging. 9 Slide the memory module into the memory module slot and push it clicks into the slot...

User Guide
Page 118
You can view the amount of memory 1 Turn on the computer. 2 Click Start, All Programs, and VAIO Central. If the additional memory does not appear, repeat the whole installation procedure and restart the computer. The VAIO Central window appears. 3 Click the Categories tab. 4 Double-click the System Information folder. 5 Double-click the System Information icon. n 118 N Upgrading Your VAIO Computer Viewing the Amount of Memory To view the amount of system memory.
You can view the amount of memory 1 Turn on the computer. 2 Click Start, All Programs, and VAIO Central. If the additional memory does not appear, repeat the whole installation procedure and restart the computer. The VAIO Central window appears. 3 Click the Categories tab. 4 Double-click the System Information folder. 5 Double-click the System Information icon. n 118 N Upgrading Your VAIO Computer Viewing the Amount of Memory To view the amount of system memory.
User Guide
Page 119
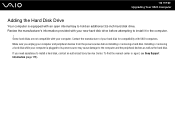
... disk drive. To find the nearest center or agent, see Sony Support Information (page 175). Contact the manufacturer of your new hard disk drive before installing or removing a hard disk. Installing or removing a hard disk while your computer. n 119 N Upgrading Your VAIO Computer Adding the Hard Disk Drive Your computer is plugged to...
... disk drive. To find the nearest center or agent, see Sony Support Information (page 175). Contact the manufacturer of your new hard disk drive before installing or removing a hard disk. Installing or removing a hard disk while your computer. n 119 N Upgrading Your VAIO Computer Adding the Hard Disk Drive Your computer is plugged to...
User Guide
Page 120
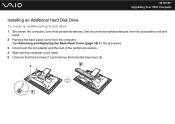
See Removing and Replacing the Back Panel Cover (page 18) for the procedure. 3 Disconnect the AC adapter and the rest of the peripheral devices. 4 Wait until the computer cools down the computer, turn off all peripheral devices, and disconnect peripheral devices from the accessible ports and jacks. 2 Remove the back panel cover from the computer. n 120 N Upgrading Your VAIO Computer Installing an Additional Hard Disk Drive To install an additional hard disk drive 1 Shut down . 5 Unscrew the three screws (1) and remove the hard disk bay cover (2).
See Removing and Replacing the Back Panel Cover (page 18) for the procedure. 3 Disconnect the AC adapter and the rest of the peripheral devices. 4 Wait until the computer cools down the computer, turn off all peripheral devices, and disconnect peripheral devices from the accessible ports and jacks. 2 Remove the back panel cover from the computer. n 120 N Upgrading Your VAIO Computer Installing an Additional Hard Disk Drive To install an additional hard disk drive 1 Shut down . 5 Unscrew the three screws (1) and remove the hard disk bay cover (2).
User Guide
Page 121
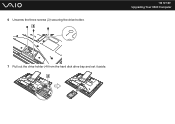
n 121 N Upgrading Your VAIO Computer 7 Pull out the drive holder (4) from the hard disk drive bay and set it aside. 6 Unscrew the three screws (3) securing the drive holder.
n 121 N Upgrading Your VAIO Computer 7 Pull out the drive holder (4) from the hard disk drive bay and set it aside. 6 Unscrew the three screws (3) securing the drive holder.
User Guide
Page 122
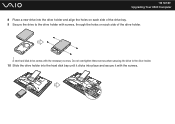
Do not overtighten these screws when securing the drive to the drive holder. 10 Slide the drive holder into the hard disk bay until it with the necessary screws. A new hard disk drive comes with the screws. n 122 N Upgrading Your VAIO Computer 8 Place a new drive into place and secure it clicks into the drive holder and align the holes on each side of the drive bay. 9 Secure the drive to the drive holder with screws, through the holes on each side of the drive holder. !
Do not overtighten these screws when securing the drive to the drive holder. 10 Slide the drive holder into the hard disk bay until it with the necessary screws. A new hard disk drive comes with the screws. n 122 N Upgrading Your VAIO Computer 8 Place a new drive into place and secure it clicks into the drive holder and align the holes on each side of the drive bay. 9 Secure the drive to the drive holder with screws, through the holes on each side of the drive holder. !

User Guide
Page 123
See Removing and Replacing the Back Panel Cover (page 18) for the procedure. 14 Plug the computer to the power source and connect the rest of the peripheral devices. 15 Turn on all peripheral devices and then the computer. n 123 N Upgrading Your VAIO Computer 11 Replace the hard disk bay cover and tighten the screws. 12 Connect the AC adapter and the peripheral devices that you disconnected in step 3. 13 Replace the back panel cover.
See Removing and Replacing the Back Panel Cover (page 18) for the procedure. 14 Plug the computer to the power source and connect the rest of the peripheral devices. 15 Turn on all peripheral devices and then the computer. n 123 N Upgrading Your VAIO Computer 11 Replace the hard disk bay cover and tighten the screws. 12 Connect the AC adapter and the peripheral devices that you disconnected in step 3. 13 Replace the back panel cover.

User Guide
Page 124
To identify the additional hard disk space 1 Log on to complete the process. n 124 N Upgrading Your VAIO Computer Identifying the Additional Hard Disk Space When you initialize the new hard disk, it must be configured as a user with red marking) and select ...
To identify the additional hard disk space 1 Log on to complete the process. n 124 N Upgrading Your VAIO Computer Identifying the Additional Hard Disk Space When you initialize the new hard disk, it must be configured as a user with red marking) and select ...


