User Guide
Page 2
n2 N Contents Before Use ...5 Documentation ...5 Ergonomic Considerations ...8 Getting Started ...10 Locating Controls and Ports...11 About the Indicator Lights ...16 Connecting a Power Source ...17 Shutting Down Your Computer Safely ...20 Using Your VAIO Computer ...21 Using the Keyboard ...22 Using the Mouse ...29 Using the Built-in MOTION EYE Camera...34 Using the Optical Disc Drive ...36 Using the TV Function ...46 Using PC Cards ...65 Using the ExpressCard Module ...68 Using the Memory Stick Media ...72 Using Other Memory Cards ...78 Using the Internet...81 Using Wireless LAN (WLAN) ...82
n2 N Contents Before Use ...5 Documentation ...5 Ergonomic Considerations ...8 Getting Started ...10 Locating Controls and Ports...11 About the Indicator Lights ...16 Connecting a Power Source ...17 Shutting Down Your Computer Safely ...20 Using Your VAIO Computer ...21 Using the Keyboard ...22 Using the Mouse ...29 Using the Built-in MOTION EYE Camera...34 Using the Optical Disc Drive ...36 Using the TV Function ...46 Using PC Cards ...65 Using the ExpressCard Module ...68 Using the Memory Stick Media ...72 Using Other Memory Cards ...78 Using the Internet...81 Using Wireless LAN (WLAN) ...82
User Guide
Page 6
..., software drivers, and drive partition(s) or your computer, as well as information on -screen guide: 1 Click Start and Help and Support. 2 Click Manuals & Specifications. 3 Click VAIO Recovery Guide. ❑ MCE Guide (Selected models only) - The online Specifications describe the hardware and software configuration of your VAIO computer. To access this on solving common problems. ❑ Specifications - Contains features of your computer. To view the online Specifications: 1 Connect to the Internet. 2 Go to the original factory installed settings. n6 N Before Use Non...
..., software drivers, and drive partition(s) or your computer, as well as information on -screen guide: 1 Click Start and Help and Support. 2 Click Manuals & Specifications. 3 Click VAIO Recovery Guide. ❑ MCE Guide (Selected models only) - The online Specifications describe the hardware and software configuration of your VAIO computer. To access this on solving common problems. ❑ Specifications - Contains features of your computer. To view the online Specifications: 1 Connect to the Internet. 2 Go to the original factory installed settings. n6 N Before Use Non...

User Guide
Page 11
... EYE camera (page 34) D Power indicator (page 16) E Power button F MONITOR OFF button / MONITOR OFF indicator (page 16) Press this button to turn off the LCD backlight and the speaker volume. ✍ You can change the MONITOR OFF button setting to identify the controls and ports shown on . G LCD screen (page 112) H Hard disk drive indicator (page 16) I WLAN (Wireless LAN) indicator (page 16) n 11 N Getting Started Locating Controls and Ports Take a moment to keep...
... EYE camera (page 34) D Power indicator (page 16) E Power button F MONITOR OFF button / MONITOR OFF indicator (page 16) Press this button to turn off the LCD backlight and the speaker volume. ✍ You can change the MONITOR OFF button setting to identify the controls and ports shown on . G LCD screen (page 112) H Hard disk drive indicator (page 16) I WLAN (Wireless LAN) indicator (page 16) n 11 N Getting Started Locating Controls and Ports Take a moment to keep...
User Guide
Page 16
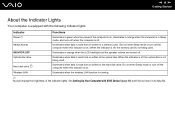
... speaker volume are turned off. Hard disk drive Illuminates when data is read from or written to the optical disc. Optical disc drive Illuminates when data is read from or written to a memory card. (Do not enter Sleep mode or turn off when the computer is not being used . n 16 N Getting Started About the Indicator Lights Your computer is on. Do not enter Sleep mode or turn off the computer when this indicator is equipped with VAIO...
... speaker volume are turned off. Hard disk drive Illuminates when data is read from or written to the optical disc. Optical disc drive Illuminates when data is read from or written to a memory card. (Do not enter Sleep mode or turn off when the computer is not being used . n 16 N Getting Started About the Indicator Lights Your computer is on. Do not enter Sleep mode or turn off the computer when this indicator is equipped with VAIO...
User Guide
Page 39
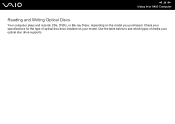
n 39 N Using Your VAIO Computer Reading and Writing Optical Discs Your computer plays and records CDs, DVDs, or Blu-ray Discs, depending on your optical disc drive supports. Check your specifications for the type of media your model. Use the table below to see which types of optical disc drive installed on the model you purchased.
n 39 N Using Your VAIO Computer Reading and Writing Optical Discs Your computer plays and records CDs, DVDs, or Blu-ray Discs, depending on your optical disc drive supports. Check your specifications for the type of media your model. Use the table below to see which types of optical disc drive installed on the model you purchased.

User Guide
Page 41
... audio side (non-DVD side) of reading 8cm discs with the High-bandwidth Digital Content Protection (HDCP) standard, you need to update the AACS key. Note that conform to playback discs that the AACS key update requires Internet access. Unless your computer's optical disc drives. For inquiries about disc formats, contact the individual publisher of the pre-recorded disc or the manufacturer of copyright protected Blu-ray Discs. Sony...
... audio side (non-DVD side) of reading 8cm discs with the High-bandwidth Digital Content Protection (HDCP) standard, you need to update the AACS key. Note that conform to playback discs that the AACS key update requires Internet access. Unless your computer's optical disc drives. For inquiries about disc formats, contact the individual publisher of the pre-recorded disc or the manufacturer of copyright protected Blu-ray Discs. Sony...

User Guide
Page 91
To connect a printer using the USB port 1 Plug the power cord (1) of your printer into the USB port and the other end to print documents. Connecting a Printer Using the USB Port You can connect a Windows-compatible printer to your computer to your printer. n 91 N Using Peripheral Devices Connecting a Printer You can connect a USB printer compatible with your version of a USB printer cable (2) (not supplied) into an AC outlet. 2 Choose the USB port (3) you prefer to use. 3 Plug one end of Windows to the computer.
To connect a printer using the USB port 1 Plug the power cord (1) of your printer into the USB port and the other end to print documents. Connecting a Printer Using the USB Port You can connect a Windows-compatible printer to your computer to your printer. n 91 N Using Peripheral Devices Connecting a Printer You can connect a USB printer compatible with your version of a USB printer cable (2) (not supplied) into an AC outlet. 2 Choose the USB port (3) you prefer to use. 3 Plug one end of Windows to the computer.

User Guide
Page 94
... other end to the connector may cause damage, overheating, or fire. - For detailed settings and devices needed to connect to the network, ask your network administrator. ✍ Your computer can connect your computer to 100BASE-TX/10BASE-T-type networks with the default settings. ! If the network (LAN) connector is connected to the telephone lines mentioned below, high electric current to your computer. Connect one end of a network cable (not supplied) to the network (Ethernet) port on your network.
... other end to the connector may cause damage, overheating, or fire. - For detailed settings and devices needed to connect to the network, ask your network administrator. ✍ Your computer can connect your computer to 100BASE-TX/10BASE-T-type networks with the default settings. ! If the network (LAN) connector is connected to the telephone lines mentioned below, high electric current to your computer. Connect one end of a network cable (not supplied) to the network (Ethernet) port on your network.

User Guide
Page 97
... press the Enter key. Press the space bar to change the setting from Disabled to Enabled. 7 Press the < or , key to display the Security tab, select Set Machine Password, and then press the Enter key. 4 On the password entry screen, enter the password twice and press the Enter key. At the confirmation prompt, press the Enter key. The BIOS setup screen appears. n 97 N Customizing Your VAIO Computer To add the power-on password 1 Turn on or display the BIOS setup screen. 6 Select Password when Power On...
... press the Enter key. Press the space bar to change the setting from Disabled to Enabled. 7 Press the < or , key to display the Security tab, select Set Machine Password, and then press the Enter key. 4 On the password entry screen, enter the password twice and press the Enter key. At the confirmation prompt, press the Enter key. The BIOS setup screen appears. n 97 N Customizing Your VAIO Computer To add the power-on password 1 Turn on or display the BIOS setup screen. 6 Select Password when Power On...

User Guide
Page 98
... display the Security tab, select Set Machine Password, and then press the Enter key. 5 On the password entry screen, enter the current password once and a new password twice, and then press the Enter key. To remove the password, leave the Enter New Password and Confirm New Password fields blank and press the Enter key. n 98 N Customizing Your VAIO Computer Changing/Removing the Power-on Password To change or remove the power-on password 1 Turn on the computer. 2 Press the F2 key when the VAIO logo appears. The BIOS setup screen...
... display the Security tab, select Set Machine Password, and then press the Enter key. 5 On the password entry screen, enter the current password once and a new password twice, and then press the Enter key. To remove the password, leave the Enter New Password and Confirm New Password fields blank and press the Enter key. n 98 N Customizing Your VAIO Computer Changing/Removing the Power-on Password To change or remove the power-on password 1 Turn on the computer. 2 Press the F2 key when the VAIO logo appears. The BIOS setup screen...

User Guide
Page 128
... for your screen to reset it may take time before the desktop screen appears due to download. ❑ Make sure you have installed the latest video driver. ❑ On some time before my computer starts? The VAIO Original Screen Saver disables the timer setting, which you can select using the Windows power options, for the automatic turn off action has passed? To find the nearest center or agent, see Sony Support Information (page...
... for your screen to reset it may take time before the desktop screen appears due to download. ❑ Make sure you have installed the latest video driver. ❑ On some time before my computer starts? The VAIO Original Screen Saver disables the timer setting, which you can select using the Windows power options, for the automatic turn off action has passed? To find the nearest center or agent, see Sony Support Information (page...
User Guide
Page 130
... on the taskbar. 3 Follow the on-screen instructions to set up automatic or scheduled updates. The Microsoft Windows operating system is to download and install the latest Windows updates regularly. The best way to protect your computer. To download and install the latest security update 1 Click Start, All Programs, Norton Internet Security, and Norton Internet Security. 2 Click the item to update the software on the left pane. 3 Follow the...
... on the taskbar. 3 Follow the on-screen instructions to set up automatic or scheduled updates. The Microsoft Windows operating system is to download and install the latest Windows updates regularly. The best way to protect your computer. To download and install the latest security update 1 Click Start, All Programs, Norton Internet Security, and Norton Internet Security. 2 Click the item to update the software on the left pane. 3 Follow the...
User Guide
Page 133
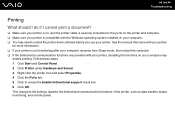
... problem persists, you are using the built-in MOTION EYE camera cannot be shared by more than one software application. Follow these steps: 1 Click Start, Control Panel, Hardware and Sound, and Device Manager. 2 Double-click Imaging devices. 3 Right-click the device name for the camera. What should I use ? ❑ Do not place your computer into Sleep mode while you must reinstall the driver software for your computer automatically enters Sleep mode, change the corresponding power saving mode setting...
... problem persists, you are using the built-in MOTION EYE camera cannot be shared by more than one software application. Follow these steps: 1 Click Start, Control Panel, Hardware and Sound, and Device Manager. 2 Double-click Imaging devices. 3 Right-click the device name for the camera. What should I use ? ❑ Do not place your computer into Sleep mode while you must reinstall the driver software for your computer automatically enters Sleep mode, change the corresponding power saving mode setting...
User Guide
Page 140
...: 1 Click Start and Control Panel. 2 Click System and Maintenance. 3 Click System. 4 Click Device Manager on the left pane. If you need to restart the computer. 2 Remove the disc from the optical disc drive. 3 Check the disc for instructions. ❑ If you are using external speakers, check the volume settings on the speakers and the connections between the speakers and your computer. ❑ Make sure the correct driver software is installed. n 140 N Troubleshooting What should I do any of your computer's hardware devices.
...: 1 Click Start and Control Panel. 2 Click System and Maintenance. 3 Click System. 4 Click Device Manager on the left pane. If you need to restart the computer. 2 Remove the disc from the optical disc drive. 3 Check the disc for instructions. ❑ If you are using external speakers, check the volume settings on the speakers and the connections between the speakers and your computer. ❑ Make sure the correct driver software is installed. n 140 N Troubleshooting What should I do any of your computer's hardware devices.
User Guide
Page 144
... transfer, status monitoring, and remote panel. See the manual that came with your printer for more information. ❑ If your printer is compatible with your printer, disabling the functions on your computer. ❑ You may need to install the printer driver software before you use your computer may enable printing. This change to cancel the Enable bidirectional support check box. 6 Click OK. n 144 N Troubleshooting Printing What should...
... transfer, status monitoring, and remote panel. See the manual that came with your printer for more information. ❑ If your printer is compatible with your printer, disabling the functions on your computer. ❑ You may need to install the printer driver software before you use your computer may enable printing. This change to cancel the Enable bidirectional support check box. 6 Click OK. n 144 N Troubleshooting Printing What should...

User Guide
Page 148
.... To change the keyboard configuration, follow these steps: 1 Click Start and Control Panel 2 Click Clock, Language, and Region, and click Regional and Language Options. 3 Change the settings as this may cause interference, causing the keyboard to stop working properly. ❑ Do not place metal furniture near the wireless keyboard. What should I cannot enter certain characters with the keyboard? ❑ If you complete the Windows setup, the key configuration will...
.... To change the keyboard configuration, follow these steps: 1 Click Start and Control Panel 2 Click Clock, Language, and Region, and click Regional and Language Options. 3 Change the settings as this may cause interference, causing the keyboard to stop working properly. ❑ Do not place metal furniture near the wireless keyboard. What should I cannot enter certain characters with the keyboard? ❑ If you complete the Windows setup, the key configuration will...
User Guide
Page 150
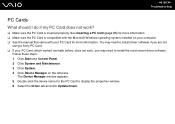
... steps: 1 Click Start and Control Panel. 2 Click System and Maintenance. 3 Click System. 4 Click Device Manager on your computer. ❑ See the manual that came with your PC Card, which worked normally before, does not work ? ❑ Make sure the PC Card is compatible with the Microsoft Windows operating system installed on the left pane. The Device Manager window appears. 5 Double-click the device name for more information. ❑ Make sure the...
... steps: 1 Click Start and Control Panel. 2 Click System and Maintenance. 3 Click System. 4 Click Device Manager on your computer. ❑ See the manual that came with your PC Card, which worked normally before, does not work ? ❑ Make sure the PC Card is compatible with the Microsoft Windows operating system installed on the left pane. The Device Manager window appears. 5 Double-click the device name for more information. ❑ Make sure the...
Safety Information
Page 2
... or in a secure location. This manual and the software described herein, in whole or in part, may not be reproduced, translated, or reduced to any time without notice. WEB SITE INFORMATION IS OBTAINED FROM VARIOUS SOURCES AND MAY BE INACCURATE. Use of your Sony Service Center. Refer to the model and serial numbers when you call your Sony VAIO® computer. SONY ELECTRONICS INC. Some...
... or in a secure location. This manual and the software described herein, in whole or in part, may not be reproduced, translated, or reduced to any time without notice. WEB SITE INFORMATION IS OBTAINED FROM VARIOUS SOURCES AND MAY BE INACCURATE. Use of your Sony Service Center. Refer to the model and serial numbers when you call your Sony VAIO® computer. SONY ELECTRONICS INC. Some...
Safety Information
Page 4
... cause medical devices to malfunction. ❑ Do not use wireless LAN on your installed optical drives. ambient temperature higher than 95ºF (35ºC) or less than 40ºF (5ºC); direct sunlight; excessive dust; Safety Information and Caution Your computer's installed optical drives may vary, depending on the system configuration you , visit the Sony online support Web site at http://esupport.sony.com/EN/VAIO/ for...
... cause medical devices to malfunction. ❑ Do not use wireless LAN on your installed optical drives. ambient temperature higher than 95ºF (35ºC) or less than 40ºF (5ºC); direct sunlight; excessive dust; Safety Information and Caution Your computer's installed optical drives may vary, depending on the system configuration you , visit the Sony online support Web site at http://esupport.sony.com/EN/VAIO/ for...
Marketing Specifications
Page 2
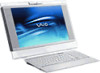
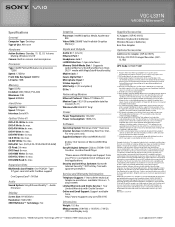
... varying software packages and add-on the operating condition and system memory size. 4. Microsoft and Windows are subject to change without notice. VGC-LS31N VAIO® LS All-in-one PC Specifications General Computer Type: Desktop Type of Use: All-in-one billion bytes and TB means 1,000 GB when referring to connect. Audio Enhancer Display Screen Size: 19" WSXGA+5 Resolution: 1680x1050 XBRITE-HiColor™ Technology: Yes Graphics Processor: Intel® Graphics Media Accelerator 950 Video RAM...
... varying software packages and add-on the operating condition and system memory size. 4. Microsoft and Windows are subject to change without notice. VGC-LS31N VAIO® LS All-in-one PC Specifications General Computer Type: Desktop Type of Use: All-in-one billion bytes and TB means 1,000 GB when referring to connect. Audio Enhancer Display Screen Size: 19" WSXGA+5 Resolution: 1680x1050 XBRITE-HiColor™ Technology: Yes Graphics Processor: Intel® Graphics Media Accelerator 950 Video RAM...


