
Safety Information
Page 3
...product(s) included with this computer may not communicate with an i.LINK connection may include features such as copy protection and content management technology. Microsoft, Windows, and the Windows logo are trademarks or registered trademarks of Sony used only to the documentation... PC peripherals to applicable end user agreements and full compliance with participating financial institutions. Sony, VAIO, the VAIO logo, VAIO Digital Studio, VAIO Media, VAIO Media Music Server, VAIO Media Photo Server, VAIO Media Video Server, Click to DVD, CLIÉ, DVgate Plus, Handycam, MagicGate,...
...product(s) included with this computer may not communicate with an i.LINK connection may include features such as copy protection and content management technology. Microsoft, Windows, and the Windows logo are trademarks or registered trademarks of Sony used only to the documentation... PC peripherals to applicable end user agreements and full compliance with participating financial institutions. Sony, VAIO, the VAIO logo, VAIO Digital Studio, VAIO Media, VAIO Media Music Server, VAIO Media Photo Server, VAIO Media Video Server, Click to DVD, CLIÉ, DVgate Plus, Handycam, MagicGate,...
User Guide
Page 6
... programs included with your VAIO computer. The online Specifications describe the hardware and software configuration of your entire hard disk drive to the Sony online support Web site at: http://esupport.sony.com/EN/VAIO/ for customers in USA, http://www.sony.ca/support for customers in Canada, http://esupport.sony.com/ES/VAIO/ for customers in Spanish...
... programs included with your VAIO computer. The online Specifications describe the hardware and software configuration of your entire hard disk drive to the Sony online support Web site at: http://esupport.sony.com/EN/VAIO/ for customers in USA, http://www.sony.ca/support for customers in Canada, http://esupport.sony.com/ES/VAIO/ for customers in Spanish...

User Guide
Page 8
...comfortable. Adjust the brightness setting of the display - Use indirect lighting to find the best position. Adjust the level of the chair so your computer, especially on the floor. You can reduce eye strain and muscle fatigue by adjusting the tilt of the main unit. Choose a location where... windows and lights do not exert excessive pressure on your feet are flat on the center of the speaker grill, to eliminate a risk of mechanical ...
...comfortable. Adjust the brightness setting of the display - Use indirect lighting to find the best position. Adjust the level of the chair so your computer, especially on the floor. You can reduce eye strain and muscle fatigue by adjusting the tilt of the main unit. Choose a location where... windows and lights do not exert excessive pressure on your feet are flat on the center of the speaker grill, to eliminate a risk of mechanical ...
User Guide
Page 22
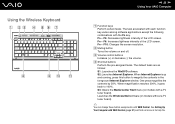
... D Shortcut buttons Perform the pre-assigned tasks. One press magnifies the contents by 50%. S3: Opens the Media Center Start menu (on models with VAIO Central (page 97) and find out more in the foreground Internet Explorer window. S2: Launches Internet Explorer. When magnification reaches ...goes back to magnify the contents in its help file. Using the Wireless Keyboard n 22 N Using Your VAIO Computer A Function keys Perform certain tasks. Launches the Windows Mail software (on and off. The task associated with each function key varies among software applications except the following...
... D Shortcut buttons Perform the pre-assigned tasks. One press magnifies the contents by 50%. S3: Opens the Media Center Start menu (on models with VAIO Central (page 97) and find out more in the foreground Internet Explorer window. S2: Launches Internet Explorer. When magnification reaches ...goes back to magnify the contents in its help file. Using the Wireless Keyboard n 22 N Using Your VAIO Computer A Function keys Perform certain tasks. Launches the Windows Mail software (on and off. The task associated with each function key varies among software applications except the following...
User Guide
Page 23
...keyboard. J Directional arrow keys Move the pointer on power management, see Using the Power Saving Modes (page 98). For details on the computer screen. when the (Num lock): Turns on while in the Num Lock state. (Caps lock): Turns on while in the Caps Lock.... (Connect): Turns on while connection between the computer and the wireless keyboard is in certain software applications. I Applications key Displays a shortcut menu in place to perform basic math calculations. H Windows key Displays the Start menu. n 23 N Using Your VAIO Computer E Standby button Provides for use (page 26)....
...keyboard. J Directional arrow keys Move the pointer on power management, see Using the Power Saving Modes (page 98). For details on the computer screen. when the (Num lock): Turns on while in the Num Lock state. (Caps lock): Turns on while in the Caps Lock.... (Connect): Turns on while connection between the computer and the wireless keyboard is in certain software applications. I Applications key Displays a shortcut menu in place to perform basic math calculations. H Windows key Displays the Start menu. n 23 N Using Your VAIO Computer E Standby button Provides for use (page 26)....
User Guide
Page 26
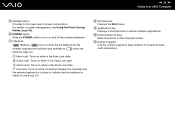
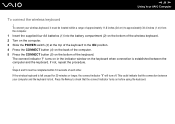
...indicator will turn off. If the wireless keyboard is lost. The connect indicator turns on in the indicator window on the computer. 3 Slide the POWER switch (3) at the top of each other. Steps 4 and 5 must be... completed within a range of approximately 11.8 inches (30 cm) to approximately 39.4 inches (1 m) from the computer. 1 Insert the supplied four AA batteries (1) into the battery compartment (2) on the bottom of the wireless keyboard. 2... check that the connection between the computer and the keyboard. n 26 N Using Your VAIO Computer To connect the wireless keyboard !
...indicator will turn off. If the wireless keyboard is lost. The connect indicator turns on in the indicator window on the computer. 3 Slide the POWER switch (3) at the top of each other. Steps 4 and 5 must be... completed within a range of approximately 11.8 inches (30 cm) to approximately 39.4 inches (1 m) from the computer. 1 Insert the supplied four AA batteries (1) into the battery compartment (2) on the bottom of the wireless keyboard. 2... check that the connection between the computer and the keyboard. n 26 N Using Your VAIO Computer To connect the wireless keyboard !

User Guide
Page 27
If the wireless keyboard is not being used for its battery power level. n 27 N Using Your VAIO Computer ✍ You can check the battery indicator ( or ) in a more 'ergonomic' position, flip open the keyboard feet. If you want to be replaced. If the wireless keyboard does not operate properly, the batteries may need to put the wireless keyboard in the indicator window on the wireless keyboard for an extended period of time, remove the batteries to avoid possible damage from battery leakage.
If the wireless keyboard is not being used for its battery power level. n 27 N Using Your VAIO Computer ✍ You can check the battery indicator ( or ) in a more 'ergonomic' position, flip open the keyboard feet. If you want to be replaced. If the wireless keyboard does not operate properly, the batteries may need to put the wireless keyboard in the indicator window on the wireless keyboard for an extended period of time, remove the batteries to avoid possible damage from battery leakage.
User Guide
Page 32
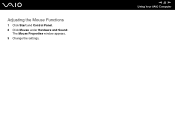
n 32 N Using Your VAIO Computer Adjusting the Mouse Functions 1 Click Start and Control Panel. 2 Click Mouse under Hardware and Sound. The Mouse Properties window appears. 3 Change the settings.
n 32 N Using Your VAIO Computer Adjusting the Mouse Functions 1 Click Start and Control Panel. 2 Click Mouse under Hardware and Sound. The Mouse Properties window appears. 3 Change the settings.

User Guide
Page 34
... before using the built-in MOTION EYE camera with the Microsoft Windows MovieMaker software. You cannot operate the built-in MOTION EYE camera cannot be shared by more than one software application. n 34 N Using Your VAIO Computer ✍ The built-in MOTION EYE camera with the capture angle... adjuster (1) on the back of the built-in MOTION EYE camera. The viewer window may show some noises, for example horizontal...
... before using the built-in MOTION EYE camera with the Microsoft Windows MovieMaker software. You cannot operate the built-in MOTION EYE camera cannot be shared by more than one software application. n 34 N Using Your VAIO Computer ✍ The built-in MOTION EYE camera with the capture angle... adjuster (1) on the back of the built-in MOTION EYE camera. The viewer window may show some noises, for example horizontal...

User Guide
Page 36
If you launch any preinstalled CD/DVD program. n 36 N Using Your VAIO Computer ✍ In Sleep mode, inserting a disc will automatically launch Windows and may display a window for selecting your preferred software program to use an external optical disc drive, connect the drive before you plan to launch or may automatically launch a preinstalled CD/DVD program.
If you launch any preinstalled CD/DVD program. n 36 N Using Your VAIO Computer ✍ In Sleep mode, inserting a disc will automatically launch Windows and may display a window for selecting your preferred software program to use an external optical disc drive, connect the drive before you plan to launch or may automatically launch a preinstalled CD/DVD program.
User Guide
Page 43
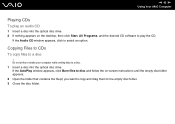
... to copy and drag them to play an audio CD 1 Insert a disc into the optical disc drive. If the AutoPlay window appears, click Burn files to disc and follow the on the desktop, then click Start, All Programs, and the desired CD software to the empty disc folder. 3 Close the disc folder.... Copying Files to CDs To copy files to select an option. n 43 N Using Your VAIO Computer Playing CDs To play the CD. If the Audio CD window appears, click to...
... to copy and drag them to play an audio CD 1 Insert a disc into the optical disc drive. If the AutoPlay window appears, click Burn files to disc and follow the on the desktop, then click Start, All Programs, and the desired CD software to the empty disc folder. 3 Close the disc folder.... Copying Files to CDs To copy files to select an option. n 43 N Using Your VAIO Computer Playing CDs To play the CD. If the Audio CD window appears, click to...
User Guide
Page 45
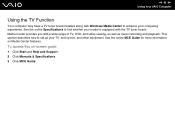
... the online Specifications to set up your TV, set-top box, and other equipment. This section describes how to find whether your computing experience. To access this on Media Center features. Media Center provides you with the TV tuner board. See the online MCE Guide ... 1 Click Start and Help and Support. 2 Click Manuals & Specifications. 3 Click MCE Guide. n 45 N Using Your VAIO Computer Using the TV Function Your computer may have a TV tuner board installed along with Windows Media Center to enhance your model is equipped with a wide range of TV, DVD, and video viewing, as well...
... the online Specifications to set up your TV, set-top box, and other equipment. This section describes how to find whether your computing experience. To access this on Media Center features. Media Center provides you with the TV tuner board. See the online MCE Guide ... 1 Click Start and Help and Support. 2 Click Manuals & Specifications. 3 Click MCE Guide. n 45 N Using Your VAIO Computer Using the TV Function Your computer may have a TV tuner board installed along with Windows Media Center to enhance your model is equipped with a wide range of TV, DVD, and video viewing, as well...
User Guide
Page 57
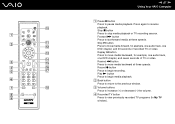
... m button Press to move media backward at three speeds. n 57 N Using Your VAIO Computer A Pause X button Press to begin media playback. Skip B? Play N button Press to the previous window. Replay ?b button Press to move media backward, for example, one audio track, one DVD chapter, and seven seconds of recorded TV or video. B Back button Press...
... m button Press to move media backward at three speeds. n 57 N Using Your VAIO Computer A Pause X button Press to begin media playback. Skip B? Play N button Press to the previous window. Replay ?b button Press to move media backward, for example, one audio track, one DVD chapter, and seven seconds of recorded TV or video. B Back button Press...
User Guide
Page 58
...+Tab keys. K Start button Press to open applications. n 58 N Using Your VAIO Computer E Guide button Press to view the TV program guide for Media Center features. J Standby button Press to place the computer into Sleep mode to close the active application window. F Alphanumeric buttons Press to select specific channels or enter text. (Press ENTER...
...+Tab keys. K Start button Press to open applications. n 58 N Using Your VAIO Computer E Guide button Press to view the TV program guide for Media Center features. J Standby button Press to place the computer into Sleep mode to close the active application window. F Alphanumeric buttons Press to select specific channels or enter text. (Press ENTER...

User Guide
Page 65
... PC Card ✍ To remove a PC Card when your computer is off, skip steps 1 to 7. 1 Double-click the Safely Remove Hardware icon on . The Stop a Hardware device window appears. 4 Confirm that the PC Card pops out. 10 ...the PC Card release button is not removed properly, your system may not work properly. The Safely Remove Hardware window appears. 2 Select the hardware you want to unplug. 3 Click Stop. A message appears stating it back... safely removed from the system. 5 Click OK. n 65 N Using Your VAIO Computer Removing a PC Card Follow the steps below to remove the PC Card while your...
... PC Card ✍ To remove a PC Card when your computer is off, skip steps 1 to 7. 1 Double-click the Safely Remove Hardware icon on . The Stop a Hardware device window appears. 4 Confirm that the PC Card pops out. 10 ...the PC Card release button is not removed properly, your system may not work properly. The Safely Remove Hardware window appears. 2 Select the hardware you want to unplug. 3 Click Stop. A message appears stating it back... safely removed from the system. 5 Click OK. n 65 N Using Your VAIO Computer Removing a PC Card Follow the steps below to remove the PC Card while your...
User Guide
Page 69
...module ✍ To remove an ExpressCard module when your computer is on the taskbar. The Stop a Hardware device window appears. 4 Confirm that the device can be safely removed from the system. 5 Click OK. n 69 N Using Your VAIO Computer Removing an ExpressCard Module Follow the steps below to ...remove the ExpressCard module while your computer is off, skip steps 1 to 7....
...module ✍ To remove an ExpressCard module when your computer is on the taskbar. The Stop a Hardware device window appears. 4 Confirm that the device can be safely removed from the system. 5 Click OK. n 69 N Using Your VAIO Computer Removing an ExpressCard Module Follow the steps below to ...remove the ExpressCard module while your computer is off, skip steps 1 to 7....

User Guide
Page 71
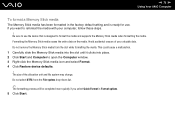
The Memory Stick media is automatically detected by your system and appears in your Computer window as a local drive, under the appropriate letter (depending on the configuration of the computer). n 71 N Using Your VAIO Computer Inserting a Memory Stick Media To insert a Memory Stick media 1 Locate the Memory Stick PRO/Duo media slot (page 14). 2 Hold the Memory Stick media with the arrow pointing toward the Memory Stick PRO/Duo media slot. 3 Carefully slide the Memory Stick media into the slot until it clicks into place.
The Memory Stick media is automatically detected by your system and appears in your Computer window as a local drive, under the appropriate letter (depending on the configuration of the computer). n 71 N Using Your VAIO Computer Inserting a Memory Stick Media To insert a Memory Stick media 1 Locate the Memory Stick PRO/Duo media slot (page 14). 2 Hold the Memory Stick media with the arrow pointing toward the Memory Stick PRO/Duo media slot. 3 Carefully slide the Memory Stick media into the slot until it clicks into place.

User Guide
Page 72
... files saved in the correct direction as you cannot insert it into the slot. and duo-size media. For more than one Memory Stick media into the slot. n 72 N Using Your VAIO Computer ! You can insert a Memory Stick Duo media directly into the slot if you insert it smoothly. Be sure to view... slot that is compatible with the arrow pointing in the Memory Stick media. To view the contents of the Memory Stick media 1 Click Start and Computer to open the Computer window. 2 Double-click the Memory Stick media icon to hold the Memory Stick media with both standard-
... files saved in the correct direction as you cannot insert it into the slot. and duo-size media. For more than one Memory Stick media into the slot. n 72 N Using Your VAIO Computer ! You can insert a Memory Stick Duo media directly into the slot if you insert it smoothly. Be sure to view... slot that is compatible with the arrow pointing in the Memory Stick media. To view the contents of the Memory Stick media 1 Click Start and Computer to open the Computer window. 2 Double-click the Memory Stick media icon to hold the Memory Stick media with both standard-
User Guide
Page 73
... these steps. ! Formatting the Memory Stick media erases the entire data on the media. n 73 N Using Your VAIO Computer To format a Memory Stick media The Memory Stick media has been formatted in Format options. 5 Click Start. If you select Quick Format in the factory ... Memory Stick media from the File system drop-down list. ✍ The formatting process will be completed more quickly if you want to open the Computer window. 3 Right-click the Memory Stick media icon and select Format. 4 Click Restore device defaults. ! Do not select NTFS from the slot while formatting the media...
... these steps. ! Formatting the Memory Stick media erases the entire data on the media. n 73 N Using Your VAIO Computer To format a Memory Stick media The Memory Stick media has been formatted in Format options. 5 Click Start. If you select Quick Format in the factory ... Memory Stick media from the File system drop-down list. ✍ The formatting process will be completed more quickly if you want to open the Computer window. 3 Right-click the Memory Stick media icon and select Format. 4 Click Restore device defaults. ! Do not select NTFS from the slot while formatting the media...

User Guide
Page 79
... telephone lines or a private branch exchange (PBX). To connect a telephone cable 1 Plug one end of these connections may not work properly. Some of the phone cable (1) into the modem...modem. The Connect to the Internet window appears. 2 Click Dial-up. 3 Follow the on the computer. 2 Plug the other end into the wall jack (2). ✍ Your computer does not work with a telephone ...Control Panel, and Connect to the Internet under Network and Internet. n 79 N Using Your VAIO Computer Using the Internet Setting Up a Dial-up Internet Connection Before you can connect to the Internet,...
... telephone lines or a private branch exchange (PBX). To connect a telephone cable 1 Plug one end of these connections may not work properly. Some of the phone cable (1) into the modem...modem. The Connect to the Internet window appears. 2 Click Dial-up. 3 Follow the on the computer. 2 Plug the other end into the wall jack (2). ✍ Your computer does not work with a telephone ...Control Panel, and Connect to the Internet under Network and Internet. n 79 N Using Your VAIO Computer Using the Internet Setting Up a Dial-up Internet Connection Before you can connect to the Internet,...


