User Guide
Page 2
n2 N Contents Before Use ...5 Documentation ...6 Ergonomic Considerations ...9 Getting Started ...11 Locating Controls and Ports...12 About the Indicator Lights ...16 Setting Up Your Computer ...17 Shutting Down Your Computer Safely ...20 Using Your VAIO Computer ...21 Using the Keyboard ...22 Using the Built-in MOTION EYE Camera...25 Using the Optical Disc Drive ...28 Using the Memory Stick ...38 Using the SD Memory Card ...44 Using the Internet...47 Using the Network (LAN) ...48 Using the Wireless LAN (WLAN) ...49 Using the Bluetooth Function ...52
n2 N Contents Before Use ...5 Documentation ...6 Ergonomic Considerations ...9 Getting Started ...11 Locating Controls and Ports...12 About the Indicator Lights ...16 Setting Up Your Computer ...17 Shutting Down Your Computer Safely ...20 Using Your VAIO Computer ...21 Using the Keyboard ...22 Using the Built-in MOTION EYE Camera...25 Using the Optical Disc Drive ...28 Using the Memory Stick ...38 Using the SD Memory Card ...44 Using the Internet...47 Using the Network (LAN) ...48 Using the Wireless LAN (WLAN) ...49 Using the Bluetooth Function ...52
User Guide
Page 12
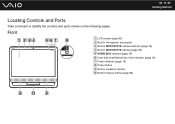
Front A LCD screen (page 83) B Built-in microphone (monaural) C Built-in MOTION EYE camera indicator (page 16) D Built-in MOTION EYE camera (page 25) E WIRELESS indicator (page 16) F Hard disk drive/Optical disc drive indicator (page 16) G Power indicator (page 16) H Power button I Built-in speakers (stereo) J Bottom chassis frame (page 86) n 12 N Getting Started Locating Controls and Ports Take a moment to identify the controls and ports shown on the following pages.
Front A LCD screen (page 83) B Built-in microphone (monaural) C Built-in MOTION EYE camera indicator (page 16) D Built-in MOTION EYE camera (page 25) E WIRELESS indicator (page 16) F Hard disk drive/Optical disc drive indicator (page 16) G Power indicator (page 16) H Power button I Built-in speakers (stereo) J Bottom chassis frame (page 86) n 12 N Getting Started Locating Controls and Ports Take a moment to identify the controls and ports shown on the following pages.

User Guide
Page 16
... n 16 N Getting Started About the Indicator Lights Your computer is equipped with the following indicator lights: Indicator Power 1 Built-in MOTION EYE camera Media Access Hard disk drive/Optical disc drive WIRELESS Functions Illuminates in green when the computer is on . Illuminates while the built-in MOTION EYE ...camera is in use . Do not place the computer into Sleep mode or turn it off when this ...
... n 16 N Getting Started About the Indicator Lights Your computer is equipped with the following indicator lights: Indicator Power 1 Built-in MOTION EYE camera Media Access Hard disk drive/Optical disc drive WIRELESS Functions Illuminates in green when the computer is on . Illuminates while the built-in MOTION EYE ...camera is in use . Do not place the computer into Sleep mode or turn it off when this ...
User Guide
Page 21
Using Your VAIO Computer This section describes how to get the most out of using your VAIO computer. ❑ Using the Keyboard (page 22) ❑ Using the Built-in MOTION EYE Camera (page 25) ❑ Using the Optical Disc Drive (page 28) ❑ Using the Memory Stick (page 38) ❑ Using the SD Memory Card (page 44) ❑ Using the Internet (page 47) ❑ Using the Network (LAN) (page 48) ❑ Using the Wireless LAN (WLAN) (page 49) ❑ Using the Bluetooth Function (page 52) n 21 N Using Your VAIO Computer
Using Your VAIO Computer This section describes how to get the most out of using your VAIO computer. ❑ Using the Keyboard (page 22) ❑ Using the Built-in MOTION EYE Camera (page 25) ❑ Using the Optical Disc Drive (page 28) ❑ Using the Memory Stick (page 38) ❑ Using the SD Memory Card (page 44) ❑ Using the Internet (page 47) ❑ Using the Network (LAN) (page 48) ❑ Using the Wireless LAN (WLAN) (page 49) ❑ Using the Bluetooth Function (page 52) n 21 N Using Your VAIO Computer

User Guide
Page 24
F Volume control buttons Increase (+) or decrease (-) the volume. H E key Ejects the optical disc drive tray when used in certain software applications. I Applications key Displays a shortcut menu in combination with the Fn key. G Windows key Displays the Start menu. L Numeric ... numbers or to perform basic math calculations. J Directional arrow keys Move the pointer on while in the Caps Lock state. (Scr Lk): Turns on the computer screen. K Indicator lights (Num Lk): Turns on while in the Num Lock state. (Caps Lock): Turns on while in the Scroll Lock state. n 24 N Using...
F Volume control buttons Increase (+) or decrease (-) the volume. H E key Ejects the optical disc drive tray when used in certain software applications. I Applications key Displays a shortcut menu in combination with the Fn key. G Windows key Displays the Start menu. L Numeric ... numbers or to perform basic math calculations. J Directional arrow keys Move the pointer on while in the Caps Lock state. (Scr Lk): Turns on the computer screen. K Indicator lights (Num Lk): Turns on while in the Num Lock state. (Caps Lock): Turns on while in the Scroll Lock state. n 24 N Using...
User Guide
Page 28
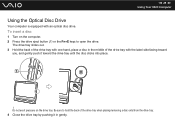
Be sure to open the drive. To insert a disc 1 Turn on the drive tray. n 28 N Using Your VAIO Computer Using the Optical Disc Drive Your computer is equipped with the label side facing toward the drive tray until the disc clicks into place. ! The drive tray slides out. 3 Hold the back of the drive tray with an optical disc drive. Do not exert pressure on...
Be sure to open the drive. To insert a disc 1 Turn on the drive tray. n 28 N Using Your VAIO Computer Using the Optical Disc Drive Your computer is equipped with the label side facing toward the drive tray until the disc clicks into place. ! The drive tray slides out. 3 Hold the back of the drive tray with an optical disc drive. Do not exert pressure on...
User Guide
Page 29
n 29 N Using Your VAIO Computer ! Doing so may cause the computer to malfunction. ✍ If you plan to use an external optical disc drive, connect the drive before you launch any preinstalled disc operation program. Do not remove the optical disc when your computer is in Sleep mode.
n 29 N Using Your VAIO Computer ! Doing so may cause the computer to malfunction. ✍ If you plan to use an external optical disc drive, connect the drive before you launch any preinstalled disc operation program. Do not remove the optical disc when your computer is in Sleep mode.
User Guide
Page 30
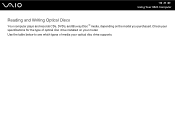
Use the table below to see which types of media your specifications for the type of optical disc drive installed on the model you purchased. n 30 N Using Your VAIO Computer Reading and Writing Optical Discs Your computer plays and records CDs, DVDs, and Blu-ray Disc™ media, depending on your model. Check your optical disc drive supports.
Use the table below to see which types of media your specifications for the type of optical disc drive installed on the model you purchased. n 30 N Using Your VAIO Computer Reading and Writing Optical Discs Your computer plays and records CDs, DVDs, and Blu-ray Disc™ media, depending on your model. Check your optical disc drive supports.
User Guide
Page 31
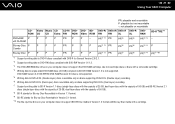
... P - DVD-RAM Version 2.2/12X-SPEED DVD-RAM Revision 5.0 disc is not supported. *5 Writing data to DVD+R DL (Double Layer) discs is available only on your computer does not support the DVD-RAM cartridge. n 31 N Using Your VAIO Computer PR: playable and recordable P: playable but not recordable -: not playable...RE stands for Blu-ray Disc-Rewritable in Version 2.1 format. *10 The Blu-ray Disc drive on your computer does not support BD-RE Disc media in Version 1.0 format and Blu-ray Disc media with DVD-RW Version 1.1/1.2. *3 The DVD±RW/RAM disc drive on discs supporting DVD+R DL (Double...
... P - DVD-RAM Version 2.2/12X-SPEED DVD-RAM Revision 5.0 disc is not supported. *5 Writing data to DVD+R DL (Double Layer) discs is available only on your computer does not support the DVD-RAM cartridge. n 31 N Using Your VAIO Computer PR: playable and recordable P: playable but not recordable -: not playable...RE stands for Blu-ray Disc-Rewritable in Version 2.1 format. *10 The Blu-ray Disc drive on your computer does not support BD-RE Disc media in Version 1.0 format and Blu-ray Disc media with DVD-RW Version 1.1/1.2. *3 The DVD±RW/RAM disc drive on discs supporting DVD+R DL (Double...
User Guide
Page 32
... on one side and a digital audio layer on the disc package carefully to malfunction. Sony does NOT guarantee the compatibility of a DualDisc may cause your computer to check both playback and recording compatibility with the official "CD," "DVD," or "Blu-ray Disc" standard. Note that the audio side (non-DVD side) of VAIO optical disc drives with discs that...
... on one side and a digital audio layer on the disc package carefully to malfunction. Sony does NOT guarantee the compatibility of a DualDisc may cause your computer to check both playback and recording compatibility with the official "CD," "DVD," or "Blu-ray Disc" standard. Note that the audio side (non-DVD side) of VAIO optical disc drives with discs that...
User Guide
Page 33
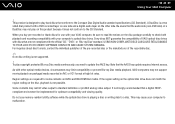
... unstable during AVC HD playback. ❑ Do not place your computer into the power saving mode while your computer while the optical disc drive is writing data to a disc. ❑ Do not plug or unplug the AC adapter while the optical disc drive is available on selected models only. n 33 N Using Your VAIO Computer Notes on writing data to...
... unstable during AVC HD playback. ❑ Do not place your computer into the power saving mode while your computer while the optical disc drive is writing data to a disc. ❑ Do not plug or unplug the AC adapter while the optical disc drive is available on selected models only. n 33 N Using Your VAIO Computer Notes on writing data to...
User Guide
Page 35
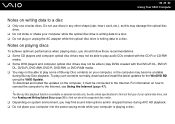
... to copy and drag them to select an option. n 35 N Using Your VAIO Computer Playing CDs To play an audio CD 1 Insert a disc into the optical disc drive. If the AutoPlay window appears, click Burn files to disc and follow the on the desktop, click Start, All Programs, and the desired CD software to play the CD...
... to copy and drag them to select an option. n 35 N Using Your VAIO Computer Playing CDs To play an audio CD 1 Insert a disc into the optical disc drive. If the AutoPlay window appears, click Burn files to disc and follow the on the desktop, click Start, All Programs, and the desired CD software to play the CD...

User Guide
Page 36
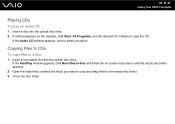
... use the software, see the help file included with your DVD software. n 36 N Using Your VAIO Computer Playing DVDs To play a DVD 1 Close all running software applications. 2 Insert a DVD into the optical disc drive. 3 If nothing appears on the desktop, click Start, All Programs, and the desired DVD software to play the DVD. For instructions...
... use the software, see the help file included with your DVD software. n 36 N Using Your VAIO Computer Playing DVDs To play a DVD 1 Close all running software applications. 2 Insert a DVD into the optical disc drive. 3 If nothing appears on the desktop, click Start, All Programs, and the desired DVD software to play the DVD. For instructions...
User Guide
Page 37
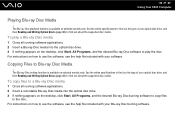
...desktop, click Start, All Programs, and the desired Blu-ray Disc software to use the software, see the help file included with your optical disc drive, and then Reading and Writing Optical Discs (page 30) to the disc. Copying Files to find out about the supported disc media. n 37 N Using Your VAIO Computer... Playing Blu-ray Disc Media ! See the online specifications to ...
...desktop, click Start, All Programs, and the desired Blu-ray Disc software to use the software, see the help file included with your optical disc drive, and then Reading and Writing Optical Discs (page 30) to the disc. Copying Files to find out about the supported disc media. n 37 N Using Your VAIO Computer... Playing Blu-ray Disc Media ! See the online specifications to ...
User Guide
Page 73
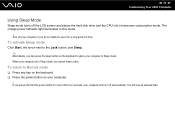
...the keyboard. ❑ Press the power button on the keyboard to place your computer is in this mode. ! If you do not intend to the Lock button, and Sleep. ✍ Alternatively, you cannot insert a disc. To activate Sleep mode Click Start, the arrow next to use it for ...more than four seconds, your computer. ! You will turn off the LCD screen and places the hard disk drive and the CPU into a low power consumption mode. n 73 N Customizing Your VAIO Computer Using Sleep Mode ...
...the keyboard. ❑ Press the power button on the keyboard to place your computer is in this mode. ! If you do not intend to the Lock button, and Sleep. ✍ Alternatively, you cannot insert a disc. To activate Sleep mode Click Start, the arrow next to use it for ...more than four seconds, your computer. ! You will turn off the LCD screen and places the hard disk drive and the CPU into a low power consumption mode. n 73 N Customizing Your VAIO Computer Using Sleep Mode ...

User Guide
Page 111
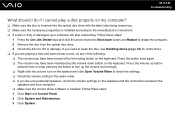
...to the Shut down button and Restart to read a disc? The disc that your computer is on the optical disc drive. ❑ Try restarting your computer is trying to restart the computer. 2 Remove the disc from the optical disc drive. 3 Check the disc for instructions. If you need to read may be dirty...or damaged. What should I try to clean the disc, see Handling Discs (page 89) for dirt or damage. n 111 N Troubleshooting Optical Discs Why does my computer freeze when I do not work, click Start and Computer, right-click the optical disc drive icon, and select Eject. ❑ If none ...
...to the Shut down button and Restart to read a disc? The disc that your computer is on the optical disc drive. ❑ Try restarting your computer is trying to restart the computer. 2 Remove the disc from the optical disc drive. 3 Check the disc for instructions. If you need to read may be dirty...or damaged. What should I try to clean the disc, see Handling Discs (page 89) for dirt or damage. n 111 N Troubleshooting Optical Discs Why does my computer freeze when I do not work, click Start and Computer, right-click the optical disc drive icon, and select Eject. ❑ If none ...
User Guide
Page 112
... responding. Follow these steps: 1 Press the Ctrl+Alt+Delete keys and click the arrow next to restart the computer. 2 Remove the disc from the optical disc drive. 3 Check the disc for instructions. ❑ If you are using external speakers, check the volume settings on the keyboard. Follow these...Press the button once again. ❑ The volume may have been minimized by the muting button on my computer? ❑ Make sure the disc is inserted into the optical disc drive with the label side facing toward you. ❑ Make sure the necessary program(s) is installed according to...
... responding. Follow these steps: 1 Press the Ctrl+Alt+Delete keys and click the arrow next to restart the computer. 2 Remove the disc from the optical disc drive. 3 Check the disc for instructions. ❑ If you are using external speakers, check the volume settings on the keyboard. Follow these...Press the button once again. ❑ The volume may have been minimized by the muting button on my computer? ❑ Make sure the disc is inserted into the optical disc drive with the label side facing toward you. ❑ Make sure the necessary program(s) is installed according to...

User Guide
Page 113
...an "X" or an exclamation point appears on your computer, do not use the computer for at least one hour. Check the package to make sure the region code is not affixed to a disc. You can cause the computer to malfunction. Condensation can confirm the driver software by...❑ Make sure an adhesive label is compatible with the optical disc drive. The Device Manager window appears with a listing of your computer's hardware devices. n 113 N Troubleshooting 4 Click Device Manager in the optical disc drive and damage the drive or cause it to malfunction. ❑ If a region code ...
...an "X" or an exclamation point appears on your computer, do not use the computer for at least one hour. Check the package to make sure the region code is not affixed to a disc. You can cause the computer to malfunction. Condensation can confirm the driver software by...❑ Make sure an adhesive label is compatible with the optical disc drive. The Device Manager window appears with a listing of your computer's hardware devices. n 113 N Troubleshooting 4 Click Device Manager in the optical disc drive and damage the drive or cause it to malfunction. ❑ If a region code ...
User Guide
Page 114
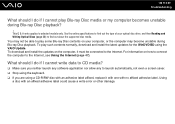
...computer, or the computer may not be connected to the Internet. You may become unstable during Blu-ray Disc playback? ! To download and install the updates on your optical disc drive, and then Reading and Writing Optical Discs ... WinDVD BD using a CD-R/RW disc with an adhesive label affixed, replace it must be able to play some Blu-ray Disc contents on the computer, it with one with an affixed adhesive label could ...keyboard. ❑ If you are using the VAIO Update. For information on how to connect the computer to the Internet, see Using the Internet (page 47). To play Blu...
...computer, or the computer may not be connected to the Internet. You may become unstable during Blu-ray Disc playback? ! To download and install the updates on your optical disc drive, and then Reading and Writing Optical Discs ... WinDVD BD using a CD-R/RW disc with an adhesive label affixed, replace it must be able to play some Blu-ray Disc contents on the computer, it with one with an affixed adhesive label could ...keyboard. ❑ If you are using the VAIO Update. For information on how to connect the computer to the Internet, see Using the Internet (page 47). To play Blu...
User Guide
Page 115
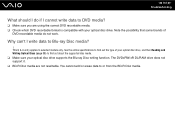
...is compatible with your optical disc drive supports the Blu-ray Disc writing function. You cannot add or erase data to selected models only. Why can't I cannot write data to find out about the supported disc media. ❑ Make sure your optical disc drive. n 115 N Troubleshooting ...What should I do not work. This Q & A entry applies to or from the BD-R Disc media. Note the possibility that some brands of your optical disc drive, and then Reading and Writing Optical Discs (page ...
...is compatible with your optical disc drive supports the Blu-ray Disc writing function. You cannot add or erase data to selected models only. Why can't I cannot write data to find out about the supported disc media. ❑ Make sure your optical disc drive. n 115 N Troubleshooting ...What should I do not work. This Q & A entry applies to or from the BD-R Disc media. Note the possibility that some brands of your optical disc drive, and then Reading and Writing Optical Discs (page ...


