
Operating Instructions
Page 1
3-289-200-11(1) Multi Channel AV Receiver Operating Instructions STR-DG920 ©2008 Sony Corporation
3-289-200-11(1) Multi Channel AV Receiver Operating Instructions STR-DG920 ©2008 Sony Corporation

Operating Instructions
Page 2
...of the FCC Rules. This symbol is no guarantee that any changes or modification not expressly approved in this manual could void your Sony dealer regarding this apparatus to rain or moisture. Consult the dealer or an experienced radio/TV technician for proper grounding and, in ...that the cable ground shall be exposed to persons. CAUTION You are cautioned that interference will not occur in cabinet. Reorient or relocate the receiving antenna. - To prevent fire or shock hazard, do not cover the ventilation of the following measures: - These limits are designed to ...
...of the FCC Rules. This symbol is no guarantee that any changes or modification not expressly approved in this manual could void your Sony dealer regarding this apparatus to rain or moisture. Consult the dealer or an experienced radio/TV technician for proper grounding and, in ...that the cable ground shall be exposed to persons. CAUTION You are cautioned that interference will not occur in cabinet. Reorient or relocate the receiving antenna. - To prevent fire or shock hazard, do not cover the ventilation of the following measures: - These limits are designed to ...
Operating Instructions
Page 3
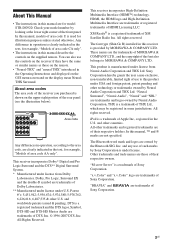
...5,974,380; 5,978,762; 6,226,616; 6,487,535 & other trademarks and registered trademarks are clearly indicated in the text, for model STR-DG920. All Rights Reserved. "Neural Surround", "Neural Audio", "Neural" and "NRL" are trademarks of Dolby Laboratories. ** Manufactured under license ...receiver if they have the same or similar names as those of their respective holders. In this manual, ™ and ® marks are trademarks or registered trademarks of HDMI Licensing LLC. and any use to this product under license from Neural Audio Corporation and THX Ltd. "BRAVIA" and Sony...
...5,974,380; 5,978,762; 6,226,616; 6,487,535 & other trademarks and registered trademarks are clearly indicated in the text, for model STR-DG920. All Rights Reserved. "Neural Surround", "Neural Audio", "Neural" and "NRL" are trademarks of Dolby Laboratories. ** Manufactured under license ...receiver if they have the same or similar names as those of their respective holders. In this manual, ™ and ® marks are trademarks or registered trademarks of HDMI Licensing LLC. and any use to this product under license from Neural Audio Corporation and THX Ltd. "BRAVIA" and Sony...
Operating Instructions
Page 4
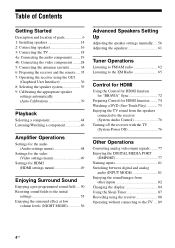
...the audio components.........19 4b: Connecting the video components ........24 5: Connecting the antennas (aerials 34 6: Preparing the receiver and the remote .....35 7: Operating the receiver using the GUI (Graphical User Interface 36 8: Selecting the speaker system 39 9: Calibrating the appropriate speaker settings ...74 Watching a DVD (One-Touch Play 75 Enjoying the TV sound from the speakers connected to the receiver (System Audio Control 76 Turning off the receiver with the TV (System Power Off 76 Other Operations Converting analog video input signals........ 77 Enjoying the...
...the audio components.........19 4b: Connecting the video components ........24 5: Connecting the antennas (aerials 34 6: Preparing the receiver and the remote .....35 7: Operating the receiver using the GUI (Graphical User Interface 36 8: Selecting the speaker system 39 9: Calibrating the appropriate speaker settings ...74 Watching a DVD (One-Touch Play 75 Enjoying the TV sound from the speakers connected to the receiver (System Audio Control 76 Turning off the receiver with the TV (System Power Off 76 Other Operations Converting analog video input signals........ 77 Enjoying the...
Operating Instructions
Page 6
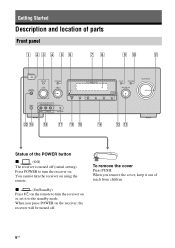
... using the remote. To remove the cover Press PUSH. MOVIE MUSIC MASTER VOLUME w; When you remove the cover, keep it to turn the receiver on . When you press POWER on or set it out of parts Front panel 1 23 4 5 6 78 9 q; Press POWER to the standby mode. Getting ... and location of reach from children. 6US qa ON/STANDBY POWER SPEAKERS (OFF/A/B/A+B) TONE MODE TONE TUNING MODE TUNING PHONES VIDEO 2 IN/PORTABLE AV IN VIDEO L AUDIO R AUTO CAL MIC MULTI CHANNEL DECODING DISPLAY INPUT MODE INPUT SELECTOR MEMORY/ ENTER DIMMER 2CH/ A.DIRECT A.F.D.
... using the remote. To remove the cover Press PUSH. MOVIE MUSIC MASTER VOLUME w; When you remove the cover, keep it to turn the receiver on . When you press POWER on or set it out of parts Front panel 1 23 4 5 6 78 9 q; Press POWER to the standby mode. Getting ... and location of reach from children. 6US qa ON/STANDBY POWER SPEAKERS (OFF/A/B/A+B) TONE MODE TONE TUNING MODE TUNING PHONES VIDEO 2 IN/PORTABLE AV IN VIDEO L AUDIO R AUTO CAL MIC MULTI CHANNEL DECODING DISPLAY INPUT MODE INPUT SELECTOR MEMORY/ ENTER DIMMER 2CH/ A.DIRECT A.F.D.
Operating Instructions
Page 7
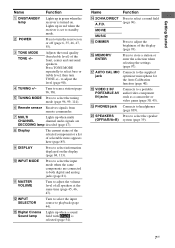
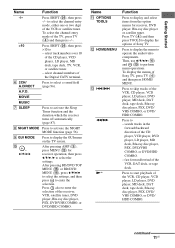
Press TONE MODE repeatedly to select the tuning mode (page 96, 99, 114). E TUNING MODE Press to select bass or treble level, then turn the receiver on or off (page 6, 35, 46, 47, 55). Name Function N 2CH/A.DIRECT Press to headphones (page 109). S PHONES jack Connects to select a sound ... same time (page 45, 46, 47). MOVIE MUSIC O DIMMER Press to adjust the volume level of the display (page 93). R VIDEO 2 IN/ PORTABLE AV IN jacks Connects to turn TONE +/- B POWER Press to a portable audio/video component such as a camcorder or video game (page 30, 45). G MULTI...
Press TONE MODE repeatedly to select the tuning mode (page 96, 99, 114). E TUNING MODE Press to select bass or treble level, then turn the receiver on or off (page 6, 35, 46, 47, 55). Name Function N 2CH/A.DIRECT Press to headphones (page 109). S PHONES jack Connects to select a sound ... same time (page 45, 46, 47). MOVIE MUSIC O DIMMER Press to adjust the volume level of the display (page 93). R VIDEO 2 IN/ PORTABLE AV IN jacks Connects to turn TONE +/- B POWER Press to a portable audio/video component such as a camcorder or video game (page 30, 45). G MULTI...
Operating Instructions
Page 8
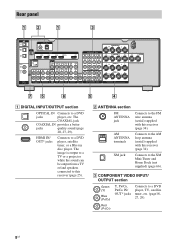
...a TV or a projector while the sound can be output from a TV or/and speakers connected to the FM wire antenna (aerial) supplied with this receiver (page 25). XM jack Connects to a DVD player, satellite tuner, or a Blu-ray disc player. HDMI IN/ OUT* jacks Connects to the XM... Mini-Tuner and Home Dock (not supplied) (page 66). B ANTENNA section FM ANTENNA jack Connects to this receiver (page 34). C COMPONENT VIDEO INPUT/ OUTPUT section Green (Y) Blue (PB/CB) Y, PB/CB, PR/CR IN/ OUT* jacks Connects to a DVD jacks ...
...a TV or a projector while the sound can be output from a TV or/and speakers connected to the FM wire antenna (aerial) supplied with this receiver (page 25). XM jack Connects to a DVD player, satellite tuner, or a Blu-ray disc player. HDMI IN/ OUT* jacks Connects to the XM... Mini-Tuner and Home Dock (not supplied) (page 66). B ANTENNA section FM ANTENNA jack Connects to this receiver (page 34). C COMPONENT VIDEO INPUT/ OUTPUT section Green (Y) Blue (PB/CB) Y, PB/CB, PR/CR IN/ OUT* jacks Connects to a DVD jacks ...
Operating Instructions
Page 9
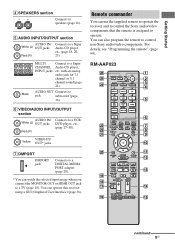
... MENU MENU F1 F2 TV INPUT WIDE qa qs qd qf qg continued 9US You can use the supplied remote to operate the receiver and to control the Sony audio/video components that the remote is assigned to a VCR, DVD player, etc. (page 27-30). RM-AAP023 wh wg wf wd ws... wa ?/1 THEATER RM SET UP AV ?/1 SYSTEM STANDBY SHIFT TV AMP 1 VIDEO 1 2 VIDEO 2 4 5 DVD SAT 7 8 MD/ TAPE SA-CD/ CD -/-- 0/10 PHONO MULTI IN CLEAR...
... MENU MENU F1 F2 TV INPUT WIDE qa qs qd qf qg continued 9US You can use the supplied remote to operate the receiver and to control the Sony audio/video components that the remote is assigned to a VCR, DVD player, etc. (page 27-30). RM-AAP023 wh wg wf wd ws... wa ?/1 THEATER RM SET UP AV ?/1 SYSTEM STANDBY SHIFT TV AMP 1 VIDEO 1 2 VIDEO 2 4 5 DVD SAT 7 8 MD/ TAPE SA-CD/ CD -/-- 0/10 PHONO MULTI IN CLEAR...
Operating Instructions
Page 10
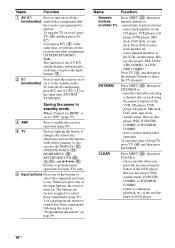
... MD deck, DAT deck, or tape deck. To turn off all components, press ?/1 and AV ?/1 (A) at the same time, it to control Sony components (page 45). If you press the input buttons (E). To turn the receiver on or (on/standby) set to preset stations. - C AMP Press to operate. It ...CLEAR Function Press SHIFT (X), then press numeric buttons to control non-Sony components following the steps in standby mode. Press 0/10 to activate the buttons with yellow printing. select channel numbers of the input buttons, the receiver turns on page 99. It changes the remote key function to ...
... MD deck, DAT deck, or tape deck. To turn off all components, press ?/1 and AV ?/1 (A) at the same time, it to control Sony components (page 45). If you press the input buttons (E). To turn the receiver on or (on/standby) set to preset stations. - C AMP Press to operate. It ...CLEAR Function Press SHIFT (X), then press numeric buttons to control non-Sony components following the steps in standby mode. Press 0/10 to activate the buttons with yellow printing. select channel numbers of the input buttons, the receiver turns on page 99. It changes the remote key function to ...
Operating Instructions
Page 11
.... Press to operate the audio/video components. Press TV (D) and then press TOOLS to start playback of Sony TV, press TV (D) and then press HOME/ MENU. Press to display the menu to select a sound field (page 96). To display the menus of ... (X), then press >10 to select the settings. Name K OPTIONS TOOLS L HOME/MENU M ./> m/M N* Function Press to display and select items from the option menus for receiver operation, then press V/v/B /b to - MOVIE MUSIC G SLEEP Press to activate the NIGHT MODE function (page 56). After pressing BD/DVD TOP MENU (P) or BD/DVD...
.... Press to operate the audio/video components. Press TV (D) and then press TOOLS to start playback of Sony TV, press TV (D) and then press HOME/ MENU. Press to display the menu to select a sound field (page 96). To display the menus of ... (X), then press >10 to select the settings. Name K OPTIONS TOOLS L HOME/MENU M ./> m/M N* Function Press to display and select items from the option menus for receiver operation, then press V/v/B /b to - MOVIE MUSIC G SLEEP Press to activate the NIGHT MODE function (page 56). After pressing BD/DVD TOP MENU (P) or BD/DVD...
Operating Instructions
Page 13
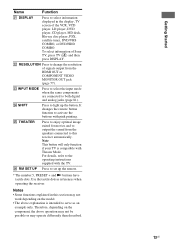
... supplied with pink printing. W INPUT MODE Press to select the input mode when the same components are connected to change the resolution of Sony TV, press TV (D) and then press DISPLAY. Z RM SET UP Press to set up the button. Note This button will only ...function if your TV is intended to serve as references when operating the receiver. Getting Started Name Function U DISPLAY Press to select information displayed in this receiver automatically. To select information of signals output from the speakers connected to output the sound from the...
... supplied with pink printing. W INPUT MODE Press to select the input mode when the same components are connected to change the resolution of Sony TV, press TV (D) and then press DISPLAY. Z RM SET UP Press to set up the button. Note This button will only ...function if your TV is intended to serve as references when operating the receiver. Getting Started Name Function U DISPLAY Press to select information displayed in this receiver automatically. To select information of signals output from the speakers connected to output the sound from the...
Operating Instructions
Page 14
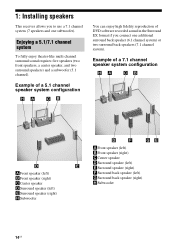
1: Installing speakers This receiver allows you connect one subwoofer). Enjoying a 5.1/7.1 channel system To fully enjoy theater-like multi channel surround sound requires five speakers (two front speakers, a center speaker, ...
1: Installing speakers This receiver allows you connect one subwoofer). Enjoying a 5.1/7.1 channel system To fully enjoy theater-like multi channel surround sound requires five speakers (two front speakers, a center speaker, ...
Operating Instructions
Page 17
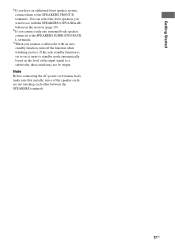
... the SPEAKERS SURROUND BACK L terminals. Getting Started a)If you connect only one surround back speaker, connect it turns to standby mode automatically based on the receiver (page 39). Note Before connecting the AC power cord (mains lead), make sure that metallic wires of the input signal to a subwoofer, then sound may...
... the SPEAKERS SURROUND BACK L terminals. Getting Started a)If you connect only one surround back speaker, connect it turns to standby mode automatically based on the receiver (page 39). Note Before connecting the AC power cord (mains lead), make sure that metallic wires of the input signal to a subwoofer, then sound may...

Operating Instructions
Page 18
...) C HDMI cable (not supplied) We recommend that you connect the HDMI OUT or MONITOR OUT jack to a TV. 3: Connecting the TV You can operate this receiver using a GUI (Graphical User Interface). D Video cord (not supplied) E Component video cord (not supplied) 18US You can watch the selected input image when you use...
...) C HDMI cable (not supplied) We recommend that you connect the HDMI OUT or MONITOR OUT jack to a TV. 3: Connecting the TV You can operate this receiver using a GUI (Graphical User Interface). D Video cord (not supplied) E Component video cord (not supplied) 18US You can watch the selected input image when you use...
Operating Instructions
Page 19
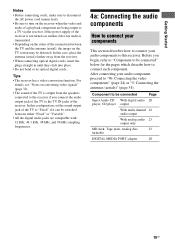
... on the status of the connection between either "Fixed" or "Variable". • All the digital audio jacks are being output to a TV via the receiver. For details, see "Notes on the TV screen may be switched between the TV and the antenna (aerial), the image on converting video signals" (page...19US Getting Started Notes • Before connecting cords, make sure to disconnect the AC power cord (mains lead). • Be sure to turn on the receiver when the video and audio of a playback component are compatible with 32 kHz, 44.1 kHz, 48 kHz, and 96 kHz sampling frequencies. 4a: Connecting...
... on the status of the connection between either "Fixed" or "Variable". • All the digital audio jacks are being output to a TV via the receiver. For details, see "Notes on the TV screen may be switched between the TV and the antenna (aerial), the image on converting video signals" (page...19US Getting Started Notes • Before connecting cords, make sure to disconnect the AC power cord (mains lead). • Be sure to turn on the receiver when the video and audio of a playback component are compatible with 32 kHz, 44.1 kHz, 48 kHz, and 96 kHz sampling frequencies. 4a: Connecting...
Operating Instructions
Page 20
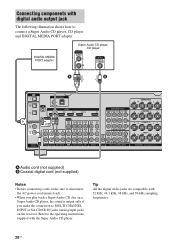
... IN jacks (analog input jack) on a Super Audio CD player, the sound is output only if you play back a Super Audio CD disc on the receiver. Refer to the operating instructions supplied with 32 kHz, 44.1 kHz, 48 kHz, and 96 kHz sampling frequencies. 20US Tip All the digital audio jacks...
... IN jacks (analog input jack) on a Super Audio CD player, the sound is output only if you play back a Super Audio CD disc on the receiver. Refer to the operating instructions supplied with 32 kHz, 44.1 kHz, 48 kHz, and 96 kHz sampling frequencies. 20US Tip All the digital audio jacks...
Operating Instructions
Page 21
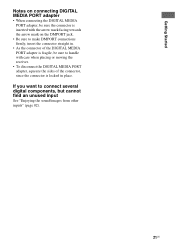
... unused input See "Enjoying the sound/images from other inputs" (page 82). 21US If you want to handle with care when placing or moving the receiver. • To disconnect the DIGITAL MEDIA PORT adapter, squeeze the sides of the DIGITAL MEDIA PORT adapter is fragile, be sure the connector is inserted...
... unused input See "Enjoying the sound/images from other inputs" (page 82). 21US If you want to handle with care when placing or moving the receiver. • To disconnect the DIGITAL MEDIA PORT adapter, squeeze the sides of the DIGITAL MEDIA PORT adapter is fragile, be sure the connector is inserted...
Operating Instructions
Page 22
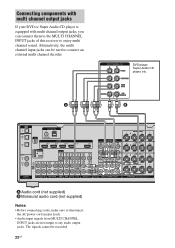
Alternatively, the multi channel input jacks can connect them to the MULTI CHANNEL INPUT jacks of this receiver to enjoy multi channel sound. The signals cannot be used to any audio output jacks. A B TV OPTICAL IN ANTENNA FM AM OPTICAL VIDEO 1 IN SAT ...
Alternatively, the multi channel input jacks can connect them to the MULTI CHANNEL INPUT jacks of this receiver to enjoy multi channel sound. The signals cannot be used to any audio output jacks. A B TV OPTICAL IN ANTENNA FM AM OPTICAL VIDEO 1 IN SAT ...
Operating Instructions
Page 24
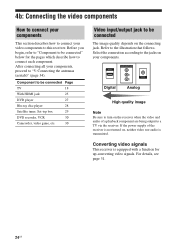
...29 DVD recorder, VCR 30 Camcorder, video game, etc. 30 Video input/output jack to the illustration that follows. Converting video signals This receiver is transmitted. Before you begin, refer to "Component to "5: Connecting the antennas (aerials)" (page 34). If the power supply of a... playback component are being output to this receiver. Refer to be connected" below for up-converting video signals. Select the connection according to the jacks on , neither video nor audio ...
...29 DVD recorder, VCR 30 Camcorder, video game, etc. 30 Video input/output jack to the illustration that follows. Converting video signals This receiver is transmitted. Before you begin, refer to "Component to "5: Connecting the antennas (aerials)" (page 34). If the power supply of a... playback component are being output to this receiver. Refer to be connected" below for up-converting video signals. Select the connection according to the jacks on , neither video nor audio ...
Operating Instructions
Page 25
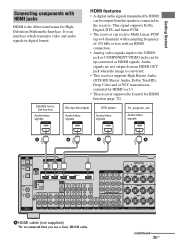
...audio signals in digital format. Audio signals are not output from the speakers connected to the VIDEO jack or COMPONENT VIDEO jacks can receive Multi Linear PCM (up -converted as HDMI signals. Audio/video signals A A A A TV OPTICAL IN ANTENNA FM AM OPTICAL... MULTI CHANNEL INPUT SURROUND BACK R L SURROUND R L R FRONT B L FRONT A R L SPEAKERS A HDMI cable (not supplied) We recommend that you use a Sony HDMI cable. It is the abbreviated name for HDMI function (page 72). HDMI features • A digital audio signals transmitted by HDMI ver1.3. • This...
...audio signals in digital format. Audio signals are not output from the speakers connected to the VIDEO jack or COMPONENT VIDEO jacks can receive Multi Linear PCM (up -converted as HDMI signals. Audio/video signals A A A A TV OPTICAL IN ANTENNA FM AM OPTICAL... MULTI CHANNEL INPUT SURROUND BACK R L SURROUND R L R FRONT B L FRONT A R L SPEAKERS A HDMI cable (not supplied) We recommend that you use a Sony HDMI cable. It is the abbreviated name for HDMI function (page 72). HDMI features • A digital audio signals transmitted by HDMI ver1.3. • This...


