
Limited Warranty (U.S. Only)
Page 1
...This warranty does not cover customer instruction, installation, set up adjustments or signal reception problems. This warranty does not cover cosmetic damage or damage due to acts of God, accident, misuse, abuse, negligence, commercial use, or modification of incidental or ...workmanship as fuses or batteries). Some states do not allow the exclusion or limitation of , or to any authorized Sony service facility. 4-557-173-02 General Stereo/Hifi Components/Tape Decks ® CD Players/Mini Disc Players/Audio Systems Hifi Audio LIMITED WARRANTY Sony Electronics Inc. ("Sony") warrants this...
...This warranty does not cover customer instruction, installation, set up adjustments or signal reception problems. This warranty does not cover cosmetic damage or damage due to acts of God, accident, misuse, abuse, negligence, commercial use, or modification of incidental or ...workmanship as fuses or batteries). Some states do not allow the exclusion or limitation of , or to any authorized Sony service facility. 4-557-173-02 General Stereo/Hifi Components/Tape Decks ® CD Players/Mini Disc Players/Audio Systems Hifi Audio LIMITED WARRANTY Sony Electronics Inc. ("Sony") warrants this...
Operating Instructions (HT-DDW650)
Page 3
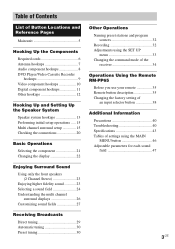
... 5 Hooking Up the Components Required cords 6 Antenna hookups 7 Audio component hookups 8 DVD Player/Video Cassette Recorder hookups 9 Video component hookups 10 Digital component hookups 11 Other hookups 12 Hooking Up and Setting Up the Speaker System Speaker system hookups 13 Performing initial setup operations ..... 15 Multi channel surround setup 15 Checking the connections 20 Basic Operations Selecting the component 21 Changing the display 22 Enjoying Surround Sound Using only the front speakers (2 Channel Stereo 23 Enjoying higher fidelity sound 23 Selecting a sound field...
... 5 Hooking Up the Components Required cords 6 Antenna hookups 7 Audio component hookups 8 DVD Player/Video Cassette Recorder hookups 9 Video component hookups 10 Digital component hookups 11 Other hookups 12 Hooking Up and Setting Up the Speaker System Speaker system hookups 13 Performing initial setup operations ..... 15 Multi channel surround setup 15 Checking the connections 20 Basic Operations Selecting the component 21 Changing the display 22 Enjoying Surround Sound Using only the front speakers (2 Channel Stereo 23 Enjoying higher fidelity sound 23 Selecting a sound field...
Operating Instructions (HT-DDW650)
Page 11
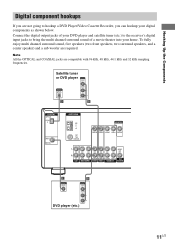
... speakers, two surround speakers, and a center speaker) and a sub woofer are compatible with 96 kHz, 48 kHz, 44.1 kHz and 32 kHz sampling frequencies. Connect the digital output jacks of your DVD player and satellite tuner (etc.) to the receiver's digital input jacks to hookup a DVD Player/Video Cassette Recorder, you can hookup your home. Note All the OPTICAL and COAXIAL jacks are required. Hooking Up the Components Digital component hookups If you are not going to bring the multi channel surround sound of a movie theater into your digital components...
... speakers, two surround speakers, and a center speaker) and a sub woofer are compatible with 96 kHz, 48 kHz, 44.1 kHz and 32 kHz sampling frequencies. Connect the digital output jacks of your DVD player and satellite tuner (etc.) to the receiver's digital input jacks to hookup a DVD Player/Video Cassette Recorder, you can hookup your home. Note All the OPTICAL and COAXIAL jacks are required. Hooking Up the Components Digital component hookups If you are not going to bring the multi channel surround sound of a movie theater into your digital components...
Operating Instructions (HT-DDW650)
Page 14
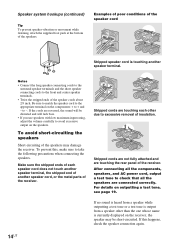
... are reversed, the sound will lack bass. • If you use speakers with low maximum input rating, adjust the volume carefully to excessive removal of the speaker cords about 2/3 inch. If the cords are touching the rear panel of another speaker terminal. If this , make sure to + and - After connecting all the components, speakers, and AC power cord, output a test tone to check that all the speakers are touching each speaker cord does not touch...
... are reversed, the sound will lack bass. • If you use speakers with low maximum input rating, adjust the volume carefully to excessive removal of the speaker cords about 2/3 inch. If the cords are touching the rear panel of another speaker terminal. If this , make sure to + and - After connecting all the components, speakers, and AC power cord, output a test tone to check that all the speakers are touching each speaker cord does not touch...
Operating Instructions (HT-DDW650)
Page 15
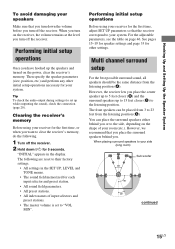
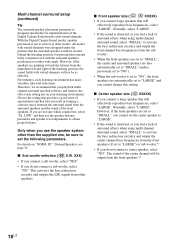
... you turn off the receiver. Clearing the receiver's memory Before using your receiver for the first time, adjust SET UP parameters so that you turn on the shape of input selectors and preset stations. • The master volume is set up the speakers and turned on page 46. Multi channel surround setup For the best possible surround sound, all speakers should be placed from 3 to the listening position. However, we recommend that you place the surround speakers...
... you turn off the receiver. Clearing the receiver's memory Before using your receiver for the first time, adjust SET UP parameters so that you turn on the shape of input selectors and preset stations. • The master volume is set up the speakers and turned on page 46. Multi channel surround setup For the best possible surround sound, all speakers should be placed from 3 to the listening position. However, we recommend that you place the surround speakers...
Operating Instructions (HT-DDW650)
Page 18
... using multi channel surround sound, select "SMALL" to activate the bass redirection circuitry and output the center channel bass frequencies from the sub woofer. • When the front speakers are set to "SMALL", the center and surround speakers are also automatically set to "SMALL" (unless previously set to "NO"). • When the sub woofer is set to "NO", the front speakers are automatically set the center speaker to "LARGE". • If the sound is distorted, or you connect large speakers that best...
... using multi channel surround sound, select "SMALL" to activate the bass redirection circuitry and output the center channel bass frequencies from the sub woofer. • When the front speakers are set to "SMALL", the center and surround speakers are also automatically set to "SMALL" (unless previously set to "NO"). • When the sub woofer is set to "NO", the front speakers are automatically set the center speaker to "LARGE". • If the sound is distorted, or you connect large speakers that best...
Operating Instructions (HT-DDW650)
Page 19
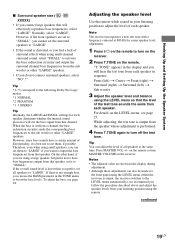
... test tone. Note The receiver incorporates a new test tone with a frequency centered at the same time. TONE" appears in the display and you do not connect surround speakers, select "NO".*3 Tip *1-*3 correspond to the following Dolby Pro Logic modes *1 NORMAL *2 PHANTOM *3 3 STEREO Tip Internally, the LARGE and SMALL settings for easier speaker level adjustment. 1 Press ?/1 on the remote to turn MASTER VOLUME on the receiver. Tip You can also be made via the front panel using the LEVEL menu (when the test tone...
... test tone. Note The receiver incorporates a new test tone with a frequency centered at the same time. TONE" appears in the display and you do not connect surround speakers, select "NO".*3 Tip *1-*3 correspond to the following Dolby Pro Logic modes *1 NORMAL *2 PHANTOM *3 3 STEREO Tip Internally, the LARGE and SMALL settings for easier speaker level adjustment. 1 Press ?/1 on the remote to turn MASTER VOLUME on the receiver. Tip You can also be made via the front panel using the LEVEL menu (when the test tone...
Operating Instructions (HT-DDW650)
Page 20
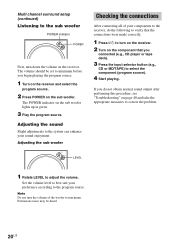
Multi channel surround setup (continued) Listening to adjust the volume. The POWER indicator on the sub woofer. LEVEL 1 Rotate LEVEL to the sub woofer POWER indicator POWER First, turn down the volume on the component that the connections were made correctly. 1 Press ?/1 to turn the volume of your sound enjoyment. Set the volume level to best suit your preference according to the system can enhance your components to the receiver, do not obtain normal sound output after performing this procedure, see...
Multi channel surround setup (continued) Listening to adjust the volume. The POWER indicator on the sub woofer. LEVEL 1 Rotate LEVEL to the sub woofer POWER indicator POWER First, turn down the volume on the component that the connections were made correctly. 1 Press ?/1 to turn the volume of your sound enjoyment. Set the volume level to best suit your preference according to the system can enhance your components to the receiver, do not obtain normal sound output after performing this procedure, see...
Operating Instructions (HT-DDW650)
Page 21
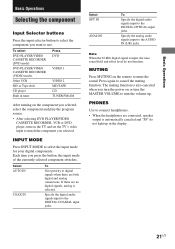
... audio signals input to cancel the muting function. Basic Operations Basic Operations Selecting the component Input Selector buttons Press the input selector button to select the component you want to match the component you selected. To select DVD PLAYER/VIDEO CASSETTE RECORDER (DVD mode) DVD PLAYER/VIDEO CASSETTE RECORDER (VIDEO mode) Other VCR MD or Tape deck CD player Built in the display. 21US Each time you selected, select the component and play the program source. • After selecting DVD PLAYER/VIDEO CASSETTE RECORDER, VCR or DVD player, turn the volume up in tuner...
... audio signals input to cancel the muting function. Basic Operations Basic Operations Selecting the component Input Selector buttons Press the input selector button to select the component you want to match the component you selected. To select DVD PLAYER/VIDEO CASSETTE RECORDER (DVD mode) DVD PLAYER/VIDEO CASSETTE RECORDER (VIDEO mode) Other VCR MD or Tape deck CD player Built in the display. 21US Each time you selected, select the component and play the program source. • After selecting DVD PLAYER/VIDEO CASSETTE RECORDER, VCR or DVD player, turn the volume up in tuner...
Operating Instructions (HT-DDW650)
Page 23
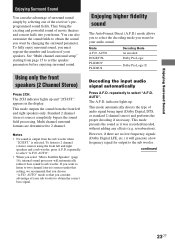
... redirect bass sound to set the speaker parameters before enjoying surround sound. Notes • No sound is selected. Using only the front speakers (2 Channel Stereo) Press 2CH. Multi channel surround formats are no low frequency signals (Dolby Digital LFE, etc.) it was recorded/encoded, without adding any effects (e.g. is output from the front left and right speakers and a sub woofer, press A.F.D. AUTO DOLBY PL PLII MOV PLII MUS Decoding Mode As encoded Dolby Pro Logic Dolby Pro Logic II Decoding the input audio signal automatically...
... redirect bass sound to set the speaker parameters before enjoying surround sound. Notes • No sound is selected. Using only the front speakers (2 Channel Stereo) Press 2CH. Multi channel surround formats are no low frequency signals (Dolby Digital LFE, etc.) it was recorded/encoded, without adding any effects (e.g. is output from the front left and right speakers and a sub woofer, press A.F.D. AUTO DOLBY PL PLII MOV PLII MUS Decoding Mode As encoded Dolby Pro Logic Dolby Pro Logic II Decoding the input audio signal automatically...
Operating Instructions (HT-DDW650)
Page 25
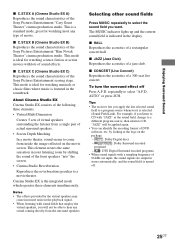
... following three elements. • Virtual Multi Dimension Creates 5 sets of virtual speakers surrounding the listener from inside the image reflected on the package. - : Dolby Digital discs - : Dolby Surround encoded programs - : DTS Digital Surround encoded programs • When sound signals with "JAZZ" as the sound field, change to a different program source, then return to select "A.F.D. The MUSIC indicator lights up and the current sound field is the integrated mode which operates these elements simultaneously. For example, if...
... following three elements. • Virtual Multi Dimension Creates 5 sets of virtual speakers surrounding the listener from inside the image reflected on the package. - : Dolby Digital discs - : Dolby Surround encoded programs - : DTS Digital Surround encoded programs • When sound signals with "JAZZ" as the sound field, change to a different program source, then return to select "A.F.D. The MUSIC indicator lights up and the current sound field is the integrated mode which operates these elements simultaneously. For example, if...
Operating Instructions (HT-DDW650)
Page 26
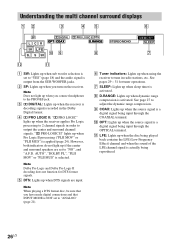
... set to "YES" (page 18) and the audio signal is output from the SUB WOOFER jacks. 2 SP: Lights up when you turn on the receiver. See pages 29 - 31 for DTS format signals. 5 DTS: Lights up when the source signal is a digital signal being played back contains the LFE (Low Frequency Effect) channel and when the sound of the LFE channel signal is selected. PRO LOGIC II: "; See page 27 to adjust the dynamic range compression. 9 COAX: Lights up when the source signal is a digital signal...
... set to "YES" (page 18) and the audio signal is output from the SUB WOOFER jacks. 2 SP: Lights up when you turn on the receiver. See pages 29 - 31 for DTS format signals. 5 DTS: Lights up when the source signal is a digital signal being played back contains the LFE (Low Frequency Effect) channel and when the sound of the LFE channel signal is selected. PRO LOGIC II: "; See page 27 to adjust the dynamic range compression. 9 COAX: Lights up when the source signal is a digital signal...
Operating Instructions (HT-DDW650)
Page 27
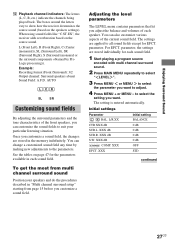
... change a customized sound field any time by Pro Logic processing)). parameter, the settings are stored individually for each sound field. 1 Start playing a program source encoded with multi channel surround sound. 2 Press MAIN MENU repeatedly to select " LEVEL ". 3 Press MENU or MENU to select the parameter you want to select the setting you want . to adjust. 4 Press MENU + or MENU - Initial settings Parameter L R BAL. XXX dB SUR.R. RANGE COMP. XXX STD continued 27US L (Front Left), R (Front Right), C (Center...
... change a customized sound field any time by Pro Logic processing)). parameter, the settings are stored individually for each sound field. 1 Start playing a program source encoded with multi channel surround sound. 2 Press MAIN MENU repeatedly to select " LEVEL ". 3 Press MENU or MENU to select the parameter you want to select the setting you want . to adjust. 4 Press MENU + or MENU - Initial settings Parameter L R BAL. XXX dB SUR.R. RANGE COMP. XXX STD continued 27US L (Front Left), R (Front Right), C (Center...
Operating Instructions (HT-DDW650)
Page 35
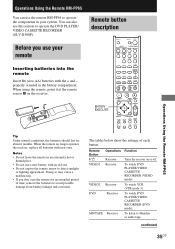
... mode 3) To watch DVD PLAYER/VIDEO CASSETTE RECORDER (VIDEO mode). continued 35US properly oriented in an extremely hot or humid place. • Do not use a new battery with an old one. • Do not expose the remote sensor to direct sunlight or lighting apparatuses. Doing so may cause a malfunction. • If you use your system. Remote Button ?/1 VIDEO1 Operations Receiver Receiver VIDEO2 Receiver DVD Receiver MD/TAPE Receiver Function Turns the receiver on the receiver. Operations Using...
... mode 3) To watch DVD PLAYER/VIDEO CASSETTE RECORDER (VIDEO mode). continued 35US properly oriented in an extremely hot or humid place. • Do not use a new battery with an old one. • Do not expose the remote sensor to direct sunlight or lighting apparatuses. Doing so may cause a malfunction. • If you use your system. Remote Button ?/1 VIDEO1 Operations Receiver Receiver VIDEO2 Receiver DVD Receiver MD/TAPE Receiver Function Turns the receiver on the receiver. Operations Using...
Operating Instructions (HT-DDW650)
Page 36
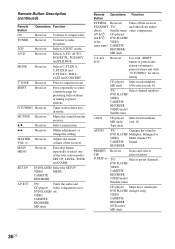
... (VIDEO mode)/ Satellite tuner CD player/ Skips discs (multi-disc DVD PLAYER/ changer only). RECORDER PRESET/ Receiver Scans and selects CH/ preset stations. SET UP DVD PLAYER/ Select the SETUP VIDEO MENU. TV/ Select channel numbers. TUNER Receiver To listen to DVD PLAYER/ Multiplex, Bilingual or VIDEO Multi channel TV CASSETTE Sound. MUTING Receiver Mutes the sound from the receiver. AUDIO TV/ Changes the sound to radio programs. 2CH Receiver Selects 2CH ST. CASSETTE RECORDER AV ?/1 TV/ Turns the audio and CD player/ video components on or DVD PLAYER...
... (VIDEO mode)/ Satellite tuner CD player/ Skips discs (multi-disc DVD PLAYER/ changer only). RECORDER PRESET/ Receiver Scans and selects CH/ preset stations. SET UP DVD PLAYER/ Select the SETUP VIDEO MENU. TV/ Select channel numbers. TUNER Receiver To listen to DVD PLAYER/ Multiplex, Bilingual or VIDEO Multi channel TV CASSETTE Sound. MUTING Receiver Mutes the sound from the receiver. AUDIO TV/ Changes the sound to radio programs. 2CH Receiver Selects 2CH ST. CASSETTE RECORDER AV ?/1 TV/ Turns the audio and CD player/ video components on or DVD PLAYER...
Operating Instructions (HT-DDW650)
Page 38
... can assign the MD/TAPE button to your system components, you want to the input selector button (for receiver operation. • Press TOP MENU/GUIDE or MENU/AV MENU on the remote before you can change (for set operation. The following numeric codes are assigned to select the input source: To operate CD player Code(s) 22 MD deck 23 Tape deck A 24 Tape deck B 25 VCR (command mode VTR 2*) 26 VCR (command mode VTR 3*) 27 TV (SONY) 01 DSS (Digital Satellite Receiver) 30 DVD 21 Tuner...
... can assign the MD/TAPE button to your system components, you want to the input selector button (for receiver operation. • Press TOP MENU/GUIDE or MENU/AV MENU on the remote before you can change (for set operation. The following numeric codes are assigned to select the input source: To operate CD player Code(s) 22 MD deck 23 Tape deck A 24 Tape deck B 25 VCR (command mode VTR 2*) 26 VCR (command mode VTR 3*) 27 TV (SONY) 01 DSS (Digital Satellite Receiver) 30 DVD 21 Tuner...
Operating Instructions (HT-DDW650)
Page 40
...; Use caution when placing the unit or speakers on the receiver has been activated because of the top, side and bottom rises considerably. On operation Before connecting other for a long time, be changed only at a large volume, the cabinet temperature of a short circuit ("PROTECT" flashes). There is no sound or only a very low-level sound no matter which component is selected. • Check that the speakers and components...
...; Use caution when placing the unit or speakers on the receiver has been activated because of the top, side and bottom rises considerably. On operation Before connecting other for a long time, be changed only at a large volume, the cabinet temperature of a short circuit ("PROTECT" flashes). There is no sound or only a very low-level sound no matter which component is selected. • Check that the speakers and components...

Operating Instructions (HT-DDW650)
Page 41
... a digital component connected to the analog MD/TAPE terminal. Recording cannot be connected to the receiver correctly. Wipe them with a cloth slightly moistened with input selector button. • Make sure that the playing DVD, etc. Dolby Digital or DTS multi channel sound is not reproduced. • Check that INPUT MODE is set or fluorescent light. • Move your TV away from the audio components. • The plugs and jacks are dirty. The surround effect cannot be connected...
... a digital component connected to the analog MD/TAPE terminal. Recording cannot be connected to the receiver correctly. Wipe them with a cloth slightly moistened with input selector button. • Make sure that the playing DVD, etc. Dolby Digital or DTS multi channel sound is not reproduced. • Check that INPUT MODE is set or fluorescent light. • Move your TV away from the audio components. • The plugs and jacks are dirty. The surround effect cannot be connected...
Operating Instructions (HT-DDW650)
Page 42
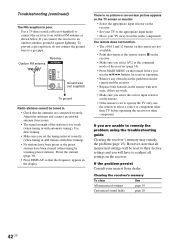
.... Adjust the antennas and connect an external antenna if necessary. • The signal strength of the receiver (page 34). • Press MAIN MENU on the receiver. • Make sure you select AV2 as shown below. Outdoor FM antenna Receiver ANTENNA AM y FM 75Ω COAXIAL Ground wire (not supplied) To ground Radio stations cannot be reset to their factory settings and you set to operate the TV only, use the remote to remedy the problem using the troubleshooting guide...
.... Adjust the antennas and connect an external antenna if necessary. • The signal strength of the receiver (page 34). • Press MAIN MENU on the receiver. • Make sure you select AV2 as shown below. Outdoor FM antenna Receiver ANTENNA AM y FM 75Ω COAXIAL Ground wire (not supplied) To ground Radio stations cannot be reset to their factory settings and you set to operate the TV only, use the remote to remedy the problem using the troubleshooting guide...
Operating Instructions (HT-DDW650)
Page 44
... down PRESET TUNING + and press ?/1. To reset the scale to 9 kHz or 10 kHz. Video section Inputs Video: Outputs Video: 1 Vp-p, 75 ohms 1 Vp-p, 75 ohms General Power requirements 120 V AC, 60 Hz Power consumption 175 W Power consumption (during standby mode) 0.3 W Dimensions 16 7/8 × 5 6/8 × 11 6/8 inches including projecting parts and controls Mass (Approx.) 15 lb 14 oz Speaker section SS-MSP75 for front and surround speakers SS-CNP75 for center speaker Speaker...
... down PRESET TUNING + and press ?/1. To reset the scale to 9 kHz or 10 kHz. Video section Inputs Video: Outputs Video: 1 Vp-p, 75 ohms 1 Vp-p, 75 ohms General Power requirements 120 V AC, 60 Hz Power consumption 175 W Power consumption (during standby mode) 0.3 W Dimensions 16 7/8 × 5 6/8 × 11 6/8 inches including projecting parts and controls Mass (Approx.) 15 lb 14 oz Speaker section SS-MSP75 for front and surround speakers SS-CNP75 for center speaker Speaker...


