Operating Instructions (HT-DDW650)
Page 2
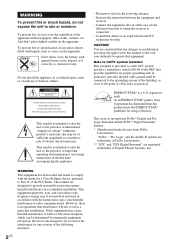
...a residential installation. WARNING This equipment has been tested and found to radio communications. Increase the separation between the equipment and receiver. - CAUTION You are cautioned that may cause harmful interference to comply with liquids, such as practical. This symbol is provided...built-in the literature accompanying the appliance. registered mark. As an ENERGY STAR® partner, Sony Corporation has determined that to rain or moisture. Reorient or relocate the receiving antenna. - To prevent fire, do not expose the unit to which can radiate radio frequency...
...a residential installation. WARNING This equipment has been tested and found to radio communications. Increase the separation between the equipment and receiver. - CAUTION You are cautioned that may cause harmful interference to comply with liquids, such as practical. This symbol is provided...built-in the literature accompanying the appliance. registered mark. As an ENERGY STAR® partner, Sony Corporation has determined that to rain or moisture. Reorient or relocate the receiving antenna. - To prevent fire, do not expose the unit to which can radiate radio frequency...
Operating Instructions (HT-DDW650)
Page 3
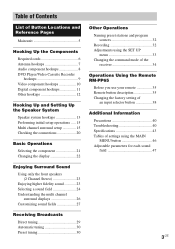
...display 22 Enjoying Surround Sound Using only the front speakers (2 Channel Stereo 23 Enjoying higher fidelity sound 23 Selecting a sound field 24 Understanding the multi channel surround displays 26 Customizing sound fields 27 Receiving Broadcasts Direct tuning 29 Automatic tuning 30 Preset tuning 30 Other Operations...Naming preset stations and program sources 32 Recording 32 Adjustments using the SET UP menu 33 Changing the command mode of the receiver 34 Operations Using the Remote RM-PP65 Before you use your remote 35 Remote button description 35 Changing the factory setting ...
...display 22 Enjoying Surround Sound Using only the front speakers (2 Channel Stereo 23 Enjoying higher fidelity sound 23 Selecting a sound field 24 Understanding the multi channel surround displays 26 Customizing sound fields 27 Receiving Broadcasts Direct tuning 29 Automatic tuning 30 Preset tuning 30 Other Operations...Naming preset stations and program sources 32 Recording 32 Adjustments using the SET UP menu 33 Changing the command mode of the receiver 34 Operations Using the Remote RM-PP65 Before you use your remote 35 Remote button description 35 Changing the factory setting ...
Operating Instructions (HT-DDW650)
Page 4
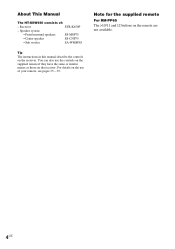
Note for the supplied remote For RM-PP65 The >10/11 and 12 buttons on the receiver. You can also use of : - Speaker system • Front/surround speakers SS-MSP75 • Center speaker SS-CNP75 • Sub woofer SA-WMSP85 Tip The instructions in this manual describe the controls on the remote are not available. 4US About This Manual The HT-DDW650 consists of your remote, see pages 35 - 39. Receiver STR-K650P - For details on the use the controls on the supplied remote if they have the same or similar names as those on the receiver.
Note for the supplied remote For RM-PP65 The >10/11 and 12 buttons on the receiver. You can also use of : - Speaker system • Front/surround speakers SS-MSP75 • Center speaker SS-CNP75 • Sub woofer SA-WMSP85 Tip The instructions in this manual describe the controls on the remote are not available. 4US About This Manual The HT-DDW650 consists of your remote, see pages 35 - 39. Receiver STR-K650P - For details on the use the controls on the supplied remote if they have the same or similar names as those on the receiver.
Operating Instructions (HT-DDW650)
Page 7
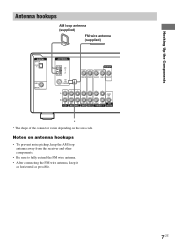
Notes on the area code. Hooking Up the Components Antenna hookups AM loop antenna (supplied) FM wire antenna (supplied) DIGITAL OPTICAL VIDEO 2 IN DVD IN COAXIAL ANTENNA AM y FM 75Ω COAXIAL MONITOR VIDEO IN VIDEO IN VIDEO OUT VIDEO IN VIDEO OUT L AUDIO OUT R IN CD OUT ... * * The shape of the connector varies depending on antenna hookups • To prevent noise pickup, keep the AM loop antenna away from the receiver and other components. • Be sure to fully extend the FM wire antenna. • After connecting the FM wire antenna, keep it as horizontal as possible. 7US
Notes on the area code. Hooking Up the Components Antenna hookups AM loop antenna (supplied) FM wire antenna (supplied) DIGITAL OPTICAL VIDEO 2 IN DVD IN COAXIAL ANTENNA AM y FM 75Ω COAXIAL MONITOR VIDEO IN VIDEO IN VIDEO OUT VIDEO IN VIDEO OUT L AUDIO OUT R IN CD OUT ... * * The shape of the connector varies depending on antenna hookups • To prevent noise pickup, keep the AM loop antenna away from the receiver and other components. • Be sure to fully extend the FM wire antenna. • After connecting the FM wire antenna, keep it as horizontal as possible. 7US

Operating Instructions (HT-DDW650)
Page 10
... TV's video output jack to the receiver as shown below. C INPUT VIDEO IN TV monitor 10US If you can connect your video components as shown above. DVD player OUTPUT AUDIO OUT R L VIDEO OUT B DIGITAL OPTICAL VIDEO 2 IN DVD IN COAXIAL ANTENNA AM y FM 75Ω COAXIAL MONITOR VIDEO IN ...IN OUT L R VCR Note on video component hookups You can hookup your TV's audio output jacks to the VIDEO 2 AUDIO IN jacks on the receiver. Video component hookups If you are connecting a separate satellite tuner, connect both the audio and video output jacks to the VIDEO 2 VIDEO IN jack...
... TV's video output jack to the receiver as shown below. C INPUT VIDEO IN TV monitor 10US If you can connect your video components as shown above. DVD player OUTPUT AUDIO OUT R L VIDEO OUT B DIGITAL OPTICAL VIDEO 2 IN DVD IN COAXIAL ANTENNA AM y FM 75Ω COAXIAL MONITOR VIDEO IN ...IN OUT L R VCR Note on video component hookups You can hookup your TV's audio output jacks to the VIDEO 2 AUDIO IN jacks on the receiver. Video component hookups If you are connecting a separate satellite tuner, connect both the audio and video output jacks to the VIDEO 2 VIDEO IN jack...
Operating Instructions (HT-DDW650)
Page 11
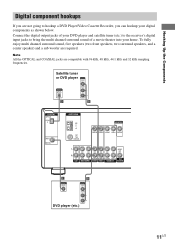
... the OPTICAL and COAXIAL jacks are not going to bring the multi channel surround sound of your DVD player and satellite tuner (etc.) to the receiver's digital input jacks to hookup a DVD Player/Video Cassette Recorder, you are compatible with 96 kHz, 48 kHz, 44.1 kHz and 32 kHz sampling ...woofer are required. Satellite tuner or DVD player OUTPUT VIDEO OUT OUTPUT DIGITAL OPTICAL AUDIO OUT L R D B DIGITAL OPTICAL VIDEO 2 IN DVD IN COAXIAL ANTENNA AM y FM 75Ω COAXIAL MONITOR VIDEO IN VIDEO IN VIDEO OUT VIDEO IN VIDEO OUT L AUDIO OUT R IN CD OUT IN AUDIO IN AUDIO IN AUDIO...
... the OPTICAL and COAXIAL jacks are not going to bring the multi channel surround sound of your DVD player and satellite tuner (etc.) to the receiver's digital input jacks to hookup a DVD Player/Video Cassette Recorder, you are compatible with 96 kHz, 48 kHz, 44.1 kHz and 32 kHz sampling ...woofer are required. Satellite tuner or DVD player OUTPUT VIDEO OUT OUTPUT DIGITAL OPTICAL AUDIO OUT L R D B DIGITAL OPTICAL VIDEO 2 IN DVD IN COAXIAL ANTENNA AM y FM 75Ω COAXIAL MONITOR VIDEO IN VIDEO IN VIDEO OUT VIDEO IN VIDEO OUT L AUDIO OUT R IN CD OUT IN AUDIO IN AUDIO IN AUDIO...
Operating Instructions (HT-DDW650)
Page 12
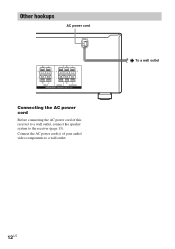
b To a wall outlet 12US Other hookups AC power cord RL RL RL RL FRONT CENTER SURROUND SPEAKERS IMPEDANCE USE 8 - 16Ω Connecting the AC power cord Before connecting the AC power cord of your audio/ video components to the receiver (page 13). Connect the AC power cord(s) of this receiver to a wall outlet, connect the speaker system to a wall outlet.
b To a wall outlet 12US Other hookups AC power cord RL RL RL RL FRONT CENTER SURROUND SPEAKERS IMPEDANCE USE 8 - 16Ω Connecting the AC power cord Before connecting the AC power cord of your audio/ video components to the receiver (page 13). Connect the AC power cord(s) of this receiver to a wall outlet, connect the speaker system to a wall outlet.
Operating Instructions (HT-DDW650)
Page 14
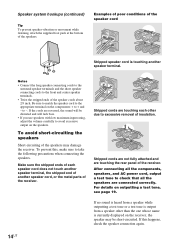
... tone is touching another speaker cord, or the metal parts of insulation. To avoid short-circuiting the speakers Short-circuiting of the receiver. Stripped cords are not fully attached and are connected correctly. Examples of poor conditions of the speaker cord Stripped speaker cord is... output from a speaker other due to the appropriate terminal on the receiver, the speaker may damage the receiver. Be sure to match the speaker cord to excessive removal of the receiver. Speaker system hookups (continued) Tip To prevent speaker vibration or movement while ...
... tone is touching another speaker cord, or the metal parts of insulation. To avoid short-circuiting the speakers Short-circuiting of the receiver. Stripped cords are not fully attached and are connected correctly. Examples of poor conditions of the speaker cord Stripped speaker cord is... output from a speaker other due to the appropriate terminal on the receiver, the speaker may damage the receiver. Be sure to match the speaker cord to excessive removal of the receiver. Speaker system hookups (continued) Tip To prevent speaker vibration or movement while ...
Operating Instructions (HT-DDW650)
Page 15
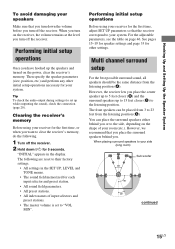
... surround speakers to 23 feet from the listening position (A). Performing initial setup operations Once you . The following . 1 Turn off the receiver. 2 Hold down the volume before you turn off the receiver. See pages 15-19 for speaker settings and page 33 for other initial setup operations necessary for your... sound field memorized for the first time, adjust SET UP parameters so that you place the surround speakers behind you turn off the receiver. The front speakers can place the surround speakers either behind you have hooked up the speakers and turned on the power, clear the...
... surround speakers to 23 feet from the listening position (A). Performing initial setup operations Once you . The following . 1 Turn off the receiver. 2 Hold down the volume before you turn off the receiver. See pages 15-19 for speaker settings and page 33 for other initial setup operations necessary for your... sound field memorized for the first time, adjust SET UP parameters so that you place the surround speakers behind you turn off the receiver. The front speakers can place the surround speakers either behind you have hooked up the speakers and turned on the power, clear the...
Operating Instructions (HT-DDW650)
Page 17
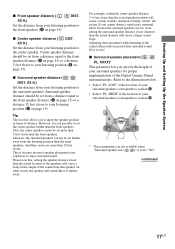
Tip The receiver allows you specify the height of your listening position (B on page 15). This is because incorrect speaker placement is further away. Please note that speaker. ...
Tip The receiver allows you specify the height of your listening position (B on page 15). This is because incorrect speaker placement is further away. Please note that speaker. ...
Operating Instructions (HT-DDW650)
Page 19
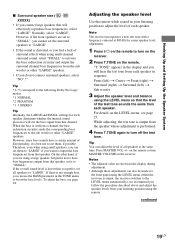
...display during adjustment. • Although these adjustments can adjust the level of all speakers to the following Dolby Pro Logic modes *1 NORMAL *2 PHANTOM *3 3 STEREO Tip Internally, the LARGE and SMALL settings for easier speaker level adjustment. 1 Press ?/1 on the remote. Front (left) t Center t Front (right) ... you follow the procedure described above and adjust the speaker levels from your listening position to boost the bass levels. Note The receiver incorporates a new test tone with a frequency centered at the same time. Hooking Up and Setting Up the Speaker System x Surround...
...display during adjustment. • Although these adjustments can adjust the level of all speakers to the following Dolby Pro Logic modes *1 NORMAL *2 PHANTOM *3 3 STEREO Tip Internally, the LARGE and SMALL settings for easier speaker level adjustment. 1 Press ?/1 on the remote. Front (left) t Center t Front (right) ... you follow the procedure described above and adjust the speaker levels from your listening position to boost the bass levels. Note The receiver incorporates a new test tone with a frequency centered at the same time. Hooking Up and Setting Up the Speaker System x Surround...
Operating Instructions (HT-DDW650)
Page 20
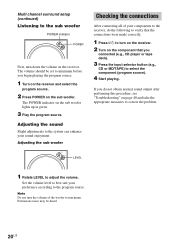
... sound enjoyment. Extraneous noise may be set to maximum. Adjusting the sound Slight adjustments to correct the problem. Note Do not turn on the receiver. 2 Turn on the component that the connections were made correctly. 1 Press ?/1 to turn the volume of your preference according to the sub...volume on the sub woofer lights up in green. 3 Play the program source. Set the volume level to best suit your components to the receiver, do not obtain normal sound output after performing this procedure, see "Troubleshooting" on the sub woofer. The volume should be heard. 20US ...
... sound enjoyment. Extraneous noise may be set to maximum. Adjusting the sound Slight adjustments to correct the problem. Note Do not turn on the receiver. 2 Turn on the component that the connections were made correctly. 1 Press ?/1 to turn the volume of your preference according to the sub...volume on the sub woofer lights up in green. 3 Play the program source. Set the volume level to best suit your components to the receiver, do not obtain normal sound output after performing this procedure, see "Troubleshooting" on the sub woofer. The volume should be heard. 20US ...
Operating Instructions (HT-DDW650)
Page 23
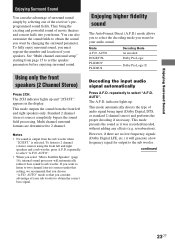
... sound, you want to listen to set the speaker parameters before enjoying surround sound. Using only the front speakers (2 Channel Stereo) Press 2CH. Standard 2 channel (stereo) sources completely bypass the sound field processing. AUTO". However, if there are downmixed to 2 channel. appears in the display...and concert halls into your speakers. indicator lights up and "2CH ST." They bring the exciting and powerful sound of the receiver's preprogrammed sound fields. This mode automatically detects the type of your home. If you must register the number and location ...
... sound, you want to listen to set the speaker parameters before enjoying surround sound. Using only the front speakers (2 Channel Stereo) Press 2CH. Standard 2 channel (stereo) sources completely bypass the sound field processing. AUTO". However, if there are downmixed to 2 channel. appears in the display...and concert halls into your speakers. indicator lights up and "2CH ST." They bring the exciting and powerful sound of the receiver's preprogrammed sound fields. This mode automatically detects the type of your home. If you must register the number and location ...
Operating Instructions (HT-DDW650)
Page 24
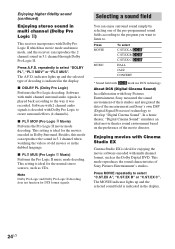
...DCS* C.ST.EX B DCS* C.ST.EX C DCS* HALL JAZZ CONCERT * Sound field with Sony Pictures Entertainment, Sony measured the sound environment of their studios and integrated the data of the measurement and Sony's own DSP (Digital Signal Processor) technology to . In a home theater, "Digital Cinema Sound" ... use DCS technology. Enjoying higher fidelity sound (continued) Enjoying stereo sound in multi channel (Dolby Pro Logic ) This receiver incorporates with Dolby Pro Logic II which has movie mode and music mode, and the receiver can reproduce the sound in 5.1 channel when watching the videos...
...DCS* C.ST.EX B DCS* C.ST.EX C DCS* HALL JAZZ CONCERT * Sound field with Sony Pictures Entertainment, Sony measured the sound environment of their studios and integrated the data of the measurement and Sony's own DSP (Digital Signal Processor) technology to . In a home theater, "Digital Cinema Sound" ... use DCS technology. Enjoying higher fidelity sound (continued) Enjoying stereo sound in multi channel (Dolby Pro Logic ) This receiver incorporates with Dolby Pro Logic II which has movie mode and music mode, and the receiver can reproduce the sound in 5.1 channel when watching the videos...
Operating Instructions (HT-DDW650)
Page 25
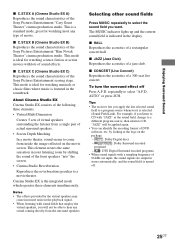
...field to a program source whenever it is indicated in the display. x HALL Reproduces the acoustics of the Sony Pictures Entertainment "Kim Novak Theater" cinema production studio. Tips • The receiver lets you will be able to come from the surround speakers. by shifting the sound of DVD software, ...is ideal for watching science-fiction or action movies with a sampling frequency of 96 kHz are input, the sound signals are output in stereo automatically, and the sound field is featured in your listening room by looking at the logo on the movie screen. To turn the...
...field to a program source whenever it is indicated in the display. x HALL Reproduces the acoustics of the Sony Pictures Entertainment "Kim Novak Theater" cinema production studio. Tips • The receiver lets you will be able to come from the surround speakers. by shifting the sound of DVD software, ...is ideal for watching science-fiction or action movies with a sampling frequency of 96 kHz are input, the sound signals are output in stereo automatically, and the sound field is featured in your listening room by looking at the logo on the movie screen. To turn the...
Operating Instructions (HT-DDW650)
Page 26
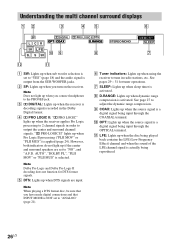
... headphones to "YES" (page 18) and the audio signal is output from the SUB WOOFER jacks. 2 SP: Lights up when you turn on the receiver. PRO LOGIC II" lights up when Pro Logic II processing ("PLII MOV" or "PLII MUS") is activated. Note When playing a DTS format disc,... signals recorded in radio stations, etc. DIGITAL: Lights up when the receiver is selected. PRO LOGIC II: "; "; Understanding the multi channel surround displays 12 3 45 6 SP LCR aDIGITAL a PRO LOGIC II DTS OPT COAX D.RANGE SW L F E q; 9 8 SL S SR STEREO MONO MEMORY SLEEP 7 qs qa 1 SW: Lights up when sub...
... headphones to "YES" (page 18) and the audio signal is output from the SUB WOOFER jacks. 2 SP: Lights up when you turn on the receiver. PRO LOGIC II" lights up when Pro Logic II processing ("PLII MOV" or "PLII MUS") is activated. Note When playing a DTS format disc,... signals recorded in radio stations, etc. DIGITAL: Lights up when the receiver is selected. PRO LOGIC II: "; "; Understanding the multi channel surround displays 12 3 45 6 SP LCR aDIGITAL a PRO LOGIC II DTS OPT COAX D.RANGE SW L F E q; 9 8 SL S SR STEREO MONO MEMORY SLEEP 7 qs qa 1 SW: Lights up when sub...
Operating Instructions (HT-DDW650)
Page 27
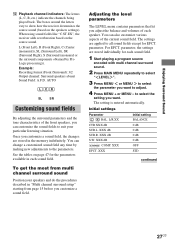
...sound field. The settings are stored in the memory indefinitely. The setting is entered automatically. When using sound fields like "C.ST.EX", the receiver adds reverberation based on the speakers settings). XXX dB D. For EFCT. L/R XX Initial setting BALANCE CTR XXX dB SUR.L. XXX dB ...3/2 Output channel: Surround speakers absent Sound Field: A.F.D. You can customize the sound fields to adjust. 4 Press MENU + or MENU - to show how the receiver downmixes the source sound (based on the source sound. Once you want . parameter. RANGE COMP. XXX 0 dB 0 dB 0 dB 0 dB OFF EFCT....
...sound field. The settings are stored in the memory indefinitely. The setting is entered automatically. When using sound fields like "C.ST.EX", the receiver adds reverberation based on the speakers settings). XXX dB D. For EFCT. L/R XX Initial setting BALANCE CTR XXX dB SUR.L. XXX dB ...3/2 Output channel: Surround speakers absent Sound Field: A.F.D. You can customize the sound fields to adjust. 4 Press MENU + or MENU - to show how the receiver downmixes the source sound (based on the source sound. Once you want . parameter. RANGE COMP. XXX 0 dB 0 dB 0 dB 0 dB OFF EFCT....
Operating Instructions (HT-DDW650)
Page 29
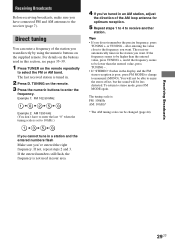
Direct tuning You can be changed (page 44). 29US For details on the remote repeatedly to select the FM or AM band. The last received station is tuned in this section, see pages 35-39. 1 Press TUNER on the buttons used in your area. 4 If you've tuned in... in a station and the entered numbers flash Make sure you want . Receiving Broadcasts Receiving Broadcasts Before receiving broadcasts, make sure you cannot tune in the display and the FM stereo reception is poor, press FM MODE to change to monaural (MONO). Example 1: FM 102.50 MHz 1 b0 b2 b5b 0 Example 2: AM 1350 kHz (You don't ...
Direct tuning You can be changed (page 44). 29US For details on the remote repeatedly to select the FM or AM band. The last received station is tuned in this section, see pages 35-39. 1 Press TUNER on the buttons used in your area. 4 If you've tuned in... in a station and the entered numbers flash Make sure you want . Receiving Broadcasts Receiving Broadcasts Before receiving broadcasts, make sure you cannot tune in the display and the FM stereo reception is poor, press FM MODE to change to monaural (MONO). Example 1: FM 102.50 MHz 1 b0 b2 b5b 0 Example 2: AM 1350 kHz (You don't ...
Operating Instructions (HT-DDW650)
Page 30
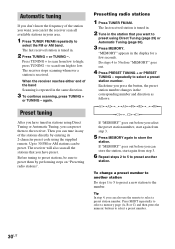
...stations in stations using the supplied remote. The last received station is tuned in. 2 Tune in the station that you have preset. The last received station is received. Preset tuning After you have tuned in your area. 1 Press TUNER FM/AM repeatedly to preset stations, be preset. Before ...tuning to select the FM or AM band. Presetting radio stations 1 Press TUNER FM/AM. Do steps 4 to 5 ...
...stations in stations using the supplied remote. The last received station is tuned in. 2 Tune in the station that you have preset. The last received station is received. Preset tuning After you have tuned in your area. 1 Press TUNER FM/AM repeatedly to preset stations, be preset. Before ...tuning to select the FM or AM band. Presetting radio stations 1 Press TUNER FM/AM. Do steps 4 to 5 ...
Operating Instructions (HT-DDW650)
Page 31
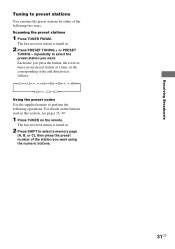
... the numeric buttons. 31US Scanning the preset stations 1 Press TUNER FM/AM. The last received station is tuned in. 2 Press SHIFT to select a memory page (A, B, or C), then press the preset number of the station you press the button, the receiver tunes in one preset station at a time, in the corresponding ...the supplied remote to preset stations You can tune the preset stations by either of the following operations. Each time you want . The last received station is tuned in this section, see pages 35-39. 1 Press TUNER on the buttons used in . 2 Press PRESET TUNING + or PRESET...
... the numeric buttons. 31US Scanning the preset stations 1 Press TUNER FM/AM. The last received station is tuned in. 2 Press SHIFT to select a memory page (A, B, or C), then press the preset number of the station you press the button, the receiver tunes in one preset station at a time, in the corresponding ...the supplied remote to preset stations You can tune the preset stations by either of the following operations. Each time you want . The last received station is tuned in this section, see pages 35-39. 1 Press TUNER on the buttons used in . 2 Press PRESET TUNING + or PRESET...


