

Limited Warranty (U.S. Only)
Page 1
... supply, at no charge, new or rebuilt replacements in exchange for defective parts for a period of five (5) years. 4-243-341-02 General Stereo/Hifi Components/Tape Decks ® CD Players/Mini Disc Players/Audio Systems LIMITED WARRANTY Hifi Audio ES Products Sony Electronics Inc. ("Sony") warrants this Product is within 90 days of the date of sale, the limitation on how long an implied warranty lasts, so...
... supply, at no charge, new or rebuilt replacements in exchange for defective parts for a period of five (5) years. 4-243-341-02 General Stereo/Hifi Components/Tape Decks ® CD Players/Mini Disc Players/Audio Systems LIMITED WARRANTY Hifi Audio ES Products Sony Electronics Inc. ("Sony") warrants this Product is within 90 days of the date of sale, the limitation on how long an implied warranty lasts, so...
Technical Background
Page 6
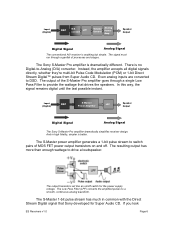
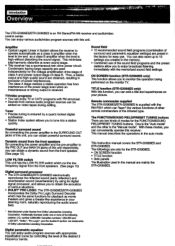
... Sony S-Master Pro amplifier is better. In this way, the signal remains digital until the last possible instant. If you look ES Receivers v1.0 Page 6 The signal must run through a single Low Pass Filter to -Analog (D/A) converter. The S-Master power amplifier generates a 1-bit pulse stream to drive a loudspeaker. The resulting output has more than enough wattage to switch pairs of processes and stages. Input (Digital) DSP D/A LPF convert Volume Control Analog Power Amp Speaker Output Digital Signal Analog Signal...
... Sony S-Master Pro amplifier is better. In this way, the signal remains digital until the last possible instant. If you look ES Receivers v1.0 Page 6 The signal must run through a single Low Pass Filter to -Analog (D/A) converter. The S-Master power amplifier generates a 1-bit pulse stream to drive a loudspeaker. The resulting output has more than enough wattage to switch pairs of processes and stages. Input (Digital) DSP D/A LPF convert Volume Control Analog Power Amp Speaker Output Digital Signal Analog Signal...

Technical Background
Page 8
... conversion expresses the music in the least significant bit. Sound quality is a major consideration when you to maximum. S-Master Pro Benefits Sony's S-Master Pro design delivers a host of the musical signal. • Synchronous Time Accuracy Controller (S-TACT). With S-Master Pro, the output MOS FET transistors simply switch between traditional amplifiers and real-world loudspeakers cause significant departure from very low volume settings all channels driven, 8 ohms, 20 to the power pulse generator...
... conversion expresses the music in the least significant bit. Sound quality is a major consideration when you to maximum. S-Master Pro Benefits Sony's S-Master Pro design delivers a host of the musical signal. • Synchronous Time Accuracy Controller (S-TACT). With S-Master Pro, the output MOS FET transistors simply switch between traditional amplifiers and real-world loudspeakers cause significant departure from very low volume settings all channels driven, 8 ohms, 20 to the power pulse generator...
Technical Background
Page 19
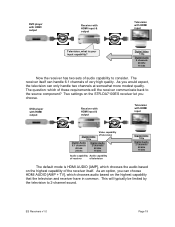
... component? DVD player with HDMI output Receiver with HDMI input & output Television with HDMI input Digital Video 720p Video capability of television Digital Audio 6.1 channels 48 kHz 24 bits Digital Audio 2 channels 48 kHz 16 bits Audio capability Audio capability of receiver of television Digital Video 720p Digital Audio 2 channels 48 kHz 16 bits The default mode is your input capability? The receiver itself . ES Receivers v1.0 Page 19 Digital Video 720p Digital Audio 2 channels 48 kHz 16 bits Now the receiver has two sets of audio capability to 2-channel sound...
... component? DVD player with HDMI output Receiver with HDMI input & output Television with HDMI input Digital Video 720p Video capability of television Digital Audio 6.1 channels 48 kHz 24 bits Digital Audio 2 channels 48 kHz 16 bits Audio capability Audio capability of receiver of television Digital Video 720p Digital Audio 2 channels 48 kHz 16 bits The default mode is your input capability? The receiver itself . ES Receivers v1.0 Page 19 Digital Video 720p Digital Audio 2 channels 48 kHz 16 bits Now the receiver has two sets of audio capability to 2-channel sound...

Technical Background
Page 20
... bits Audio capability of receiver Digital Audio 2 channels 48 kHz 16 bits Audio capability of TV Digital Video 720p Digital Audio 2 channels 48 kHz 16 bits Now the DVD player can satisfy both the television's request for 720p and the receiver's request for audio and submits its capabilities, the television cannot play sound. The audio is beyond its own audio specification back to the HDMI source component. HDMI AUDIO [ AMP ] : Default HDMI AUDIO [AMP+TV] When you choose HDMI AUDIO [AMP], the receiver ignores...
... bits Audio capability of receiver Digital Audio 2 channels 48 kHz 16 bits Audio capability of TV Digital Video 720p Digital Audio 2 channels 48 kHz 16 bits Now the DVD player can satisfy both the television's request for 720p and the receiver's request for audio and submits its capabilities, the television cannot play sound. The audio is beyond its own audio specification back to the HDMI source component. HDMI AUDIO [ AMP ] : Default HDMI AUDIO [AMP+TV] When you choose HDMI AUDIO [AMP], the receiver ignores...

Technical Background
Page 21
... time, the 2-channel audio is easy and automatic and delivers the very highest digital quality with HDMI input Digital Video 720p Digital Audio 2 channels 48 kHz 16 bits Audio capability of television Digital Audio 6.1 channels 48 kHz 24 bits Video capability of television Audio capability of receiver Digital Video 720p Digital Audio 2 channels 48 kHz 16 bits Once again, the DVD player can see, the selection process is available for audio back to the source component. HDMI AUDIO [AMP+TV] DVD player with HDMI output Receiver with HDMI input & output...
... time, the 2-channel audio is easy and automatic and delivers the very highest digital quality with HDMI input Digital Video 720p Digital Audio 2 channels 48 kHz 16 bits Audio capability of television Digital Audio 6.1 channels 48 kHz 24 bits Video capability of television Audio capability of receiver Digital Video 720p Digital Audio 2 channels 48 kHz 16 bits Once again, the DVD player can see, the selection process is available for audio back to the source component. HDMI AUDIO [AMP+TV] DVD player with HDMI output Receiver with HDMI input & output...
Technical Background
Page 36
... analog audio. • Assignable digital input (all models). To accommodate installations where the stack of Surround speakers. • 12V triggers (STR-DA2100ES and higher). An optical or coaxial digital input can place an inconspicuous IR "eye" in the digital technology. This means you can be used in addition to any video input, providing greater versatility when connecting a second DVD player, an HDTV tuner or other digital video source component. • A/B speaker terminals (all models). • 7.1-channel Cinema Studio EX modes (all models...
... analog audio. • Assignable digital input (all models). To accommodate installations where the stack of Surround speakers. • 12V triggers (STR-DA2100ES and higher). An optical or coaxial digital input can place an inconspicuous IR "eye" in the digital technology. This means you can be used in addition to any video input, providing greater versatility when connecting a second DVD player, an HDTV tuner or other digital video source component. • A/B speaker terminals (all models). • 7.1-channel Cinema Studio EX modes (all models...
Technical Background
Page 37
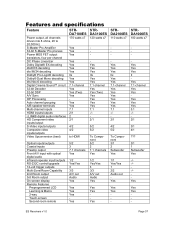
... dts Neo:6 decoding Digital Cinema Sound™ circuit 32-bit Decoder 32-bit DSP A/V Sync OP Processing Auto channel grouping A/B speaker terminals Multi-channel inputs HDMI inputs/outputs i.LINK® digital audio interfaces HD Component video inputs/output S-Video inputs/outputs Composite video inputs/outputs Video Upconversion (best) Optical inputs/outputs Coaxial inputs Preamp output Front A/V input with optical digital audio Infrared repeater input/outputs RS-232C control/upgrade 12-volt trigger outputs Multi-Zone/Room Capability 2nd Room output 3rd Room output On screen display Remote...
... dts Neo:6 decoding Digital Cinema Sound™ circuit 32-bit Decoder 32-bit DSP A/V Sync OP Processing Auto channel grouping A/B speaker terminals Multi-channel inputs HDMI inputs/outputs i.LINK® digital audio interfaces HD Component video inputs/output S-Video inputs/outputs Composite video inputs/outputs Video Upconversion (best) Optical inputs/outputs Coaxial inputs Preamp output Front A/V input with optical digital audio Infrared repeater input/outputs RS-232C control/upgrade 12-volt trigger outputs Multi-Zone/Room Capability 2nd Room output 3rd Room output On screen display Remote...
Operating Instructions
Page 3
...power amplifiers and a pre-amplifier 10 Connecting to the power outlet 11 Selecting the mode of the FUNCTION/ SOUND FIELD/PRESET TUNING buttons 11 Identifying the parts and controls 12 Front panel 12 Remote commander 14 Chapter 2 Basic Operations Operating with the remote commander 15 Changing the settings of the FUNCTION buttons 15 The on-screen-display (STR-GX909ES only) 16 Adjusting basic audio controls 16 Adjusting volume 16 Adjusting left and right sound balance 16 Reinforcing the bass 16 Selecting the speaker system 16 Selecting a program source 17 To turn...
...power amplifiers and a pre-amplifier 10 Connecting to the power outlet 11 Selecting the mode of the FUNCTION/ SOUND FIELD/PRESET TUNING buttons 11 Identifying the parts and controls 12 Front panel 12 Remote commander 14 Chapter 2 Basic Operations Operating with the remote commander 15 Changing the settings of the FUNCTION buttons 15 The on-screen-display (STR-GX909ES only) 16 Adjusting basic audio controls 16 Adjusting volume 16 Adjusting left and right sound balance 16 Reinforcing the bass 16 Selecting the speaker system 16 Selecting a program source 17 To turn...
Operating Instructions
Page 4
... audio/video program sources with this unit, you to operate automatically as a class A amplifier when the level is low and as movie theaters and gives a theater-like experience in the memory. • Combined use . TV/video programs • You can obtain powerful surround sound. Dynamic sound from the front speakers By connecting the power amplifier and the pre-amplifier to the SURROUND OUT jacks of this unit. "Dolby", "Pro Logic", and the double-D symbol are preset in the manual...
... audio/video program sources with this unit, you to operate automatically as a class A amplifier when the level is low and as movie theaters and gives a theater-like experience in the memory. • Combined use . TV/video programs • You can obtain powerful surround sound. Dynamic sound from the front speakers By connecting the power amplifier and the pre-amplifier to the SURROUND OUT jacks of this unit. "Dolby", "Pro Logic", and the double-D symbol are preset in the manual...
Operating Instructions
Page 5
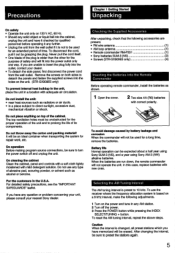
... the unit and to preset the stations again. 5 To reset the AM tuning interval, repeat the above steps. Remove the screws on both sides to turn the power switch off the power. 3 Press the POWER button while pressing the INDEX SELECT/TUNING + button. Do not throw away the carton and packing material! On operation Before making program source connections, be used for the proper operation of the cabinet. For...
... the unit and to preset the stations again. 5 To reset the AM tuning interval, repeat the above steps. Remove the screws on both sides to turn the power switch off the power. 3 Press the POWER button while pressing the INDEX SELECT/TUNING + button. Do not throw away the carton and packing material! On operation Before making program source connections, be used for the proper operation of the cabinet. For...

Operating Instructions
Page 11
..., or other is the "Auto mode" and the other high-wattage equipment to the SOUND FIELD mode automatically. When TUNER is pressed, these outlets. Audio equipment Caution Be careful that the total power consumption of modes for the FUNCTION/SOUND FIELD/PRESET TUNING buttons. Do not connect electrical home appliances such as numeric buttons. • Manual mode When you can supply the power source to the other audio equipment 0 Ili®...
..., or other is the "Auto mode" and the other high-wattage equipment to the SOUND FIELD mode automatically. When TUNER is pressed, these outlets. Audio equipment Caution Be careful that the total power consumption of modes for the FUNCTION/SOUND FIELD/PRESET TUNING buttons. Do not connect electrical home appliances such as numeric buttons. • Manual mode When you can supply the power source to the other audio equipment 0 Ili®...

Operating Instructions
Page 14
.... buttons : Control the volume of TVNCR. MUTING button: Mutes the sound. buttons: Control the receiver volume. ANT TV/VTR button: Selects the output signal from the antenna terminal on /off the setting of the equalizer and TONE controls. VISUAL POWER: Turns on the next page can be used. MI 0000 000 O OOO 0000 11 =CI 0 O l== 0000 = = J RM-P331 El Program control section Mode selector and indicator SONY STD: To control Sony equipment. El Receiver control section FUNCTION (DAT, CD, TUNER, PHONO, VIDEO 1, VIDEO 2, VIDEO 3, TAPE) buttons: The...
.... buttons : Control the volume of TVNCR. MUTING button: Mutes the sound. buttons: Control the receiver volume. ANT TV/VTR button: Selects the output signal from the antenna terminal on /off the setting of the equalizer and TONE controls. VISUAL POWER: Turns on the next page can be used. MI 0000 000 O OOO 0000 11 =CI 0 O l== 0000 = = J RM-P331 El Program control section Mode selector and indicator SONY STD: To control Sony equipment. El Receiver control section FUNCTION (DAT, CD, TUNER, PHONO, VIDEO 1, VIDEO 2, VIDEO 3, TAPE) buttons: The...
Operating Instructions
Page 16
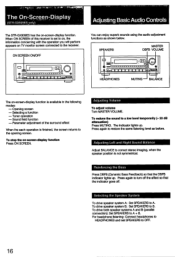
...Opening screen - Tuner operation - '**71f3°. 0 , 4511,Ali . ;" 7X,Otiniejril The On-Screen-Display (STR-GX909ES only) Adjusting Basic Audio Controls The STR-GX909ES has the on -screen-display function Press ON SCREEN. SPEAKERS MASTER DBFB VOLUME C17 :1-29 i==v 0 HEADPHONES MUTING BALANCE The on TV monitor screen connected to correct stereo imaging, when the speaker position is available in the following modes: - To reduce the sound to B. Adjusting Volume To adjust volume Turn MASTER VOLUME. Adjusting Left and Right Sound Balance Adjust BALANCE to the receiver. To...
...Opening screen - Tuner operation - '**71f3°. 0 , 4511,Ali . ;" 7X,Otiniejril The On-Screen-Display (STR-GX909ES only) Adjusting Basic Audio Controls The STR-GX909ES has the on -screen-display function Press ON SCREEN. SPEAKERS MASTER DBFB VOLUME C17 :1-29 i==v 0 HEADPHONES MUTING BALANCE The on TV monitor screen connected to correct stereo imaging, when the speaker position is available in the following modes: - To reduce the sound to B. Adjusting Volume To adjust volume Turn MASTER VOLUME. Adjusting Left and Right Sound Balance Adjust BALANCE to the receiver. To...

Operating Instructions
Page 26
... source sound again, press the button again so that the TAPE 2 MONITOR indicator lights up. Dubbing will start. vut Recorcting an Audio Source Recording onto an Audio Tape Deck or DAT Deck 4 POWER -+ ON I => Audio signals Tape Dubbing I POWER ON i=> Audio signals 3 • 03:1 0 O I= 0 o 0 ,0 to DAT or l TAPE 1, 2 OUT 4 2 DAT or tape deck Turntable CD player 3 VCR O 0 = 0 I I I Q. Note on tape dubbing Tape dubbing is possible only In the following directions: From (playback deck) To (Recording deck) Tape deck connected to TAPE 1IN Tape deck connected...
... source sound again, press the button again so that the TAPE 2 MONITOR indicator lights up. Dubbing will start. vut Recorcting an Audio Source Recording onto an Audio Tape Deck or DAT Deck 4 POWER -+ ON I => Audio signals Tape Dubbing I POWER ON i=> Audio signals 3 • 03:1 0 O I= 0 o 0 ,0 to DAT or l TAPE 1, 2 OUT 4 2 DAT or tape deck Turntable CD player 3 VCR O 0 = 0 I I I Q. Note on tape dubbing Tape dubbing is possible only In the following directions: From (playback deck) To (Recording deck) Tape deck connected to TAPE 1IN Tape deck connected...

Operating Instructions
Page 32
... DOLBY PRO LOGIC MODE button according to select the rear level mode and then adjust the level with a center speaker: The test tone will be output automatically from the front L, center, front R, and the rear speakers in succession. The SUR (surround) indicator lights up . 2 Press DOLBY SUR. To adjust the level of rear speakers Press o or v to your listening position by using the remote commander. o cicl 0 =I= 0 ,1,1,1 A & IS 6 I > or CENTER LEVEL +1- Sequence of the last selected sound fieldlights up . You can adjust the volume level...
... DOLBY PRO LOGIC MODE button according to select the rear level mode and then adjust the level with a center speaker: The test tone will be output automatically from the front L, center, front R, and the rear speakers in succession. The SUR (surround) indicator lights up . 2 Press DOLBY SUR. To adjust the level of rear speakers Press o or v to your listening position by using the remote commander. o cicl 0 =I= 0 ,1,1,1 A & IS 6 I > or CENTER LEVEL +1- Sequence of the last selected sound fieldlights up . You can adjust the volume level...

Operating Instructions
Page 38
... output signals including SURROUND (REAR, CENTER). The EQ (equalizer) indicator lights up. 4 Press EQUALIZER BAND to accurately adjust the sound quality. In the DOLBY SUR, LIVE or THEATER mode, peak levels of each band will accumulate. On the function of DISPLAY GRAPHIC Every time you to select a frequency band. When the center frequency band overlaps the bass or treble frequency band during adjustment The setting level of each channel are graphically displayed except when the equalizer curve is displayed. - The STR-GX909ES/STR-GX808ES...
... output signals including SURROUND (REAR, CENTER). The EQ (equalizer) indicator lights up. 4 Press EQUALIZER BAND to accurately adjust the sound quality. In the DOLBY SUR, LIVE or THEATER mode, peak levels of each band will accumulate. On the function of DISPLAY GRAPHIC Every time you to select a frequency band. When the center frequency band overlaps the bass or treble frequency band during adjustment The setting level of each channel are graphically displayed except when the equalizer curve is displayed. - The STR-GX909ES/STR-GX808ES...
Operating Instructions
Page 44
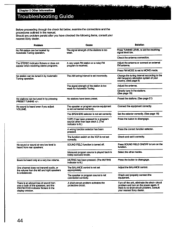
... you adjust VOLUME. Problem No FM station can be located by pressing PRESET TUNING +/-. The STEREO indicator flickers or does not appear when receiving stereo programs. A very weak FM station or a noisy FM program is heard even if you have been preset. No sound is received. The function switch on the VCR is too weak. Check the antenna connection. Press FM MODE to MONO mode. Adjust the BALANCE control. circuit problem and turn on the power again...
... you adjust VOLUME. Problem No FM station can be located by pressing PRESET TUNING +/-. The STEREO indicator flickers or does not appear when receiving stereo programs. A very weak FM station or a noisy FM program is heard even if you have been preset. No sound is received. The function switch on the VCR is too weak. Check the antenna connection. Press FM MODE to MONO mode. Adjust the BALANCE control. circuit problem and turn on the power again...
Operating Instructions
Page 45
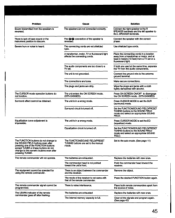
... type cords. Connect the ground wire to the SOUND FIELD mode and select an appropriate SOUND FIELD. Set the FUNCTION/SOUND FIELD/PRESET TUNING buttons to the antenna ground terminal. The mode of the remote commander. Replace the batteries with the correct phase. Clear all the signals and program again. (See page 43) I 45 Connect the speaker with new ones. The connecting cords are loose. A transformer, motor, TV or fluorescent light affects the connecting cords. Equalization curve adjustment...
... type cords. Connect the ground wire to the SOUND FIELD mode and select an appropriate SOUND FIELD. Set the FUNCTION/SOUND FIELD/PRESET TUNING buttons to the antenna ground terminal. The mode of the remote commander. Replace the batteries with the correct phase. Clear all the signals and program again. (See page 43) I 45 Connect the speaker with new ones. The connecting cords are loose. A transformer, motor, TV or fluorescent light affects the connecting cords. Equalization curve adjustment...

Operating Instructions
Page 49
... Tune in the index ON POWER 9 TUNER STADIUM DISPLAY INDEX INDEX SELECT/TUNING Select the station memorized under the same index name. nnnnnr- Select memory page. Create an index name. 4000. ON POWER empi. station with the preset tuning. SHIFT 40m. PRESET TUNING ON POWER Labeling the program sources Select the desired program except TUNER. MEMORY IsNPP1 0 CURSOR MODE - )&( J Createan index name. 49 Selecting a station among the preset stations in a desired mogo. MEMORY -.1403P1CURSOR MODE - Labeling the preset stations Select channel...
... Tune in the index ON POWER 9 TUNER STADIUM DISPLAY INDEX INDEX SELECT/TUNING Select the station memorized under the same index name. nnnnnr- Select memory page. Create an index name. 4000. ON POWER empi. station with the preset tuning. SHIFT 40m. PRESET TUNING ON POWER Labeling the program sources Select the desired program except TUNER. MEMORY IsNPP1 0 CURSOR MODE - )&( J Createan index name. 49 Selecting a station among the preset stations in a desired mogo. MEMORY -.1403P1CURSOR MODE - Labeling the preset stations Select channel...


