Operating Instructions (Large File - 14.22 MB)
Page 8
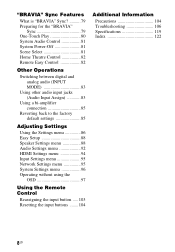
...BRAVIA" Sync? ..........79 Preparing for the "BRAVIA" Sync 79 One-Touch Play 80 System Audio Control 81 System Power-Off 81 Scene Select 81 Home Theatre Control 82 Remote Easy Control 82 Other Operations Switching between digital and analog audio (INPUT MODE 83 Using other audio input ... menu 88 Audio Settings menu 92 HDMI Settings menu 94 Input Settings menu 95 Network Settings menu 95 System Settings menu 96 Operating without using the OSD 97 Using the Remote Control Reassigning the input button .....103 Resetting the input buttons ........104 Additional Information Precautions...
...BRAVIA" Sync? ..........79 Preparing for the "BRAVIA" Sync 79 One-Touch Play 80 System Audio Control 81 System Power-Off 81 Scene Select 81 Home Theatre Control 82 Remote Easy Control 82 Other Operations Switching between digital and analog audio (INPUT MODE 83 Using other audio input ... menu 88 Audio Settings menu 92 HDMI Settings menu 94 Input Settings menu 95 Network Settings menu 95 System Settings menu 96 Operating without using the OSD 97 Using the Remote Control Reassigning the input button .....103 Resetting the input buttons ........104 Additional Information Precautions...
Operating Instructions (Large File - 14.22 MB)
Page 10
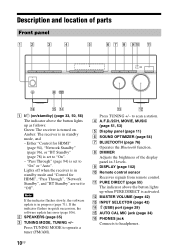
Lights off when the receiver is in standby mode and "Control for HDMI" (page 94), "Network Standby" (page 96), or "BT Standby" (page 78) is set to "Off". B SPEAKERS (page 35) C TUNING MODE, TUNING +/- D A.F.D./2CH, MOVIE, MUSIC (page 51, 53) E ... flashes slowly, the software update is in standby mode, and - Press TUNING MODE to scan a station. to operate a tuner (FM/AM). Either "Control for HDMI", "Pass Through", "Network Standby", and "BT Standby" are set to headphones. 10US K PURE DIRECT (page 55) The indicator above the button lights up when PURE DIRECT...
Lights off when the receiver is in standby mode and "Control for HDMI" (page 94), "Network Standby" (page 96), or "BT Standby" (page 78) is set to "Off". B SPEAKERS (page 35) C TUNING MODE, TUNING +/- D A.F.D./2CH, MOVIE, MUSIC (page 51, 53) E ... flashes slowly, the software update is in standby mode, and - Press TUNING MODE to scan a station. to operate a tuner (FM/AM). Either "Control for HDMI", "Pass Through", "Network Standby", and "BT Standby" are set to headphones. 10US K PURE DIRECT (page 55) The indicator above the button lights up when PURE DIRECT...
Operating Instructions (Large File - 14.22 MB)
Page 14
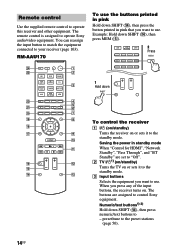
... receiver on or sets it to operate this receiver and other equipment. The buttons are set to - Saving the power in standby mode When "Control for HDMI", "Network Standby", "Pass Through", and "BT Standby" are assigned to the standby mode. When you want to your receiver (page 103). Numeric/text buttons1).../tune to use the buttons printed in pink that you press any of the input buttons, the receiver turns on or sets it to control Sony equipment. Remote control Use the supplied remote control to the standby mode. B TV ?/11) (on/standby) Turns the TV on . The remote...
... receiver on or sets it to operate this receiver and other equipment. The buttons are set to - Saving the power in standby mode When "Control for HDMI", "Network Standby", "Pass Through", and "BT Standby" are assigned to the standby mode. When you want to your receiver (page 103). Numeric/text buttons1).../tune to use the buttons printed in pink that you press any of the input buttons, the receiver turns on or sets it to control Sony equipment. Remote control Use the supplied remote control to the standby mode. B TV ?/11) (on/standby) Turns the TV on . The remote...
Operating Instructions (Large File - 14.22 MB)
Page 15
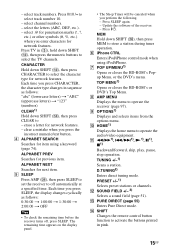
... a specified time. ALPHABET NEXT Searches for network features. - D.TUNING2) Enters direct tuning mode. Each time you enter characters for network features. PRESET +/-1) Selects preset stations or channels. N SHIFT Changes the remote control button function to activate the buttons printed in... (page 55) Enters Pure Direct mode. I OPTIONS1) Displays and selects items from the options menu. - ALPHABET PREV Searches for network features. MEM Hold down SHIFT (N), then press CLEAR to operate the audio/video equipment. select track numbers. Update the software of...
... a specified time. ALPHABET NEXT Searches for network features. - D.TUNING2) Enters direct tuning mode. Each time you enter characters for network features. PRESET +/-1) Selects preset stations or channels. N SHIFT Changes the remote control button function to activate the buttons printed in... (page 55) Enters Pure Direct mode. I OPTIONS1) Displays and selects items from the options menu. - ALPHABET PREV Searches for network features. MEM Hold down SHIFT (N), then press CLEAR to operate the audio/video equipment. select track numbers. Update the software of...
Operating Instructions (Large File - 14.22 MB)
Page 33
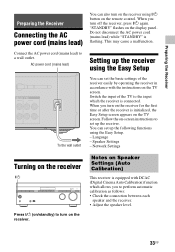
... panel. AC power cord (mains lead) Setting up the receiver. Follow the on Speaker Settings (Auto Calibration) This receiver is connected. Network Settings Turning on the receiver ?/1 Press ?/1 (on the receiver for the first time or after the receiver is flashing. This may cause... a malfunction. You can also turn on /standby) to a wall outlet. "STANDBY" flashes on the remote control. Language - Switch the input of the receiver easily by operating the receiver in accordance with DCAC (Digital Cinema Auto Calibration) function ...
... panel. AC power cord (mains lead) Setting up the receiver. Follow the on Speaker Settings (Auto Calibration) This receiver is connected. Network Settings Turning on the receiver ?/1 Press ?/1 (on the receiver for the first time or after the receiver is flashing. This may cause... a malfunction. You can also turn on /standby) to a wall outlet. "STANDBY" flashes on the remote control. Language - Switch the input of the receiver easily by operating the receiver in accordance with DCAC (Digital Cinema Auto Calibration) function ...
Operating Instructions (Large File - 14.22 MB)
Page 36
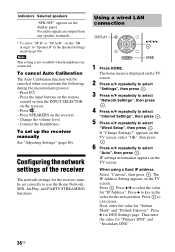
...IP Address". No audio signals are connected. Note This setting is displayed on the TV screen. Press the input buttons on the remote control or turn the INPUT SELECTOR on the receiver. - Press SPEAKERS on the receiver. - The IP Address Setting appears on the TV ...screen. 2 Press V/v repeatedly to select "Settings", then press . 3 Press V/v repeatedly to select "Network Settings", then press . 4 Press V/v repeatedly to select "Internet Settings", then press . 5 Press V/v repeatedly to select "Auto", then press . Press V/v to key...
...IP Address". No audio signals are connected. Note This setting is displayed on the TV screen. Press the input buttons on the remote control or turn the INPUT SELECTOR on the receiver. - Press SPEAKERS on the receiver. - The IP Address Setting appears on the TV ...screen. 2 Press V/v repeatedly to select "Settings", then press . 3 Press V/v repeatedly to select "Network Settings", then press . 4 Press V/v repeatedly to select "Internet Settings", then press . 5 Press V/v repeatedly to select "Auto", then press . Press V/v to key...
Operating Instructions (Large File - 14.22 MB)
Page 56
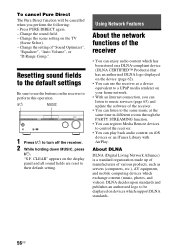
... devices to their default setting. Change the scene setting on the display panel and all sound fields are reset to control the receiver. • You can use the buttons on your home network. • With an Internet connection, you perform the following: - Resetting sound fields to the default settings Be sure to...
... devices to their default setting. Change the scene setting on the display panel and all sound fields are reset to control the receiver. • You can use the buttons on your home network. • With an Internet connection, you perform the following: - Resetting sound fields to the default settings Be sure to...
Operating Instructions (Large File - 14.22 MB)
Page 57
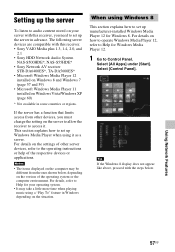
...server To listen to audio content stored on your operating system. • It may be different from other server devices, refer to Control Panel. When using Windows 8 This section explains how to set up Windows Media Player when using a "Play To" feature in... Windows Media Player 12, refer to Help for your server with this receiver. • Sony VAIO Media plus 1.3, 1.4, 2.0, and 2.1 • Sony HDD Network Audio System NAS-S500HDE*, NAS-S55HDE* • Sony Network AV receiver STR-DA6400ES*, TA-DA5600ES* • Microsoft Windows Media Player 12 installed on Windows 8 and Windows...
...server To listen to audio content stored on your operating system. • It may be different from other server devices, refer to Control Panel. When using Windows 8 This section explains how to set up Windows Media Player when using a "Play To" feature in... Windows Media Player 12, refer to Help for your server with this receiver. • Sony VAIO Media plus 1.3, 1.4, 2.0, and 2.1 • Sony HDD Network Audio System NAS-S500HDE*, NAS-S55HDE* • Sony Network AV receiver STR-DA6400ES*, TA-DA5600ES* • Microsoft Windows Media Player 12 installed on Windows 8 and Windows...

Operating Instructions (Large File - 14.22 MB)
Page 58
Tip If the item you want does not appear on the display, try to change the display type of the Control Panel. 4 Select [Choose media streaming options] from Media streaming. 5 If [Media streaming is not turned on] appears on the [Media streaming options] window, select [Turn on media streaming]. 58US The [Network Sharing Center] window appears. Select [Control Panel] under [Settings]. 3 Select [Change advanced sharing settings]. 2 Select [View network status and tasks] under [Network and Internet].
Tip If the item you want does not appear on the display, try to change the display type of the Control Panel. 4 Select [Choose media streaming options] from Media streaming. 5 If [Media streaming is not turned on] appears on the [Media streaming options] window, select [Turn on media streaming]. 58US The [Network Sharing Center] window appears. Select [Control Panel] under [Settings]. 3 Select [Change advanced sharing settings]. 2 Select [View network status and tasks] under [Network and Internet].

Operating Instructions (Large File - 14.22 MB)
Page 59
... [Allow All Media Devices] window opens. For details on the display, try to [Start] - [Control Panel]. 7 Select [Allow all the devices in the local network are completed, refresh the server list of the Control Panel. 3 Select [Public network] under [Network and Internet]. Tip If the item you want does not appear on selecting a server, see...
... [Allow All Media Devices] window opens. For details on the display, try to [Start] - [Control Panel]. 7 Select [Allow all the devices in the local network are completed, refresh the server list of the Control Panel. 3 Select [Public network] under [Network and Internet]. Tip If the item you want does not appear on selecting a server, see...

Operating Instructions (Large File - 14.22 MB)
Page 64
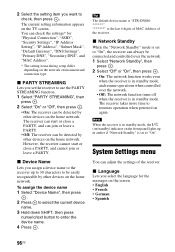
... 4, then press . In this receiver, you want , then press . Press "Registration" on the TV screen. Select "OK" on the home network. 1 Select "Control Device" in home menu. 2 Press OPTIONS. 3 Select "TV SideView Device Registration", then press . 4 Select "Start Registration", then press . Tip...registered device list appears on the device list. To add devices to the device list 1 Select "Control Device" in step 3, then press . To register the TV SideView Device 1 Press HOME NETWORK. Using the TV SideView TV SideView is a free mobile application for a device on the TV...
... 4, then press . In this receiver, you want , then press . Press "Registration" on the TV screen. Select "OK" on the home network. 1 Select "Control Device" in home menu. 2 Press OPTIONS. 3 Select "TV SideView Device Registration", then press . 4 Select "Start Registration", then press . Tip...registered device list appears on the device list. To add devices to the device list 1 Select "Control Device" in step 3, then press . To register the TV SideView Device 1 Press HOME NETWORK. Using the TV SideView TV SideView is a free mobile application for a device on the TV...
Operating Instructions (Large File - 14.22 MB)
Page 65
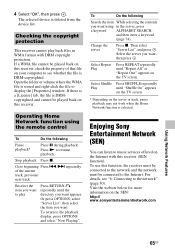
... current track, previous/ next track Reselect the item you want appears. Change the server Press x. Enjoying Sony Entertainment Network (SEN) You can listen to the network" (page 30). Operating Home Network function using in WMA format with this receiver. Stop playback Press x. Or press OPTIONS, select "Server ..., see whether the file is stored and right-click the file to resume playback. Select the server you want using the remote control To Do the following Search the item While selecting the contents you want . Go to the playback display, press OPTIONS and select...
... current track, previous/ next track Reselect the item you want appears. Change the server Press x. Enjoying Sony Entertainment Network (SEN) You can listen to the network" (page 30). Operating Home Network function using in WMA format with this receiver. Stop playback Press x. Or press OPTIONS, select "Server ..., see whether the file is stored and right-click the file to resume playback. Select the server you want using the remote control To Do the following Search the item While selecting the contents you want . Go to the playback display, press OPTIONS and select...

Operating Instructions (Large File - 14.22 MB)
Page 66
If the receiver automatically displays the last selected service or station, press RETURN O repeatedly until the receiver is turned off the receiver. When "Network Standby" is displayed even if you may have to register your receiver depending on the service provider. The service provider list appears on the Internet...details on registration, visit the customer support site of music services offered on the TV screen. SEN This receiver Note Before using the remote control To Do the following steps explain how to SEN function, until the service provider list appears.
If the receiver automatically displays the last selected service or station, press RETURN O repeatedly until the receiver is turned off the receiver. When "Network Standby" is displayed even if you may have to register your receiver depending on the service provider. The service provider list appears on the Internet...details on registration, visit the customer support site of music services offered on the TV screen. SEN This receiver Note Before using the remote control To Do the following steps explain how to SEN function, until the service provider list appears.
Operating Instructions (Large File - 14.22 MB)
Page 71
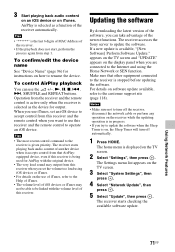
...Settings menu list appears on software update available, refer to use iTunes, set the volume too loud using the Home Network or SEN function. Using Network Features 71US To control AirPlay playback You can take advantage of the newest functions. For details on the TV screen. 3 Select "System Settings... update. To confirm/edit the device name See "Device Name" (page 96) for output. Tips • The most recent control command to update the software. The receiver accesses the Sony server to the receiver is on the use the 2 +/-, N, X, x, ., >, SHUFFLE and REPEAT buttons.
...Settings menu list appears on software update available, refer to use iTunes, set the volume too loud using the Home Network or SEN function. Using Network Features 71US To control AirPlay playback You can take advantage of the newest functions. For details on the TV screen. 3 Select "System Settings... update. To confirm/edit the device name See "Device Name" (page 96) for output. Tips • The most recent control command to update the software. The receiver accesses the Sony server to the receiver is on the use the 2 +/-, N, X, x, ., >, SHUFFLE and REPEAT buttons.
Operating Instructions (Large File - 14.22 MB)
Page 96
... works even when the receiver is in standby mode. Tip The default device name is "STR-DN840 is in standby mode, and resume operations when controlled over the network. • Off: The network function turns off when the receiver is the last 6 digits of MAC Address of the receiver. You can always be easily recognizable...
... works even when the receiver is in standby mode. Tip The default device name is "STR-DN840 is in standby mode, and resume operations when controlled over the network. • Off: The network function turns off when the receiver is the last 6 digits of MAC Address of the receiver. You can always be easily recognizable...
Operating Instructions (Large File - 14.22 MB)
Page 103
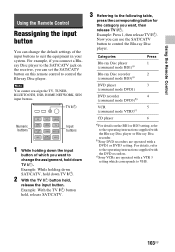
...)a) DVD player 3 (command mode DVD1) DVD recorder 4 (command mode DVD3)b) VCR 5 (command mode VTR3)c) CD player 6 a)For details on this remote control to the operating instructions supplied with the Blu-ray Disc player or Blu-ray Disc recorder. For example, if you connect a Bluray Disc player to...Example: With the TV ?/1 button held , release the input button. Note You cannot reassign the TV, TUNER, BLUETOOTH, USB, HOME NETWORK, SEN input buttons. b)Sony DVD recorders are operated with a VTR 3 setting which you can set the SAT/CATV button on the BD1 or BD3 setting, refer ...
...)a) DVD player 3 (command mode DVD1) DVD recorder 4 (command mode DVD3)b) VCR 5 (command mode VTR3)c) CD player 6 a)For details on this remote control to the operating instructions supplied with the Blu-ray Disc player or Blu-ray Disc recorder. For example, if you connect a Bluray Disc player to...Example: With the TV ?/1 button held , release the input button. Note You cannot reassign the TV, TUNER, BLUETOOTH, USB, HOME NETWORK, SEN input buttons. b)Sony DVD recorders are operated with a VTR 3 setting which you can set the SAT/CATV button on the BD1 or BD3 setting, refer ...
Operating Instructions (Large File - 14.22 MB)
Page 113
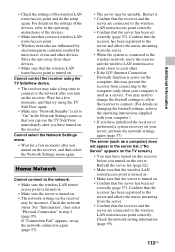
... wireless LAN router/access point correctly. • Confirm that you can use a wireless LAN router/access point. • Wireless networks are connected to the operating instructions supplied with your computer.) • If you have initialized the receiver or performed a system recovery...connected to the computer (only when your server, perform the network settings again (page 57). Cannot control the receiver using the TV SideView again. • Make sure "Network Standby" is turned on the receiver. Cannot select the Network Settings menu. • Wait for a few moments after ...
... wireless LAN router/access point correctly. • Confirm that you can use a wireless LAN router/access point. • Wireless networks are connected to the operating instructions supplied with your computer.) • If you have initialized the receiver or performed a system recovery...connected to the computer (only when your server, perform the network settings again (page 57). Cannot control the receiver using the TV SideView again. • Make sure "Network Standby" is turned on the receiver. Cannot select the Network Settings menu. • Wait for a few moments after ...

Operating Instructions (Large File - 14.22 MB)
Page 116
...receiver. • Press BLUETOOTH on the receiver to connect to the last connected Bluetooth device. • Turn on . • Check the network status. The sound skips or fluctuates, or the connection is lost. • The receiver and the Bluetooth device are too far apart. ... ., >, SHUFFLE and REPEAT do not work. • Make sure that the settings that allow iTunes to accept control from this receiver are active. • The receiver is not selected as the network speaker. Perform the pairing operation again (page 76). • While connected to a Bluetooth device, this receiver cannot...
...receiver. • Press BLUETOOTH on the receiver to connect to the last connected Bluetooth device. • Turn on . • Check the network status. The sound skips or fluctuates, or the connection is lost. • The receiver and the Bluetooth device are too far apart. ... ., >, SHUFFLE and REPEAT do not work. • Make sure that the settings that allow iTunes to accept control from this receiver are active. • The receiver is not selected as the network speaker. Perform the pairing operation again (page 76). • While connected to a Bluetooth device, this receiver cannot...

Operating Instructions (Large File - 14.22 MB)
Page 121
...conversion format 4) Subband Codec General Power requirements 120 V AC, 60 Hz Power consumption 240 W Power consumption (during standby mode) 0.3 W (When "Control for HDMI", "Pass Through", "Network Standby", and "BT Standby" are set to "Off".) Dimensions (width/height/depth) (Approx.) 430 mm × 156 mm × 329.4... mm (17 in × 6 1/4 in × 13 in) including projecting parts and controls Mass (Approx.) 8.5 kg (18 lb 9 oz) Design ...
...conversion format 4) Subband Codec General Power requirements 120 V AC, 60 Hz Power consumption 240 W Power consumption (during standby mode) 0.3 W (When "Control for HDMI", "Pass Through", "Network Standby", and "BT Standby" are set to "Off".) Dimensions (width/height/depth) (Approx.) 430 mm × 156 mm × 329.4... mm (17 in × 6 1/4 in × 13 in) including projecting parts and controls Mass (Approx.) 8.5 kg (18 lb 9 oz) Design ...
Operating Instructions (Large File - 14.22 MB)
Page 123
... IP address 38 FM 48 FM Mode 49, 101 H HD-D.C.S. 52 HDMI 101 HDMI Audio Out 94, 101 HDMI Settings 94, 101 Home Network 62 Home Theatre Control 82 I Input 41 Input Assign 83 Input Edit 95 INPUT MODE 83 Input Settings 95 IP Setting 96 iPod/iPhone Charging 45 Compatible models... 95 Network Standby 96 Network Update 97 O One-Touch Play 80 OSD (On-Screen Display) 40 P PARTY STREAMING 68 Pass Through 94, 101 Passkey 76 PlayStation 3 27 Preset Memory 50 Preset stations 50 PROTECTOR 118 Pure Direct 55 R Remote control 14 Resetting 33 S Satellite tuner 27, 28 SB Assign 90, 99 Scene Select...
... IP address 38 FM 48 FM Mode 49, 101 H HD-D.C.S. 52 HDMI 101 HDMI Audio Out 94, 101 HDMI Settings 94, 101 Home Network 62 Home Theatre Control 82 I Input 41 Input Assign 83 Input Edit 95 INPUT MODE 83 Input Settings 95 IP Setting 96 iPod/iPhone Charging 45 Compatible models... 95 Network Standby 96 Network Update 97 O One-Touch Play 80 OSD (On-Screen Display) 40 P PARTY STREAMING 68 Pass Through 94, 101 Passkey 76 PlayStation 3 27 Preset Memory 50 Preset stations 50 PROTECTOR 118 Pure Direct 55 R Remote control 14 Resetting 33 S Satellite tuner 27, 28 SB Assign 90, 99 Scene Select...


