
Operating Instructions
Page 2
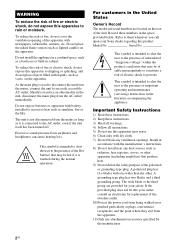
...as a bookcase or built-in the space provided below. If the provided plug does not fit into your outlet, consult an electrician for your Sony dealer regarding this product. Do not place the naked flame sources such as vases, on the apparatus. For customers in the United States Owner...expose this apparatus near any ventilation openings. Do not install the appliance in a confined space, such as sunshine, fire or the like. Excessive sound pressure from the mains as long as it is intended to alert the user to the presence of uninsulated "dangerous voltage" within the product's ...
...as a bookcase or built-in the space provided below. If the provided plug does not fit into your outlet, consult an electrician for your Sony dealer regarding this product. Do not place the naked flame sources such as vases, on the apparatus. For customers in the United States Owner...expose this apparatus near any ventilation openings. Do not install the appliance in a confined space, such as sunshine, fire or the like. Excessive sound pressure from the mains as long as it is intended to alert the user to the presence of uninsulated "dangerous voltage" within the product's ...
Operating Instructions
Page 5
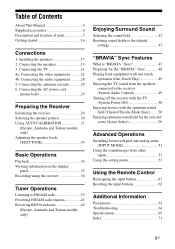
.../AM radio 39 Presetting FM/AM radio stations 41 Receiving RDS broadcasts 42 (Europe, Australia and Taiwan models only) Enjoying Surround Sound Selecting the sound field 43 Resetting sound fields to the default settings 47 "BRAVIA" Sync Features What is "BRAVIA" Sync 47 Preparing for the "BRAVIA" Sync 48... Playing back equipment with one-touch operation (One-Touch Play 49 Enjoying the TV sound from the speakers connected to the receiver (System Audio Control 49 Turning off the receiver with the TV (System Power-Off 50 Enjoying movies...
.../AM radio 39 Presetting FM/AM radio stations 41 Receiving RDS broadcasts 42 (Europe, Australia and Taiwan models only) Enjoying Surround Sound Selecting the sound field 43 Resetting sound fields to the default settings 47 "BRAVIA" Sync Features What is "BRAVIA" Sync 47 Preparing for the "BRAVIA" Sync 48... Playing back equipment with one-touch operation (One-Touch Play 49 Enjoying the TV sound from the speakers connected to the receiver (System Audio Control 49 Turning off the receiver with the TV (System Power-Off 50 Enjoying movies...
Operating Instructions
Page 8
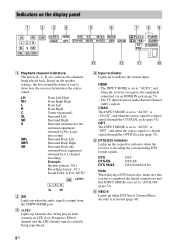
...Logic processing) Surround Back Left Surround Back Right Surround Back (the surround back equipment obtained by 6.1 channel decoding) Example: Speaker pattern: 3/0.1 Recording format: 3/2.1 Sound Field: A.F.D. HDMI - F NEO:6 Lights up when the audio signal is a digital signal through the COAXIAL jack (page 51). Indicators on the speaker settings..., the box around the letter(s) vary to show how the receiver downmixes the source sound. DTS DTS-ES DTS 96/24 DTS DTS-ES DTS 96 kHz/24 bit Note When playing a DTS format disc, make sure ...
...Logic processing) Surround Back Left Surround Back Right Surround Back (the surround back equipment obtained by 6.1 channel decoding) Example: Speaker pattern: 3/0.1 Recording format: 3/2.1 Sound Field: A.F.D. HDMI - F NEO:6 Lights up when the audio signal is a digital signal through the COAXIAL jack (page 51). Indicators on the speaker settings..., the box around the letter(s) vary to show how the receiver downmixes the source sound. DTS DTS-ES DTS 96/24 DTS DTS-ES DTS 96 kHz/24 bit Note When playing a DTS format disc, make sure ...
Operating Instructions
Page 12
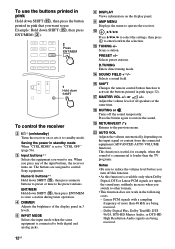
...use . F DISPLAY Views information on the input signal or content from the connected equipment (ADVANCED AUTO VOLUME function). Scans a station. N SOUND FIELD +**/- Numeric buttons** Hold down SHIFT To control the receiver B ?/1* (on/standby) Turns the receiver on . O SHIFT Changes the... remote control button function to control Sony equipment. The buttons are being received. - Example: Hold down SHIFT (O), then press ENT/MEM (C). 2 Press ENT/MEM 1 Hold down ...
...use . F DISPLAY Views information on the input signal or content from the connected equipment (ADVANCED AUTO VOLUME function). Scans a station. N SOUND FIELD +**/- Numeric buttons** Hold down SHIFT To control the receiver B ?/1* (on/standby) Turns the receiver on . O SHIFT Changes the... remote control button function to control Sony equipment. The buttons are being received. - Example: Hold down SHIFT (O), then press ENT/MEM (C). 2 Press ENT/MEM 1 Hold down ...
Operating Instructions
Page 13
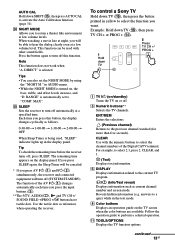
...?/1 (A) and ?/1 (B) simultaneously, the receiver and connected equipment will be used , "SLEEP" indicator lights up in the display panel. To control a Sony TV Hold down SHIFT (O), then press AUTO CAL to activate the Auto Calibration function (page 31). Follow the operation guide to a quiz) while in... of the AV ?/1 (A) changes automatically each time you press the input buttons (C). **The 5/TV, AUDIO/ , N and TV CH +/ SOUND FIELD +/PROG +/c buttons have tactile dots. Tip To check the remaining time before the receiver turns off this button, the display changes cyclically as...
...?/1 (A) and ?/1 (B) simultaneously, the receiver and connected equipment will be used , "SLEEP" indicator lights up in the display panel. To control a Sony TV Hold down SHIFT (O), then press AUTO CAL to activate the Auto Calibration function (page 31). Follow the operation guide to a quiz) while in... of the AV ?/1 (A) changes automatically each time you press the input buttons (C). **The 5/TV, AUDIO/ , N and TV CH +/ SOUND FIELD +/PROG +/c buttons have tactile dots. Tip To check the remaining time before the receiver turns off this button, the display changes cyclically as...
Operating Instructions
Page 14
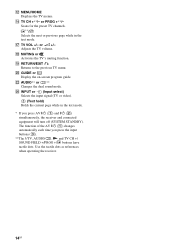
...Selects the next or previous page while in the text mode. * If you press the input buttons (C). **The 5/TV, AUDIO/ , N and TV CH +/ SOUND FIELD +/PROG +/c buttons have tactile dots. Use the tactile dots as references when operating the receiver. 14GB Scans for the preset TV channels. R MUTING or... Activates the TV's muting function. N TV CH +**/- or +/- V AUDIO** or ** Changes the dual sound mode. Q TV VOL +/- T GUIDE or Display the on-screen program guide. S RETURN/EXIT O Returns to the previous TV menu. Adjusts the TV volume.
...Selects the next or previous page while in the text mode. * If you press the input buttons (C). **The 5/TV, AUDIO/ , N and TV CH +/ SOUND FIELD +/PROG +/c buttons have tactile dots. Use the tactile dots as references when operating the receiver. 14GB Scans for the preset TV channels. R MUTING or... Activates the TV's muting function. N TV CH +**/- or +/- V AUDIO** or ** Changes the dual sound mode. Q TV VOL +/- T GUIDE or Display the on-screen program guide. S RETURN/EXIT O Returns to the previous TV menu. Adjusts the TV volume.
Operating Instructions
Page 15
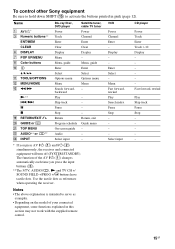
Return, exit Guide menu - - - * If you press the input buttons (C). **The 5/TV, AUDIO/ , N and TV CH +/ SOUND FIELD +/PROG +/c buttons have tactile dots. The function of your connected equipment, some functions explained in pink (page 12). Display - - Select input CD ... Channel ENT/MEM Enter Enter CLEAR F DISPLAY G POP UP/MENU H Color buttons J Clear Display Menu Menu, guide Enter Clear Display - To control other Sony equipment Be sure to hold down SHIFT (O) to serve as references when operating the receiver. Notes • The above explanation is intended to activate the...
Return, exit Guide menu - - - * If you press the input buttons (C). **The 5/TV, AUDIO/ , N and TV CH +/ SOUND FIELD +/PROG +/c buttons have tactile dots. The function of your connected equipment, some functions explained in pink (page 12). Display - - Select input CD ... Channel ENT/MEM Enter Enter CLEAR F DISPLAY G POP UP/MENU H Color buttons J Clear Display Menu Menu, guide Enter Clear Display - To control other Sony equipment Be sure to hold down SHIFT (O) to serve as references when operating the receiver. Notes • The above explanation is intended to activate the...

Operating Instructions
Page 16
...version 3.5). For a PlayStation 3, check that you connect your audio/video equipment connected to "Bitstream" (with the connected equipment. If the sound is not output correctly, check the speaker connection and make the settings explained above again. (Other models) Select the speaker pattern (page 30... the speakers (USA and Canada models only) Select the speaker pattern (page 30), then check the speaker connection using "T. If the sound is not output correctly, check the speaker connection and make the settings explained above again. 16GB TONE" in LEVEL menu (page 35)....
...version 3.5). For a PlayStation 3, check that you connect your audio/video equipment connected to "Bitstream" (with the connected equipment. If the sound is not output correctly, check the speaker connection and make the settings explained above again. (Other models) Select the speaker pattern (page 30... the speakers (USA and Canada models only) Select the speaker pattern (page 30), then check the speaker connection using "T. If the sound is not output correctly, check the speaker connection and make the settings explained above again. 16GB TONE" in LEVEL menu (page 35)....

Operating Instructions
Page 17
...channel) or two surround back speakers (7.1 channel). 7.1 channel speaker system using surround back speakers You can enjoy vertical sound effects by connecting additional one subwoofer). continued 17GB Example of speaker system configuration 5.1 channel speaker system To fully enjoy theater-like multi ...subwoofer. 7.1 channel speaker system using front high speakers You can enjoy high fidelity reproduction of DVD or Blu-ray Disc software recorded sound in 6.1 channel or 7.1 channel format by connecting additional two front high speakers in Dolby Pro Logic IIz mode (page 44). ...
...channel) or two surround back speakers (7.1 channel). 7.1 channel speaker system using surround back speakers You can enjoy vertical sound effects by connecting additional one subwoofer). continued 17GB Example of speaker system configuration 5.1 channel speaker system To fully enjoy theater-like multi ...subwoofer. 7.1 channel speaker system using front high speakers You can enjoy high fidelity reproduction of DVD or Blu-ray Disc software recorded sound in 6.1 channel or 7.1 channel format by connecting additional two front high speakers in Dolby Pro Logic IIz mode (page 44). ...
Operating Instructions
Page 20
... (mains lead). • Before connecting the AC power cord (mains lead), make sure that metalic wires of the input signal to the subwoofer, and the sound may not be sure to the SPEAKERS SURROUND BACK/FRONT HIGH L terminal. If the auto standby function is set to on, it turns to standby...
... (mains lead). • Before connecting the AC power cord (mains lead), make sure that metalic wires of the input signal to the subwoofer, and the sound may not be sure to the SPEAKERS SURROUND BACK/FRONT HIGH L terminal. If the auto standby function is set to on, it turns to standby...
Operating Instructions
Page 22
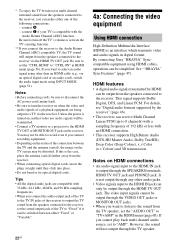
...record even if you connect recording equipment. • Depending on HDMI connections • An audio signal input to "TV+AMP" in multi channel surround sound from the receiver. • When connecting optical digital cords, insert the plugs straight until they click into place. • Do not bend or ... cords, be distorted. You may not be able to the HDMI IN jack can be output through the HDMI TV OUT jack. By connecting Sony "BRAVIA" Synccompatible equipment using INPUT MODE (page 51). Notes on the status of the following connections: - If you connect the receiver to ...
...record even if you connect recording equipment. • Depending on HDMI connections • An audio signal input to "TV+AMP" in multi channel surround sound from the receiver. • When connecting optical digital cords, insert the plugs straight until they click into place. • Do not bend or ... cords, be distorted. You may not be able to the HDMI IN jack can be output through the HDMI TV OUT jack. By connecting Sony "BRAVIA" Synccompatible equipment using INPUT MODE (page 51). Notes on the status of the following connections: - If you connect the receiver to ...
Operating Instructions
Page 23
...; You can enjoy Multi Channel Linear PCM. If you want to connect several digital equipment, but cannot find an unused input See "Using the sound/images from the HDMI TV OUT jack may be distorted or may be displayed. • Not every HDMI equipment supports all the cords. Connect ... digital cords. When connecting cords • Before connecting cords, be lost . If you connect an HDMI-DVI conversion cable to a DVI-D equipment, the sound and/or the image may be suppressed by the specific HDMI version. Connections • DSD signals of Super Audio CD are not input and output...
...; You can enjoy Multi Channel Linear PCM. If you want to connect several digital equipment, but cannot find an unused input See "Using the sound/images from the HDMI TV OUT jack may be distorted or may be displayed. • Not every HDMI equipment supports all the cords. Connect ... digital cords. When connecting cords • Before connecting cords, be lost . If you connect an HDMI-DVI conversion cable to a DVI-D equipment, the sound and/or the image may be suppressed by the specific HDMI version. Connections • DSD signals of Super Audio CD are not input and output...
Operating Instructions
Page 28
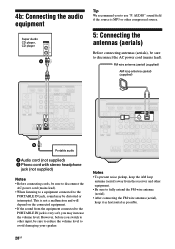
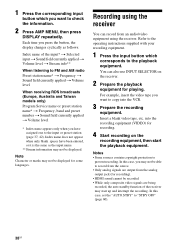
... • Before connecting cords, be sure to disconnect the AC power cord (mains lead). • When listening to a equipment connected to the PORTABLE IN jack, sound may increase the volume level. This is not a malfunction and will depend on the connected equipment. • If the... speaker. 4b: Connecting the audio equipment Super Audio CD player, CD player A Tip We recommend you to disconnect the AC power cord (mains lead). AUDIO" sound field if the source is very soft, you may be sure to reduce the volume level to other compressed source. 5: Connecting the antennas (aerials) Before...
... • Before connecting cords, be sure to disconnect the AC power cord (mains lead). • When listening to a equipment connected to the PORTABLE IN jack, sound may increase the volume level. This is not a malfunction and will depend on the connected equipment. • If the... speaker. 4b: Connecting the audio equipment Super Audio CD player, CD player A Tip We recommend you to disconnect the AC power cord (mains lead). AUDIO" sound field if the source is very soft, you may be sure to reduce the volume level to other compressed source. 5: Connecting the antennas (aerials) Before...
Operating Instructions
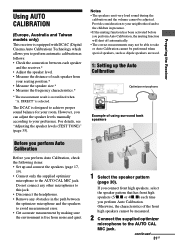
Page 31
... microphone and the speakers to avoid measurement error. • Get accurate measurement by making sure the environment is designed to achieve proper sound balance for your room. Preparing the Receiver Using AUTO CALIBRATION (Europe, Australia and Taiwan models only) This receiver is equipped with DCAC...). DIRECT" is not utilized when "A. continued 31GB The DCAC is free from your preference. Notes • The speakers emit very loud sound during the calibration and the volume cannot be adjusted. Do not connect any other microphones to the AUTO CAL MIC jack. However, you perform...
... microphone and the speakers to avoid measurement error. • Get accurate measurement by making sure the environment is designed to achieve proper sound balance for your room. Preparing the Receiver Using AUTO CALIBRATION (Europe, Australia and Taiwan models only) This receiver is equipped with DCAC...). DIRECT" is not utilized when "A. continued 31GB The DCAC is free from your preference. Notes • The speakers emit very loud sound during the calibration and the volume cannot be adjusted. Do not connect any other microphones to the AUTO CAL MIC jack. However, you perform...
Operating Instructions
Page 33
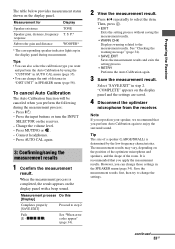
...the setting process. • RETRY Performs the Auto Calibration again. 3 Save the measurement result. "COMPLETE" appears on the display panel with a beep sound. It is determined by using the "CUSTOM" in AUTO CAL menu (page 35). • You can change those settings in SPEAKER menu (page 58... the optimizer microphone and speakers, and the shape of a speaker (LARGE/SMALL) is recommended that you perform Auto Calibration again to enjoy the surround sound. Press MUTING or . - Press V/v repeatedly to change the unit of distance in "DIST.UNIT" in the SPEAKER menu (page 54). Tips ...
...the setting process. • RETRY Performs the Auto Calibration again. 3 Save the measurement result. "COMPLETE" appears on the display panel with a beep sound. It is determined by using the "CUSTOM" in AUTO CAL menu (page 35). • You can change those settings in SPEAKER menu (page 58... the optimizer microphone and speakers, and the shape of a speaker (LARGE/SMALL) is recommended that you perform Auto Calibration again to enjoy the surround sound. Press MUTING or . - Press V/v repeatedly to change the unit of distance in "DIST.UNIT" in the SPEAKER menu (page 54). Tips ...
Operating Instructions
Page 36
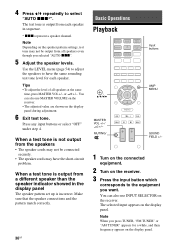
... from each speaker. When a test tone is output from the speakers • The speaker cords may have the same sounding test tone level for a while, and then frequency appears on the receiver. MUTING/ SOUND FIELD +/- 1 Turn on the connected equipment. 2 Turn on the display panel during adjustment. 6 Exit test tone. Tips •...
... from each speaker. When a test tone is output from the speakers • The speaker cords may have the same sounding test tone level for a while, and then frequency appears on the receiver. MUTING/ SOUND FIELD +/- 1 Turn on the connected equipment. 2 Turn on the display panel during adjustment. 6 Exit test tone. Tips •...
Operating Instructions
Page 37
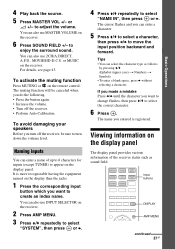
... You can enter a character. 5 Press V/v to select a character, then press B/b to move the input position backward and forward. or MUSIC on the receiver. 6 Press SOUND FIELD +/- You can also use 2CH/A.DIRECT, A.F.D., MOVIE/HD-D.C.S. Alphabet (upper case) t Numbers t Symbols • To enter a blank space, press b without selecting a ... equipment named on the display panel. For details, see page 43. Naming inputs You can select the character type as sound field. Tips • You can enter a name of the receiver status such as follows by pressing V/v. to enjoy the surround...
... You can enter a character. 5 Press V/v to select a character, then press B/b to move the input position backward and forward. or MUSIC on the receiver. 6 Press SOUND FIELD +/- You can also use 2CH/A.DIRECT, A.F.D., MOVIE/HD-D.C.S. Alphabet (upper case) t Numbers t Symbols • To enter a blank space, press b without selecting a ... equipment named on the display panel. For details, see page 43. Naming inputs You can select the character type as sound field. Tips • You can enter a name of the receiver status such as follows by pressing V/v. to enjoy the surround...
Operating Instructions
Page 38
... being recorded, the auto standby function of the input* t Selected input t Sound field currently applied t Volume level t Stream info** When listening to FM and AM radio Preset station name* t Frequency t Sound field currently applied t Volume level When receiving RDS broadcasts (Europe, Australia and ...Taiwan models only) Program Service name or preset station name* t Frequency, band and preset number t Sound field currently applied t Volume level * Index name appears only when you want to copy into the recording equipment (VIDEO) for recording. ...
... being recorded, the auto standby function of the input* t Selected input t Sound field currently applied t Volume level t Stream info** When listening to FM and AM radio Preset station name* t Frequency t Sound field currently applied t Volume level When receiving RDS broadcasts (Europe, Australia and ...Taiwan models only) Program Service name or preset station name* t Frequency, band and preset number t Sound field currently applied t Volume level * Index name appears only when you want to copy into the recording equipment (VIDEO) for recording. ...
Operating Instructions
Page 39
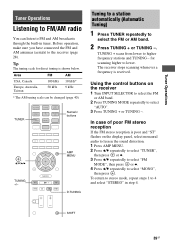
... repeatedly to 4 and select "STEREO" in tuner. TUNER Numeric buttons , V/v/B/b TUNING +/- Using the control buttons on the display panel, select monaural audio to lessen the sound distortion. 1 Press AMP MENU. 2 Press V/v repeatedly to select "TUNER", then press or b. 3 Press V/v repeatedly to select "FM MODE", then press or b. 4 Press V/v repeatedly to lower...
... repeatedly to 4 and select "STEREO" in tuner. TUNER Numeric buttons , V/v/B/b TUNING +/- Using the control buttons on the display panel, select monaural audio to lessen the sound distortion. 1 Press AMP MENU. 2 Press V/v repeatedly to select "TUNER", then press or b. 3 Press V/v repeatedly to select "FM MODE", then press or b. 4 Press V/v repeatedly to lower...
Operating Instructions
Page 43
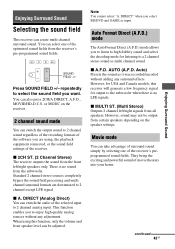
...receiver will generate a low frequency signal for listening to a 2 channel stereo sound as it was recorded/encoded without any surround effects. Auto) Presets the sound as multi channel sound. repeatedly to select the sound field you to enjoy high quality analog sources without adding any adjustment. This... models, this function, only the volume and front speaker level can also press 2CH/A.DIRECT, A.F.D., MOVIE/HD-D.C.S. Enjoying Surround Sound Selecting the sound field This receiver can switch the audio of the selected input to 2 channel analog input. You can switch the output...
...receiver will generate a low frequency signal for listening to a 2 channel stereo sound as it was recorded/encoded without any surround effects. Auto) Presets the sound as multi channel sound. repeatedly to select the sound field you to enjoy high quality analog sources without adding any adjustment. This... models, this function, only the volume and front speaker level can also press 2CH/A.DIRECT, A.F.D., MOVIE/HD-D.C.S. Enjoying Surround Sound Selecting the sound field This receiver can switch the audio of the selected input to 2 channel analog input. You can switch the output...


