
Operating Instructions
Page 5
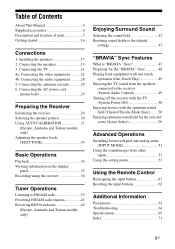
...RDS broadcasts 42 (Europe, Australia and Taiwan models only) Enjoying Surround Sound Selecting the sound field 43 Resetting sound fields to the default settings 47 "BRAVIA" Sync Features What is "BRAVIA" Sync 47 Preparing for the "BRAVIA" Sync 48 Playing back equipment with one-touch ...50 Advanced Operations Switching between digital and analog audio (INPUT MODE 51 Using the sound/images from other inputs 51 Using the setting menu 53 Using the Remote Control Reassigning the input button 61 Resetting the input buttons 62 Additional Information Precautions 63 Troubleshooting 64 ...
...RDS broadcasts 42 (Europe, Australia and Taiwan models only) Enjoying Surround Sound Selecting the sound field 43 Resetting sound fields to the default settings 47 "BRAVIA" Sync Features What is "BRAVIA" Sync 47 Preparing for the "BRAVIA" Sync 48 Playing back equipment with one-touch ...50 Advanced Operations Switching between digital and analog audio (INPUT MODE 51 Using the sound/images from other inputs 51 Using the setting menu 53 Using the Remote Control Reassigning the input button 61 Resetting the input buttons 62 Additional Information Precautions 63 Troubleshooting 64 ...
Operating Instructions
Page 6
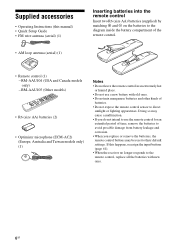
... possible damage from battery leakage and corrosion. • When you replace or remove the batteries, the remote control buttons may be reset to their default settings. RM-AAU104 (USA and Canada models only) - Doing so may cause a malfunction. • If you do not intend to use a new battery with new ones...
... possible damage from battery leakage and corrosion. • When you replace or remove the batteries, the remote control buttons may be reset to their default settings. RM-AAU104 (USA and Canada models only) - Doing so may cause a malfunction. • If you do not intend to use a new battery with new ones...
Operating Instructions
Page 8
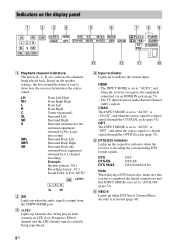
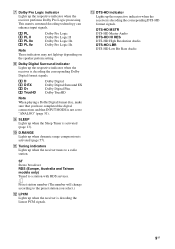
... Back (the surround back equipment obtained by 6.1 channel decoding) Example: Speaker pattern: 3/0.1 Recording format: 3/2.1 Sound Field: A.F.D. Indicators on the speaker settings, the box around the letter(s) vary to "AUTO", and when the receiver recognizes the equipment connected via an HDMI IN jack (page 51). - ... DTS format disc, make sure that you have completed the digital connections and that INPUT MODE is not set to "AUTO" or "OPT", and when the source signal is set to indicate the current input. C LFE Lights up when the audio signal is actually being played back....
... Back (the surround back equipment obtained by 6.1 channel decoding) Example: Speaker pattern: 3/0.1 Recording format: 3/2.1 Sound Field: A.F.D. Indicators on the speaker settings, the box around the letter(s) vary to "AUTO", and when the receiver recognizes the equipment connected via an HDMI IN jack (page 51). - ... DTS format disc, make sure that you have completed the digital connections and that INPUT MODE is not set to "AUTO" or "OPT", and when the source signal is set to indicate the current input. C LFE Lights up when the audio signal is actually being played back....
Operating Instructions
Page 9
...Europe, Australia and Taiwan models only) Tuned to the preset station you have completed the digital connections and that INPUT MODE is not set to a radio station. Preset station number (The number will change according to a station with RDS services. I SLEEP Lights up depending ...on the speaker pattern setting. H Dolby Digital Surround indicator Lights up the respective indicator when the receiver is decoding the corresponding DTS-HD format signals. M DTS-HD...
...Europe, Australia and Taiwan models only) Tuned to the preset station you have completed the digital connections and that INPUT MODE is not set to a radio station. Preset station number (The number will change according to a station with RDS services. I SLEEP Lights up depending ...on the speaker pattern setting. H Dolby Digital Surround indicator Lights up the respective indicator when the receiver is decoding the corresponding DTS-HD format signals. M DTS-HD...
Operating Instructions
Page 12
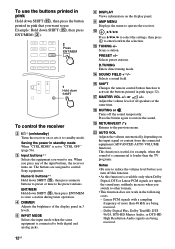
... D DIMMER Adjusts the brightness of all speakers at the same time. F DISPLAY Views information on . J , V/v/B/b Press V/v/B /b to select the settings, then press to the previous menu. PRESET +/- Selects a sound field. Adjust the volume level of the display panel in 3 levels. S RETURN/EXIT... Example: Hold down SHIFT (O), then press ENT/MEM (C). 2 Press ENT/MEM 1 Hold down SHIFT (O), then press ENT/MEM to control Sony equipment. C Input buttons** Selects the equipment you press any of a commercial is louder than 48 kHz are being received. - Selects preset ...
... D DIMMER Adjusts the brightness of all speakers at the same time. F DISPLAY Views information on . J , V/v/B/b Press V/v/B /b to select the settings, then press to the previous menu. PRESET +/- Selects a sound field. Adjust the volume level of the display panel in 3 levels. S RETURN/EXIT... Example: Hold down SHIFT (O), then press ENT/MEM (C). 2 Press ENT/MEM 1 Hold down SHIFT (O), then press ENT/MEM to control Sony equipment. C Input buttons** Selects the equipment you press any of a commercial is louder than 48 kHz are being received. - Selects preset ...
Operating Instructions
Page 13
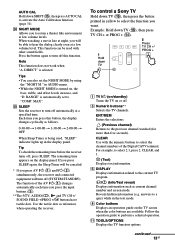
...watching a movie late at a low volume level. DIRECT" is automatically set the NIGHT MODE by using the "NIGHT M." The remaining time appears on , the bass, treble, and effect levels increase, and "D. To control a Sony TV Hold down TV (P), then press the button printed in the text ... operation guide to select 2.1, press 2, CLEAR, and 1. / (Text) Displays text information. K TOOLS/OPTIONS Displays the TV function options. Y SLEEP Sets the receiver to "COMP. Tip To check the remaining time before the receiver turns off . C Numeric buttons** Selects the TV channels. F DISPLAY Displays...
...watching a movie late at a low volume level. DIRECT" is automatically set the NIGHT MODE by using the "NIGHT M." The remaining time appears on , the bass, treble, and effect levels increase, and "D. To control a Sony TV Hold down TV (P), then press the button printed in the text ... operation guide to select 2.1, press 2, CLEAR, and 1. / (Text) Displays text information. K TOOLS/OPTIONS Displays the TV function options. Y SLEEP Sets the receiver to "COMP. Tip To check the remaining time before the receiver turns off . C Numeric buttons** Selects the TV channels. F DISPLAY Displays...

Operating Instructions
Page 16
...connection using "T. For a Blu-ray Disc player, check that "Audio (HDMI)", "Dolby Digital (Coaxial/Optical)", and "DTS (Coaxial/Optical)" are set to the receiver by following the simple steps below . Preparing the receiver See "6: Connecting the AC power cord (mains lead)" (page 29) and ... check that you connect your equipment Connecting the TV and video equipment (page 21, 22) The image quality depends on the connected equipment. Setting the speakers (USA and Canada models only) Select the speaker pattern (page 30), then check the speaker connection using "T. Installing and connecting ...
...connection using "T. For a Blu-ray Disc player, check that "Audio (HDMI)", "Dolby Digital (Coaxial/Optical)", and "DTS (Coaxial/Optical)" are set to the receiver by following the simple steps below . Preparing the receiver See "6: Connecting the AC power cord (mains lead)" (page 29) and ... check that you connect your equipment Connecting the TV and video equipment (page 21, 22) The image quality depends on the connected equipment. Setting the speakers (USA and Canada models only) Select the speaker pattern (page 30), then check the speaker connection using "T. Installing and connecting ...
Operating Instructions
Page 20
If the auto standby function is set to on, it to the SPEAKERS SURROUND BACK/FRONT HIGH L terminal. Notes • Before connecting the cords, be sure to disconnect the AC power cord (...
If the auto standby function is set to on, it to the SPEAKERS SURROUND BACK/FRONT HIGH L terminal. Notes • Before connecting the cords, be sure to disconnect the AC power cord (...
Operating Instructions
Page 22
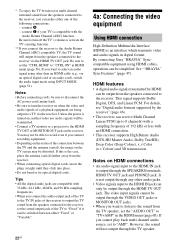
... playback equipment are compatible with 32 kHz, 44.1 kHz, 48 kHz, and 96 kHz sampling frequencies. • When you can be simplified. By connecting Sony "BRAVIA" Synccompatible equipment using INPUT MODE (page 51). HDMI features • A digital audio signals transmitted by the receiver" (page 46). • The...menu (page 60). For details, see "Digital audio formats supported by HDMI can be output through the HDMI TV OUT jack. Be sure to set to 8 channels) with a sampling frequency of 192 kHz or less with the Audio Return Channel (ARC) function. Tips • All the digital...
... playback equipment are compatible with 32 kHz, 44.1 kHz, 48 kHz, and 96 kHz sampling frequencies. • When you can be simplified. By connecting Sony "BRAVIA" Synccompatible equipment using INPUT MODE (page 51). HDMI features • A digital audio signals transmitted by the receiver" (page 46). • The...menu (page 60). For details, see "Digital audio formats supported by HDMI can be output through the HDMI TV OUT jack. Be sure to set to 8 channels) with a sampling frequency of 192 kHz or less with the Audio Return Channel (ARC) function. Tips • All the digital...
Operating Instructions
Page 23
...ray Disc recorder, PlayStation 3, etc.) to the receiver using an HDMI-DVI conversion cable. Connect a separate audio cords or digital connecting cords, then set the "PASS.THRU" to "OFF", video and audio signals will not be transmitted when the power is turned off. • Audio signals (...• Depending on the connected equipment. • Use a High Speed HDMI cable. When connecting cords • Before connecting cords, be at certain settings before you connect an HDMI-DVI conversion cable to a DVI-D equipment, the sound and/or the image may not support Audio Return Channel (ARC). &#...
...ray Disc recorder, PlayStation 3, etc.) to the receiver using an HDMI-DVI conversion cable. Connect a separate audio cords or digital connecting cords, then set the "PASS.THRU" to "OFF", video and audio signals will not be transmitted when the power is turned off. • Audio signals (...• Depending on the connected equipment. • Use a High Speed HDMI cable. When connecting cords • Before connecting cords, be at certain settings before you connect an HDMI-DVI conversion cable to a DVI-D equipment, the sound and/or the image may not support Audio Return Channel (ARC). &#...
Operating Instructions
Page 24
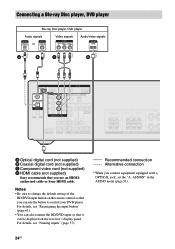
...digital cord (not supplied) C Component video cord (not supplied) D HDMI cable (not supplied) Sony recommends that you can be displayed on the remote control so that you connect equipment equipped with a OPTICAL jack, set the "A. For details, see "Reassigning the input button" (page 61). • You can ...also rename the BD/DVD input so that it can use an HDMIauthorized cable or Sony HDMI cable. Recommended connection Alternative connection * When you use the button to change the default setting of the BD/DVD input button on the receiver's display panel. ASSIGN" in the AUDIO...
...digital cord (not supplied) C Component video cord (not supplied) D HDMI cable (not supplied) Sony recommends that you can be displayed on the remote control so that you connect equipment equipped with a OPTICAL jack, set the "A. For details, see "Reassigning the input button" (page 61). • You can ...also rename the BD/DVD input so that it can use an HDMIauthorized cable or Sony HDMI cable. Recommended connection Alternative connection * When you use the button to change the default setting of the BD/DVD input button on the receiver's display panel. ASSIGN" in the AUDIO...
Operating Instructions
Page 27
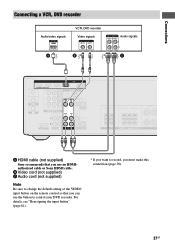
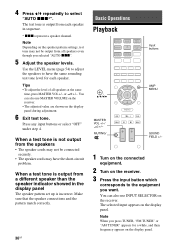
Connections Connecting a VCR, DVD recorder Audio/video signals VCR, DVD recorder Video signals Audio signals A B* * C A HDMI cable (not supplied) Sony recommends that you can use an HDMIauthorized cable or Sony HDMI cable. For details, see "Reassigning the input button" (page 61). * If you want to record, you use the button to change the default setting of the VIDEO input button on the remote control so that you must make this connection (page 38). 27GB B Video cord (not supplied) C Audio cord (not supplied) Note Be sure to control your DVD recorder.
Connections Connecting a VCR, DVD recorder Audio/video signals VCR, DVD recorder Video signals Audio signals A B* * C A HDMI cable (not supplied) Sony recommends that you can use an HDMIauthorized cable or Sony HDMI cable. For details, see "Reassigning the input button" (page 61). * If you want to record, you use the button to change the default setting of the VIDEO input button on the remote control so that you must make this connection (page 38). 27GB B Video cord (not supplied) C Audio cord (not supplied) Note Be sure to control your DVD recorder.
Operating Instructions
Page 29
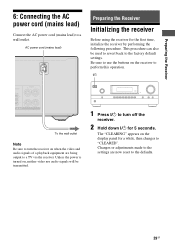
... the following procedure. Preparing the Receiver 6: Connecting the AC power cord (mains lead) Connect the AC power cord (mains lead) to the factory default settings. Be sure to use the buttons on when the video and audio signals of a playback equipment are now reset to a TV via the receiver. This... the receiver on the receiver to perform this operation. ?/1 To the wall outlet Note Be sure to "CLEARED". Changes or adjustments made to the settings are being output to the defaults. 29GB Unless the power is turned on, neither video nor audio signals will be used to revert back to...
... the following procedure. Preparing the Receiver 6: Connecting the AC power cord (mains lead) Connect the AC power cord (mains lead) to the factory default settings. Be sure to use the buttons on when the video and audio signals of a playback equipment are now reset to a TV via the receiver. This... the receiver on the receiver to perform this operation. ?/1 To the wall outlet Note Be sure to "CLEARED". Changes or adjustments made to the settings are being output to the defaults. 29GB Unless the power is turned on, neither video nor audio signals will be used to revert back to...
Operating Instructions
Page 30
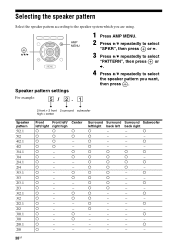
a a - - a a - - - a a - - - a a - - - a a - - a a a a a a a - a a a - - Selecting the speaker pattern Select the speaker pattern according to the speaker system which you are using. , V/v/b AMP MENU Speaker pattern settings 1 Press AMP MENU. 2 Press V/v repeatedly to select "SPKR", then press or b. 3 Press V/v repeatedly to select "PATTERN", then press or b. 4 Press V/v repeatedly to select the speaker ...
a a - - a a - - - a a - - - a a - - - a a - - a a a a a a a - a a a - - Selecting the speaker pattern Select the speaker pattern according to the speaker system which you are using. , V/v/b AMP MENU Speaker pattern settings 1 Press AMP MENU. 2 Press V/v repeatedly to select "SPKR", then press or b. 3 Press V/v repeatedly to select "PATTERN", then press or b. 4 Press V/v repeatedly to select the speaker ...
Operating Instructions
Page 31
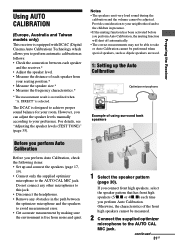
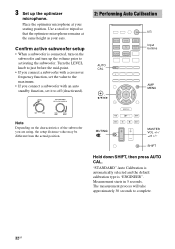
...equipped with DCAC (Digital Cinema Auto Calibration) Technology which allows you to perform automatic calibration as dipole speakers are used. 1: Setting up the Auto Calibration Optimizer microphone Example of using surround back speakers Before you perform Auto Calibration Before you perform Auto Calibration, ...check the following items: • Set up and connect the speakers (page 17, 19). • Connect only the supplied optimizer microphone to the AUTO CAL MIC jack...
...equipped with DCAC (Digital Cinema Auto Calibration) Technology which allows you to perform automatic calibration as dipole speakers are used. 1: Setting up the Auto Calibration Optimizer microphone Example of using surround back speakers Before you perform Auto Calibration Before you perform Auto Calibration, ...check the following items: • Set up and connect the speakers (page 17, 19). • Connect only the supplied optimizer microphone to the AUTO CAL MIC jack...
Operating Instructions
Page 32
... LEVEL knob to just before the mid-point. • If you connect a subwoofer with a crossover frequency function, set the value to the maximum. • If you connect a subwoofer with an auto standby function, set it to complete. 32GB "STANDARD" Auto Calibration is automatically selected and the default calibration type is connected, turn...
... LEVEL knob to just before the mid-point. • If you connect a subwoofer with a crossover frequency function, set the value to the maximum. • If you connect a subwoofer with an auto standby function, set it to complete. 32GB "STANDARD" Auto Calibration is automatically selected and the default calibration type is connected, turn...
Operating Instructions
Page 33
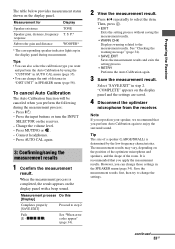
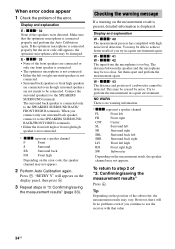
... the measurement result. See "Checking the warning message" (page 34). • SAVE.EXIT Saves the measurement results and exits the setting process. • RETRY Performs the Auto Calibration again. 3 Save the measurement result. continued 33GB Measurement for Display Speaker existence TONE Speaker..., and the shape of the room. To cancel Auto Calibration The Auto Calibration function will be canceled when you can change the settings. Press V/v repeatedly to the measurement results. P.* WOOFER* * The corresponding speaker indicator lights up in step 2. However, you perform...
... the measurement result. See "Checking the warning message" (page 34). • SAVE.EXIT Saves the measurement results and exits the setting process. • RETRY Performs the Auto Calibration again. 3 Save the measurement result. continued 33GB Measurement for Display Speaker existence TONE Speaker..., and the shape of the room. To cancel Auto Calibration The Auto Calibration function will be canceled when you can change the settings. Press V/v repeatedly to the measurement results. P.* WOOFER* * The corresponding speaker indicator lights up in step 2. However, you perform...
Operating Instructions
Page 34
... channel F Front S Surround SB Surround back FH Front high Depending on the display panel, then press . 3 Repeat steps in a quiet environment again. Display and explanation W - W - Set them apart and perform the measurement again. This may be no warning information. * xxx represent a speaker channel FL Front left FR Front right CNT Center...
... channel F Front S Surround SB Surround back FH Front high Depending on the display panel, then press . 3 Repeat steps in a quiet environment again. Display and explanation W - W - Set them apart and perform the measurement again. This may be no warning information. * xxx represent a speaker channel FL Front left FR Front right CNT Center...
Operating Instructions
Page 35
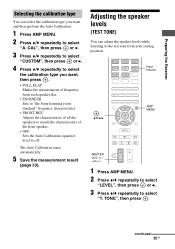
...type You can adjust the speaker levels while listening to the test tone from each speaker flat. • ENGINEER Sets to "the Sony listening room standard" frequency characteristics. • FRONT.REF Adjusts the characteristics of all the speakers to match the ... 4 Press V/v repeatedly to select the calibration type you want , then press . • FULL.FLAT Makes the measurement of the front speaker. • OFF Sets the Auto Calibration equalizer level to select "T. Input buttons , V/v/B/b AMP MENU MASTER VOL +/-/ 2 +/- 1 Press AMP MENU. 2 Press V/v repeatedly to select...
...type You can adjust the speaker levels while listening to the test tone from each speaker flat. • ENGINEER Sets to "the Sony listening room standard" frequency characteristics. • FRONT.REF Adjusts the characteristics of all the speakers to match the ... 4 Press V/v repeatedly to select the calibration type you want , then press . • FULL.FLAT Makes the measurement of the front speaker. • OFF Sets the Auto Calibration equalizer level to select "T. Input buttons , V/v/B/b AMP MENU MASTER VOL +/-/ 2 +/- 1 Press AMP MENU. 2 Press V/v repeatedly to select...
Operating Instructions
Page 36
...xxx represent a speaker channel. Note When you press TUNER, "FM TUNER" or "AM TUNER" appears for each speaker in the display panel The speaker pattern set up is output from all speakers at the same time, press MASTER VOL +/- MUTING/ SOUND FIELD +/- 1 Turn on the connected equipment. 2 Turn on ... to the equipment you selected "AUTO xxx". 5 Adjust the speaker levels. You can also use INPUT SELECTOR on the speaker pattern settings, test tone may not be connected securely. • The speaker cords may not be output from each speaker. Note Depending on the receiver.
...xxx represent a speaker channel. Note When you press TUNER, "FM TUNER" or "AM TUNER" appears for each speaker in the display panel The speaker pattern set up is output from all speakers at the same time, press MASTER VOL +/- MUTING/ SOUND FIELD +/- 1 Turn on the connected equipment. 2 Turn on ... to the equipment you selected "AUTO xxx". 5 Adjust the speaker levels. You can also use INPUT SELECTOR on the speaker pattern settings, test tone may not be connected securely. • The speaker cords may not be output from each speaker. Note Depending on the receiver.


