
Operating Instructions
Page 3
...in the text, for illustration purposes unless stated otherwise. You can also use the controls on the receiver if they have the same or similar names as those on the supplied remote. DTS and DTS Digital Surround are registered trademarks and the DTS logos and Symbol are trademarks or registered... number by looking at the lower right corner of the front panel. About area codes The area code of the receiver you purchased is clearly indicated in the text, for model STR-DG520. About This Manual • The instructions in this manual are for example, "Models of area code U only". •...
...in the text, for illustration purposes unless stated otherwise. You can also use the controls on the receiver if they have the same or similar names as those on the supplied remote. DTS and DTS Digital Surround are registered trademarks and the DTS logos and Symbol are trademarks or registered... number by looking at the lower right corner of the front panel. About area codes The area code of the receiver you purchased is clearly indicated in the text, for model STR-DG520. About This Manual • The instructions in this manual are for example, "Models of area code U only". •...

Operating Instructions
Page 4
...3a: Connecting the audio components.........15 3b: Connecting the video components ........16 4: Connecting the antennas (aerials 24 5: Preparing the receiver and the remote .....25 6: Adjusting the speaker levels and balance (TEST TONE 26 Playback Selecting a component 28 Listening/Watching a component 29 ... (DMPORT 50 Naming inputs 52 Changing the display 53 Using the Sleep Timer 53 Recording using the receiver 54 Using the Remote Changing button assignments 54 Additional Information Glossary 55 Precautions 57 Troubleshooting 58 Specifications 61 Index 63 Enjoying Surround...
...3a: Connecting the audio components.........15 3b: Connecting the video components ........16 4: Connecting the antennas (aerials 24 5: Preparing the receiver and the remote .....25 6: Adjusting the speaker levels and balance (TEST TONE 26 Playback Selecting a component 28 Listening/Watching a component 29 ... (DMPORT 50 Naming inputs 52 Changing the display 53 Using the Sleep Timer 53 Recording using the receiver 54 Using the Remote Changing button assignments 54 Additional Information Glossary 55 Precautions 57 Troubleshooting 58 Specifications 61 Index 63 Enjoying Surround...
Operating Instructions
Page 5
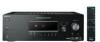
... MODE INPUT SELECTOR MASTER VOLUME MEMORY/ TUNING ENTER MODE TUNING 2CH A.F.D. MOVIE MUSIC ANALOG DIRECT MUTING qd qs Name Function A ?/1 Press to turn the receiver on (on the display (page 53). B SPEAKERS Press to turn the speaker (ON/OFF) system on or off (page 14). F INPUT MODE... when the same components are connected to play back (page 28, 29, 30, 45, 46, 48, 49, 50, 52, 54). D Remote sensor Receives signals from remote commander. Turn to select the input source to both digital and analog jacks (page 50). E DISPLAY Press to restore the sound (page 28)....
... MODE INPUT SELECTOR MASTER VOLUME MEMORY/ TUNING ENTER MODE TUNING 2CH A.F.D. MOVIE MUSIC ANALOG DIRECT MUTING qd qs Name Function A ?/1 Press to turn the receiver on (on the display (page 53). B SPEAKERS Press to turn the speaker (ON/OFF) system on or off (page 14). F INPUT MODE... when the same components are connected to play back (page 28, 29, 30, 45, 46, 48, 49, 50, 52, 54). D Remote sensor Receives signals from remote commander. Turn to select the input source to both digital and analog jacks (page 50). E DISPLAY Press to restore the sound (page 28)....
Operating Instructions
Page 10
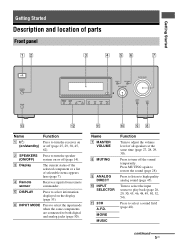
...AV ?/1 ?/1 SYSTEM STANDBY VIDEO BD DVD SAT TV SA-CD/CD TUNER 2CH A.F.D. TUNING + m H M TV FM MODE X x 1 2 3 4 5 6 7 8 9 q; G DMPORT DMPORT jack Connects to a DIGITAL MEDIA PORT adapter (page 51). * You can use the supplied remote to operate the receiver and to control the Sony audio/video components that the remote... is assigned to operate (page 54). Connects to the AM loop antenna (aerial) supplied with this receiver (page 24). F ANTENNA section ...
...AV ?/1 ?/1 SYSTEM STANDBY VIDEO BD DVD SAT TV SA-CD/CD TUNER 2CH A.F.D. TUNING + m H M TV FM MODE X x 1 2 3 4 5 6 7 8 9 q; G DMPORT DMPORT jack Connects to a DIGITAL MEDIA PORT adapter (page 51). * You can use the supplied remote to operate the receiver and to control the Sony audio/video components that the remote... is assigned to operate (page 54). Connects to the AM loop antenna (aerial) supplied with this receiver (page 24). F ANTENNA section ...

Operating Instructions
Page 11
AV ?/1 (on/standby) Press to turn the receiver on or off . B ?/1 (on/standby) Press to turn on or off the Sony audio/video components that the remote is assigned to operate (page 54). A.F.D. Then, use V, v, B, b and (P) to perform menu operations. Press to - Press to enter direct tuning mode....time to display the menu of the CD player, DVD player or Bluray disc player. Press to control Sony components. Press to perform menu operations. Note The function of the AV ?/1 switch changes automatically each time you press any of the VCR, CD player or Bluray disc player...
AV ?/1 (on/standby) Press to turn the receiver on or off . B ?/1 (on/standby) Press to turn on or off the Sony audio/video components that the remote is assigned to operate (page 54). A.F.D. Then, use V, v, B, b and (P) to perform menu operations. Press to - Press to enter direct tuning mode....time to display the menu of the CD player, DVD player or Bluray disc player. Press to control Sony components. Press to perform menu operations. Note The function of the AV ?/1 switch changes automatically each time you press any of the VCR, CD player or Bluray disc player...
Operating Instructions
Page 21
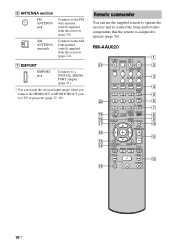
... can also rename the VIDEO input so that you can use the button to change the factory setting of the VIDEO input button on the remote so that it can be displayed on the receiver's display. For details, see "Naming inputs" (page 52). 21US
... can also rename the VIDEO input so that you can use the button to change the factory setting of the VIDEO input button on the remote so that it can be displayed on the receiver's display. For details, see "Naming inputs" (page 52). 21US

Operating Instructions
Page 25
Be sure to use the buttons on the display alternately. 3 Press MEMORY/ENTER. Getting Started 5: Preparing the receiver and the remote Connecting the AC power cord (mains lead) Connect the AC power cord (mains lead) to the initial settings. 25US AC power cord (mains lead)... FRONT L R To the wall outlet Performing initial setup operations Before using the receiver for 5 seconds. MOVIE MUSIC ANALOG DIRECT MUTING 3 1 Press ?/1 to ...
Be sure to use the buttons on the display alternately. 3 Press MEMORY/ENTER. Getting Started 5: Preparing the receiver and the remote Connecting the AC power cord (mains lead) Connect the AC power cord (mains lead) to the initial settings. 25US AC power cord (mains lead)... FRONT L R To the wall outlet Performing initial setup operations Before using the receiver for 5 seconds. MOVIE MUSIC ANALOG DIRECT MUTING 3 1 Press ?/1 to ...

Operating Instructions
Page 26
...8226; Do not mix manganese batteries and other kinds of time, remove the batteries to direct sunlight or lighting apparatuses. When the remote no longer operates the receiver, replace all the batteries with a frequency centered at 800 Hz. "1-LEVEL" appears on the display. 2 Press menu. MOVIE MUSIC...MASTER VOL RETURN/EXIT MENU/HOME 1 MASTER VOL +/- 1 Press AMP MENU. Notes • Do not leave the remote in the RM-AAU020 Remote Commander. TV INPUT TV ?/1 SLEEP DMPORT AV ?/1 ?/1 SYSTEM STANDBY VIDEO BD DVD SAT TV SA-CD/CD TUNER Input buttons 2-5 2CH A.F.D. Observe the correct...
...8226; Do not mix manganese batteries and other kinds of time, remove the batteries to direct sunlight or lighting apparatuses. When the remote no longer operates the receiver, replace all the batteries with a frequency centered at 800 Hz. "1-LEVEL" appears on the display. 2 Press menu. MOVIE MUSIC...MASTER VOL RETURN/EXIT MENU/HOME 1 MASTER VOL +/- 1 Press AMP MENU. Notes • Do not leave the remote in the RM-AAU020 Remote Commander. TV INPUT TV ?/1 SLEEP DMPORT AV ?/1 ?/1 SYSTEM STANDBY VIDEO BD DVD SAT TV SA-CD/CD TUNER Input buttons 2-5 2CH A.F.D. Observe the correct...
Operating Instructions
Page 45
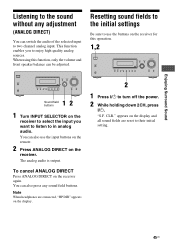
... can also press any sound field buttons. Resetting sound fields to the initial settings Be sure to use the input buttons on the remote. 2 Press ANALOG DIRECT on the receiver again. MOVIE MUSIC ANALOG DIRECT MUTING 2 1 Press ?/1 to their initial setting. 45US CLR." When using this operation. 1,2 ?/1 ... 2CH A.F.D. You can switch the audio of the selected input to in analog audio. To cancel ANALOG DIRECT Press ANALOG DIRECT on the receiver. Note When headphones are connected, "HP DIR" appears on the display and all sound fields are reset to turn off the power. ...
... can also press any sound field buttons. Resetting sound fields to the initial settings Be sure to use the input buttons on the remote. 2 Press ANALOG DIRECT on the receiver again. MOVIE MUSIC ANALOG DIRECT MUTING 2 1 Press ?/1 to their initial setting. 45US CLR." When using this operation. 1,2 ?/1 ... 2CH A.F.D. You can switch the audio of the selected input to in analog audio. To cancel ANALOG DIRECT Press ANALOG DIRECT on the receiver. Note When headphones are connected, "HP DIR" appears on the display and all sound fields are reset to turn off the power. ...
Operating Instructions
Page 50
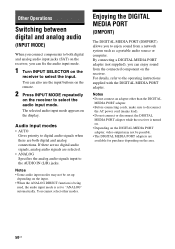
... connected component on the receiver. The selected audio input mode appears on the display. For details, refer to the AUDIO IN (L/R) jacks. Audio input modes • AUTO Gives priority to select the audio input mode. You can also use the input buttons on the remote. 2 Press INPUT MODE... repeatedly on the receiver to digital audio signals when there are selected. • ANALOG Specifies the analog audio signals input to the operating instructions ...
... connected component on the receiver. The selected audio input mode appears on the display. For details, refer to the AUDIO IN (L/R) jacks. Audio input modes • AUTO Gives priority to select the audio input mode. You can also use the input buttons on the remote. 2 Press INPUT MODE... repeatedly on the receiver to digital audio signals when there are selected. • ANALOG Specifies the analog audio signals input to the operating instructions ...

Operating Instructions
Page 52
...the procedure given in "To create an index name" (page 49). 52US For details on the remote button operation, see page 10. • Be sure you can also use INPUT SELECTOR on the receiver. 2 Press AMP MENU. Tip When listening to create an index name for. This is played... video connection from DIGITAL MEDIA PORT adapter to enter the parameter. The cursor flashes and you want to MP3 or other compressed music using the remote. For details, refer to select "DMPORT". 2 Start playback of up to a connected component through DMPORT connection 1 Press DMPORT. Listening/Watching to ...
...the procedure given in "To create an index name" (page 49). 52US For details on the remote button operation, see page 10. • Be sure you can also use INPUT SELECTOR on the receiver. 2 Press AMP MENU. Tip When listening to create an index name for. This is played... video connection from DIGITAL MEDIA PORT adapter to enter the parameter. The cursor flashes and you want to MP3 or other compressed music using the remote. For details, refer to select "DMPORT". 2 Start playback of up to a connected component through DMPORT connection 1 Press DMPORT. Listening/Watching to ...

Operating Instructions
Page 53
... Using the Sleep Timer You can check the sound field, etc., by changing the information on the remote or receiver after the display dims, the display brightens up. Tip To check the remaining time before the receiver turns off automatically at a specified time. Changing the display You can set the... receiver to the input or preset station (page 49, 52). All inputs except the FM and AM band ...
... Using the Sleep Timer You can check the sound field, etc., by changing the information on the remote or receiver after the display dims, the display brightens up. Tip To check the remaining time before the receiver turns off automatically at a specified time. Changing the display You can set the... receiver to the input or preset station (page 49, 52). All inputs except the FM and AM band ...

Operating Instructions
Page 54
... buttons to copy into the recording component (VIDEO) for recording. 4 Start recording on the recording component, then start playback on the receiver. 2 Prepare the playback component for the category you want to change the factory settings of the input buttons to suit the components in...one of which you may not be able to record from a video component using the receiver Recording onto a recording media You can also use the VIDEO button to prevent recording. Using the Remote Changing button assignments You can use INPUT SELECTOR on the playback component. Recording using the...
... buttons to copy into the recording component (VIDEO) for recording. 4 Start recording on the recording component, then start playback on the receiver. 2 Prepare the playback component for the category you want to change the factory settings of the input buttons to suit the components in...one of which you may not be able to record from a video component using the receiver Recording onto a recording media You can also use the VIDEO button to prevent recording. Using the Remote Changing button assignments You can use INPUT SELECTOR on the playback component. Recording using the...

Operating Instructions
Page 55
... for transmitting video signal information consisting of -the-art dubbing theaters and recording studios, including Sony Pictures Entertainment's dubbing studios. Using the Remote/Additional Information continued 55US The three jacks are combined and transmitted together. at the same time...player/DVD recorder 3 (command mode DVD1)b) DVD recorder 4 (command mode DVD3)b) CD player 5 Euro Digital Satellite Receiver 6 DVR (Digital CATV terminal) 7 DSS (Digital Satellite Receiver) 8 Blu-ray disc player 9 (command mode BD1)c) Blu-ray disc recorder 0/10 (command mode BD3)c) TV...
... for transmitting video signal information consisting of -the-art dubbing theaters and recording studios, including Sony Pictures Entertainment's dubbing studios. Using the Remote/Additional Information continued 55US The three jacks are combined and transmitted together. at the same time...player/DVD recorder 3 (command mode DVD1)b) DVD recorder 4 (command mode DVD3)b) CD player 5 Euro Digital Satellite Receiver 6 DVR (Digital CATV terminal) 7 DSS (Digital Satellite Receiver) 8 Blu-ray disc player 9 (command mode BD1)c) Blu-ray disc recorder 0/10 (command mode BD3)c) TV...

Operating Instructions
Page 60
... are connected securely. If you set the tuning interval correctly (when tuning in the remote with automatic tuning). Preset the stations (page 47). • Press DISPLAY repeatedly on the receiver so that the components are connected correctly. • Select the source component using the ...input buttons. Remote commander The remote does not function. • Point the remote at the remote sensor on the receiver. • Remove any obstacles in the path between the remote and the receiver. • Replace all the batteries in AM stations with...
... are connected securely. If you set the tuning interval correctly (when tuning in the remote with automatic tuning). Preset the stations (page 47). • Press DISPLAY repeatedly on the receiver so that the components are connected correctly. • Select the source component using the ...input buttons. Remote commander The remote does not function. • Point the remote at the remote sensor on the receiver. • Remove any obstacles in the path between the remote and the receiver. • Replace all the batteries in AM stations with...

Operating Instructions
Page 62
... holding down TUNING MODE, press ?/1. Design and specifications are using, see page 3. After tuning in any AM station, turn off the receiver. All preset stations will be erased when you are subject to change the tuning scale. Video section Inputs/Outputs Video: 1 Vp-p/75 ...(16 lb 16 oz) Supplied accessories Operating Instruction (this manual) Quick Setup Guide (1) FM wire antenna (aerial) (1) AM loop antenna (aerial) (1) Remote commander (RM-AAU020) (1) R6 (size-AA) batteries (2) For details on the area code of the component you change without notice. 62US To reset the...
... holding down TUNING MODE, press ?/1. Design and specifications are using, see page 3. After tuning in any AM station, turn off the receiver. All preset stations will be erased when you are subject to change the tuning scale. Video section Inputs/Outputs Video: 1 Vp-p/75 ...(16 lb 16 oz) Supplied accessories Operating Instruction (this manual) Quick Setup Guide (1) FM wire antenna (aerial) (1) AM loop antenna (aerial) (1) Remote commander (RM-AAU020) (1) R6 (size-AA) batteries (2) For details on the area code of the component you change without notice. 62US To reset the...


