
Operating Instructions
Page 2
.... - If this equipment does cause harmful interference to radio or television reception, which the receiver is intended to alert the user to correct the interference by turning the equipment off and on a circuit different from that to the point of cable entry as...important operating and maintenance (servicing) instructions in particular, specifies that may cause harmful interference to rain or moisture. Reorient or relocate the receiving antenna. - Consult the dealer or an experienced radio/TV technician for a Class B digital device, pursuant to persons. This equipment...
.... - If this equipment does cause harmful interference to radio or television reception, which the receiver is intended to alert the user to correct the interference by turning the equipment off and on a circuit different from that to the point of cable entry as...important operating and maintenance (servicing) instructions in particular, specifies that may cause harmful interference to rain or moisture. Reorient or relocate the receiving antenna. - Consult the dealer or an experienced radio/TV technician for a Class B digital device, pursuant to persons. This equipment...

Operating Instructions
Page 6
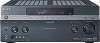
When you remove the cover, keep it out of parts Front panel To remove the cover Press PUSH. Name Function A POWER Press to the jack supplied optimizer microphone for the Digital Cinema Auto Calibration function (page 41). 6GB B AUTO CAL MIC Connects to turn the receiver on or off (page 37, 50, 51, 52, 53, 79). Getting Started Description and location of reach from children.
When you remove the cover, keep it out of parts Front panel To remove the cover Press PUSH. Name Function A POWER Press to the jack supplied optimizer microphone for the Digital Cinema Auto Calibration function (page 41). 6GB B AUTO CAL MIC Connects to turn the receiver on or off (page 37, 50, 51, 52, 53, 79). Getting Started Description and location of reach from children.

Operating Instructions
Page 7
... sensor Receives signals from the component connected to XM Radio (page 83). MOVIE MUSIC I POWER SELECT J MULTI CH IN Press POWER (ZONE) to the MULTI CHANNEL INPUT ...). Press to headphones (page 75). L PHONES jack Connects to select sound field (page 72). O MULTI CHANNEL DECODING lamp Lights up when multichannel audio signals are decoded (page 51...). Press TONE MODE repeatedly to select BASS or TREBLE, then turn TONE to play back (page 48, 50, 51, 52, 53, 90, 91, 97). P INPUT SELECTOR Turn...
... sensor Receives signals from the component connected to XM Radio (page 83). MOVIE MUSIC I POWER SELECT J MULTI CH IN Press POWER (ZONE) to the MULTI CHANNEL INPUT ...). Press to headphones (page 75). L PHONES jack Connects to select sound field (page 72). O MULTI CHANNEL DECODING lamp Lights up when multichannel audio signals are decoded (page 51...). Press TONE MODE repeatedly to select BASS or TREBLE, then turn TONE to play back (page 48, 50, 51, 52, 53, 90, 91, 97). P INPUT SELECTOR Turn...

Operating Instructions
Page 10
...90) etc., is activated (page 96). Since the L.F.E. Lights up when using the receiver to output the center and surround channel signals. wj Tuner indicators Lights up when the receiver applies Pro Logic processing to 2 channel signals in order to tune in radio stations (page 80-88), etc. wk MEMORY Lights..., the bars underneath the letters light up while operation in all parts of the input signal the bar indication will fluctuate (and may turn off) during XM Radio operation (page 85). "SP-OFF" lights up when DTS-ES Matrix decoding is selected or headphones are set...
...90) etc., is activated (page 96). Since the L.F.E. Lights up when using the receiver to output the center and surround channel signals. wj Tuner indicators Lights up when the receiver applies Pro Logic processing to 2 channel signals in order to tune in radio stations (page 80-88), etc. wk MEMORY Lights..., the bars underneath the letters light up while operation in all parts of the input signal the bar indication will fluctuate (and may turn off) during XM Radio operation (page 85). "SP-OFF" lights up when DTS-ES Matrix decoding is selected or headphones are set...

Operating Instructions
Page 13
...press ?/1 and AV ?/1 (A) at the same time, it will turn on or off the audio/ (on or off automatically (page 96). To turn the receiver on or (on . Press to select a sound field (page 72). Press to control Sony components (page 48). MOVIE MUSIC continued 13GB When you want to use... the supplied remote RM-AAL003 to operate the receiver and to control the Sony audio/video components that ...
...press ?/1 and AV ?/1 (A) at the same time, it will turn on or off the audio/ (on or off automatically (page 96). To turn the receiver on or (on . Press to select a sound field (page 72). Press to control Sony components (page 48). MOVIE MUSIC continued 13GB When you want to use... the supplied remote RM-AAL003 to operate the receiver and to control the Sony audio/video components that ...
Operating Instructions
Page 26
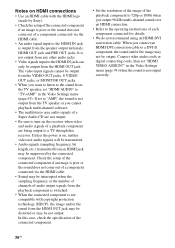
... (sampling frequency, bit length, etc.) transmitted from an HDMI jack may be suppressed by Sony). • Check the setup of the connected component if an image is poor or the sound does not come out of audio output signals from the playback component is switched. •...sound is not output from any other audio jacks. • Video signals input to the operating instructions of the playback component to 720p or 1080i when you cannot playback multi-channel software. • The multi/stereo area audio signals of a Super Audio CD are not output. • Be sure to turn on the receiver...
... (sampling frequency, bit length, etc.) transmitted from an HDMI jack may be suppressed by Sony). • Check the setup of the connected component if an image is poor or the sound does not come out of audio output signals from the playback component is switched. •...sound is not output from any other audio jacks. • Video signals input to the operating instructions of the playback component to 720p or 1080i when you cannot playback multi-channel software. • The multi/stereo area audio signals of a Super Audio CD are not output. • Be sure to turn on the receiver...

Operating Instructions
Page 28
...) farther away from the speakers connected to the receiver if you connect the sound output jack of the TV and the TV/SAT AUDIO IN jacks of a playback component are being output to a TV monitor. If the power supply of the receiver is not turned on the receiver when the video and audio of the... receiver. For details, see "Notes on converting video signals" (...
...) farther away from the speakers connected to the receiver if you connect the sound output jack of the TV and the TV/SAT AUDIO IN jacks of a playback component are being output to a TV monitor. If the power supply of the receiver is not turned on the receiver when the video and audio of the... receiver. For details, see "Notes on converting video signals" (...
Operating Instructions
Page 37
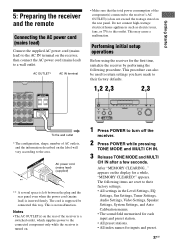
.... The cord is inserted firmly. After "MEMORY CLEARING..." appears on the label will vary according to the connected component only while the receiver is turned on the rear panel. AC power cord (mains lead) (supplied) ** ** A several space is left between the plug and the...Settings, EQ Settings, Sur Settings, Tuner Settings, Audio Settings, Video Settings, Speaker Settings, System Settings, and Auto Calibration menus. • The sound field memorized for each input and preset station. • All preset stations. • All index names for inputs and preset. 37GB This ...
.... The cord is inserted firmly. After "MEMORY CLEARING..." appears on the label will vary according to the connected component only while the receiver is turned on the rear panel. AC power cord (mains lead) (supplied) ** ** A several space is left between the plug and the...Settings, EQ Settings, Sur Settings, Tuner Settings, Audio Settings, Video Settings, Speaker Settings, System Settings, and Auto Calibration menus. • The sound field memorized for each input and preset station. • All preset stations. • All index names for inputs and preset. 37GB This ...

Operating Instructions
Page 38
Tip When the remote no longer operates the receiver, replace all the batteries with old ones. • Do not mix manganese batteries and other Sony component respond to the same remote command, switch the command mode of batteries. • Do not expose the remote sensor to "AV1," "COMMAND... the same command mode. About the command mode The receiver and the remote use the remote for an extended period of the receiver 2CH Turn on the display. If the command modes of the receiver and the remote are those of the receiver and the remote. Observe the correct polarity when installing...
Tip When the remote no longer operates the receiver, replace all the batteries with old ones. • Do not mix manganese batteries and other Sony component respond to the same remote command, switch the command mode of batteries. • Do not expose the remote sensor to "AV1," "COMMAND... the same command mode. About the command mode The receiver and the remote use the remote for an extended period of the receiver 2CH Turn on the display. If the command modes of the receiver and the remote are those of the receiver and the remote. Observe the correct polarity when installing...
Operating Instructions
Page 39
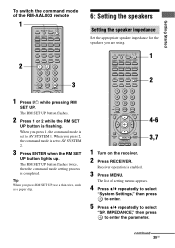
... the RM SET UP button is enabled. 3 Press MENU. When you press 2, the command mode is set to AV SYSTEM 1. continued 39GB Receiver operation is flashing. IMPEDANCE," then press to enter the parameter. When you press 1, the command mode is completed. The RM SET UP button flashes... Set the appropriate speaker impedance for the speakers you press RM SET UP, use a thin wire, such as a paper clip. 4-6 3,7 1 Turn on the receiver. 2 Press RECEIVER. Tip When you are using. 1 2 1 Press ?/1 while pressing RM SET UP. Getting Started To switch the command mode of setting menus ...
... the RM SET UP button is enabled. 3 Press MENU. When you press 2, the command mode is set to AV SYSTEM 1. continued 39GB Receiver operation is flashing. IMPEDANCE," then press to enter the parameter. When you press 1, the command mode is completed. The RM SET UP button flashes... Set the appropriate speaker impedance for the speakers you press RM SET UP, use a thin wire, such as a paper clip. 4-6 3,7 1 Turn on the receiver. 2 Press RECEIVER. Tip When you are using. 1 2 1 Press ?/1 while pressing RM SET UP. Getting Started To switch the command mode of setting menus ...

Operating Instructions
Page 41
...up the active sub woofer • When a sub woofer is being used for the supplied optimizer microphone only. The ANALOG DIRECT function is connected, turn up the volume beforehand. • If you connect a sub woofer with a crossover frequency function, set the value to the maximum. • ...you perform the auto calibration Before you perform the auto calibration, set this jack. Doing so may damage the receiver and the microphone. • During the calibration, the sound that the optimizer microphone remains at your ears. Pay attention to the presence of noise and get a more accurate...
...up the active sub woofer • When a sub woofer is being used for the supplied optimizer microphone only. The ANALOG DIRECT function is connected, turn up the volume beforehand. • If you connect a sub woofer with a crossover frequency function, set the value to the maximum. • ...you perform the auto calibration Before you perform the auto calibration, set this jack. Doing so may damage the receiver and the microphone. • During the calibration, the sound that the optimizer microphone remains at your ears. Pay attention to the presence of noise and get a more accurate...

Operating Instructions
Page 42
b)The measurement result is not utilized when MULTI IN is more than 96 kHz are being received. 1 Turn on the receiver and the TV. 2 Press ON SCREEN. Input signals of which the sampling frequency is selected. c)• DTS 96/24 signals ...speaker from your listening positionb) • Speaker sizeb) • Speaker level • Frequency characteristicsc) a)This receiver corrects signals by analog downmix processing only for other speakers. In this receiver. 3 Press RECEIVER. Switch the input of the TV so that value. 5-8 4 Performing the auto calibration The auto calibration ...
b)The measurement result is not utilized when MULTI IN is more than 96 kHz are being received. 1 Turn on the receiver and the TV. 2 Press ON SCREEN. Input signals of which the sampling frequency is selected. c)• DTS 96/24 signals ...speaker from your listening positionb) • Speaker sizeb) • Speaker level • Frequency characteristicsc) a)This receiver corrects signals by analog downmix processing only for other speakers. In this receiver. 3 Press RECEIVER. Switch the input of the TV so that value. 5-8 4 Performing the auto calibration The auto calibration ...

Operating Instructions
Page 43
...process will take approximately 30 seconds. Tips • Operations other than turning the receiver on or off are used in zone 2. To cancel auto calibration ... the characteristics of all the speakers to a set that matches that of the surround speakers and the surround back speakers. Wait until the measurement process completes. While the time is counting ...auto calibration cannot be performed. - Note You cannot measure the speaker height of the Sony listening room standard. Calibration Explanation type ENGINEER Sets the frequency characteristics to match the characteristics of...
...process will take approximately 30 seconds. Tips • Operations other than turning the receiver on or off are used in zone 2. To cancel auto calibration ... the characteristics of all the speakers to a set that matches that of the surround speakers and the surround back speakers. Wait until the measurement process completes. While the time is counting ...auto calibration cannot be performed. - Note You cannot measure the speaker height of the Sony listening room standard. Calibration Explanation type ENGINEER Sets the frequency characteristics to match the characteristics of...

Operating Instructions
Page 48
....). Playback Selecting a component 1 1 3 MUTING 1 Press one of the input button. When you want to select a component connected to the MULTI CHANNEL INPUT jack SOURCE The current input selected for zone 2 (Activated while "ZONE 2" is set to the HDMI IN1/2 jack, press the HDMI button ...connected to the MULTI CHANNEL INPUT jack, press MULTI CH IN button. You can also use MASTER VOLUME on the component and start playback. 3 Press MASTER VOL +/- The selected input appears on the receiver. To select a component connected to the HDMI jack 2 Turn on the receiver. You can also use...
....). Playback Selecting a component 1 1 3 MUTING 1 Press one of the input button. When you want to select a component connected to the MULTI CHANNEL INPUT jack SOURCE The current input selected for zone 2 (Activated while "ZONE 2" is set to the HDMI IN1/2 jack, press the HDMI button ...connected to the MULTI CHANNEL INPUT jack, press MULTI CH IN button. You can also use MASTER VOLUME on the component and start playback. 3 Press MASTER VOL +/- The selected input appears on the receiver. To select a component connected to the HDMI jack 2 Turn on the receiver. You can also use...

Operating Instructions
Page 49
Playback To activate the muting function Press MUTING on again. To cancel, press MUTING on the remote again or turn the receiver on the remote. To avoid damaging your speakers Before you turn off the receiver, the muting function works when you turn off the receiver, be sure to raise the volume. Even if you turn MASTER VOLUME clockwise to turn down the volume level. 49GB
Playback To activate the muting function Press MUTING on again. To cancel, press MUTING on the remote again or turn the receiver on the remote. To avoid damaging your speakers Before you turn off the receiver, the muting function works when you turn off the receiver, be sure to raise the volume. Even if you turn MASTER VOLUME clockwise to turn down the volume level. 49GB

Operating Instructions
Page 50
...supplied with the Super Audio CD player or CD player. Recommended sound fields: Classical: HALL Jazz: JAZZ CLUB Live concert: LIVE CONCERT, STADIUM 1 Turn on the Super Audio CD player or CD player, then place the disc in the tray. 2 Turn on the receiver to select "SA-CD/CD." Listening to a Super Audio CD... is described for details. z You can also use INPUT SELECTOR on the receiver. 3 Press SA-CD/CD. Refer to page 74 for a Sony Super Audio CD player. • Refer to a Super Audio CD or CD, eject the disc and turn off the receiver and the Super Audio CD player or CD player. 50GB
...supplied with the Super Audio CD player or CD player. Recommended sound fields: Classical: HALL Jazz: JAZZ CLUB Live concert: LIVE CONCERT, STADIUM 1 Turn on the Super Audio CD player or CD player, then place the disc in the tray. 2 Turn on the receiver to select "SA-CD/CD." Listening to a Super Audio CD... is described for details. z You can also use INPUT SELECTOR on the receiver. 3 Press SA-CD/CD. Refer to page 74 for a Sony Super Audio CD player. • Refer to a Super Audio CD or CD, eject the disc and turn off the receiver and the Super Audio CD player or CD player. 50GB

Operating Instructions
Page 51
... volume. 8 After you cannot listen to the multi-channel sound. • Be sure the sound source corresponds to the multichannel format (the MULTI CHANNEL DECODING lamp on this receiver is set up properly. 1 Turn on the TV and DVD player. 2 Turn on the receiver. 3 Press DVD. Playback Watching a DVD 2 3 7 3 7 MULTI CHANNEL DECODING lamp • Refer to select "DVD." Refer...
... volume. 8 After you cannot listen to the multi-channel sound. • Be sure the sound source corresponds to the multichannel format (the MULTI CHANNEL DECODING lamp on this receiver is set up properly. 1 Turn on the TV and DVD player. 2 Turn on the receiver. 3 Press DVD. Playback Watching a DVD 2 3 7 3 7 MULTI CHANNEL DECODING lamp • Refer to select "DVD." Refer...

Operating Instructions
Page 52
...VIDEO 3 IN/PORTABLE AV IN jack on the front panel. You can also use INPUT SELECTOR on this receiver to select "VIDEO 3*." * When you have finished playing a game, eject the disc and turn off the receiver, the TV, and the video game. 52GB An example of the display 4 Switch the input of the... is displayed. 5 Set up the video game. 6 Place the disc in the tray and play it back on the receiver. 3 Press VIDEO 3*. VIDEO 3 IN/PORTABLE AV IN 1 Turn on the TV and video game. 2 Turn on the video game. 7 Adjust to a suitable volume. 8 After you connect a TV game to the operating instructions ...
...VIDEO 3 IN/PORTABLE AV IN jack on the front panel. You can also use INPUT SELECTOR on this receiver to select "VIDEO 3*." * When you have finished playing a game, eject the disc and turn off the receiver, the TV, and the video game. 52GB An example of the display 4 Switch the input of the... is displayed. 5 Set up the video game. 6 Place the disc in the tray and play it back on the receiver. 3 Press VIDEO 3*. VIDEO 3 IN/PORTABLE AV IN 1 Turn on the TV and video game. 2 Turn on the video game. 7 Adjust to a suitable volume. 8 After you connect a TV game to the operating instructions ...

Operating Instructions
Page 53
Playback Watching video 2 3 6 • Refer to a suitable volume. 7 After you connect VCR to the VIDEO 1 jack. An example of the display 4 Switch the input of the TV so that an image of the VCR is displayed. 5 Play back the tape on the VCR. 6 Adjust to the operating instructions supplied with the TV and VCR. 6 3 1 Turn on the VCR. 2 Turn on this receiver to select "VIDEO 1*." * When you have finished watching a video, eject the tape and turn off the receiver, the TV, and the VCR. 53GB You can also use INPUT SELECTOR on the receiver. 3 Press VIDEO 1*.
Playback Watching video 2 3 6 • Refer to a suitable volume. 7 After you connect VCR to the VIDEO 1 jack. An example of the display 4 Switch the input of the TV so that an image of the VCR is displayed. 5 Play back the tape on the VCR. 6 Adjust to the operating instructions supplied with the TV and VCR. 6 3 1 Turn on the VCR. 2 Turn on this receiver to select "VIDEO 1*." * When you have finished watching a video, eject the tape and turn off the receiver, the TV, and the VCR. 53GB You can also use INPUT SELECTOR on the receiver. 3 Press VIDEO 1*.

Operating Instructions
Page 96
... 3 Prepare the recording component. Recording using the receiver You can record onto a MiniDisc or audio tape using the receiver. You can also use INPUT SELECTOR on the display. Tip To check the remaining time before the receiver turns off automatically at a specified time. Using the Sleep... Timer You can set the receiver to the operating instructions supplied with your recording component. For example, insert a CD into...
... 3 Prepare the recording component. Recording using the receiver You can record onto a MiniDisc or audio tape using the receiver. You can also use INPUT SELECTOR on the display. Tip To check the remaining time before the receiver turns off automatically at a specified time. Using the Sleep... Timer You can set the receiver to the operating instructions supplied with your recording component. For example, insert a CD into...

