
Limited Warranty (U.S. Only)
Page 1
... (1) year. 4-557-173-02 General Stereo/Hifi Components/Tape Decks ® CD Players/Mini Disc Players/Audio Systems Hifi Audio LIMITED WARRANTY Sony Electronics Inc. ("Sony") warrants this Product is determined to be presented to you. After the warranty period, you , or for service assistance or resolution of sale or receipted invoice which vary from your convenience, Sony Electronics Inc. REPAIR OR REPLACEMENT AS PROVIDED UNDER THIS WARRANTY IS...
... (1) year. 4-557-173-02 General Stereo/Hifi Components/Tape Decks ® CD Players/Mini Disc Players/Audio Systems Hifi Audio LIMITED WARRANTY Sony Electronics Inc. ("Sony") warrants this Product is determined to be presented to you. After the warranty period, you , or for service assistance or resolution of sale or receipted invoice which vary from your convenience, Sony Electronics Inc. REPAIR OR REPLACEMENT AS PROVIDED UNDER THIS WARRANTY IS...
Operating Instructions
Page 3
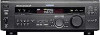
... 4 Antenna Hookups 5 Audio Component Hookups 6 Video Component Hookups 8 Digital Component Hookups 9 5.1CH Input Hookups 11 Other Hookups 12 Hooking Up and Setting Up the Speaker System 15 Speaker System Hookup 16 Performing Initial Setup Operations 18 Multi Channel Surround Setup 19 Before You Use Your Receiver 23 Location of Parts and Basic Operations 26 Front Panel Parts Description 26 Enjoying Surround Sound 31 Selecting a Sound Field 32 Understanding the Multi-Channel Surround Displays 36 Customizing Sound Fields 38 Receiving Broadcasts 43 Direct Tuning 44 Automatic Tuning 45 Preset...
... 4 Antenna Hookups 5 Audio Component Hookups 6 Video Component Hookups 8 Digital Component Hookups 9 5.1CH Input Hookups 11 Other Hookups 12 Hooking Up and Setting Up the Speaker System 15 Speaker System Hookup 16 Performing Initial Setup Operations 18 Multi Channel Surround Setup 19 Before You Use Your Receiver 23 Location of Parts and Basic Operations 26 Front Panel Parts Description 26 Enjoying Surround Sound 31 Selecting a Sound Field 32 Understanding the Multi-Channel Surround Displays 36 Customizing Sound Fields 38 Receiving Broadcasts 43 Direct Tuning 44 Automatic Tuning 45 Preset...
Operating Instructions
Page 7
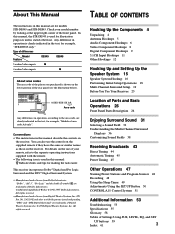
Hooking Up the Components ç STR-DE845 Turntable MD/TAPE deck INPUT OUTPUT LINE LINE L R ç OUT IN Required cords Audio cords (not supplied) When connecting a cord, be sure to match the color-coded pins to the U SIGNAL GND terminal on the components. White (L) White (L) Red (R) Red (R) ANTENNA AM y COAXIAL FM 75Ω FRONT REAR L CENTER MD/TAPE OUT OPTICAL MD/TAPE IN TV/SAT IN DVD/LD IN COAX DVD/LD IN R SUB 5.1CH INPUT WOOFER DIGITAL CTRL S S-VIDEO CTRL S S-VIDEO S-VIDEO CTRL S IN OUT...
Hooking Up the Components ç STR-DE845 Turntable MD/TAPE deck INPUT OUTPUT LINE LINE L R ç OUT IN Required cords Audio cords (not supplied) When connecting a cord, be sure to match the color-coded pins to the U SIGNAL GND terminal on the components. White (L) White (L) Red (R) Red (R) ANTENNA AM y COAXIAL FM 75Ω FRONT REAR L CENTER MD/TAPE OUT OPTICAL MD/TAPE IN TV/SAT IN DVD/LD IN COAX DVD/LD IN R SUB 5.1CH INPUT WOOFER DIGITAL CTRL S S-VIDEO CTRL S S-VIDEO S-VIDEO CTRL S IN OUT...
Operating Instructions
Page 8
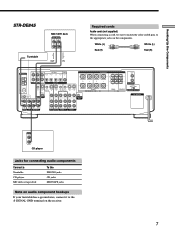
... SURROUND, LEVEL, EQUALIZER parameters by pressing the ON SCREEN button on the remote. 8 Note on video component hookups You can use the video cord of the supplied audio/video/control S cord. (Models of the video jacks Your monitor must also be sure to match the color-coded pins to the audio from the video signals and will not be output through the video jacks. ANTENNA AM y COAXIAL FM 75Ω FRONT REAR L CENTER MD/DAT OUT OPTICAL MD/DAT IN TV/SAT IN DVD...
... SURROUND, LEVEL, EQUALIZER parameters by pressing the ON SCREEN button on the remote. 8 Note on video component hookups You can use the video cord of the supplied audio/video/control S cord. (Models of the video jacks Your monitor must also be sure to match the color-coded pins to the audio from the video signals and will not be output through the video jacks. ANTENNA AM y COAXIAL FM 75Ω FRONT REAR L CENTER MD/DAT OUT OPTICAL MD/DAT IN TV/SAT IN DVD...

Operating Instructions
Page 9
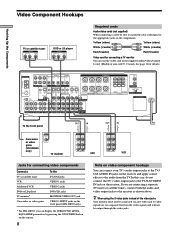
...1CH INPUT - VIDEO 1 VIDEO 2 VIDEO 3 DVD/LD TV/SAT CINEMA STUDIO EX. TUNING + MEMORY FM/AM FM MODE 2ND AUDIO + SET UP NAME ENTER 0 BASS MUTING EQUALIZER BOOST VIDEO 3 INPUT 10 VIDEO L AUDIO R Note When making coaxial connections instead of multi channel surround sound, five speakers (two front speakers, two rear speakers, and a center speaker) and a sub woofer are required. Hooking Up the Components Digital Component Hookups Connect the digital output jacks of your DVD player and satellite tuner (etc.) to the receiver's digital input jacks to bring the multi channel surround sound of...
...1CH INPUT - VIDEO 1 VIDEO 2 VIDEO 3 DVD/LD TV/SAT CINEMA STUDIO EX. TUNING + MEMORY FM/AM FM MODE 2ND AUDIO + SET UP NAME ENTER 0 BASS MUTING EQUALIZER BOOST VIDEO 3 INPUT 10 VIDEO L AUDIO R Note When making coaxial connections instead of multi channel surround sound, five speakers (two front speakers, two rear speakers, and a center speaker) and a sub woofer are required. Hooking Up the Components Digital Component Hookups Connect the digital output jacks of your DVD player and satellite tuner (etc.) to the receiver's digital input jacks to bring the multi channel surround sound of...

Operating Instructions
Page 10
... sound. 10 White (L) White (L) Red (R) Red (R) ç ç OUT IN OUT IN ANTENNA AM y COAXIAL FM 75Ω FRONT REAR L CENTER MD/DAT OUT OPTICAL MD/DAT IN TV/SAT IN DVD/LD IN COAX DVD/LD IN R SUB 5.1CH INPUT WOOFER DIGITAL CTRL S S-VIDEO CTRL S S-VIDEO S-VIDEO CTRL S IN OUT STATUS IN IN IN OUT VIDEO OUT CTRL S S-VIDEO S-VIDEO OUT OUT IN B + SPEAKERS A R L ++ + R L R L - - - - To record analog signals, make digital connections. • Input signals with only digital connections. Using other OPTICAL jacks...
... sound. 10 White (L) White (L) Red (R) Red (R) ç ç OUT IN OUT IN ANTENNA AM y COAXIAL FM 75Ω FRONT REAR L CENTER MD/DAT OUT OPTICAL MD/DAT IN TV/SAT IN DVD/LD IN COAX DVD/LD IN R SUB 5.1CH INPUT WOOFER DIGITAL CTRL S S-VIDEO CTRL S S-VIDEO S-VIDEO CTRL S IN OUT STATUS IN IN IN OUT VIDEO OUT CTRL S S-VIDEO S-VIDEO OUT OUT IN B + SPEAKERS A R L ++ + R L R L - - - - To record analog signals, make digital connections. • Input signals with only digital connections. Using other OPTICAL jacks...
Operating Instructions
Page 11
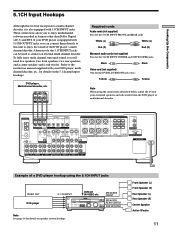
... 5.1 channel input hookups. TUNING + SHIFT - TUNING + MEMORY FM/AM FM MODE 2ND AUDIO + SET UP NAME ENTER 0 BASS MUTING EQUALIZER BOOST VIDEO 3 INPUT 10 VIDEO L AUDIO R SPEAKERS REAR/CENTER SUB WOOFER Note See page 16 for the DVD/LD VIDEO IN jacks (etc.) Yellow Yellow Note When using the 5.1CH INPUT jacks VIDEO OUT DVD player 5.1 CH INPUT DVD/LD IN VIDEO etc. Alternatively, the 5.1CH INPUT jacks can connect them directly to this receiver incorporates a multi channel decoder, it is equipped with 5.1CH OUTPUT jacks, you can be used to enjoy the sound...
... 5.1 channel input hookups. TUNING + SHIFT - TUNING + MEMORY FM/AM FM MODE 2ND AUDIO + SET UP NAME ENTER 0 BASS MUTING EQUALIZER BOOST VIDEO 3 INPUT 10 VIDEO L AUDIO R SPEAKERS REAR/CENTER SUB WOOFER Note See page 16 for the DVD/LD VIDEO IN jacks (etc.) Yellow Yellow Note When using the 5.1CH INPUT jacks VIDEO OUT DVD player 5.1 CH INPUT DVD/LD IN VIDEO etc. Alternatively, the 5.1CH INPUT jacks can connect them directly to this receiver incorporates a multi channel decoder, it is equipped with 5.1CH OUTPUT jacks, you can be used to enjoy the sound...
Operating Instructions
Page 12
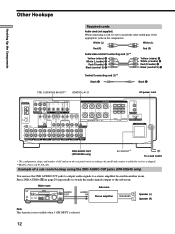
... L ++ + R L R L - - - - VIDEO 1 VIDEO 2 VIDEO 3 DVD/LD TV/SAT CINEMA STUDIO EX. Other Hookups Hooking Up the Components Required cords Audio cords (not supplied) When connecting a cord, be sure to match the color-coded pins to a stereo amplifier located in another room. Main room SPEAKERS OFF A B A+B PHONES MULTI CHANNEL DECODING DIMMER DISPLAY INPUT MODE 5.1CH INPUT - Press 2ND AUDIO (qf on the rear panel varies according to the model and country to the sub room. TUNING + MEMORY FM/AM FM MODE 2ND AUDIO BASS MUTING EQUALIZER BOOST VIDEO 3 INPUT VIDEO L AUDIO R AUDIO...
... L ++ + R L R L - - - - VIDEO 1 VIDEO 2 VIDEO 3 DVD/LD TV/SAT CINEMA STUDIO EX. Other Hookups Hooking Up the Components Required cords Audio cords (not supplied) When connecting a cord, be sure to match the color-coded pins to a stereo amplifier located in another room. Main room SPEAKERS OFF A B A+B PHONES MULTI CHANNEL DECODING DIMMER DISPLAY INPUT MODE 5.1CH INPUT - Press 2ND AUDIO (qf on the rear panel varies according to the model and country to the sub room. TUNING + MEMORY FM/AM FM MODE 2ND AUDIO BASS MUTING EQUALIZER BOOST VIDEO 3 INPUT VIDEO L AUDIO R AUDIO...
Operating Instructions
Page 18
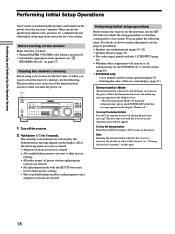
... (page 19). • The video signal paired with the SET UP button are reset to turn on the power. To view the demonstration Hold down ?/1 for your system. Hooking Up and Setting Up the Speaker System Performing Initial Setup Operations Once you turn the receiver off during the previous message. LEVEL A B C TAPE MD/DAT CD TUNER PHONO SOUND FIELD SUR A.F.D. 2CH MODE EQ EQUALIZER BASS BOOST MASTER VOLUME PRESET - You can adjust the following message appears...
... (page 19). • The video signal paired with the SET UP button are reset to turn on the power. To view the demonstration Hold down ?/1 for your system. Hooking Up and Setting Up the Speaker System Performing Initial Setup Operations Once you turn the receiver off during the previous message. LEVEL A B C TAPE MD/DAT CD TUNER PHONO SOUND FIELD SUR A.F.D. 2CH MODE EQ EQUALIZER BASS BOOST MASTER VOLUME PRESET - You can adjust the following message appears...
Operating Instructions
Page 22
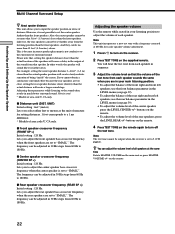
.... * Models of area code U, CA only. x Center speaker crossover frequency (CENTER SP >) Initial setting : 120 Hz Lets you to adjust the center speaker bass crossover frequency when the center speaker is set the center speaker further than the front speakers. The frequency can be output when the receiver is set to "SMALL". Note This unit incorporates a new test tone with a frequency centered at the same time Rotate MASTER VOLUME on the main unit or press MASTER VOLUME +/- buttons on the remote. 4 Press TEST TONE on the supplied remote...
.... * Models of area code U, CA only. x Center speaker crossover frequency (CENTER SP >) Initial setting : 120 Hz Lets you to adjust the center speaker bass crossover frequency when the center speaker is set the center speaker further than the front speakers. The frequency can be output when the receiver is set to "SMALL". Note This unit incorporates a new test tone with a frequency centered at the same time Rotate MASTER VOLUME on the main unit or press MASTER VOLUME +/- buttons on the remote. 4 Press TEST TONE on the supplied remote...
Operating Instructions
Page 23
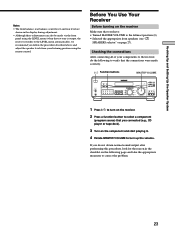
...MULTI CHANNEL DECODING DIMMER DISPLAY INPUT MODE 5.1CH INPUT - Checking the connections After connecting all of your listening position using the LEVEL menu (when the test tone is output, the receiver switches to the leftmost position (0). • Selected the appropriate front speakers (see "7 SPEAKERS selector" on the component and start playing it. 4 Rotate MASTER VOLUME to turn on the receiver. 2 Press a function button to select a component (program source) that the connections were made via the front panel using the remote control. TUNING + MEMORY FM/AM FM MODE 2ND AUDIO + SET...
...MULTI CHANNEL DECODING DIMMER DISPLAY INPUT MODE 5.1CH INPUT - Checking the connections After connecting all of your listening position using the LEVEL menu (when the test tone is output, the receiver switches to the leftmost position (0). • Selected the appropriate front speakers (see "7 SPEAKERS selector" on the component and start playing it. 4 Rotate MASTER VOLUME to turn on the receiver. 2 Press a function button to select a component (program source) that the connections were made via the front panel using the remote control. TUNING + MEMORY FM/AM FM MODE 2ND AUDIO + SET...
Operating Instructions
Page 26
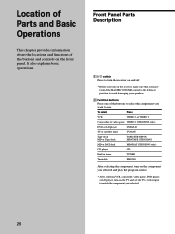
... satellite tuner TV/SAT Tape deck MD or Tape deck TAPE (STR-DE945) MD/TAPE (STR-DE845) MD or DAT deck MD/DAT (STR-DE945 only) CD player CD Built in tuner TUNER Turntable PHONO After selecting the component, turn on the component you selected and play the program source. • After selecting VCR, camcorder, video game, DVD player, or LD player, turn on the receiver, make sure that you have turned the MASTER VOLUME control to the leftmost position to avoid damaging your speakers. 2 Function buttons Press...
... satellite tuner TV/SAT Tape deck MD or Tape deck TAPE (STR-DE945) MD/TAPE (STR-DE845) MD or DAT deck MD/DAT (STR-DE945 only) CD player CD Built in tuner TUNER Turntable PHONO After selecting the component, turn on the component you selected and play the program source. • After selecting VCR, camcorder, video game, DVD player, or LD player, turn on the receiver, make sure that you have turned the MASTER VOLUME control to the leftmost position to avoid damaging your speakers. 2 Function buttons Press...
Operating Instructions
Page 27
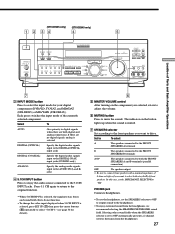
...). 6 5 MASTER VOLUME control After turning on the button lights up when the sound is set the SPEAKERS selector to OFF to output sound to the headphones. • To enjoy surround sound from the headphones. 27 The indicator on the component you want to the 5.1CH INPUT jacks. Select To AUTO Give priority to digital signals when there are no digital signals, analog is selected DIGITAL (OPTICAL) Specify the digital audio signals input to the DIGITAL OPTICAL input jacks DIGITAL (COAXIAL) Specify the digital audio signals input to the DIGITAL COAX input jacks (DVD/LD...
...). 6 5 MASTER VOLUME control After turning on the button lights up when the sound is set the SPEAKERS selector to OFF to output sound to the headphones. • To enjoy surround sound from the headphones. 27 The indicator on the component you want to the 5.1CH INPUT jacks. Select To AUTO Give priority to digital signals when there are no digital signals, analog is selected DIGITAL (OPTICAL) Specify the digital audio signals input to the DIGITAL OPTICAL input jacks DIGITAL (COAXIAL) Specify the digital audio signals input to the DIGITAL COAX input jacks (DVD/LD...
Operating Instructions
Page 28
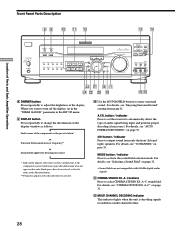
...the function button. ** Frequency appears only when the tuner is selected. 0 Use the SOUND FIELD buttons to adjust the brightness of Parts and Basic Amplifier Operations Front Panel Parts Description 8 9 0 qa qs qd qf SPEAKERS OFF A B A+B PHONES MULTI CHANNEL DECODING DIMMER DISPLAY INPUT MODE 5.1CH INPUT - For details, see page 48). A~C buttons Press to activate the sound field selection mode. VIDEO 1 VIDEO 2 VIDEO 3 DVD/LD TV/SAT CINEMA STUDIO EX. LEVEL A B C TAPE MD/DAT CD TUNER PHONO SOUND FIELD SUR A.F.D. 2CH MODE EQ EQUALIZER BASS BOOST MASTER VOLUME PRESET...
...the function button. ** Frequency appears only when the tuner is selected. 0 Use the SOUND FIELD buttons to adjust the brightness of Parts and Basic Amplifier Operations Front Panel Parts Description 8 9 0 qa qs qd qf SPEAKERS OFF A B A+B PHONES MULTI CHANNEL DECODING DIMMER DISPLAY INPUT MODE 5.1CH INPUT - For details, see page 48). A~C buttons Press to activate the sound field selection mode. VIDEO 1 VIDEO 2 VIDEO 3 DVD/LD TV/SAT CINEMA STUDIO EX. LEVEL A B C TAPE MD/DAT CD TUNER PHONO SOUND FIELD SUR A.F.D. 2CH MODE EQ EQUALIZER BASS BOOST MASTER VOLUME PRESET...
Operating Instructions
Page 32
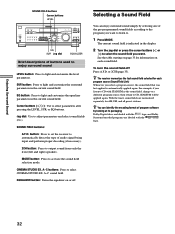
...different program source, then return to the program you want . See the table starting on page 33 for each sound field. Enjoying Surround Sound SOUND FIELD buttons Cursor buttons LEVEL SPEAKERS OFF A B A+B PHONES MULTI CHANNEL DECODING DIMMER DISPLAY INPUT MODE 5.1CH INPUT - Cursor buttons ( / ): Use to select CINEMA STUDIO EX. LEVEL A B C TAPE MD/DAT CD TUNER PHONO SOUND FIELD SUR A.F.D. 2CH MODE EQ EQUALIZER BASS BOOST MASTER VOLUME PRESET - TUNING + MEMORY FM/AM FM MODE 2ND AUDIO + SET UP NAME ENTER 0 BASS MUTING EQUALIZER BOOST VIDEO 3 INPUT 10 VIDEO L AUDIO R EQ...
...different program source, then return to the program you want . See the table starting on page 33 for each sound field. Enjoying Surround Sound SOUND FIELD buttons Cursor buttons LEVEL SPEAKERS OFF A B A+B PHONES MULTI CHANNEL DECODING DIMMER DISPLAY INPUT MODE 5.1CH INPUT - Cursor buttons ( / ): Use to select CINEMA STUDIO EX. LEVEL A B C TAPE MD/DAT CD TUNER PHONO SOUND FIELD SUR A.F.D. 2CH MODE EQ EQUALIZER BASS BOOST MASTER VOLUME PRESET - TUNING + MEMORY FM/AM FM MODE 2ND AUDIO + SET UP NAME ENTER 0 BASS MUTING EQUALIZER BOOST VIDEO 3 INPUT 10 VIDEO L AUDIO R EQ...
Operating Instructions
Page 47
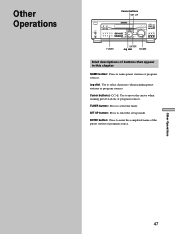
... CD TUNER PHONO SOUND FIELD SUR A.F.D. 2CH MODE EQ EQUALIZER BASS BOOST MASTER VOLUME PRESET - TUNING + MEMORY FM/AM FM MODE 2ND AUDIO + SET UP NAME ENTER 0 BASS MUTING EQUALIZER BOOST VIDEO 3 INPUT 10 VIDEO L AUDIO R TUNER ENTER Jog dial NAME Brief descriptions of the preset station or program source. SET UP button: Press to enter the completed name of buttons that appear in this chapter NAME button: Press to select the tuner. ENTER button: Press to enter the set up mode. TUNING + SHIFT - Cursor buttons ( / ): Use to select...
... CD TUNER PHONO SOUND FIELD SUR A.F.D. 2CH MODE EQ EQUALIZER BASS BOOST MASTER VOLUME PRESET - TUNING + MEMORY FM/AM FM MODE 2ND AUDIO + SET UP NAME ENTER 0 BASS MUTING EQUALIZER BOOST VIDEO 3 INPUT 10 VIDEO L AUDIO R TUNER ENTER Jog dial NAME Brief descriptions of the preset station or program source. SET UP button: Press to enter the completed name of buttons that appear in this chapter NAME button: Press to select the tuner. ENTER button: Press to enter the set up mode. TUNING + SHIFT - Cursor buttons ( / ): Use to select...
Operating Instructions
Page 48
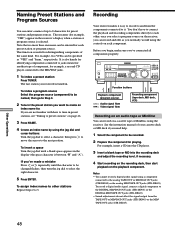
... want to each preset station or program source. This function is useful for example, "VHS") appear in the preset station you need help. 1 Select the component to 5. The last station you 've connected all components properly. LEVEL A B C TAPE MD/DAT CD TUNER PHONO SOUND FIELD SUR A.F.D. 2CH MODE EQ EQUALIZER BASS BOOST MASTER VOLUME PRESET - See the instruction manual of up to the MD/DAT jacks. 1 To index a preset station Press TUNER. To index a program source Select the program source (component) to be changed flashes, then turn the jog dial...
... want to each preset station or program source. This function is useful for example, "VHS") appear in the preset station you need help. 1 Select the component to 5. The last station you 've connected all components properly. LEVEL A B C TAPE MD/DAT CD TUNER PHONO SOUND FIELD SUR A.F.D. 2CH MODE EQ EQUALIZER BASS BOOST MASTER VOLUME PRESET - See the instruction manual of up to the MD/DAT jacks. 1 To index a preset station Press TUNER. To index a program source Select the program source (component) to be changed flashes, then turn the jog dial...

Operating Instructions
Page 52
... MD Tape Other (Receiver) player deck deck component In the CONTROL A1 control system, the control signals flow both the ( and P indicators light together). 3 Set the recorder component to operate. Other Operations 52 Basic Functions The CONTROL A1 functions will cause the automatic function selection to the REC-PAUSE mode. 4 Press PAUSE on the recorder component. CONTROL A1 Control System Connections Connect monaural (2P) mini-plug cords in series to the Operating Instructions supplied with the receiver. • When recording, do not play button...
... MD Tape Other (Receiver) player deck deck component In the CONTROL A1 control system, the control signals flow both the ( and P indicators light together). 3 Set the recorder component to operate. Other Operations 52 Basic Functions The CONTROL A1 functions will cause the automatic function selection to the REC-PAUSE mode. 4 Press PAUSE on the recorder component. CONTROL A1 Control System Connections Connect monaural (2P) mini-plug cords in series to the Operating Instructions supplied with the receiver. • When recording, do not play button...
Operating Instructions
Page 54
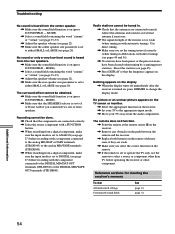
...). , Adjust the speaker volume (see page 20). MODE). , Make sure that the components are connected correctly. , Select the source component with a FUNCTION button. , When recording from a digital component, make sure the input mode is set to ANALOG (see page 27) before recording with a component connected to the analog MD/DAT or TAPE terminals (STR-DE945) or the analog MD/TAPE terminals (STR-DE845). , When recording from a digital component, make sure the input mode is set to operate the TV only, use the remote to...
...). , Adjust the speaker volume (see page 20). MODE). , Make sure that the components are connected correctly. , Select the source component with a FUNCTION button. , When recording from a digital component, make sure the input mode is set to ANALOG (see page 27) before recording with a component connected to the analog MD/DAT or TAPE terminals (STR-DE945) or the analog MD/TAPE terminals (STR-DE845). , When recording from a digital component, make sure the input mode is set to operate the TV only, use the remote to...
Operating Instructions
Page 61
... H Hookups 5.1 CH input 11 AC power cord 14 antennas 5 audio components 6, 7 digital components 9, 10 CONTROL A1 II 12 S-LINK CONTROL S 13 speaker system 16 video components 8 I, J, K Indexing. See Automatic tuning Selecting component 26 front speaker system 27 sound field 32 Sleep timer 49 Sound field adjustable parameters 41, 42 customizing 38~42 pre-programmed 33~35 resetting 41 selecting 32 Speakers adjusting speaker volume 22 connection 16 impedance 17 placement 19~22 Supplied accessories 4 Surround sound 31~42 T Test tone 22 Tuning automatically 45 directly 44 preset stations 45...
... H Hookups 5.1 CH input 11 AC power cord 14 antennas 5 audio components 6, 7 digital components 9, 10 CONTROL A1 II 12 S-LINK CONTROL S 13 speaker system 16 video components 8 I, J, K Indexing. See Automatic tuning Selecting component 26 front speaker system 27 sound field 32 Sleep timer 49 Sound field adjustable parameters 41, 42 customizing 38~42 pre-programmed 33~35 resetting 41 selecting 32 Speakers adjusting speaker volume 22 connection 16 impedance 17 placement 19~22 Supplied accessories 4 Surround sound 31~42 T Test tone 22 Tuning automatically 45 directly 44 preset stations 45...


