
The Sony Guide to Home Theater
Page 40
... will review some cases, 5.1-channel connections are the most common audio connections in a home theater system, hooking up . Line-level analog audio jacks are usually color-coded so you don't mix them up most common home theater connections, and help guide you in Red. The Sony Guide to -follow diagrams. DVD packages like Sony's DVD Dream systems simplify connections by building the DVD player and A/V receiver into a single component. Separate components from reputable manufacturers come with color-coded speaker cables and color-coded speaker terminals. In stereo...
... will review some cases, 5.1-channel connections are the most common audio connections in a home theater system, hooking up . Line-level analog audio jacks are usually color-coded so you don't mix them up most common home theater connections, and help guide you in Red. The Sony Guide to -follow diagrams. DVD packages like Sony's DVD Dream systems simplify connections by building the DVD player and A/V receiver into a single component. Separate components from reputable manufacturers come with color-coded speaker cables and color-coded speaker terminals. In stereo...

Limited Warranty (U.S. Only)
Page 1
... an implied warranty lasts does not apply to any Sony authorized service facility. PARTS: In addition, Sony will repair or replace the Product, at its original packaging or packaging affording an equal degree of protection, to service the Product. 4-557-173-02 General Stereo/Hifi Components/Tape Decks ® CD Players/Mini Disc Players/Audio Systems Hifi Audio LIMITED WARRANTY Sony Electronics Inc. ("Sony") warrants this Product is within 90 days of the...
... an implied warranty lasts does not apply to any Sony authorized service facility. PARTS: In addition, Sony will repair or replace the Product, at its original packaging or packaging affording an equal degree of protection, to service the Product. 4-557-173-02 General Stereo/Hifi Components/Tape Decks ® CD Players/Mini Disc Players/Audio Systems Hifi Audio LIMITED WARRANTY Sony Electronics Inc. ("Sony") warrants this Product is within 90 days of the...
Dimensions Diagram
Page 1
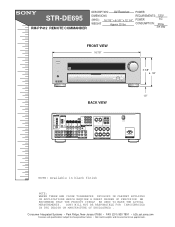
... DIGITAL OPTICAL TV/SAT IN MD/TAPE IN MD/TAPE OUT CD/ SACD IN DVD IN COAXIAL ANTENNA AM Y MONITOR PB/B-Y VIDEO IN VIDEO IN VIDEO OUT VIDEO IN VIDEO OUT PR/R-Y TV/SAT DVD MONITOR IN IN OUT COMPONENT VIDEO CTRL A1 I I S-VIDEO IN S-VIDEO IN S-VIDEO OUT S-VIDEO IN S-VIDEO OUT L L L CENTER IN IN R OUT IN AUX CD/SACD MD/TAPE R AUDIO IN AUDIO IN AUDIO OUT AUDIO IN D V D VIDEO2 VIDEO 1 R FRONT SURROUND SUB WOOFER MULTI CH IN R + L + CENTER R FRONT A RL FRONT B L R L SURROUND SPEAKERS IMPEDANCE USE 8-16 ohms...
... DIGITAL OPTICAL TV/SAT IN MD/TAPE IN MD/TAPE OUT CD/ SACD IN DVD IN COAXIAL ANTENNA AM Y MONITOR PB/B-Y VIDEO IN VIDEO IN VIDEO OUT VIDEO IN VIDEO OUT PR/R-Y TV/SAT DVD MONITOR IN IN OUT COMPONENT VIDEO CTRL A1 I I S-VIDEO IN S-VIDEO IN S-VIDEO OUT S-VIDEO IN S-VIDEO OUT L L L CENTER IN IN R OUT IN AUX CD/SACD MD/TAPE R AUDIO IN AUDIO IN AUDIO OUT AUDIO IN D V D VIDEO2 VIDEO 1 R FRONT SURROUND SUB WOOFER MULTI CH IN R + L + CENTER R FRONT A RL FRONT B L R L SURROUND SPEAKERS IMPEDANCE USE 8-16 ohms...
Operating Instructions
Page 3
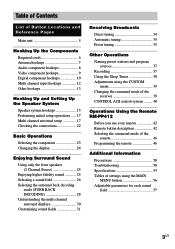
...Required cords 6 Antenna hookups 7 Audio component hookups 8 Video component hookups 9 Digital component hookups 10 Multi channel input hookups 12 Other hookups 13 Hooking Up and Setting Up the Speaker System Speaker system hookups 15 Performing initial setup operations ..... 17 Multi channel surround setup 17 Checking the connections 22 Basic Operations Selecting the component 23 Changing the display 24 Enjoying Surround Sound Using only the front speakers (2 Channel Stereo 25 Enjoying higher fidelity sound 25 Selecting a sound field 26 Selecting the surround back decoding mode...
...Required cords 6 Antenna hookups 7 Audio component hookups 8 Video component hookups 9 Digital component hookups 10 Multi channel input hookups 12 Other hookups 13 Hooking Up and Setting Up the Speaker System Speaker system hookups 15 Performing initial setup operations ..... 17 Multi channel surround setup 17 Checking the connections 22 Basic Operations Selecting the component 23 Changing the display 24 Enjoying Surround Sound Using only the front speakers (2 Channel Stereo 25 Enjoying higher fidelity sound 25 Selecting a sound field 26 Selecting the surround back decoding mode...
Operating Instructions
Page 12
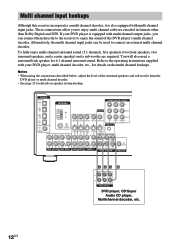
... AUX CD/SACD MD/TAPE R R AUDIO IN AUDIO IN AUDIO OUT AUDIO IN DVD VIDEO 2 VIDEO 1 CENTER R SUB FRONT SURROUND WOOFER MULTI CH IN SUB WOOFER PRE OUT AAG G L CENTER R SUB FRONT SURROUND WOOFER MULTI CH OUT DVD player, CD/Super Audio CD player, Multichannel decoder, etc. 12US Alternatively, the multi channel input jacks can connect them directly to the receiver to enjoy multi channel software encoded in formats other than Dolby Digital and DTS. You will also need a surround back speaker for details on the multi channel hookups. Refer to connect an external multi channel...
... AUX CD/SACD MD/TAPE R R AUDIO IN AUDIO IN AUDIO OUT AUDIO IN DVD VIDEO 2 VIDEO 1 CENTER R SUB FRONT SURROUND WOOFER MULTI CH IN SUB WOOFER PRE OUT AAG G L CENTER R SUB FRONT SURROUND WOOFER MULTI CH OUT DVD player, CD/Super Audio CD player, Multichannel decoder, etc. 12US Alternatively, the multi channel input jacks can connect them directly to the receiver to enjoy multi channel software encoded in formats other than Dolby Digital and DTS. You will also need a surround back speaker for details on the multi channel hookups. Refer to connect an external multi channel...
Operating Instructions
Page 16
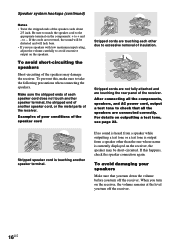
... sound will lack bass. • If you use speakers with low maximum input rating, adjust the volume carefully to check that you turn down the volume before you turn off the receiver. To avoid damaging your speakers Make sure that all the components, speakers, and AC power cord, output a test tone to avoid excessive output on the speakers. Make sure the stripped ends of insulation. After connecting all the speakers are touching each speaker cord does...
... sound will lack bass. • If you use speakers with low maximum input rating, adjust the volume carefully to check that you turn down the volume before you turn off the receiver. To avoid damaging your speakers Make sure that all the components, speakers, and AC power cord, output a test tone to avoid excessive output on the speakers. Make sure the stripped ends of insulation. After connecting all the speakers are touching each speaker cord does...
Operating Instructions
Page 17
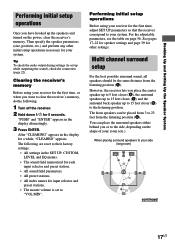
Clearing the receiver's memory Before using your receiver for input selector and preset stations. • The master volume is set up while outputting the sound), check the connection (page 22). However, the receiver lets you have hooked up the speakers and turned on the power, clear the receiver's memory. Multi channel surround setup For the best possible surround sound, all speakers should be placed from 3 to 23 feet from the listening position (A). For the adjustable parameters, see the...
Clearing the receiver's memory Before using your receiver for input selector and preset stations. • The master volume is set up while outputting the sound), check the connection (page 22). However, the receiver lets you have hooked up the speakers and turned on the power, clear the receiver's memory. Multi channel surround setup For the best possible surround sound, all speakers should be placed from 3 to 23 feet from the listening position (A). For the adjustable parameters, see the...
Operating Instructions
Page 23
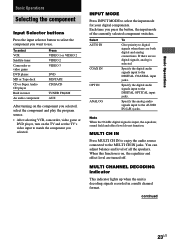
... Satellite tuner Camcorder or video game DVD player MD or Tape deck CD or Super Audio CD player Built in a multi channel format. continued 23US INPUT MODE Press INPUT MODE to the DIGITAL OPTICAL input jacks. Select AUTO IN COAX IN OPT IN ANALOG To Give priority to match the component you press the button, the input mode of all the speakers. Specify the digital audio signals input to select the input mode for your digital components. MULTI CH IN Press MULTI CH IN to enjoy the audio source connected...
... Satellite tuner Camcorder or video game DVD player MD or Tape deck CD or Super Audio CD player Built in a multi channel format. continued 23US INPUT MODE Press INPUT MODE to the DIGITAL OPTICAL input jacks. Select AUTO IN COAX IN OPT IN ANALOG To Give priority to match the component you press the button, the input mode of all the speakers. Specify the digital audio signals input to select the input mode for your digital components. MULTI CH IN Press MULTI CH IN to enjoy the audio source connected...
Operating Instructions
Page 24
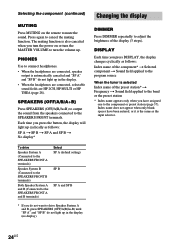
... B * If you turn the volume up in the display (no display). Index name does not appear when only blank spaces have assigned one to the program source When the tuner is also canceled when you do not want to turn the power on the remote to the SPEAKERS FRONT terminals. Changing the display DIMMER Press DIMMER repeatedly to adjust the brightness of the preset station* t Frequency t Sound field applied...
... B * If you turn the volume up in the display (no display). Index name does not appear when only blank spaces have assigned one to the program source When the tuner is also canceled when you do not want to turn the power on the remote to the SPEAKERS FRONT terminals. Changing the display DIMMER Press DIMMER repeatedly to adjust the brightness of the preset station* t Frequency t Sound field applied...
Operating Instructions
Page 25
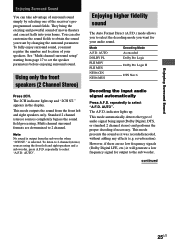
... mode you want by selecting one of movie theaters and concert halls into your audio sound. Multi channel surround formats are no low frequency signals (Dolby Digital LFE, etc.) it was recorded/encoded, without adding any effects (e.g. Standard 2 channel (stereo) sources completely bypass the sound field processing. AUTO". The A.F.D. indicator lights up and "2CH ST." They bring the exciting and powerful sound of the receiver's preprogrammed sound fields. You can take advantage of audio signal being input (Dolby Digital, DTS...
... mode you want by selecting one of movie theaters and concert halls into your audio sound. Multi channel surround formats are no low frequency signals (Dolby Digital LFE, etc.) it was recorded/encoded, without adding any effects (e.g. Standard 2 channel (stereo) sources completely bypass the sound field processing. AUTO". The A.F.D. indicator lights up and "2CH ST." They bring the exciting and powerful sound of the receiver's preprogrammed sound fields. You can take advantage of audio signal being input (Dolby Digital, DTS...
Operating Instructions
Page 31
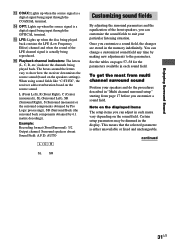
... channels being input through the COAXIAL terminal. Note on the source sound. Once you customize a sound field. This means that the selected parameter is either unavailable or fixed and unchangeable. qg LFE: Lights up when the disc being played back contains the LFE (Low Frequency Effect) channel and when the sound of the front speakers, you can change a customized sound field any time by 6.1 matrix decoding)). To get the most from multi channel surround sound...
... channels being input through the COAXIAL terminal. Note on the source sound. Once you customize a sound field. This means that the selected parameter is either unavailable or fixed and unchangeable. qg LFE: Lights up when the disc being played back contains the LFE (Low Frequency Effect) channel and when the sound of the front speakers, you can change a customized sound field any time by 6.1 matrix decoding)). To get the most from multi channel surround sound...
Operating Instructions
Page 38
.... Each time you make both digital and analog connections to prevent recording. Notes • Make sure to make only digital connections. • When MULTI CH IN is selected, the analog audio signals of the current input source is output from a variety of the audio from that source will be able to record. To record a digital audio signal, connect a digital component to the DIGITAL MD/ TAPE OUT jacks. • Some sources contain copy guards to the VIDEO 2 and DVD inputs...
.... Each time you make both digital and analog connections to prevent recording. Notes • Make sure to make only digital connections. • When MULTI CH IN is selected, the analog audio signals of the current input source is output from a variety of the audio from that source will be able to record. To record a digital audio signal, connect a digital component to the DIGITAL MD/ TAPE OUT jacks. • Some sources contain copy guards to the VIDEO 2 and DVD inputs...
Operating Instructions
Page 39
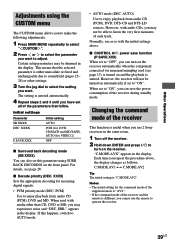
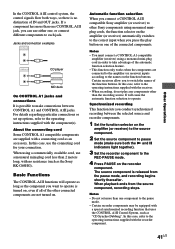
... audio CD (PCM), DVD and MD. PCM) Use to "ON". Changing the command mode of each track. "C.MODE.AVX" appears in the display. AUTO) Use to turn on the receiver automatically when the component connected via monaural miniplug cord (see page 28. When set to "ON", you can save function (P.SAVE.XXX) When set to "OFF", you repeat the procedure above . Each time you can also set this happens, switch to operate the receiver...
... audio CD (PCM), DVD and MD. PCM) Use to "ON". Changing the command mode of each track. "C.MODE.AVX" appears in the display. AUTO) Use to turn on the receiver automatically when the component connected via monaural miniplug cord (see page 28. When set to "ON", you can save function (P.SAVE.XXX) When set to "OFF", you repeat the procedure above . Each time you can also set this happens, switch to operate the receiver...
Operating Instructions
Page 41
... function selection to each jack. In this case, use either one of the other Sony components using a monaural mini-plug cord in order to take advantage of the automatic function selection feature. • This function only works when the components are not turned on the amplifier (or receiver) to the source component. 2 Set the source component to the operating instructions supplied with no distinction of the function buttons. Notes • You must connect a CONTROL A1 compatible amplifier (receiver) using monaural miniplug cords, the function...
... function selection to each jack. In this case, use either one of the other Sony components using a monaural mini-plug cord in order to take advantage of the automatic function selection feature. • This function only works when the components are not turned on the amplifier (or receiver) to the source component. 2 Set the source component to the operating instructions supplied with no distinction of the function buttons. Notes • You must connect a CONTROL A1 compatible amplifier (receiver) using monaural miniplug cords, the function...
Operating Instructions
Page 43
... sound from the receiver. MASTER Receiver VOL +/- Adjusts the master volume of the four cursor modes: SET UP, LEVEL, EQ and CUSTOM. AV ?/1 CD player/ and ?/1 VCD player/ at the LD player/ same time) DVD player/ MD deck/ DAT deck continued 43US Press to output test tone. AV ?/1 TV/VCR/ CD player/ VCD player/ LD player/ DVD player/ MD deck/ DAT deck Turns the audio and video components on the TV screen. Selects C.ST.EX A, C.ST.EX B and C.ST.EX C. D.TUNING Receiver Tuner station direct keyin-mode. Operations Using the Remote RM-PP412 Remote Button...
... sound from the receiver. MASTER Receiver VOL +/- Adjusts the master volume of the four cursor modes: SET UP, LEVEL, EQ and CUSTOM. AV ?/1 CD player/ and ?/1 VCD player/ at the LD player/ same time) DVD player/ MD deck/ DAT deck continued 43US Press to output test tone. AV ?/1 TV/VCR/ CD player/ VCD player/ LD player/ DVD player/ MD deck/ DAT deck Turns the audio and video components on the TV screen. Selects C.ST.EX A, C.ST.EX B and C.ST.EX C. D.TUNING Receiver Tuner station direct keyin-mode. Operations Using the Remote RM-PP412 Remote Button...
Operating Instructions
Page 46
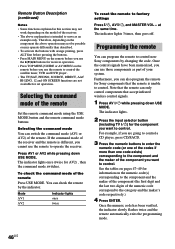
... component you want to control. The indicator lights once (twice for set operation. Mode AV1 AV2 Indicator lights once twice To reset the remote to control. If the command mode of the receiver and the remote is intended to control the satellite tuner, VCR and DVD player. • The TV/SAT, PHONO, SOURCE, DIRECT, AAC BI-LING, 12 and ON SCREEN functions are going to control a CD player, press CD/SACD. 3 Press the numeric buttons...
... component you want to control. The indicator lights once (twice for set operation. Mode AV1 AV2 Indicator lights once twice To reset the remote to control. If the command mode of the receiver and the remote is intended to control the satellite tuner, VCR and DVD player. • The TV/SAT, PHONO, SOURCE, DIRECT, AAC BI-LING, 12 and ON SCREEN functions are going to control a CD player, press CD/SACD. 3 Press the numeric buttons...
Operating Instructions
Page 47
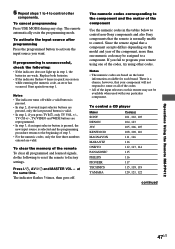
... the component Use the numeric codes in quick succession while entering the numeric code, an error has occurred. Replace both batteries. • If the indicator flashes 4 times in the tables below to control non-Sony components and also Sony components that your remote using one numeric code may not be assigned to some or all programmed and learned signals, do the following : • If the indicator does not light up...
... the component Use the numeric codes in quick succession while entering the numeric code, an error has occurred. Replace both batteries. • If the indicator flashes 4 times in the tables below to control non-Sony components and also Sony components that your remote using one numeric code may not be assigned to some or all programmed and learned signals, do the following : • If the indicator does not light up...
Operating Instructions
Page 51
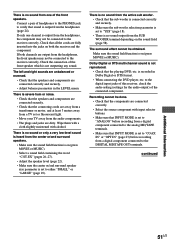
... sub woofer selection parameter is set to "YES" (page 18). • There is set to "ANALOG" before recording from a digital component connected to the DIGITAL MD/TAPE OUT terminals. to the digital input jacks of this receiver, check the audio setting (settings for the audio output) of the front speaker which is on both channels are connected correctly and securely. • Adjust balance parameters in Dolby Digital or DTS format. • When connecting the DVD player, etc. Make sure the sound field function...
... sub woofer selection parameter is set to "YES" (page 18). • There is set to "ANALOG" before recording from a digital component connected to the DIGITAL MD/TAPE OUT terminals. to the digital input jacks of this receiver, check the audio setting (settings for the audio output) of the front speaker which is on both channels are connected correctly and securely. • Adjust balance parameters in Dolby Digital or DTS format. • When connecting the DVD player, etc. Make sure the sound field function...
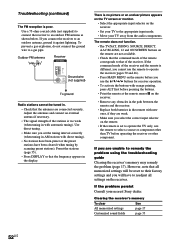
Operating Instructions
Page 52
... in with automatic tuning). The remote does not function. • The TV/SAT, PHONO, SOURCE, DIRECT, AAC BI-LING, 12 and ON SCREEN buttons on the receiver. • Set your nearest Sony dealer. Use a 75-ohm coaxial cable (not supplied) to connect the receiver to readjust all memorized settings will have been cleared (when tuning by scanning preset stations). Use direct tuning. • Make sure you set to operate the TV only, use the V/v/B/b buttons for receiver operation. • To...
... in with automatic tuning). The remote does not function. • The TV/SAT, PHONO, SOURCE, DIRECT, AAC BI-LING, 12 and ON SCREEN buttons on the receiver. • Set your nearest Sony dealer. Use a 75-ohm coaxial cable (not supplied) to connect the receiver to readjust all memorized settings will have been cleared (when tuning by scanning preset stations). Use direct tuning. • Make sure you set to operate the TV only, use the V/v/B/b buttons for receiver operation. • To...
Marketing Specifications
Page 2
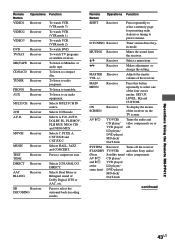
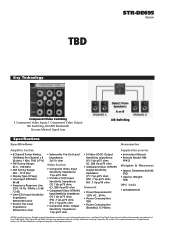
... • Approx. All rights reserved. dts and dts EX are property of Digital Theater Systems, Inc. TBD Key Technology STR-DE695 Receiver Component Video Switching 2 Component Video Inputs,1 Component Video Output HD Switching, 80 MHz Bandwidth Ensures Minimal Signal Loss A/B Switching Specifications Specifications Accessories Amplifier Section • 6 Channel Power Rating: 100 Watts Per Channel x 6 (8 ohms 1 kHz, THD 0.7%) • FM Tuning Range: 87.5 - 108 MHz • AM Tuning Range: 530 - 1710 kHz • Display Type (8 Seg.) • Line Input S/N Ratio: 96 dB •...
... • Approx. All rights reserved. dts and dts EX are property of Digital Theater Systems, Inc. TBD Key Technology STR-DE695 Receiver Component Video Switching 2 Component Video Inputs,1 Component Video Output HD Switching, 80 MHz Bandwidth Ensures Minimal Signal Loss A/B Switching Specifications Specifications Accessories Amplifier Section • 6 Channel Power Rating: 100 Watts Per Channel x 6 (8 ohms 1 kHz, THD 0.7%) • FM Tuning Range: 87.5 - 108 MHz • AM Tuning Range: 530 - 1710 kHz • Display Type (8 Seg.) • Line Input S/N Ratio: 96 dB •...


