
Operating Instructions
Page 5
...Connecting to Your AV Amplifier (Receiver 18 Step 5: Connecting the Power Cord 20 Step 6: Preparing the Remote 20 Step 7: Easy Setup 23 Connecting Another VCR or Similar Device 27 Quick Guide to Disc Types 30 Recordable and Playable Discs 30 Playable Discs 32 DVD Operation DVD/USB Playback 34... Equipment 51 Changing or Canceling DVD Timer Settings (Timer List 53 Recording From Connected Equipment With a Timer (Synchro Rec 54 Recording From Another VCR or Similar Device 56 DVD Editing 57 Before Editing 57 Editing a Title 58 Changing the Name of a Title 61 Creating a Playlist 62 ...
...Connecting to Your AV Amplifier (Receiver 18 Step 5: Connecting the Power Cord 20 Step 6: Preparing the Remote 20 Step 7: Easy Setup 23 Connecting Another VCR or Similar Device 27 Quick Guide to Disc Types 30 Recordable and Playable Discs 30 Playable Discs 32 DVD Operation DVD/USB Playback 34... Equipment 51 Changing or Canceling DVD Timer Settings (Timer List 53 Recording From Connected Equipment With a Timer (Synchro Rec 54 Recording From Another VCR or Similar Device 56 DVD Editing 57 Before Editing 57 Editing a Title 58 Changing the Name of a Title 61 Creating a Playlist 62 ...
Operating Instructions
Page 6
... and Play Information 72 Selecting the Sound During Playback 73 VCR Recording 74 Before Recording 74 VCR Recording From Connected Equipment Without the Timer 75 VCR Timer Recording From Connected Equipment 77 Changing or Canceling VCR Timer Settings (Timer List 79 Recording From Connected Equipment With... Files From a Connected Digital Still Camera 93 Settings and Adjustments 96 Using the Setup Displays 96 Clock Setting (Clock Set 97 Video Settings (Video 98 Audio Settings (Audio 100 Recording, VCR, Set Top Box, Control for HDMI Settings (Features 102 Language, Parental Control ...
... and Play Information 72 Selecting the Sound During Playback 73 VCR Recording 74 Before Recording 74 VCR Recording From Connected Equipment Without the Timer 75 VCR Timer Recording From Connected Equipment 77 Changing or Canceling VCR Timer Settings (Timer List 79 Recording From Connected Equipment With... Files From a Connected Digital Still Camera 93 Settings and Adjustments 96 Using the Setup Displays 96 Clock Setting (Clock Set 97 Video Settings (Video 98 Audio Settings (Audio 100 Recording, VCR, Set Top Box, Control for HDMI Settings (Features 102 Language, Parental Control ...
Operating Instructions
Page 10
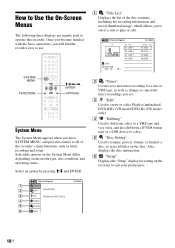
Once you become familiar with the basic operations, you will find the recorder easy to operate this recorder. SYSTEM MENU 123 456 789 0 O RETURN M/m/ How to Use the On-Screen Menus The following three displays are mainly used to use.
Once you become familiar with the basic operations, you will find the recorder easy to operate this recorder. SYSTEM MENU 123 456 789 0 O RETURN M/m/ How to Use the On-Screen Menus The following three displays are mainly used to use.
Operating Instructions
Page 13
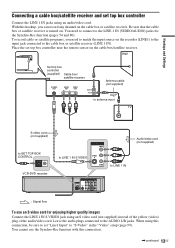
... ANT IN TO TV Antenna cable (not supplied) to antenna input TV S video cord (not supplied) to SET TOP BOX CONTROL SET TOP BOX CONTROL VCR-DVD recorder LINE 1 IN VIDEO S VIDEO to LINE 1 IN S VIDEO AUDIO to LINE 1 IN HDMI OUT SET TOP BOX CONTROL LINE 1 IN VIDEO ...AUDIO L/R jacks. Leave the audio plugs connected to match the input source on . With this hookup, you need to connect to "S-Video" in the "Video" setup (page 99). When using this connection. ,continued 13US Hookups and Settings Connecting a cable box/satellite receiver and set "Line1 Input" to the LINE 1 IN (...
... ANT IN TO TV Antenna cable (not supplied) to antenna input TV S video cord (not supplied) to SET TOP BOX CONTROL SET TOP BOX CONTROL VCR-DVD recorder LINE 1 IN VIDEO S VIDEO to LINE 1 IN S VIDEO AUDIO to LINE 1 IN HDMI OUT SET TOP BOX CONTROL LINE 1 IN VIDEO ...AUDIO L/R jacks. Leave the audio plugs connected to match the input source on . With this hookup, you need to connect to "S-Video" in the "Video" setup (page 99). When using this connection. ,continued 13US Hookups and Settings Connecting a cable box/satellite receiver and set "Line1 Input" to the LINE 1 IN (...

Operating Instructions
Page 14
In this case, select "Line2" for "Connections" of "Set Top Box Control" in the "Features" setup (page 103). For details, see the tuner's operating instructions. 14US z Hint You can also connect a cable box/satellite receiver to the S VIDEO and yellow VIDEO jacks at the same time. • Synchro-Recording does not work with some tuners. Notes • Do not connect to the LINE 2 IN jacks on the front panel.
In this case, select "Line2" for "Connections" of "Set Top Box Control" in the "Features" setup (page 103). For details, see the tuner's operating instructions. 14US z Hint You can also connect a cable box/satellite receiver to the S VIDEO and yellow VIDEO jacks at the same time. • Synchro-Recording does not work with some tuners. Notes • Do not connect to the LINE 2 IN jacks on the front panel.

Operating Instructions
Page 16
... when the recorder outputs signals through the HDMI OUT jack. "Player" appears on the TV screen when using a certified Sony HDMI cord (not supplied). TV or projector HDMI OUT HDMI cord (not supplied) HDMI IN to HDMI input to HDMI... LINE OUT AUDIO OUT COMPONENT VIDEO OUT VIDEO L Y S VIDEO L PB R R PR AUDIO AUDIO COAXIAL DIGITAL AUDIO OUT VCR-DVD recorder Using the Control for HDMI functions for 'BRAVIA' Sync (for HDMI" to DVI jacks that are trademarks or registered...components compatible with an HDMI cord (not supplied), operation is lit in the "Features" setup (page 104).
... when the recorder outputs signals through the HDMI OUT jack. "Player" appears on the TV screen when using a certified Sony HDMI cord (not supplied). TV or projector HDMI OUT HDMI cord (not supplied) HDMI IN to HDMI input to HDMI... LINE OUT AUDIO OUT COMPONENT VIDEO OUT VIDEO L Y S VIDEO L PB R R PR AUDIO AUDIO COAXIAL DIGITAL AUDIO OUT VCR-DVD recorder Using the Control for HDMI functions for 'BRAVIA' Sync (for HDMI" to DVI jacks that are trademarks or registered...components compatible with an HDMI cord (not supplied), operation is lit in the "Features" setup (page 104).

Operating Instructions
Page 17
...video signals only. 17US When using a component video cord (not supplied) or three video cords (not supplied) of "Video" to "On" in the "Setup" display (page 99). If your TV has component video input jacks Connect the COMPONENT VIDEO OUT jacks using this connection, be sure to connect the... BOX CONTROL LINE 1 IN VIDEO LINE OUT AUDIO OUT COMPONENT VIDEO OUT VIDEO L Y S VIDEO L PB R R PR AUDIO AUDIO COAXIAL DIGITAL AUDIO OUT VCR-DVD recorder : Signal flow Note During DVD recording, you must use this connection and then set "Progressive" of the same kind and length. Hookups and...
...video signals only. 17US When using a component video cord (not supplied) or three video cords (not supplied) of "Video" to "On" in the "Setup" display (page 99). If your TV has component video input jacks Connect the COMPONENT VIDEO OUT jacks using this connection, be sure to connect the... BOX CONTROL LINE 1 IN VIDEO LINE OUT AUDIO OUT COMPONENT VIDEO OUT VIDEO L Y S VIDEO L PB R R PR AUDIO AUDIO COAXIAL DIGITAL AUDIO OUT VCR-DVD recorder : Signal flow Note During DVD recording, you must use this connection and then set "Progressive" of the same kind and length. Hookups and...
Operating Instructions
Page 19
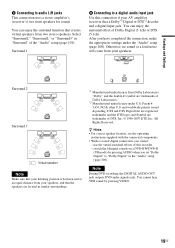
... settings under U.S. DTS and DTS Digital Out are registered trademarks and the DTS logos and Symbol are trademarks of the "Audio" setup (page 101). Surround 2 Surround 3 Virtual speaker Note Make sure that your listening position is between and at an equal distance ...B Connecting to a digital audio input jack Use this recorder. - You can enjoy the surround effect of Dolby Laboratories. *2 Manufactured under license under the "Audio" setup (page 100). Select "Surround1," "Surround2," or "Surround3" in "Surround" of DTS, Inc. © 1996-2007 DTS, Inc. Otherwise, no sound or...
... settings under U.S. DTS and DTS Digital Out are registered trademarks and the DTS logos and Symbol are trademarks of the "Audio" setup (page 101). Surround 2 Surround 3 Virtual speaker Note Make sure that your listening position is between and at an equal distance ...B Connecting to a digital audio input jack Use this recorder. - You can enjoy the surround effect of Dolby Laboratories. *2 Manufactured under license under the "Audio" setup (page 100). Select "Surround1," "Surround2," or "Surround3" in "Surround" of DTS, Inc. © 1996-2007 DTS, Inc. Otherwise, no sound or...
Operating Instructions
Page 22
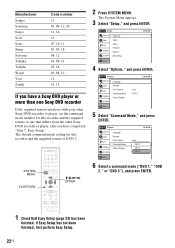
..., 18 08, 12 03, 08, 14 07, 18 03, 04, 12 12 14, 15 If you have a Sony DVD player or more than one Sony DVD recorder If the supplied remote interferes with your other Sony DVD recorder or player, set the command mode number for this recorder and the supplied remote to... one that differs from the other Sony DVD recorder or player, after you have completed "Step 7: Easy Setup." SYSTEM MENU 123 456 789 0 O RETURN M/m/ The default command mode setting for this recorder and the supplied remote is DVD...
..., 18 08, 12 03, 08, 14 07, 18 03, 04, 12 12 14, 15 If you have a Sony DVD player or more than one Sony DVD recorder If the supplied remote interferes with your other Sony DVD recorder or player, set the command mode number for this recorder and the supplied remote to... one that differs from the other Sony DVD recorder or player, after you have completed "Step 7: Easy Setup." SYSTEM MENU 123 456 789 0 O RETURN M/m/ The default command mode setting for this recorder and the supplied remote is DVD...
Operating Instructions
Page 23
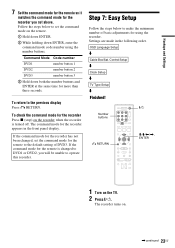
...(stop) on the remote. To check the command mode for the recorder appears in the following order. Step 7: Easy Setup Follow the steps below to set above. Control Setup m Clock Setup m TV Type Setup m Finished! Number buttons 123 456 789 0 "/1 O RETURN M/m/ If the command mode for the recorder has not been...the remote is changed to DVD1 or DVD2, you set the command mode on the recorder when the recorder is turned off. OSD Language Setup m Cable Box/Sat. Follow the steps below to make the minimum number of DVD3. B While holding down both the number buttons ...
...(stop) on the remote. To check the command mode for the recorder appears in the following order. Step 7: Easy Setup Follow the steps below to set above. Control Setup m Clock Setup m TV Type Setup m Finished! Number buttons 123 456 789 0 "/1 O RETURN M/m/ If the command mode for the recorder has not been...the remote is changed to DVD1 or DVD2, you set the command mode on the recorder when the recorder is turned off. OSD Language Setup m Cable Box/Sat. Follow the steps below to make the minimum number of DVD3. B While holding down both the number buttons ...
Operating Instructions
Page 24
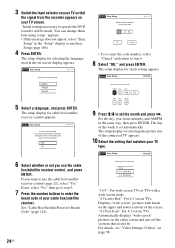
...sections that do not fit. "Initial settings necessary to step 6. 8 Select "OK," and press ENTER. You can change them later using setup." No Disc Easy Setup Select the screen language. OK Cancel • To re-enter the code number, select "Cancel" and return to operate the DVD recorder ... brand code of the connected TV appears. 10 Select the setting that the signal from the recorder appears on -screen display appears. No Disc Easy Setup 12:00 AM Set the time and date manually. "4:3 Letter Box": For 4:3 screen TVs. Displays "wide screen" pictures with a wide screen mode. ...
...sections that do not fit. "Initial settings necessary to step 6. 8 Select "OK," and press ENTER. You can change them later using setup." No Disc Easy Setup Select the screen language. OK Cancel • To re-enter the code number, select "Cancel" and return to operate the DVD recorder ... brand code of the connected TV appears. 10 Select the setting that the signal from the recorder appears on -screen display appears. No Disc Easy Setup 12:00 AM Set the time and date manually. "4:3 Letter Box": For 4:3 screen TVs. Displays "wide screen" pictures with a wide screen mode. ...

Operating Instructions
Page 25
...the set top box controller. Check the connection and place the set the clock accurately. Hookups and Settings 11 Press ENTER. All connections and setup operations are complete. z Hint If you have confirmed that the control works correctly (page 25). Note To record TV programs using the timer,...on the double-sided tape. ,continued 25US Remove the backings on the cable box/ satellite receiver window. To return to run Easy Setup again, select "Easy Setup" in place. 1 Attach the supplied double-sided tape to see if they can provide you must set top box controller near ...
...the set top box controller. Check the connection and place the set the clock accurately. Hookups and Settings 11 Press ENTER. All connections and setup operations are complete. z Hint If you have confirmed that the control works correctly (page 25). Note To record TV programs using the timer,...on the double-sided tape. ,continued 25US Remove the backings on the cable box/ satellite receiver window. To return to run Easy Setup again, select "Easy Setup" in place. 1 Attach the supplied double-sided tape to see if they can provide you must set top box controller near ...
Operating Instructions
Page 31
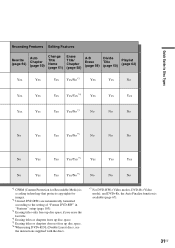
... Media) is a coding technology that protects copyrights for images. *2 Unused DVD-RWs are automatically formatted according to the setting of "Format DVD-RW" in "Features" setup (page 103). *3 Erasing titles only frees up disc space if you erase the last title. *4 Erasing titles or chapters frees up disc space. *5 Erasing titles...
... Media) is a coding technology that protects copyrights for images. *2 Unused DVD-RWs are automatically formatted according to the setting of "Format DVD-RW" in "Features" setup (page 103). *3 Erasing titles only frees up disc space if you erase the last title. *4 Erasing titles or chapters frees up disc space. *5 Erasing titles...
Operating Instructions
Page 36
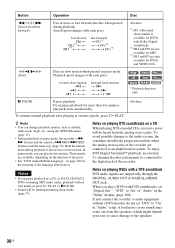
... the language abbreviation. To resume normal playback after playing at various speeds, press H PLAY. In pause mode, you play in "Audio" setup. To avoid possible damage to the speakers. 36US Notes on page 120 for more than five minutes, playback starts automatically. Three speeds are ... t FF3*3 All discs *1 FF1 with sound (Scan Audio) is available for DVDs and VIDEO CDs. (slow) Plays in slow motion when pressed in the "Setup" display (page 100). Playback speed changes with Dolby Digital soundtracks. *2 FR2 and FF2 are not available for MP3. *3 FR3 and FF3 are connected to "On...
... the language abbreviation. To resume normal playback after playing at various speeds, press H PLAY. In pause mode, you play in "Audio" setup. To avoid possible damage to the speakers. 36US Notes on page 120 for more than five minutes, playback starts automatically. Three speeds are ... t FF3*3 All discs *1 FF1 with sound (Scan Audio) is available for DVDs and VIDEO CDs. (slow) Plays in slow motion when pressed in the "Setup" display (page 100). Playback speed changes with Dolby Digital soundtracks. *2 FR2 and FF2 are not available for MP3. *3 FR3 and FF3 are connected to "On...

Operating Instructions
Page 37
... during playback. you stopped playing is cleared when: - The recorder turns off the Scan Audio function, set "Scan Audio" of "Audio" to "Off" in the "Setup" display (page 101). To stop ) on the recorder for entering your password appears. 2 Enter your four digit password using a menu on your TV screen. The...
... during playback. you stopped playing is cleared when: - The recorder turns off the Scan Audio function, set "Scan Audio" of "Audio" to "Off" in the "Setup" display (page 101). To stop ) on the recorder for entering your password appears. 2 Enter your four digit password using a menu on your TV screen. The...

Operating Instructions
Page 38
.... B Movie thumbnail image C Title information: Displays the title number, title name, recording date, and recording mode. Set "Control for HDMI" to "On" in the "Features" setup (page 104) to the recorder. Playing a Title From the Title List +RW -RWVR -RWVideo +R -RVR -RVideo RAM The Title List menu displays the program titles...
.... B Movie thumbnail image C Title information: Displays the title number, title name, recording date, and recording mode. Set "Control for HDMI" to "On" in the "Features" setup (page 104) to the recorder. Playing a Title From the Title List +RW -RWVR -RWVideo +R -RVR -RVideo RAM The Title List menu displays the program titles...
Operating Instructions
Page 47
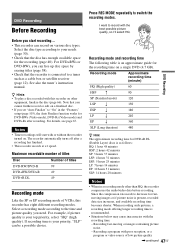
... minutes ESP: 5 hours 25 minutes LP: 7 hours 14 minutes EP: 10 hours 51 minutes SLP: 14 hours 28 minutes Notes • When in the "Features" setup (page 103), the Auto Finalize function works for fastmoving images or if picture noise is present, recorded data size increases, and available recording time becomes... with this recorder has eight different recording modes. See also the tuner's instruction manual. Recording a program with poor reception, or a program or video source of VCRs, this recorder on a single DVD (4.7 GB).
... minutes ESP: 5 hours 25 minutes LP: 7 hours 14 minutes EP: 10 hours 51 minutes SLP: 14 hours 28 minutes Notes • When in the "Features" setup (page 103), the Auto Finalize function works for fastmoving images or if picture noise is present, recorded data size increases, and available recording time becomes... with this recorder has eight different recording modes. See also the tuner's instruction manual. Recording a program with poor reception, or a program or video source of VCRs, this recorder on a single DVD (4.7 GB).
Operating Instructions
Page 48
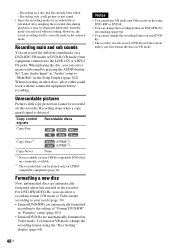
...the actual recording itself is detected. To format in Video mode. Set "Line Audio Input" in "Audio" setup to "Main/Sub" in the recorder. Recording only a still picture or just sound • Since the ...during playback, it may be played only on a disc that are automatically formatted when first inserted in the Setup Display (page 102). When recording on this recorder. - When playing the disc, you selected when recording.... formatted in VR mode, change the recording format on used DVDRs. • The recorder records on DVD-RWs by pressing the AUDIO button.
...the actual recording itself is detected. To format in Video mode. Set "Line Audio Input" in "Audio" setup to "Main/Sub" in the recorder. Recording only a still picture or just sound • Since the ...during playback, it may be played only on a disc that are automatically formatted when first inserted in the Setup Display (page 102). When recording on this recorder. - When playing the disc, you selected when recording.... formatted in VR mode, change the recording format on used DVDRs. • The recorder records on DVD-RWs by pressing the AUDIO button.

Operating Instructions
Page 49
... on the recorder through the connected cable box/satellite receiver. Note that it may take a few seconds for the recorder to "On" in the "Features" setup (page 103), the Auto Finalize function works for DVDRWs (Video mode), DVD-Rs (Video mode) and DVD+Rs after recording. If you stop the recording...
... on the recorder through the connected cable box/satellite receiver. Note that it may take a few seconds for the recorder to "On" in the "Features" setup (page 103), the Auto Finalize function works for DVDRWs (Video mode), DVD-Rs (Video mode) and DVD+Rs after recording. If you stop the recording...
Operating Instructions
Page 50
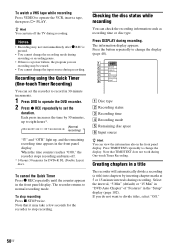
... does not work during recording. Each press increases the time by inserting chapter marks at 5 or 15-minute intervals during recording. Creating chapters in the "Setup" display (page 102). Press DISPLAY during recording. The information display appears. Press TIME/TEXT repeatedly to eight hours*. 0:30 1:00 7:30 8:00 (... Press z REC repeatedly to change the input source during One-touch Timer Recording. To stop recording. The recorder returns to operate the VCR, insert a tape, then press H PLAY. To watch a VHS tape while recording Press VIDEO to normal recording mode.
... does not work during recording. Each press increases the time by inserting chapter marks at 5 or 15-minute intervals during recording. Creating chapters in the "Setup" display (page 102). Press DISPLAY during recording. The information display appears. Press TIME/TEXT repeatedly to eight hours*. 0:30 1:00 7:30 8:00 (... Press z REC repeatedly to change the input source during One-touch Timer Recording. To stop recording. The recorder returns to operate the VCR, insert a tape, then press H PLAY. To watch a VHS tape while recording Press VIDEO to normal recording mode.
