Operating Instructions
Page 2
... cautioned that any change or modifications not expressly approved in accordance with adequate ventilation to prevent heat build-up in the recorder. • If the recorder is brought directly from a cold to a warm location, remove the disc and tape and leave the recorder turned on for a Class B digital device, pursuant to qualified personnel only. This equipment generates, uses, and can be...
... cautioned that any change or modifications not expressly approved in accordance with adequate ventilation to prevent heat build-up in the recorder. • If the recorder is brought directly from a cold to a warm location, remove the disc and tape and leave the recorder turned on for a Class B digital device, pursuant to qualified personnel only. This equipment generates, uses, and can be...
Operating Instructions
Page 8
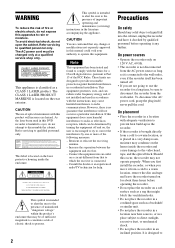
...VIDEO DVD 8 This is a DVD recorder with the simple press of a button. Recording and timer recording Record TV programs on a DVD or VHS tape, either direction between DVD and VCR Simply press the DVD or VIDEO button to select the media format you want to have the recorder change the channel of DVD discs and VHS tapes. Set top box control Connect the supplied set top box controller to use. * Note that copy-protected signals will not be recorded. Control your cable box or satellite receiver during a timer recording (page 12). DVD VIDEO Easy selection between a DVD disc and VHS tape...
...VIDEO DVD 8 This is a DVD recorder with the simple press of a button. Recording and timer recording Record TV programs on a DVD or VHS tape, either direction between DVD and VCR Simply press the DVD or VIDEO button to select the media format you want to have the recorder change the channel of DVD discs and VHS tapes. Set top box control Connect the supplied set top box controller to use. * Note that copy-protected signals will not be recorded. Control your cable box or satellite receiver during a timer recording (page 12). DVD VIDEO Easy selection between a DVD disc and VHS tape...
Operating Instructions
Page 10
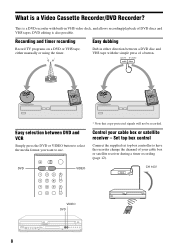
A "Title List" Displays the list of the disc contents, including the recording information and movie thumbnail image, which allows you will find the recorder easy to use. Title 01 Ch 23 02 Ch 66 03 Ch 95 04 Ch 97 T Ch 23 May/02/2006 08:00 PM 10:10 AM Length Edit 01:29:03 > 00:31:23 > 01:59:00 > 00:58:56 > SYSTEM MENU O RETURN M/m/ How to Use the On-Screen Menus The following three displays are mainly used to play or edit. Once you become familiar with the basic operations, you to select a title to operate this recorder. Title List (Original) 1/4 No.
A "Title List" Displays the list of the disc contents, including the recording information and movie thumbnail image, which allows you will find the recorder easy to use. Title 01 Ch 23 02 Ch 66 03 Ch 95 04 Ch 97 T Ch 23 May/02/2006 08:00 PM 10:10 AM Length Edit 01:29:03 > 00:31:23 > 01:59:00 > 00:58:56 > SYSTEM MENU O RETURN M/m/ How to Use the On-Screen Menus The following three displays are mainly used to play or edit. Once you become familiar with the basic operations, you to select a title to operate this recorder. Title List (Original) 1/4 No.
Operating Instructions
Page 11
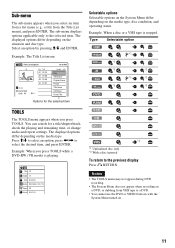
...:10 AM Length Edit Pla0y1:29:03 > Tit0le0:E3r1a:s2e3 > Ch0a1p:5te9r:0E0ras>e Pr0o0te:5ct8:56 > Title Name A·B Erase Divide Title Options for a title/chapter/track, check the playing and remaining time, or change audio and repeat settings. The sub-menu displays options applicable only to select an option, press Example: The Title List menu Title List (Original) 1/4 No. The displayed options differ depending on the situation and disc type. Select an option by...
...:10 AM Length Edit Pla0y1:29:03 > Tit0le0:E3r1a:s2e3 > Ch0a1p:5te9r:0E0ras>e Pr0o0te:5ct8:56 > Title Name A·B Erase Divide Title Options for a title/chapter/track, check the playing and remaining time, or change audio and repeat settings. The sub-menu displays options applicable only to select an option, press Example: The Title List menu Title List (Original) 1/4 No. The displayed options differ depending on the situation and disc type. Select an option by...
Operating Instructions
Page 26
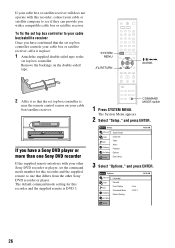
If your cable box or satellite receiver still does not operate with this recorder, contact your cable or satellite company to the set top box controller controls your cable box/satellite receiver Once you with a compatible cable box or satellite receiver. To fix the set top box controller to your cable box or satellite receiver, affix it in place. 1 Attach the supplied double-sided tape to see if they can provide you have confirmed that the set top box controller. SYSTEM MENU O RETURN M/m/ Remove the backings on the double-sided tape.
If your cable box or satellite receiver still does not operate with this recorder, contact your cable or satellite company to the set top box controller controls your cable box/satellite receiver Once you with a compatible cable box or satellite receiver. To fix the set top box controller to your cable box or satellite receiver, affix it in place. 1 Attach the supplied double-sided tape to see if they can provide you have confirmed that the set top box controller. SYSTEM MENU O RETURN M/m/ Remove the backings on the double-sided tape.
Operating Instructions
Page 27
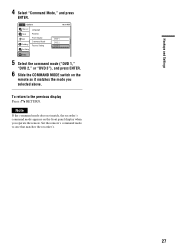
Set the remote's command mode to the previous display Press O RETURN. Hookups and Settings 4 Select "Command Mode," and press ENTER. No Disc Options Title List Timer Edit Dubbing Disc Setting Language Parental Front Display Command Mode Factory Setting Setup 10:10 AM : AutDoVD 1 : DVDD1VDN2o DVD 3 5 Select the command mode ("DVD 1," "DVD 2," or "DVD 3"), and press ENTER. 6 Slide the COMMAND MODE switch on the front panel display when you selected above. To return to one that matches the recorder's. 27 Note If the command mode does not...
Set the remote's command mode to the previous display Press O RETURN. Hookups and Settings 4 Select "Command Mode," and press ENTER. No Disc Options Title List Timer Edit Dubbing Disc Setting Language Parental Front Display Command Mode Factory Setting Setup 10:10 AM : AutDoVD 1 : DVDD1VDN2o DVD 3 5 Select the command mode ("DVD 1," "DVD 2," or "DVD 3"), and press ENTER. 6 Slide the COMMAND MODE switch on the front panel display when you selected above. To return to one that matches the recorder's. 27 Note If the command mode does not...

Operating Instructions
Page 50
... select a video source from the LINE 1 IN or LINE 2 IN jacks using the Quick Timer (One-touch Timer Recording) You can turn off . * 12 hours 30 minutes for the recorder to stop the recording or the disc is a power failure, the program you are using a cable box or a satellite receiver, make sure to change the channel or input source during recording or recording pause. • If there is full. To cancel the Quick Timer Press z REC repeatedly...
... select a video source from the LINE 1 IN or LINE 2 IN jacks using the Quick Timer (One-touch Timer Recording) You can turn off . * 12 hours 30 minutes for the recorder to stop the recording or the disc is a power failure, the program you are using a cable box or a satellite receiver, make sure to change the channel or input source during recording or recording pause. • If there is full. To cancel the Quick Timer Press z REC repeatedly...
Operating Instructions
Page 87
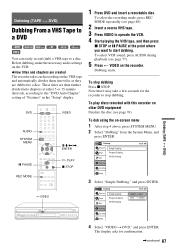
... VCR. ◆How titles and chapters are created The recorder takes each recording on the VHS tape and automatically divides them into titles as they are then further divided into chapters at either 5 or 15-minute intervals, according to the "DVD Auto Chapter" setting of "Features" in the "Setup" display. DVD VIDEO AUDIO SYSTEM MENU X PAUSE REC MODE M/m/ DVD DVD --> VIDEO 4 Select "VIDEO t DVD," and press ENTER. Dubbing (TAPE y DVD) Dubbing (TAPE y DVD) Dubbing From a VHS Tape to a DVD +RW -RWVR -RWVideo +R -RVR -RVideo You can easily record (dub) a VHS tape to a disc...
... VCR. ◆How titles and chapters are created The recorder takes each recording on the VHS tape and automatically divides them into titles as they are then further divided into chapters at either 5 or 15-minute intervals, according to the "DVD Auto Chapter" setting of "Features" in the "Setup" display. DVD VIDEO AUDIO SYSTEM MENU X PAUSE REC MODE M/m/ DVD DVD --> VIDEO 4 Select "VIDEO t DVD," and press ENTER. Dubbing (TAPE y DVD) Dubbing (TAPE y DVD) Dubbing From a VHS Tape to a DVD +RW -RWVR -RWVideo +R -RVR -RVideo You can easily record (dub) a VHS tape to a disc...
Operating Instructions
Page 89
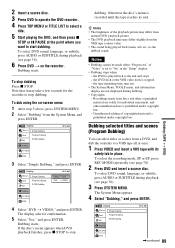
...Title List Timer Edit Simple Dubbing Program Dubbing DV/D8 Dubbing Dubbing Disc Setting Setup 10:10 AM VIDEO --> DVD DVD --> VIDEO 4 Select "DVD t VIDEO," and press ENTER. To select the recording mode, SP or EP, press REC MODE repeatedly (see page 36). 3 Press SYSTEM MENU. Dubbing (TAPE y DVD) Dubbing selected titles and scenes (Program Dubbing) You can select titles or scenes from discs and other unauthorized use is prohibited under copyright law. - To dub using the on the recorder. the DVD is set to "On" in place. To select DVD sound, language, or subtitle, press AUDIO...
...Title List Timer Edit Simple Dubbing Program Dubbing DV/D8 Dubbing Dubbing Disc Setting Setup 10:10 AM VIDEO --> DVD DVD --> VIDEO 4 Select "DVD t VIDEO," and press ENTER. To select the recording mode, SP or EP, press REC MODE repeatedly (see page 36). 3 Press SYSTEM MENU. Dubbing (TAPE y DVD) Dubbing selected titles and scenes (Program Dubbing) You can select titles or scenes from discs and other unauthorized use is prohibited under copyright law. - To dub using the on the recorder. the DVD is set to "On" in place. To select DVD sound, language, or subtitle, press AUDIO...
Operating Instructions
Page 90
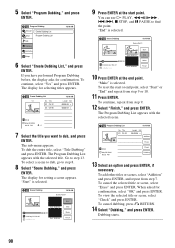
...The display for confirmation, select "OK" and press ENTER. You can use H PLAY, , ./>, x STOP, and X PAUSE to step 8. 8 Select "Scene Dubbing," and press ENTER. "End" is selected. "Make" is selected. To continue, repeat from step 7. Program Dubbing List No. To add other titles or scenes, select "Addition" and press ENTER, and repeat from step 9. 12 Select "Finish," and press ENTER. Program Dubbing Title List Timer Create Dubbing List Program Dubbing List Edit Dubbing Disc Setting Setup 10:10 AM 6 Select "Create Dubbing List," and press ENTER. Create Dubbing List 1/2 No...
...The display for confirmation, select "OK" and press ENTER. You can use H PLAY, , ./>, x STOP, and X PAUSE to step 8. 8 Select "Scene Dubbing," and press ENTER. "End" is selected. "Make" is selected. To continue, repeat from step 7. Program Dubbing List No. To add other titles or scenes, select "Addition" and press ENTER, and repeat from step 9. 12 Select "Finish," and press ENTER. Program Dubbing Title List Timer Create Dubbing List Program Dubbing List Edit Dubbing Disc Setting Setup 10:10 AM 6 Select "Create Dubbing List," and press ENTER. Create Dubbing List 1/2 No...

Operating Instructions
Page 94
... divided into chapters at either 5 or 15-minute intervals, according to the "DVD Auto Chapter" setting of "Features" in slow motion, and stop the tape to a DVD +RW -RWVR -RWVideo +R -RVR -RVideo You can fast forward, rewind, play in the "Setup" display. Z OPEN/ CLOSE DVD CH +/- SYSTEM MENU O RETURN INPUT SELECT M/m/ You can record a DV/D8 format tape onto a disc. The recorder controls the digital video camera. Dubbing From a DV/D8 Format Tape to select the scenes using the onscreen menu.
... divided into chapters at either 5 or 15-minute intervals, according to the "DVD Auto Chapter" setting of "Features" in slow motion, and stop the tape to a DVD +RW -RWVR -RWVideo +R -RVR -RVideo You can fast forward, rewind, play in the "Setup" display. Z OPEN/ CLOSE DVD CH +/- SYSTEM MENU O RETURN INPUT SELECT M/m/ You can record a DV/D8 format tape onto a disc. The recorder controls the digital video camera. Dubbing From a DV/D8 Format Tape to select the scenes using the onscreen menu.
Operating Instructions
Page 95
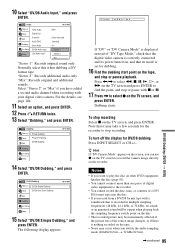
... power turned on, and that its mode is set for dubbing. 16 Find the dubbing start point on the tape, and stop or pause playback. For the details, see page 104. 11 Select an option, and press ENTER. 12 Press O RETURN twice. 13 Select "Dubbing," and press ENTER. Select "Stereo 2" or "Mix" if you have added a second audio channel when recording with your digital video camera. Dubbing Title List Timer Edit Simple Dubbing Program Dubbing DV/D8 Dubbing Dubbing Disc Setting Setup...
... power turned on, and that its mode is set for dubbing. 16 Find the dubbing start point on the tape, and stop or pause playback. For the details, see page 104. 11 Select an option, and press ENTER. 12 Press O RETURN twice. 13 Select "Dubbing," and press ENTER. Select "Stereo 2" or "Mix" if you have added a second audio channel when recording with your digital video camera. Dubbing Title List Timer Edit Simple Dubbing Program Dubbing DV/D8 Dubbing Dubbing Disc Setting Setup...
Operating Instructions
Page 97
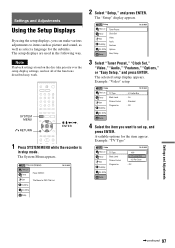
Note Playback settings stored on the disc take priority over the setup display settings, and not all of the functions described may work. SYSTEM MENU O RETURN M/m/ Settings and Adjustments Using the Setup Displays By using the setup displays, you can make various adjustments to items such as picture and sound, as well as select a language for the subtitles. The setup displays are used in the following way.
Note Playback settings stored on the disc take priority over the setup display settings, and not all of the functions described may work. SYSTEM MENU O RETURN M/m/ Settings and Adjustments Using the Setup Displays By using the setup displays, you can make various adjustments to items such as picture and sound, as well as select a language for the subtitles. The setup displays are used in the following way.
Operating Instructions
Page 98
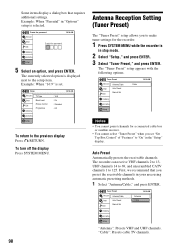
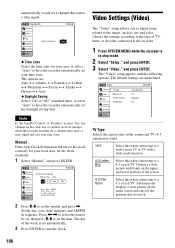
...Dubbing Disc Setting Setup 5 Select an option, and press ENTER. The currently selected option is set "Set Top Box Control" of "Features" to "On" in the "Setup" display. Video Title List Timer Edit Dubbing TV Type Black Level Picture Control Progressive Disc Setting Setup : 16:9 : On : Standard : Off 10:10 AM To return to 125. Tuner Preset Title List Timer Edit Antenna/Cable Auto Preset Manual Set Dubbing Disc Setting Setup : Cable 10:10 AM Notes • You cannot preset channels for the recorder. 1 Press SYSTEM MENU while the recorder is selected. The recorder...
...Dubbing Disc Setting Setup 5 Select an option, and press ENTER. The currently selected option is set "Set Top Box Control" of "Features" to "On" in the "Setup" display. Video Title List Timer Edit Dubbing TV Type Black Level Picture Control Progressive Disc Setting Setup : 16:9 : On : Standard : Off 10:10 AM To return to 125. Tuner Preset Title List Timer Edit Antenna/Cable Auto Preset Manual Set Dubbing Disc Setting Setup : Cable 10:10 AM Notes • You cannot preset channels for the recorder. 1 Press SYSTEM MENU while the recorder is selected. The recorder...
Operating Instructions
Page 99
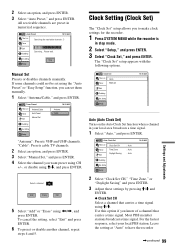
..."Clock Set" setup appears with the following options. Tuner Preset Title List Timer Edit Antenna/Cable Auto Preset Manual Set Dubbing Disc Setting Setup 10:10 AM : AntAenntneanna Cable "Antenna": Presets VHF and UHF channels. Disc Setting Stop Setup Clock Setting (Clock Set) The "Clock Set" setup allows you to make clock settings for receivable channels: 3 Edit Dubbing Scanning... If some channels could not be set them manually. 1 Select "Antenna/Cable," and press ENTER. Please wait. Manual Set Presets or disables channels manually. "Cable": Presets cable TV channels. 2 Select...
..."Clock Set" setup appears with the following options. Tuner Preset Title List Timer Edit Antenna/Cable Auto Preset Manual Set Dubbing Disc Setting Setup 10:10 AM : AntAenntneanna Cable "Antenna": Presets VHF and UHF channels. Disc Setting Stop Setup Clock Setting (Clock Set) The "Clock Set" setup allows you to make clock settings for receivable channels: 3 Edit Dubbing Scanning... If some channels could not be set them manually. 1 Select "Antenna/Cable," and press ENTER. Please wait. Manual Set Presets or disables channels manually. "Cable": Presets cable TV channels. 2 Select...
Operating Instructions
Page 100
... time), or select "Auto" to have the recorder automatically set your local area, set the clock manually. 1 Select "Manual," and press ENTER. Clock Set Title List Timer Set the time and date. Manual If the Auto Clock Set function did not set the daylight saving time. Press Clock Set CH Title List Timer Edit Dubbing Select a Channel: Disc Setting Setup 10:10 AM Auto ◆ Time Zone Select the time zone for your area, or select "Auto" to "On," the channel on the cable box or satellite receiver changes when the recorder searches for a channel that carries a time signal. Set...
... time), or select "Auto" to have the recorder automatically set your local area, set the clock manually. 1 Select "Manual," and press ENTER. Clock Set Title List Timer Set the time and date. Manual If the Auto Clock Set function did not set the daylight saving time. Press Clock Set CH Title List Timer Edit Dubbing Select a Channel: Disc Setting Setup 10:10 AM Auto ◆ Time Zone Select the time zone for your area, or select "Auto" to "On," the channel on the cable box or satellite receiver changes when the recorder searches for a channel that carries a time signal. Set...

Operating Instructions
Page 102
... outputting audio signals when you connect the recorder to a TV that cannot accept the signal in progressive format, the image quality will deteriorate. Note If no SAP sound is received, the main sound is in step 2 above. Press ENTER, and select "Dolby Digital" or "DTS." 102 Main Records only the main sound. The default settings are underlined. The "Audio" setup appears with a digital input jack. Audio 10:10 AM Title List Timer Edit Dubbing Disc Setting Setup Tuner Audio : Main Digital...
... outputting audio signals when you connect the recorder to a TV that cannot accept the signal in progressive format, the image quality will deteriorate. Note If no SAP sound is received, the main sound is in step 2 above. Press ENTER, and select "Dolby Digital" or "DTS." 102 Main Records only the main sound. The default settings are underlined. The "Audio" setup appears with a digital input jack. Audio 10:10 AM Title List Timer Edit Dubbing Disc Setting Setup Tuner Audio : Main Digital...
Operating Instructions
Page 106
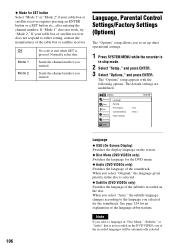
... language in "Disc Menu," "Subtitle," or "Audio" that is selected. ◆ Subtitle (DVD VIDEOs only) Switches the language of the recorded languages will be automatically selected. Note If you select "Original," the language given priority in stop mode. 2 Select "Setup," and press ENTER. 3 Select "Options," and press ENTER. Options Title List Timer Edit Dubbing Disc Setting Language Parental Front Display Command Mode Factory Setting Setup : Auto : DVD 3 10:10 AM 106 Language ◆ OSD (On-Screen Display) Switches the display language on the disc. Language, Parental Control...
... language in "Disc Menu," "Subtitle," or "Audio" that is selected. ◆ Subtitle (DVD VIDEOs only) Switches the language of the recorded languages will be automatically selected. Note If you select "Original," the language given priority in stop mode. 2 Select "Setup," and press ENTER. 3 Select "Options," and press ENTER. Options Title List Timer Edit Dubbing Disc Setting Language Parental Front Display Command Mode Factory Setting Setup : Auto : DVD 3 10:10 AM 106 Language ◆ OSD (On-Screen Display) Switches the display language on the disc. Language, Parental Control...

Operating Instructions
Page 107
... a 4-digit password using the number buttons. In this case, enter your password, select "Factory Setting" of "Options" in step 2, and press ENTER. When the display for confirming the password appears. Maintains bright lighting when power is off. Settings and Adjustments ,continued 107 Create the password Title List 10:10 AM Timer Edit Confirm the password. Dubbing Disc Setting Setup 2 Select "Rating Level," and press ENTER. Scenes may be blocked or replaced with different scenes. 1 After step 3 above, select "Parental...
... a 4-digit password using the number buttons. In this case, enter your password, select "Factory Setting" of "Options" in step 2, and press ENTER. When the display for confirming the password appears. Maintains bright lighting when power is off. Settings and Adjustments ,continued 107 Create the password Title List 10:10 AM Timer Edit Confirm the password. Dubbing Disc Setting Setup 2 Select "Rating Level," and press ENTER. Scenes may be blocked or replaced with different scenes. 1 After step 3 above, select "Parental...
Operating Instructions
Page 113
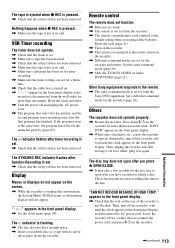
... panel display, and disconnect the AC power cord. The SYNCHRO REC indicator flashes after the first program has finished. Reset the code (page 21). , Turn on the recorder. , The remote is set . , Check that the cable box is turned on the screen. , While the recorder is disconnected from the recorder. , The remote's manufacturer code returned to the remote. , The same command mode is not blocked. Others The recorder does not operate properly. , Restart the recorder. The disc tray does not open...
... panel display, and disconnect the AC power cord. The SYNCHRO REC indicator flashes after the first program has finished. Reset the code (page 21). , Turn on the recorder. , The remote is set . , Check that the cable box is turned on the screen. , While the recorder is disconnected from the recorder. , The remote's manufacturer code returned to the remote. , The same command mode is not blocked. Others The recorder does not operate properly. , Restart the recorder. The disc tray does not open...


