Operating Instructions
Page 4
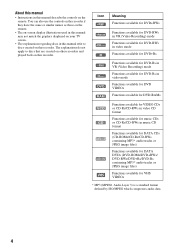
...remote. • The on-screen display illustrations used in this manual may not match the graphics displayed on this recorder. The explanations do not apply to discs created on your TV screen. • The explanations regarding discs in this recorder. Icon +RW -RWVR -RWVideo +R Meaning Functions available for DVD...RWs containing MP3* audio tracks or JPEG image files) Functions available for DATA DVDs (DVD-ROMs/DVD+RWs/ DVD-RWs/DVD+Rs/DVD-Rs containing MP3* audio tracks or JPEG image files) Functions available for VHS VIDEOs * MP3 (MPEG1 Audio Layer 3) is a standard format defined by ...
...remote. • The on-screen display illustrations used in this manual may not match the graphics displayed on this recorder. The explanations do not apply to discs created on your TV screen. • The explanations regarding discs in this recorder. Icon +RW -RWVR -RWVideo +R Meaning Functions available for DVD...RWs containing MP3* audio tracks or JPEG image files) Functions available for DATA DVDs (DVD-ROMs/DVD+RWs/ DVD-RWs/DVD+Rs/DVD-Rs containing MP3* audio tracks or JPEG image files) Functions available for VHS VIDEOs * MP3 (MPEG1 Audio Layer 3) is a standard format defined by ...
Operating Instructions
Page 6
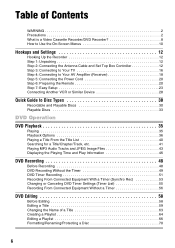
... Amplifier (Receiver 18 Step 5: Connecting the Power Cord 20 Step 6: Preparing the Remote 20 Step 7: Easy Setup 23 Connecting Another VCR or Similar Device 28 Quick Guide to Disc Types 30 Recordable and Playable Discs 30 Playable Discs 33 DVD Operation DVD Playback 35 Playing 35 Playback Options 36 Playing a Title From the Title...
... Amplifier (Receiver 18 Step 5: Connecting the Power Cord 20 Step 6: Preparing the Remote 20 Step 7: Easy Setup 23 Connecting Another VCR or Similar Device 28 Quick Guide to Disc Types 30 Recordable and Playable Discs 30 Playable Discs 33 DVD Operation DVD Playback 35 Playing 35 Playback Options 36 Playing a Title From the Title...
Operating Instructions
Page 12
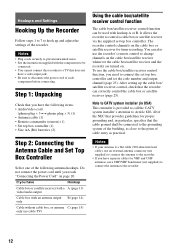
.../satellite receiver and the recorder are turned on. After setting up and adjust the settings of cable entry as close to disconnect the power cord of the following items: • Audio/video cord (phono plug × 3 y phono plug × 3) (1) • Antenna cable (1) • Remote commander (remote) (1) • Set... Controller Select one of each component before connecting. If you have separate cables for VHF and UHF antennas, use the recorder's remote control to control a cable box or satellite receiver via the supplied set the code number and output channel (page 23). The...
.../satellite receiver and the recorder are turned on. After setting up and adjust the settings of cable entry as close to disconnect the power cord of the following items: • Audio/video cord (phono plug × 3 y phono plug × 3) (1) • Antenna cable (1) • Remote commander (remote) (1) • Set... Controller Select one of each component before connecting. If you have separate cables for VHF and UHF antennas, use the recorder's remote control to control a cable box or satellite receiver via the supplied set the code number and output channel (page 23). The...
Operating Instructions
Page 13
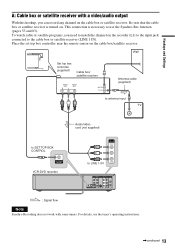
...PB L PR SET TOP BOX OPTICAL COAXIAL CONTROL DIGITAL AUDIO OUT R OUT AUDIO AUDIO : Signal flow Note Synchro-Recording does not work with a video/audio output With this hookup, you need to match the channel on the cable box... top box controller near the remote sensor on . Hookups and Settings A: Cable box or satellite receiver with some tuners. To watch cable or satellite programs, you can record any channel on the recorder (L1) to the input ... supplied) to SET TOP BOX CONTROL SET TOP BOX CONTROL VCR-DVD recorder LINE 1 IN VIDEO to use the Synchro-Rec function (pages 53 and 83).
...PB L PR SET TOP BOX OPTICAL COAXIAL CONTROL DIGITAL AUDIO OUT R OUT AUDIO AUDIO : Signal flow Note Synchro-Recording does not work with a video/audio output With this hookup, you need to match the channel on the cable box... top box controller near the remote sensor on . Hookups and Settings A: Cable box or satellite receiver with some tuners. To watch cable or satellite programs, you can record any channel on the recorder (L1) to the input ... supplied) to SET TOP BOX CONTROL SET TOP BOX CONTROL VCR-DVD recorder LINE 1 IN VIDEO to use the Synchro-Rec function (pages 53 and 83).

Operating Instructions
Page 14
... or 4ch) to antenna input 14 Set top box controller (supplied) Cable box ANT IN TO TV Wall to SET TOP BOX CONTROL VCR-DVD recorder SET TOP BOX CONTROL AUDIO OUT COMPONENT VIDEO OUT S VIDEO OUT LINE 1 IN LINE OUT VIDEO VIDEO VHF/UHF L Y IN R PB L PR SET TOP BOX ... receiver. Be sure that the cable box or satellite receiver is turned on the satellite receiver or cable box. To watch cable programs, you can record any channel on . Place the set top box controller near the remote sensor on the cable box (3ch or 4ch).
... or 4ch) to antenna input 14 Set top box controller (supplied) Cable box ANT IN TO TV Wall to SET TOP BOX CONTROL VCR-DVD recorder SET TOP BOX CONTROL AUDIO OUT COMPONENT VIDEO OUT S VIDEO OUT LINE 1 IN LINE OUT VIDEO VIDEO VHF/UHF L Y IN R PB L PR SET TOP BOX ... receiver. Be sure that the cable box or satellite receiver is turned on the satellite receiver or cable box. To watch cable programs, you can record any channel on . Place the set top box controller near the remote sensor on the cable box (3ch or 4ch).
Operating Instructions
Page 20
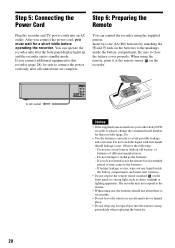
... AC outlet AUDIO OUT COMPONENT VIDEO OUT L Y R PB PR SET TOP BOX OPTICAL COAXIAL CONTROL DIGITAL AUDIO OUT Notes • If the supplied remote interferes your other Sony DVD recorder or player, change the command mode number for an extended period of different manufacturers. - Do not touch the liquid with an old battery, or batteries...
... AC outlet AUDIO OUT COMPONENT VIDEO OUT L Y R PB PR SET TOP BOX OPTICAL COAXIAL CONTROL DIGITAL AUDIO OUT Notes • If the supplied remote interferes your other Sony DVD recorder or player, change the command mode number for an extended period of different manufacturers. - Do not touch the liquid with an old battery, or batteries...

Operating Instructions
Page 21
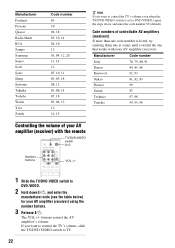
...AV amplifier (receiver) with some or all of the remote, the code number may not be able to the default setting. Manufacturer Sony Akai AOC Centurion Coronado Curtis-Mathes Daewoo Daytron Fisher ... 12 06, 19 02, 03, 04, 08 08, 21 06, 16 ,continued 21 If you connect the recorder to an AV amplifier (receiver), you replace the batteries of the buttons below ) using the number buttons. 4... Release "/1. TV/VIDEO WIDE MODE 1 Slide the TV/DVD·VIDEO switch to TV. 2 Hold down "/1. 3 Enter your TV's manufacturer code (see below . •...
...AV amplifier (receiver) with some or all of the remote, the code number may not be able to the default setting. Manufacturer Sony Akai AOC Centurion Coronado Curtis-Mathes Daewoo Daytron Fisher ... 12 06, 19 02, 03, 04, 08 08, 21 06, 16 ,continued 21 If you connect the recorder to an AV amplifier (receiver), you replace the batteries of the buttons below ) using the number buttons. 4... Release "/1. TV/VIDEO WIDE MODE 1 Slide the TV/DVD·VIDEO switch to TV. 2 Hold down "/1. 3 Enter your TV's manufacturer code (see below . •...
Operating Instructions
Page 22
... Code number Sony 78, 79, 80, 91 Denon 84, 85, 86 Kenwood 92, 93 Onkyo 81, 82, 83 Pioneer 99 Sansui 87 Technics 97, 98 Yamaha 94, 95, 96 Controlling the volume of controllable AV amplifiers (receivers) If more than one that works with the remote TV/DVD·VIDEO ...switch "/1 Number buttons VOL +/- 1 Slide the TV/DVD·VIDEO switch to DVD·VIDEO. 2 Hold down "/1, and enter the manufacturer code (see the table below) for your ...
... Code number Sony 78, 79, 80, 91 Denon 84, 85, 86 Kenwood 92, 93 Onkyo 81, 82, 83 Pioneer 99 Sansui 87 Technics 97, 98 Yamaha 94, 95, 96 Controlling the volume of controllable AV amplifiers (receivers) If more than one that works with the remote TV/DVD·VIDEO ...switch "/1 Number buttons VOL +/- 1 Slide the TV/DVD·VIDEO switch to DVD·VIDEO. 2 Hold down "/1, and enter the manufacturer code (see the table below) for your ...
Operating Instructions
Page 25
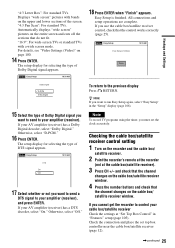
...your amplifier (receiver), and press ENTER. Otherwise, select "Off." For details, see "Video Settings (Video)" on the recorder and the cable box/ satellite receiver. 2 Point the recorder's remote at the recorder (not at "Set Top Box Control" in the "Setup" display (page 108). Easy Setup is finished. No ...use the cable box/satellite receiver control, check that the control works correctly (page 25). All connections and setup operations are complete. Note To record TV programs using the timer, you want to send a DTS signal to run Easy Setup again, select "Easy Setup" in "Features" ...
...your amplifier (receiver), and press ENTER. Otherwise, select "Off." For details, see "Video Settings (Video)" on the recorder and the cable box/ satellite receiver. 2 Point the recorder's remote at the recorder (not at "Set Top Box Control" in the "Setup" display (page 108). Easy Setup is finished. No ...use the cable box/satellite receiver control, check that the control works correctly (page 25). All connections and setup operations are complete. Note To record TV programs using the timer, you want to send a DTS signal to run Easy Setup again, select "Easy Setup" in "Features" ...
Operating Instructions
Page 26
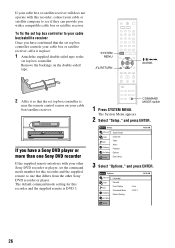
SYSTEM MENU O RETURN M/m/ Remove the backings on the double-sided tape. To fix the set top box controller. If your cable box or satellite receiver still does not operate with this recorder, contact your cable or satellite company to see if they can provide you have confirmed that the set top box controller controls your cable box or satellite receiver, affix it in place. 1 Attach the supplied double-sided tape to the set top box controller to your cable box/satellite receiver Once you with a compatible cable box or satellite receiver.
SYSTEM MENU O RETURN M/m/ Remove the backings on the double-sided tape. To fix the set top box controller. If your cable box or satellite receiver still does not operate with this recorder, contact your cable or satellite company to see if they can provide you have confirmed that the set top box controller controls your cable box or satellite receiver, affix it in place. 1 Attach the supplied double-sided tape to the set top box controller to your cable box/satellite receiver Once you with a compatible cable box or satellite receiver.
Operating Instructions
Page 27
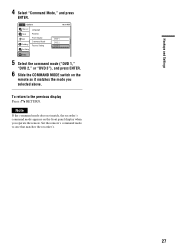
... Setting Setup 10:10 AM : AutDoVD 1 : DVDD1VDN2o DVD 3 5 Select the command mode ("DVD 1," "DVD 2," or "DVD 3"), and press ENTER. 6 Slide the COMMAND MODE switch on the front panel display when you selected above. Note If the command mode does not match, the recorder's command mode appears on the remote so it matches the mode you operate...
... Setting Setup 10:10 AM : AutDoVD 1 : DVDD1VDN2o DVD 3 5 Select the command mode ("DVD 1," "DVD 2," or "DVD 3"), and press ENTER. 6 Slide the COMMAND MODE switch on the front panel display when you selected above. Note If the command mode does not match, the recorder's command mode appears on the remote so it matches the mode you operate...
Operating Instructions
Page 38
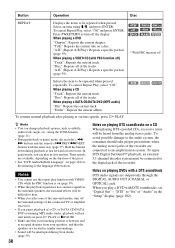
... play a DVD with a DTS soundtrack DTS audio signals are located in the "Setup" display (page 102). Press O RETURN to be connected to an amplification system. "Disc": Repeats all of the tracks. Select an item using the TOOLS menu (page 11). • During playback or pause mode, the recorder's m/ M buttons and the remote's .PREV...
... play a DVD with a DTS soundtrack DTS audio signals are located in the "Setup" display (page 102). Press O RETURN to be connected to an amplification system. "Disc": Repeats all of the tracks. Select an item using the TOOLS menu (page 11). • During playback or pause mode, the recorder's m/ M buttons and the remote's .PREV...
Operating Instructions
Page 108
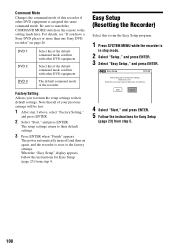
Factory Setting Allows you have a Sony DVD player or more than one Sony DVD recorder" on the remote to the setting made all of the recorder. Before you start, check that all necessary connections. Select this if the default command mode conflicts with other DVD equipment is assigned the same command mode. DVD 1 DVD 2 DVD 3 Select this if the default command mode conflicts...
Factory Setting Allows you have a Sony DVD player or more than one Sony DVD recorder" on the remote to the setting made all of the recorder. Before you start, check that all necessary connections. Select this if the default command mode conflicts with other DVD equipment is assigned the same command mode. DVD 1 DVD 2 DVD 3 Select this if the default command mode conflicts...
Operating Instructions
Page 113
... on appears in the front panel display if the recorder is disconnected from the recorder. , The remote's manufacturer code returned to operate abnormally, turn off for more than ten seconds until "SONY DVD" appears in place inside the recorder. Others The recorder does not operate properly. , Restart the recorder. The c indicator flashes after the first program has finished...
... on appears in the front panel display if the recorder is disconnected from the recorder. , The remote's manufacturer code returned to operate abnormally, turn off for more than ten seconds until "SONY DVD" appears in place inside the recorder. Others The recorder does not operate properly. , Restart the recorder. The c indicator flashes after the first program has finished...

Operating Instructions
Page 116
... projecting parts and controls (w/h/d) Approx. 430 × 82 × 334 mm (Approx. 17 × 3 1/4 × 131/4 inches) Mass Approx. 4.8 kg (Approx. 10.6 lbs) Supplied accessories Remote commander (remote) (1) Size AA (R6) batteries (2) Antenna cable (1) Audio/video cord (1) Set top box controller (1) Design and specifications are subject to change without notice. 116
... projecting parts and controls (w/h/d) Approx. 430 × 82 × 334 mm (Approx. 17 × 3 1/4 × 131/4 inches) Mass Approx. 4.8 kg (Approx. 10.6 lbs) Supplied accessories Remote commander (remote) (1) Size AA (R6) batteries (2) Antenna cable (1) Audio/video cord (1) Set top box controller (1) Design and specifications are subject to change without notice. 116
Operating Instructions
Page 118
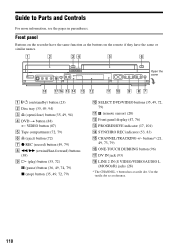
... on /standby) button (23) B Disc tray (35, 49, 94) C A (open/close) button (35, 49, 94) D DVD t button (88) T VIDEO button (87) E Tape compartment (72, 79) F A (eject) button (72) G z REC (record) button (49, 79) H m/M (rewind/fast-forward) buttons (38) I H (play) button (35, 72) X (pause) button... (36, 49, 74, 79) x (stop) button (35, 49, 72, 79) J SELECT DVD/VIDEO buttons (35, 49, 72, 79) K (remote sensor) (20) L Front panel display (47, 76) M ...
... on /standby) button (23) B Disc tray (35, 49, 94) C A (open/close) button (35, 49, 94) D DVD t button (88) T VIDEO button (87) E Tape compartment (72, 79) F A (eject) button (72) G z REC (record) button (49, 79) H m/M (rewind/fast-forward) buttons (38) I H (play) button (35, 72) X (pause) button... (36, 49, 74, 79) x (stop) button (35, 49, 72, 79) J SELECT DVD/VIDEO buttons (35, 49, 72, 79) K (remote sensor) (20) L Front panel display (47, 76) M ...
Operating Instructions
Page 119
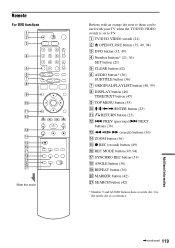
... (search) buttons (36) N ZOOM button (36) O z REC (record) button (49) P REC MODE button (49, 94) Q SYNCHRO REC button (53) R ANGLE button (36) S REPEAT button (36) T MARKER button (42) U SEARCH button (42) * Number 5 and AUDIO buttons have a tactile dot. Remote For DVD functions Slide the cover Buttons with an orange dot next... to them can be used with your TV when the TV/DVD·VIDEO switch is set to TV. Use the tactile dot as a reference. ,...
... (search) buttons (36) N ZOOM button (36) O z REC (record) button (49) P REC MODE button (49, 94) Q SYNCHRO REC button (53) R ANGLE button (36) S REPEAT button (36) T MARKER button (42) U SEARCH button (42) * Number 5 and AUDIO buttons have a tactile dot. Remote For DVD functions Slide the cover Buttons with an orange dot next... to them can be used with your TV when the TV/DVD·VIDEO switch is set to TV. Use the tactile dot as a reference. ,...

Operating Instructions
Page 130
...to your AV/amplifier (receiver) 18 to your TV 16 "Connections" 105 Controlling TVs with the remote 21 "Copy" 69 Copy protection 49, 123 Copy-Free 49 Copy-Never 49 Copy-Once 49... Touch Dubbing" 96 "DV/D8 Simple Dubbing" 95 "DVD Auto Chapter" 104 DVD Editing 58 DVD VIDEO 33, 123 DVD+R 30, 123 DVD+R DL 30 DVD+RW 30, 123 DVD-R 30, 123 DVD-RAM 33 DVD-RW 30, 123 E Easy Setup 108 "Edit" 55...F "Factory Setting" 108 Fast forward 37, 74 Fast reverse 37, 74 Feature settings 104 Finalizing 91 "Format DVD-RW" 105 Formatting 49, 70 "Front Display" 107 Front panel 118 Front panel display 122 H Handling discs 114...
...to your AV/amplifier (receiver) 18 to your TV 16 "Connections" 105 Controlling TVs with the remote 21 "Copy" 69 Copy protection 49, 123 Copy-Free 49 Copy-Never 49 Copy-Once 49... Touch Dubbing" 96 "DV/D8 Simple Dubbing" 95 "DVD Auto Chapter" 104 DVD Editing 58 DVD VIDEO 33, 123 DVD+R 30, 123 DVD+R DL 30 DVD+RW 30, 123 DVD-R 30, 123 DVD-RAM 33 DVD-RW 30, 123 E Easy Setup 108 "Edit" 55...F "Factory Setting" 108 Fast forward 37, 74 Fast reverse 37, 74 Feature settings 104 Finalizing 91 "Format DVD-RW" 105 Formatting 49, 70 "Front Display" 107 Front panel 118 Front panel display 122 H Handling discs 114...
Operating Instructions
Page 131
... 50, 79 Recording 48, 78 recordable discs 30 recording format 30 recording mode 48 tape speed 78 while watching another program 50, 79 Recording mode 48, 78 Recording time 48, 51 Region code 34 Remaining time 47, 80 Remote 20, 119 ... 72, 79 Sub-menu 11 SUBTITLE 36 "Subtitle" 106 SUR (surround) 37 SYNCHRO REC 54, 83 "Synchro Recording" 54, 83, 105 System Menu 10 T "Tape Length" 105 Tape speed 78 "Time Zone" 100 TIME/...TEXT 47, 76 TIMER 52, 81 Timer List 55, 84 Timer recording 51, 81 change or cancel 55, 84 Title 124 "Title Dubbing" 90 "Title Erase" 60, 66 TITLE...
... 50, 79 Recording 48, 78 recordable discs 30 recording format 30 recording mode 48 tape speed 78 while watching another program 50, 79 Recording mode 48, 78 Recording time 48, 51 Region code 34 Remaining time 47, 80 Remote 20, 119 ... 72, 79 Sub-menu 11 SUBTITLE 36 "Subtitle" 106 SUR (surround) 37 SYNCHRO REC 54, 83 "Synchro Recording" 54, 83, 105 System Menu 10 T "Tape Length" 105 Tape speed 78 "Time Zone" 100 TIME/...TEXT 47, 76 TIMER 52, 81 Timer List 55, 84 Timer recording 51, 81 change or cancel 55, 84 Title 124 "Title Dubbing" 90 "Title Erase" 60, 66 TITLE...


