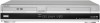
Operating Instructions
Page 2
... SÄTEELLE. Increase the separation between the equipment and receiver. - never pull the cord. Should this DVD recorder is connected to the wall outlet, even if the recorder itself ; Reorient or relocate the receiving antenna. - WARNING To reduce the risk of uninsulated "dangerous voltage"...instructions, may not operate properly. Refer servicing to operate this manual could void your authority to qualified personnel only. The CLASS 1 LASER PRODUCT MARKING is located on 120 V AC, 60 Hz. • The recorder is not disconnected from a cold to direct sunlight, excessive dust...
... SÄTEELLE. Increase the separation between the equipment and receiver. - never pull the cord. Should this DVD recorder is connected to the wall outlet, even if the recorder itself ; Reorient or relocate the receiving antenna. - WARNING To reduce the risk of uninsulated "dangerous voltage"...instructions, may not operate properly. Refer servicing to operate this manual could void your authority to qualified personnel only. The CLASS 1 LASER PRODUCT MARKING is located on 120 V AC, 60 Hz. • The recorder is not disconnected from a cold to direct sunlight, excessive dust...
Operating Instructions
Page 4
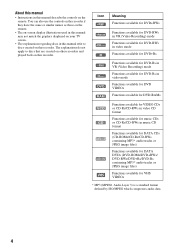
...DATA CD DATA DVD Functions available for VIDEO CDs or CD-Rs/CD-RWs in video CD format Functions available for VHS VIDEOs * MP3 (MPEG1 Audio Layer 3) is a standard format defined by ISO/MPEG which compresses audio data. 4 About this manual • Instructions in this recorder. The explanations ... available for DATA DVDs (DVD-ROMs/DVD+RWs/ DVD-RWs/DVD+Rs/DVD-Rs containing MP3* audio tracks or JPEG image files) Functions available for music CDs or CD-Rs/CD-RWs in this manual refer to discs that are created on other recorders and played back on this manual describe the controls ...
...DATA CD DATA DVD Functions available for VIDEO CDs or CD-Rs/CD-RWs in video CD format Functions available for VHS VIDEOs * MP3 (MPEG1 Audio Layer 3) is a standard format defined by ISO/MPEG which compresses audio data. 4 About this manual • Instructions in this recorder. The explanations ... available for DATA DVDs (DVD-ROMs/DVD+RWs/ DVD-RWs/DVD+Rs/DVD-Rs containing MP3* audio tracks or JPEG image files) Functions available for music CDs or CD-Rs/CD-RWs in this manual refer to discs that are created on other recorders and played back on this manual describe the controls ...
Operating Instructions
Page 8
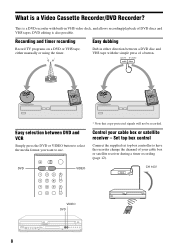
... direction between DVD and VCR Simply press the DVD or VIDEO button to select the media format you want to have the recorder change the channel of DVD discs and VHS tapes. DVD VIDEO Easy selection between a DVD disc and VHS tape with built-in either manually or using the timer. What is also possible. DVD editing is a Video Cassette Recorder/DVD Recorder?
... direction between DVD and VCR Simply press the DVD or VIDEO button to select the media format you want to have the recorder change the channel of DVD discs and VHS tapes. DVD VIDEO Easy selection between a DVD disc and VHS tape with built-in either manually or using the timer. What is also possible. DVD editing is a Video Cassette Recorder/DVD Recorder?
Operating Instructions
Page 23
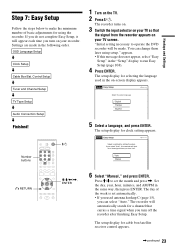
...Step 7: Easy Setup Follow the steps below to make the minimum number of basic adjustments for using setup." "Initial setting necessary to operate the DVD recorder will look for a time signal when you turn it will appear each time you turn on the TV. 2 Press "/1. No Disc Easy Setup... Select the screen language. Settings are made . OSD Language Setup m Clock Setup m Cable Box/Sat. Auto Manual O RETURN M/m/ "/1 Number buttons 1 Turn on your TV screen. If you select "Auto", this message does not appear, select "Easy Setup" in the on...
...Step 7: Easy Setup Follow the steps below to make the minimum number of basic adjustments for using setup." "Initial setting necessary to operate the DVD recorder will look for a time signal when you turn it will appear each time you turn on the TV. 2 Press "/1. No Disc Easy Setup... Select the screen language. Settings are made . OSD Language Setup m Clock Setup m Cable Box/Sat. Auto Manual O RETURN M/m/ "/1 Number buttons 1 Turn on your TV screen. If you select "Auto", this message does not appear, select "Easy Setup" in the on...
Operating Instructions
Page 24
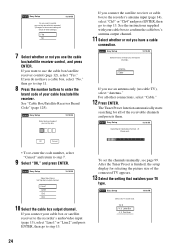
...ENTER, then go to step 7. 9 Select "OK," and press ENTER. No Disc Easy Setup 10:10 AM Searching for all of your set the channels manually, see page 99. To set top box. 10:10 AM OK Cancel If you use the cable box/satellite receiver control (page 12), select "Yes... not you will erase all other connections, select "Cable." 12 Press ENTER. If you do not have a cable connection. See the instructions supplied with this recorder? (Changes to step 13. If you connect your TV screen type. 16 : 9 4 : 3 Letter Box 4 : 3 Pan Scan 24 No Disc Easy Setup 10:10 AM ...
...ENTER, then go to step 7. 9 Select "OK," and press ENTER. No Disc Easy Setup 10:10 AM Searching for all of your set the channels manually, see page 99. To set top box. 10:10 AM OK Cancel If you use the cable box/satellite receiver control (page 12), select "Yes... not you will erase all other connections, select "Cable." 12 Press ENTER. If you do not have a cable connection. See the instructions supplied with this recorder? (Changes to step 13. If you connect your TV screen type. 16 : 9 4 : 3 Letter Box 4 : 3 Pan Scan 24 No Disc Easy Setup 10:10 AM ...
Operating Instructions
Page 28
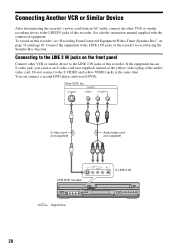
... on page 53 and page 83. If the equipment has an S video jack, you can connect a second DVD player and record DVDs. See also the instruction manual supplied with the connected equipment. Do not connect to LINE 2 IN VCR-DVD recorder : Signal flow 28 Other VCR, etc OUTPUT S VIDEO VIDEO AUDIO L R S video cord (not supplied) Audio/video...
... on page 53 and page 83. If the equipment has an S video jack, you can connect a second DVD player and record DVDs. See also the instruction manual supplied with the connected equipment. Do not connect to LINE 2 IN VCR-DVD recorder : Signal flow 28 Other VCR, etc OUTPUT S VIDEO VIDEO AUDIO L R S video cord (not supplied) Audio/video...
Operating Instructions
Page 30
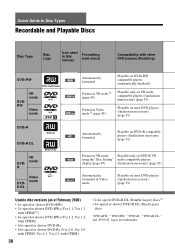
... on DVD+R compatible players (finalization necessary) (page 91) VR DVD- Quick Guide to Disc Types Recordable and Playable Discs Disc Type Disc Logo Icon used in this manual Formatting (new discs) Compatibility with CPRM) 30 • 2.4×-speed DVD+R DL (Double Layer) discs*6 • 4×-speed or slower DVD-R DL (Dual Layer) discs "DVD+RW," "DVD-RW," "DVD+R," "DVD+R DL," and "DVD...
... on DVD+R compatible players (finalization necessary) (page 91) VR DVD- Quick Guide to Disc Types Recordable and Playable Discs Disc Type Disc Logo Icon used in this manual Formatting (new discs) Compatibility with CPRM) 30 • 2.4×-speed DVD+R DL (Double Layer) discs*6 • 4×-speed or slower DVD-R DL (Dual Layer) discs "DVD+RW," "DVD-RW," "DVD+R," "DVD+R DL," and "DVD...
Operating Instructions
Page 31
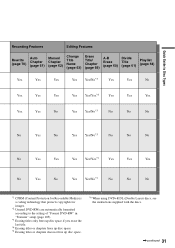
Quick Guide to Disc Types Recording Features Editing Features Rewrite (page 70) Auto Chapter (page 51) Manual Chapter (page 62) Change Title Name (page 63) Erase Title/ Chapter (page 59) A-B Erase (page 60) Divide Title (page 61) Playlist (page 64) Yes Yes... Yes Yes No Yes No Yes Yes/No*5 No No No *1 CPRM (Content Protection for Recordable Media) is a coding technology that protects copyrights for images. *2 Unused DVD-RWs are automatically formatted according to the setting of "Format DVD-RW" in "Features" setup (page 105). *3 Erasing titles only frees up disc space if ...
Quick Guide to Disc Types Recording Features Editing Features Rewrite (page 70) Auto Chapter (page 51) Manual Chapter (page 62) Change Title Name (page 63) Erase Title/ Chapter (page 59) A-B Erase (page 60) Divide Title (page 61) Playlist (page 64) Yes Yes... Yes Yes No Yes No Yes Yes/No*5 No No No *1 CPRM (Content Protection for Recordable Media) is a coding technology that protects copyrights for images. *2 Unused DVD-RWs are automatically formatted according to the setting of "Format DVD-RW" in "Features" setup (page 105). *3 Erasing titles only frees up disc space if ...
Operating Instructions
Page 33
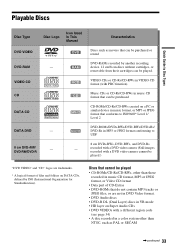
... purchased or rented DVD-RAMs recorded by ISO (International Organization for Standardization). Quick Guide to UDF 8 cm DVD+RWs, DVD-RWs, and DVD-Rs recorded with a DVD video camera (Still images recorded with a DVD video camera cannot be played.) "DVD VIDEO" and "CD...DVD Video format. • DVD Audio discs • DVD-R DL (Dual Layer) discs in VR mode • HD layer on Super Audio CDs • DVD VIDEOs with a different region code (see page 34) • A disc recorded in This Manual DVD DVD-RAM - RAM VIDEO CD CD VCD CD DATA CD DATA CD DATA DVD - 8 cm DVD+RW/ DVD-RW/DVD...
... purchased or rented DVD-RAMs recorded by ISO (International Organization for Standardization). Quick Guide to UDF 8 cm DVD+RWs, DVD-RWs, and DVD-Rs recorded with a DVD video camera (Still images recorded with a DVD video camera cannot be played.) "DVD VIDEO" and "CD...DVD Video format. • DVD Audio discs • DVD-R DL (Dual Layer) discs in VR mode • HD layer on Super Audio CDs • DVD VIDEOs with a different region code (see page 34) • A disc recorded in This Manual DVD DVD-RAM - RAM VIDEO CD CD VCD CD DATA CD DATA CD DATA DVD - 8 cm DVD+RW/ DVD-RW/DVD...
Operating Instructions
Page 51
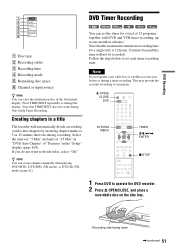
DVD Recording Record 0:00:03 HQ Rem 00:59 Ch 1 A Disc type B Recording status C Recording time D Recording mode E Remaining disc space F Channel or input source z Hint You can create chapters manually when playing DVD+RWs, DVD-RWs (VR mode), or DVD-Rs (VR mode) (page 62). Select the interval, "5 Min" (default) or "15 Min" in "DVD... Auto Chapter" of 12 programs together with DVD and VCR timer recording, up to set the timer ...
DVD Recording Record 0:00:03 HQ Rem 00:59 Ch 1 A Disc type B Recording status C Recording time D Recording mode E Remaining disc space F Channel or input source z Hint You can create chapters manually when playing DVD+RWs, DVD-RWs (VR mode), or DVD-Rs (VR mode) (page 62). Select the interval, "5 Min" (default) or "15 Min" in "DVD... Auto Chapter" of 12 programs together with DVD and VCR timer recording, up to set the timer ...
Operating Instructions
Page 62
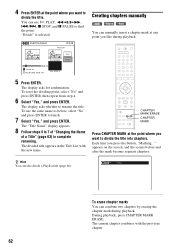
... chapter. 62 appears on the screen, and the scenes before , select "No" and press ENTER to find the point. To erase chapter marks You can manually insert a chapter mark at any point you want to divide the title. Each time you want to divide the title into chapters. VR Marking... The... a Title" (page 63) to rename the title. During playback, press CHAPTER MARK ERASE. 4 Press ENTER at the point where you like during playback. Creating chapters manually +RW -RWVR -RVR You can combine two chapters by erasing the chapter mark during playback.
... chapter. 62 appears on the screen, and the scenes before , select "No" and press ENTER to find the point. To erase chapter marks You can manually insert a chapter mark at any point you want to divide the title. Each time you want to divide the title into chapters. VR Marking... The... a Title" (page 63) to rename the title. During playback, press CHAPTER MARK ERASE. 4 Press ENTER at the point where you like during playback. Creating chapters manually +RW -RWVR -RVR You can combine two chapters by erasing the chapter mark during playback.

Operating Instructions
Page 73
Tracking Tracking meter To resume automatic tracking Press TRACKING + and TRACKING - on the recorder at the same time for more than ten seconds. The tracking meter appears. Press TRACKING +/- Press TRACKING +/-. VCR Playback Adjusting the picture (tracking) You can manually adjust tracking if the recording quality is too poor to be remedied by the VCR's automatic tracking (a tracking meter appears during the automatic tracking). Or, eject the tape and reinsert it. 73 repeatedly until the distortion disappears.
Tracking Tracking meter To resume automatic tracking Press TRACKING + and TRACKING - on the recorder at the same time for more than ten seconds. The tracking meter appears. Press TRACKING +/- Press TRACKING +/-. VCR Playback Adjusting the picture (tracking) You can manually adjust tracking if the recording quality is too poor to be remedied by the VCR's automatic tracking (a tracking meter appears during the automatic tracking). Or, eject the tape and reinsert it. 73 repeatedly until the distortion disappears.

Operating Instructions
Page 93
...see "About i.LINK" on the tape contain copy protection signals, which limit recording. Hookups VCR-DVD recorder DV/D8 Dubbing (DV/D8 t DVD) DV IN to DV IN i.LINK cable (not supplied) to dub by way of "Recording From Connected Equipment Without a Timer" on dubbing. Follow the instructions in DVC...the DV IN jack when: - For more information about i.LINK, see "Recording From Connected Equipment With a Timer (Synchro Rec)" on the recorder to the DV IN jack on page 53. See the instruction manual supplied with the digital video camera as well before connecting. It will fast ...
...see "About i.LINK" on the tape contain copy protection signals, which limit recording. Hookups VCR-DVD recorder DV/D8 Dubbing (DV/D8 t DVD) DV IN to DV IN i.LINK cable (not supplied) to dub by way of "Recording From Connected Equipment Without a Timer" on dubbing. Follow the instructions in DVC...the DV IN jack when: - For more information about i.LINK, see "Recording From Connected Equipment With a Timer (Synchro Rec)" on the recorder to the DV IN jack on page 53. See the instruction manual supplied with the digital video camera as well before connecting. It will fast ...
Operating Instructions
Page 98
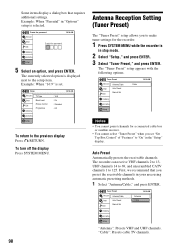
..." display. Tuner Preset Title List Timer Edit Antenna/Cable Auto Preset Manual Set Dubbing Disc Setting Setup : Cable 10:10 AM Notes • You cannot preset channels for the recorder. 1 Press SYSTEM MENU while the recorder is displayed next to 125. The recorder can receive VHF channels 2 to 13, UHF channels 14 to 69...
..." display. Tuner Preset Title List Timer Edit Antenna/Cable Auto Preset Manual Set Dubbing Disc Setting Setup : Cable 10:10 AM Notes • You cannot preset channels for the recorder. 1 Press SYSTEM MENU while the recorder is displayed next to 125. The recorder can receive VHF channels 2 to 13, UHF channels 14 to 69...
Operating Instructions
Page 99
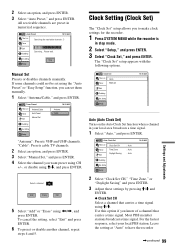
..."Setup," and press ENTER. 3 Select "Clock Set," and press ENTER. Manual Set Presets or disables channels manually. Auto Preset 10:10 AM Title List Timer Searching for the recorder. 1 Press SYSTEM MENU while the recorder is in numerical sequence. Please wait. "Cable": Presets cable TV channels. 2... Select an option, and press ENTER. 3 Select "Manual Set," and press ENTER. 4 Select the channel you...
..."Setup," and press ENTER. 3 Select "Clock Set," and press ENTER. Manual Set Presets or disables channels manually. Auto Preset 10:10 AM Title List Timer Searching for the recorder. 1 Press SYSTEM MENU while the recorder is in numerical sequence. Please wait. "Cable": Presets cable TV channels. 2... Select an option, and press ENTER. 3 Select "Manual Set," and press ENTER. 4 Select the channel you...
Operating Instructions
Page 100
Note If "Set Top Box Control" of "Features" is set to have the recorder automatically set the clock manually. 1 Select "Manual," and press ENTER. Clock Set Title List Timer Set the time and date. Month Day Year Edit 01 01 2006 Dubbing Disc Setting Setup Hour ... time zone for your area, or select "Auto" to "On," the channel on the cable box or satellite receiver changes when the recorder searches for a channel that carries a time signal. Manual If the Auto Clock Set function did not set the month, and press ,. Set the day, year, hour, minutes, and AM...
Note If "Set Top Box Control" of "Features" is set to have the recorder automatically set the clock manually. 1 Select "Manual," and press ENTER. Clock Set Title List Timer Set the time and date. Month Day Year Edit 01 01 2006 Dubbing Disc Setting Setup Hour ... time zone for your area, or select "Auto" to "On," the channel on the cable box or satellite receiver changes when the recorder searches for a channel that carries a time signal. Manual If the Auto Clock Set function did not set the month, and press ,. Set the day, year, hour, minutes, and AM...
Operating Instructions
Page 109
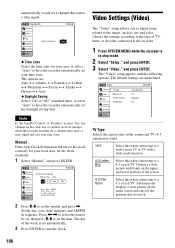
... by pressing INPUT SELECT. TV program reception does not fill the screen. , Set the channel manually in "Video" setup (page 101). The channel on your TV is compatible with progressive format ... Select the correct source using the INPUT SELECT button, or select a channel of your nearest Sony dealer. Check the "Set Top Box Control" settings in "Video" setup to progressive format (...DVD player, VCR, or tuner goes through your VCR to get to your TV, or if you connect your recorder directly to your TV, try connecting your recorder to your TV's S VIDEO input. , You have set the recorder...
... by pressing INPUT SELECT. TV program reception does not fill the screen. , Set the channel manually in "Video" setup (page 101). The channel on your TV is compatible with progressive format ... Select the correct source using the INPUT SELECT button, or select a channel of your nearest Sony dealer. Check the "Set Top Box Control" settings in "Video" setup to progressive format (...DVD player, VCR, or tuner goes through your VCR to get to your TV, or if you connect your recorder directly to your TV, try connecting your recorder to your TV's S VIDEO input. , You have set the recorder...
Operating Instructions
Page 110
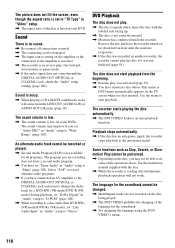
... the disc has an auto pause signal, the recorder stops playback at the auto pause signal. DVD Playback The disc does not play. , The disc is first inserted. Use the menu to "Wide Range" (page 103). See the instruction manual supplied with the disc. , While the recorder is reading disc information, playback operations will...
... the disc has an auto pause signal, the recorder stops playback at the auto pause signal. DVD Playback The disc does not play. , The disc is first inserted. Use the menu to "Wide Range" (page 103). See the instruction manual supplied with the disc. , While the recorder is reading disc information, playback operations will...
Operating Instructions
Page 117
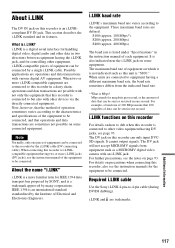
...familiar term for IEEE 1394 data transport bus proposed by SONY, and is connected to but also with not only the equipment that can be connected to this recorder to equipment having DV jacks, see the instruction manual of Electrical and Electronics Engineers. When units are possible with..."S100." Required i.LINK cable Use the Sony i.LINK 4-pin-to the equipment. IEEE 1394 is listed under "Specifications" in one second. For further precautions, see the instruction manuals for megabits per second, or the amount of data that this recorder can be sent or received in the ...
...familiar term for IEEE 1394 data transport bus proposed by SONY, and is connected to but also with not only the equipment that can be connected to this recorder to equipment having DV jacks, see the instruction manual of Electrical and Electronics Engineers. When units are possible with..."S100." Required i.LINK cable Use the Sony i.LINK 4-pin-to the equipment. IEEE 1394 is listed under "Specifications" in one second. For further precautions, see the instruction manuals for megabits per second, or the amount of data that this recorder can be sent or received in the ...
Operating Instructions
Page 131
... 124 LINE 1 IN 29 LINE 2 IN 28 "Line Audio Input" 53, 57, 104 M Manual Clock Set 100 "Manual Set" 99 MARKER 42 MENU 35 Menu Top menu 35 "Mode for SET button" 106 "Modify"... 122 REC 50, 79 REC MODE 50, 79 Recording 48, 78 recordable discs 30 recording format 30 recording mode 48 tape speed 78 while watching another program 50, 79 Recording mode 48, 78 Recording time 48, 51 Region code 34 Remaining time 47...50, 72, 79 Sub-menu 11 SUBTITLE 36 "Subtitle" 106 SUR (surround) 37 SYNCHRO REC 54, 83 "Synchro Recording" 54, 83, 105 System Menu 10 T "Tape Length" 105 Tape speed 78 "Time Zone" 100 TIME/TEXT...
... 124 LINE 1 IN 29 LINE 2 IN 28 "Line Audio Input" 53, 57, 104 M Manual Clock Set 100 "Manual Set" 99 MARKER 42 MENU 35 Menu Top menu 35 "Mode for SET button" 106 "Modify"... 122 REC 50, 79 REC MODE 50, 79 Recording 48, 78 recordable discs 30 recording format 30 recording mode 48 tape speed 78 while watching another program 50, 79 Recording mode 48, 78 Recording time 48, 51 Region code 34 Remaining time 47...50, 72, 79 Sub-menu 11 SUBTITLE 36 "Subtitle" 106 SUR (surround) 37 SYNCHRO REC 54, 83 "Synchro Recording" 54, 83, 105 System Menu 10 T "Tape Length" 105 Tape speed 78 "Time Zone" 100 TIME/TEXT...