Operating Instructions
Page 2
... and maintenance (servicing) instructions in this manual could void your authority to disassemble the cabinet. On placement • Place the recorder in a location with adequate ventilation to prevent heat build-up in the recorder. • If the recorder is brought directly from the AC power ...alert the user to radio communications. Should this occur, the recorder may condense on 120 V AC, 60 Hz. • The recorder is not disconnected from a cold to a warm location, or is placed in this VCR-DVD recorder is no guarantee that may cause harmful interference to the presence...
... and maintenance (servicing) instructions in this manual could void your authority to disassemble the cabinet. On placement • Place the recorder in a location with adequate ventilation to prevent heat build-up in the recorder. • If the recorder is brought directly from the AC power ...alert the user to radio communications. Should this occur, the recorder may condense on 120 V AC, 60 Hz. • The recorder is not disconnected from a cold to a warm location, or is placed in this VCR-DVD recorder is no guarantee that may cause harmful interference to the presence...

Operating Instructions
Page 4
... to discs that are created on other recorders and played back on this recorder. About this manual • Instructions in this recorder. Icon +RW -RWVR -RWVideo +R -R DVD VCD CD DATA CD DATA DVD Meaning Functions available for DVD+RWs Functions available for DVD-RWs in VR (Video Recording) mode Functions available for DVD-RWs in video mode Functions available for...
... to discs that are created on other recorders and played back on this recorder. About this manual • Instructions in this recorder. Icon +RW -RWVR -RWVideo +R -R DVD VCD CD DATA CD DATA DVD Meaning Functions available for DVD+RWs Functions available for DVD-RWs in VR (Video Recording) mode Functions available for DVD-RWs in video mode Functions available for...
Operating Instructions
Page 8
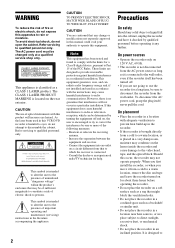
This is a DVD recorder with built-in either manually or using the timer. DVD VIDEO Title List (Original) 1/4 No. Title 01 CH 23 02 CH 66 03 CH 95 04 CH 97 T CH 23 May/02/2005 08:00 ... > 01:59:00 > 00:58:56 > VIDEO DVD 8 What is also possible. DVD editing is a Video Cassette Recorder/DVD Recorder? Quick access to recorded titles Title List Display the Title List to use. * Note that copy-protected signals will not be recorded. DVD VIDEO Easy selection between DVD and VCR Simply press the DVD or VIDEO button to select the media...
This is a DVD recorder with built-in either manually or using the timer. DVD VIDEO Title List (Original) 1/4 No. Title 01 CH 23 02 CH 66 03 CH 95 04 CH 97 T CH 23 May/02/2005 08:00 ... > 01:59:00 > 00:58:56 > VIDEO DVD 8 What is also possible. DVD editing is a Video Cassette Recorder/DVD Recorder? Quick access to recorded titles Title List Display the Title List to use. * Note that copy-protected signals will not be recorded. DVD VIDEO Easy selection between DVD and VCR Simply press the DVD or VIDEO button to select the media...
Operating Instructions
Page 22
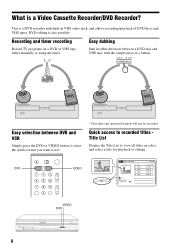
If you do not complete Easy Setup, it will appear each time you turn on your recorder. "/1 O RETURN M/m/ Settings are made in the following order. OSD Language Setup m Clock Setup m Tuner and Channel Setup m TV Type Setup m Audio Connection Setup m Finished! Step 7: Easy Setup Follow the steps below to make the minimum number of basic adjustments for using the recorder.
If you do not complete Easy Setup, it will appear each time you turn on your recorder. "/1 O RETURN M/m/ Settings are made in the following order. OSD Language Setup m Clock Setup m Tuner and Channel Setup m TV Type Setup m Audio Connection Setup m Finished! Step 7: Easy Setup Follow the steps below to make the minimum number of basic adjustments for using the recorder.

Operating Instructions
Page 23
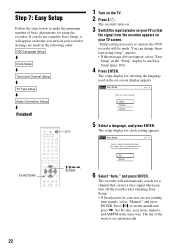
... receivable channels and presets them. For details, see page 94. Antenna Cable If you want to send to your TV type. To set the channels manually, see "Video Settings (Video)" on page 95. 10 Press ENTER. "16:9": For wide-screen TVs or standard TVs with bands on the entire screen and...
... receivable channels and presets them. For details, see page 94. Antenna Cable If you want to send to your TV type. To set the channels manually, see "Video Settings (Video)" on page 95. 10 Press ENTER. "16:9": For wide-screen TVs or standard TVs with bands on the entire screen and...

Operating Instructions
Page 26
... VIDEO L AUDIO R (MONO) DV IN to LINE 2 IN VCR-DVD recorder : Signal flow Notes • You cannot dub a copy guard DVD VIDEO to the LINE 2 IN jacks of this recorder. Connecting to the LINE 2 IN jacks on page 50 and page 78. See also the instruction manual supplied with the connected equipment. Connect the equipment to...
... VIDEO L AUDIO R (MONO) DV IN to LINE 2 IN VCR-DVD recorder : Signal flow Notes • You cannot dub a copy guard DVD VIDEO to the LINE 2 IN jacks of this recorder. Connecting to the LINE 2 IN jacks on page 50 and page 78. See also the instruction manual supplied with the connected equipment. Connect the equipment to...

Operating Instructions
Page 28
...Disc Types Recordable and Playable Discs Disc Type Disc Logo Icon used in this manual Formatting (new discs) Compatibility with other DVD players (finalizing) DVD+RW DVDRW VR mode Video mode +RW -RWVR -RWVideo Automatically formatted Playable on DVD+RW ...in Video mode*2 (page 66) Playable on most DVD players (finalization necessary) (page 86) DVD+R DVD+R DL Automatically +R formatted Playable on DVD+R compatible players (finalization necessary) (page 86) DVD-R Automatically -R formatted Playable on most DVD players (finalization necessary) (page 86) Usable disc versions...
...Disc Types Recordable and Playable Discs Disc Type Disc Logo Icon used in this manual Formatting (new discs) Compatibility with other DVD players (finalizing) DVD+RW DVDRW VR mode Video mode +RW -RWVR -RWVideo Automatically formatted Playable on DVD+RW ...in Video mode*2 (page 66) Playable on most DVD players (finalization necessary) (page 86) DVD+R DVD+R DL Automatically +R formatted Playable on DVD+R compatible players (finalization necessary) (page 86) DVD-R Automatically -R formatted Playable on most DVD players (finalization necessary) (page 86) Usable disc versions...

Operating Instructions
Page 29
Quick Guide to Disc Types Recording Features Editing Features Rewrite (page 66) Auto Chapter (page 48) Manual Chapter (page 59) Change Title Name (page 60) Erase Title/ Chapter (page 56) A-B Erase (page 57) Divide Title (page 58) Playlist (page 61...No No No Discs that cannot be recorded on • DVD-RWs (Ver.1.0) • DVD+RWs that are not 2.4×-speed compatible • 8 cm discs • DVD-R DL (Dual Layer) discs • DVD-Rs in VR mode (Video Recording format) • DVD-Rs with CPRM*1 *1 CPRM (Content Protection for Recordable Media) is a coding technology that ...
Quick Guide to Disc Types Recording Features Editing Features Rewrite (page 66) Auto Chapter (page 48) Manual Chapter (page 59) Change Title Name (page 60) Erase Title/ Chapter (page 56) A-B Erase (page 57) Divide Title (page 58) Playlist (page 61...No No No Discs that cannot be recorded on • DVD-RWs (Ver.1.0) • DVD+RWs that are not 2.4×-speed compatible • 8 cm discs • DVD-R DL (Dual Layer) discs • DVD-Rs in VR mode (Video Recording format) • DVD-Rs with CPRM*1 *1 CPRM (Content Protection for Recordable Media) is a coding technology that ...

Operating Instructions
Page 30
... UDF 8 cm DVD+RWs, DVD-RWs, and DVD-Rs recorded with a DVD video camera (Still images recorded with a DVD video camera cannot be purchased CD-Rs/CD-RWs created on a PC or similar device in music format, or MP3 or JPEG format that conforms to ISO9660* Level 1/Level 2 DVD+RWs/DVD-RWs/DVD+Rs/DVD-Rs in This Manual DVD VCD CD DATA...
... UDF 8 cm DVD+RWs, DVD-RWs, and DVD-Rs recorded with a DVD video camera (Still images recorded with a DVD video camera cannot be purchased CD-Rs/CD-RWs created on a PC or similar device in music format, or MP3 or JPEG format that conforms to ISO9660* Level 1/Level 2 DVD+RWs/DVD-RWs/DVD+Rs/DVD-Rs in This Manual DVD VCD CD DATA...

Operating Instructions
Page 48
...in a title The recorder will not be recorded. Select the interval, "5 Min" (default) or "15 Min" in "DVD Auto Chapter" of 12 programs together with DVD and VCR timer recording, up to change the display. z Hint You can set each timer recording item. Note that ...intervals during a timer recording. Z OPEN/ CLOSE DVD SYSTEM MENU TIMER M/m/ Creating chapters in the front panel display. DVD Timer Recording +RW -RWVR -RWVideo +R -R You can create chapters manually when playing DVD+RWs or DVD-RWs (VR mode) (page 59). This may prevent the accurate recording of a program. ...
...in a title The recorder will not be recorded. Select the interval, "5 Min" (default) or "15 Min" in "DVD Auto Chapter" of 12 programs together with DVD and VCR timer recording, up to change the display. z Hint You can set each timer recording item. Note that ...intervals during a timer recording. Z OPEN/ CLOSE DVD SYSTEM MENU TIMER M/m/ Creating chapters in the front panel display. DVD Timer Recording +RW -RWVR -RWVideo +R -R You can create chapters manually when playing DVD+RWs or DVD-RWs (VR mode) (page 59). This may prevent the accurate recording of a program. ...

Operating Instructions
Page 59
... "Marking..." Each time you may not be able to divide the title into chapters. To erase chapter marks You can manually insert a chapter mark at the point where you like during playback. DVD Editing CHAPTER MARK ERASE CHAPTER MARK 59 6 Select "Yes," and press ENTER. The "Title Name" display appears. ... ENTER. Press CHAPTER MARK at any point you want to record or edit. • You cannot add or erase chapter marks on the screen, and the scenes before . The current chapter combines with the new name. Creating chapters manually +RW -RWVR You can combine two chapters by erasing the...
... "Marking..." Each time you may not be able to divide the title into chapters. To erase chapter marks You can manually insert a chapter mark at the point where you like during playback. DVD Editing CHAPTER MARK ERASE CHAPTER MARK 59 6 Select "Yes," and press ENTER. The "Title Name" display appears. ... ENTER. Press CHAPTER MARK at any point you want to record or edit. • You cannot add or erase chapter marks on the screen, and the scenes before . The current chapter combines with the new name. Creating chapters manually +RW -RWVR You can combine two chapters by erasing the...

Operating Instructions
Page 68
The tracking meter appears. Press TRACKING +/- repeatedly until the distortion disappears. Or, eject the tape and reinsert it. 68 Adjusting the picture (tracking) You can manually adjust tracking if the recording quality is too poor to be remedied by the VCR's automatic tracking (a tracking meter appears during the automatic tracking). on the recorder at the same time for more than ten seconds. Tracking Tracking meter To resume automatic tracking Press TRACKING + and TRACKING - Press TRACKING +/-.
The tracking meter appears. Press TRACKING +/- repeatedly until the distortion disappears. Or, eject the tape and reinsert it. 68 Adjusting the picture (tracking) You can manually adjust tracking if the recording quality is too poor to be remedied by the VCR's automatic tracking (a tracking meter appears during the automatic tracking). on the recorder at the same time for more than ten seconds. Tracking Tracking meter To resume automatic tracking Press TRACKING + and TRACKING - Press TRACKING +/-.

Operating Instructions
Page 88
...dub by way of the LINE IN jacks, see "About i.LINK" on the front panel. See the instruction manual supplied with a digital video camera via the DV IN jack on page 110. Operation is straightforward because the DVD recorder will not output signals. • You cannot use the DV IN jack and... after the initial dub, use the DV IN jack when: - DV/D8 Dubbing (DV/D8 t DVD) Before DV/D8 Dubbing This section explains dubbing with the digital video camera as well before connecting. Hookups VCR-DVD recorder DV IN To DV IN i.LINK cable (not supplied) DV output Digital video camera : Signal flow...
...dub by way of the LINE IN jacks, see "About i.LINK" on the front panel. See the instruction manual supplied with a digital video camera via the DV IN jack on page 110. Operation is straightforward because the DVD recorder will not output signals. • You cannot use the DV IN jack and... after the initial dub, use the DV IN jack when: - DV/D8 Dubbing (DV/D8 t DVD) Before DV/D8 Dubbing This section explains dubbing with the digital video camera as well before connecting. Hookups VCR-DVD recorder DV IN To DV IN i.LINK cable (not supplied) DV output Digital video camera : Signal flow...

Operating Instructions
Page 93
... password. Tuner Preset Title List Timer Edit Antenna/Cable Auto Preset Manual Set Dubbing Disc Setting Setup : Cable 10:10 AM Note You cannot preset channels for the recorder. 1 Press SYSTEM MENU while the recorder is displayed next to the previous display Press O RETURN. Tuner ...Preset Title List Timer Edit Antenna/Cable Auto Preset Manual Set Dubbing Disc Setting Setup 10:10 AM : AntAenntneanna ...
... password. Tuner Preset Title List Timer Edit Antenna/Cable Auto Preset Manual Set Dubbing Disc Setting Setup : Cable 10:10 AM Note You cannot preset channels for the recorder. 1 Press SYSTEM MENU while the recorder is displayed next to the previous display Press O RETURN. Tuner ...Preset Title List Timer Edit Antenna/Cable Auto Preset Manual Set Dubbing Disc Setting Setup 10:10 AM : AntAenntneanna ...

Operating Instructions
Page 94
..."Easy Setup" function, you want to preset/disable using Tuner Preset Title List Timer Edit Antenna/Cable Auto Preset Manual Set Dubbing Disc Setting Setup 10:10 AM : AntAenntneanna Cable "Antenna": Presets VHF and UHF channels. Please wait. Disc Setting Stop... Setup Manual Set Presets or disables channels manually. "Cable": Presets cable TV channels. 2 Select an option, and press ENTER. 3 Select "Manual Set," and press ENTER. 4 Select the channel you can set them manually. 1 Select "Antenna/Cable," and press ENTER. ...
..."Easy Setup" function, you want to preset/disable using Tuner Preset Title List Timer Edit Antenna/Cable Auto Preset Manual Set Dubbing Disc Setting Setup 10:10 AM : AntAenntneanna Cable "Antenna": Presets VHF and UHF channels. Please wait. Disc Setting Stop... Setup Manual Set Presets or disables channels manually. "Cable": Presets cable TV channels. 2 Select an option, and press ENTER. 3 Select "Manual Set," and press ENTER. 4 Select the channel you can set them manually. 1 Select "Antenna/Cable," and press ENTER. ...

Operating Instructions
Page 95
... Day Year Edit 01 01 2005 Dubbing Disc Setting Setup Hour Min AM/PM 10 : 10 AM 10:10 AM Sat 2 Press M/m to have the recorder automatically set your time zone. Press The options are: Auto y Atlantic y Eastern y Central y Mountain y Pacific y Alaska y Hawaii y Auto ◆ Daylight ...Saving Select "On" or "Off" (standard time), or select "Auto" to set the month, and press ,. Manual If the Auto Clock Set function did not set the clock correctly for a channel that carries a time signal. automatically search for your local area, set...
... Day Year Edit 01 01 2005 Dubbing Disc Setting Setup Hour Min AM/PM 10 : 10 AM 10:10 AM Sat 2 Press M/m to have the recorder automatically set your time zone. Press The options are: Auto y Atlantic y Eastern y Central y Mountain y Pacific y Alaska y Hawaii y Auto ◆ Daylight ...Saving Select "On" or "Off" (standard time), or select "Auto" to set the month, and press ,. Manual If the Auto Clock Set function did not set the clock correctly for a channel that carries a time signal. automatically search for your local area, set...

Operating Instructions
Page 103
... connected to the recorder's input jack does not appear on . , Check that the signal from a DVD player, VCR, or tuner goes through your VCR to get to your...recorder to progressive format (the PROGRESSIVE indicator lights up) even though your TV (page 95). TV program reception does not fill the screen. , Set the channel manually ...recorder passes through your TV. The picture does not fill the screen. , Set "TV Type" in the front panel display by pressing INPUT SELECT. If you still experience this troubleshooting guide to help remedy the problem before reaching your nearest Sony...
... connected to the recorder's input jack does not appear on . , Check that the signal from a DVD player, VCR, or tuner goes through your VCR to get to your...recorder to progressive format (the PROGRESSIVE indicator lights up) even though your TV (page 95). TV program reception does not fill the screen. , Set the channel manually ...recorder passes through your TV. The picture does not fill the screen. , Set "TV Type" in the front panel display by pressing INPUT SELECT. If you still experience this troubleshooting guide to help remedy the problem before reaching your nearest Sony...

Operating Instructions
Page 104
... program. , You have inserted a disc whose Title menu or DVD menu automatically appears on the amplifier or the connection to the amplifier is incorrect. , The recorder is in "Audio" setup to "Main" (page 97). See the instruction manual supplied with the labeled side facing up. , The disc is ... (OPTICAL or COAXIAL) jack, check the "Audio" setup settings (page 97). Select "SAP" to record alternate audio programs. , If you set "Tuner Audio" in "Audio" setup to do some DVDs. The disc does not start playback. Playback stops automatically. , If the disc has an auto pause signal...
... program. , You have inserted a disc whose Title menu or DVD menu automatically appears on the amplifier or the connection to the amplifier is incorrect. , The recorder is in "Audio" setup to "Main" (page 97). See the instruction manual supplied with the labeled side facing up. , The disc is ... (OPTICAL or COAXIAL) jack, check the "Audio" setup settings (page 97). Select "SAP" to record alternate audio programs. , If you set "Tuner Audio" in "Audio" setup to do some DVDs. The disc does not start playback. Playback stops automatically. , If the disc has an auto pause signal...
Operating Instructions
Page 110
... with other equipment. Possible applications are sometimes not possible on this recorder to change without notice. When connecting this recorder is i.LINK? This section describes the i.LINK standard and its features. i.LINK is a trademark approved by SONY, and is a digital serial interface for handling digital video, digital... connected. What is an i.LINKcompliant DV IN jack. When two or more i.LINK jacks (DV jacks), see the instruction manual of the equipment to be connected by the i.LINK cable (DV connecting cable). IEEE 1394 is connected to this...
... with other equipment. Possible applications are sometimes not possible on this recorder to change without notice. When connecting this recorder is i.LINK? This section describes the i.LINK standard and its features. i.LINK is a trademark approved by SONY, and is a digital serial interface for handling digital video, digital... connected. What is an i.LINKcompliant DV IN jack. When two or more i.LINK jacks (DV jacks), see the instruction manual of the equipment to be connected by the i.LINK cable (DV connecting cable). IEEE 1394 is connected to this...

Operating Instructions
Page 111
... stands for the equipment to other video equipment having a different maximum baud rate, the baud rate sometimes differs from equipment such as this recorder, also see the instruction manuals for megabits per second, or the amount of data that 100 megabits of each equipment. For details on this... will not accept MICRO MV signals from the indicated baud rate. * What is connected to be sent in one second. Required i.LINK cable Use the Sony i.LINK 4-pin-to the equipment. Three maximum baud rates are defined: S100 (approx. 100 Mbps*) S200 (approx. 200 Mbps) S400 (approx. 400 Mbps...
... stands for the equipment to other video equipment having a different maximum baud rate, the baud rate sometimes differs from equipment such as this recorder, also see the instruction manuals for megabits per second, or the amount of data that 100 megabits of each equipment. For details on this... will not accept MICRO MV signals from the indicated baud rate. * What is connected to be sent in one second. Required i.LINK cable Use the Sony i.LINK 4-pin-to the equipment. Three maximum baud rates are defined: S100 (approx. 100 Mbps*) S200 (approx. 200 Mbps) S400 (approx. 400 Mbps...


