Operating Instructions
Page 2
...the cabinet. However, there is connected. - never pull the cord. The AC power cord must be sure to disconnect the recorder from the wall outlet. Note This equipment has been tested and found to comply with this equipment does cause harmful interference to... place subject to direct sunlight, excessive dust, or mechanical shock. • Do not place the recorder in a residential installation. Reorient or relocate the receiving antenna. - Should this VCR-DVD recorder is intended to alert the user to the presence of uninsulated "dangerous voltage" within the product's ...
...the cabinet. However, there is connected. - never pull the cord. The AC power cord must be sure to disconnect the recorder from the wall outlet. Note This equipment has been tested and found to comply with this equipment does cause harmful interference to... place subject to direct sunlight, excessive dust, or mechanical shock. • Do not place the recorder in a residential installation. Reorient or relocate the receiving antenna. - Should this VCR-DVD recorder is intended to alert the user to the presence of uninsulated "dangerous voltage" within the product's ...
Operating Instructions
Page 5
...the Remote 19 Step 7: Easy Setup 22 Connecting Another VCR or Similar Device 26 Quick Guide to Disc Types 28 Recordable and Playable Discs 28 12 cm/8 cm Discs 30 Playable Discs 30 DVD Operation DVD Playback 32 Playing 32 Playback Options 33 Playing a ...Time and Play Information 43 DVD Recording 45 Before Recording 45 DVD Recording Without the Timer 46 DVD Timer Recording 48 Recording From Connected Equipment With a Timer (Synchro Rec 50 Changing or Canceling DVD Timer Settings (Timer List 52 Recording From Connected Equipment Without a Timer 53 DVD Editing 55 Before Editing ...
...the Remote 19 Step 7: Easy Setup 22 Connecting Another VCR or Similar Device 26 Quick Guide to Disc Types 28 Recordable and Playable Discs 28 12 cm/8 cm Discs 30 Playable Discs 30 DVD Operation DVD Playback 32 Playing 32 Playback Options 33 Playing a ...Time and Play Information 43 DVD Recording 45 Before Recording 45 DVD Recording Without the Timer 46 DVD Timer Recording 48 Recording From Connected Equipment With a Timer (Synchro Rec 50 Changing or Canceling DVD Timer Settings (Timer List 52 Recording From Connected Equipment Without a Timer 53 DVD Editing 55 Before Editing ...

Operating Instructions
Page 6
... Sound During Playback 72 VCR Recording 73 Before Recording 73 VCR Recording Without the Timer 74 VCR Timer Recording 76 Recording From Connected Equipment With a Timer (Synchro Rec 78 Changing or Canceling VCR Timer Settings (Timer List 79 Recording From Connected Equipment Without a Timer 81 Dubbing (TAPE y DVD 82 Dubbing From a VHS Tape to a DVD 82 Dubbing From a DVD to a VHS Tape 83...
... Sound During Playback 72 VCR Recording 73 Before Recording 73 VCR Recording Without the Timer 74 VCR Timer Recording 76 Recording From Connected Equipment With a Timer (Synchro Rec 78 Changing or Canceling VCR Timer Settings (Timer List 79 Recording From Connected Equipment Without a Timer 81 Dubbing (TAPE y DVD 82 Dubbing From a VHS Tape to a DVD 82 Dubbing From a DVD to a VHS Tape 83...
Operating Instructions
Page 8
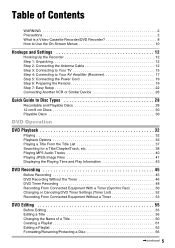
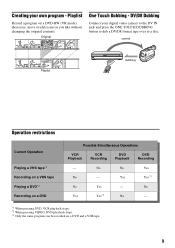
...is also possible. Quick access to recorded titles Title List Display the Title List to use. * Note that copy-protected signals will not be recorded. DVD VIDEO Title List (Original) 1/4 No. DVD VIDEO Easy selection between DVD and VCR Simply press the DVD or VIDEO button to select the... media format you want to view all titles on a DVD or VHS tape, either direction between a DVD disc and VHS tape ...
...is also possible. Quick access to recorded titles Title List Display the Title List to use. * Note that copy-protected signals will not be recorded. DVD VIDEO Title List (Original) 1/4 No. DVD VIDEO Easy selection between DVD and VCR Simply press the DVD or VIDEO button to select the... media format you want to view all titles on a DVD or VHS tape, either direction between a DVD disc and VHS tape ...
Operating Instructions
Page 9
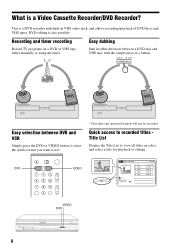
... tape. 9 Yes Yes*3 No Yes - Original One Touch Dubbing - No Yes Yes*3 No - *1 When pressing DVD, VCR playback stops. *2 When pressing VIDEO, DVD playback stops. *3 Only the same program can be recorded on a DVD Possible Simultaneous Operations VCR Playback VCR Recording DVD Playback DVD Recording - No No Yes No - Creating your digital video camera to the DV IN jack and press...
... tape. 9 Yes Yes*3 No Yes - Original One Touch Dubbing - No Yes Yes*3 No - *1 When pressing DVD, VCR playback stops. *2 When pressing VIDEO, DVD playback stops. *3 Only the same program can be recorded on a DVD Possible Simultaneous Operations VCR Playback VCR Recording DVD Playback DVD Recording - No No Yes No - Creating your digital video camera to the DV IN jack and press...
Operating Instructions
Page 13
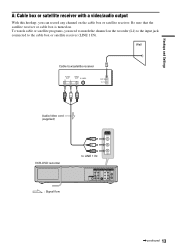
Hookups and Settings A: Cable box or satellite receiver with a video/audio output With this hookup, you need to match the channel on the recorder (L1) to the input jack connected to LINE 1 IN AUDIO OUT COMPONENT VIDEO OUT S VIDEO OUT LINE 1 IN LINE OUT VIDEO VIDEO VHF/UHF L... cable box or satellite receiver. To watch cable or satellite programs, you can record any channel on . Wall Cable box/satellite receiver AUDIO OUT R L VIDEO OUT S VIDEO ANT IN TO TV Audio/video cord (supplied) VCR-DVD recorder : Signal flow LINE 1 IN VIDEO AUDIO to the cable box or satellite receiver...
Hookups and Settings A: Cable box or satellite receiver with a video/audio output With this hookup, you need to match the channel on the recorder (L1) to the input jack connected to LINE 1 IN AUDIO OUT COMPONENT VIDEO OUT S VIDEO OUT LINE 1 IN LINE OUT VIDEO VIDEO VHF/UHF L... cable box or satellite receiver. To watch cable or satellite programs, you can record any channel on . Wall Cable box/satellite receiver AUDIO OUT R L VIDEO OUT S VIDEO ANT IN TO TV Audio/video cord (supplied) VCR-DVD recorder : Signal flow LINE 1 IN VIDEO AUDIO to the cable box or satellite receiver...

Operating Instructions
Page 14
... on the cable box (2ch, 3ch or 4ch). To watch cable channels without a cable box. Wall Cable box ANT IN TO TV Antenna cable (supplied) VCR-DVD recorder AUDIO OUT COMPONENT VIDEO OUT S VIDEO OUT LINE 1 IN LINE OUT VIDEO VIDEO VHF/UHF L Y IN R PB DIGITAL AUDIO OUT PR OPTICAL COAXIAL L... R OUT AUDIO AUDIO VHF/UHF IN OUT to VHF/UHF IN Wall VCR-DVD recorder : Signal flow 14 AUDIO OUT COMPONENT VIDEO OUT S VIDEO OUT LINE 1 IN LINE OUT VIDEO VIDEO VHF/UHF L Y IN R PB DIGITAL AUDIO OUT...
... on the cable box (2ch, 3ch or 4ch). To watch cable channels without a cable box. Wall Cable box ANT IN TO TV Antenna cable (supplied) VCR-DVD recorder AUDIO OUT COMPONENT VIDEO OUT S VIDEO OUT LINE 1 IN LINE OUT VIDEO VIDEO VHF/UHF L Y IN R PB DIGITAL AUDIO OUT PR OPTICAL COAXIAL L... R OUT AUDIO AUDIO VHF/UHF IN OUT to VHF/UHF IN Wall VCR-DVD recorder : Signal flow 14 AUDIO OUT COMPONENT VIDEO OUT S VIDEO OUT LINE 1 IN LINE OUT VIDEO VIDEO VHF/UHF L Y IN R PB DIGITAL AUDIO OUT...
Operating Instructions
Page 15
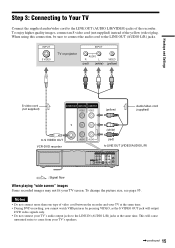
...page 95. To enjoy higher quality images, connect an S video cord (not supplied) instead of the recorder. Hookups and Settings Step 3: Connecting to Your TV Connect the supplied audio/video cord to the LINE...8226; Do not connect more than one type of video cord between the recorder and your TV at the same time. • During DVD recording, you cannot watch VHS pictures by pressing VIDEO, as the S VIDEO OUT...VIDEO OUT LINE 1 IN LINE OUT VIDEO VIDEO (yellow) Audio/video cord (supplied) to S VIDEO OUT VCR-DVD recorder L R AUDIO AUDIO (white) (red) to the LINE OUT (AUDIO L/R) jacks.
...page 95. To enjoy higher quality images, connect an S video cord (not supplied) instead of the recorder. Hookups and Settings Step 3: Connecting to Your TV Connect the supplied audio/video cord to the LINE...8226; Do not connect more than one type of video cord between the recorder and your TV at the same time. • During DVD recording, you cannot watch VHS pictures by pressing VIDEO, as the S VIDEO OUT...VIDEO OUT LINE 1 IN LINE OUT VIDEO VIDEO (yellow) Audio/video cord (supplied) to S VIDEO OUT VCR-DVD recorder L R AUDIO AUDIO (white) (red) to the LINE OUT (AUDIO L/R) jacks.
Operating Instructions
Page 16
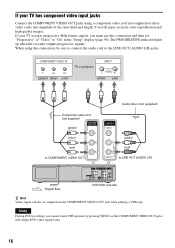
... jacks using this connection and then set "Progressive" of the same kind and length. The PROGRESSIVE indicator lights up when the recorder outputs progressive signals. Note During DVD recording, you must use this connection, be output from the COMPONENT VIDEO OUT jack when playing a VHS tape. COMPONENT VIDEO IN ... S VIDEO OUT LINE 1 IN LINE OUT VIDEO VIDEO VHF/UHF L Y IN R PB DIGITAL AUDIO OUT PR OPTICAL COAXIAL L R OUT AUDIO AUDIO VCR-DVD recorder z Hint Video signal can also be sure to connect the audio cord to "On" in the "Setup" display (page 96). You will output...
... jacks using this connection and then set "Progressive" of the same kind and length. The PROGRESSIVE indicator lights up when the recorder outputs progressive signals. Note During DVD recording, you must use this connection, be output from the COMPONENT VIDEO OUT jack when playing a VHS tape. COMPONENT VIDEO IN ... S VIDEO OUT LINE 1 IN LINE OUT VIDEO VIDEO VHF/UHF L Y IN R PB DIGITAL AUDIO OUT PR OPTICAL COAXIAL L R OUT AUDIO AUDIO VCR-DVD recorder z Hint Video signal can also be sure to connect the audio cord to "On" in the "Setup" display (page 96). You will output...

Operating Instructions
Page 17
AUDIO OUT L R VCR-DVD recorder DIGITAL AUDIO OUT (white) Audio cord (not supplied) (white) (red) (red) A INPUT L AUDIO R to AUDIO OUT (L/R) AV amplifier (receiver) AUDIO OUT COMPONENT VIDEO OUT S VIDEO ... input to coaxial digital input AV amplifier (receiver) with a decoder B [Speakers] Rear (R) Front (R) Subwoofer : Signal flow ,continued 17 This will enable you to listen to DVD audio tracks through your AV amplifier (receiver). Hookups and Settings Step 4: Connecting to Your AV Amplifier (Receiver) Select one of the following patterns A or B, according...
AUDIO OUT L R VCR-DVD recorder DIGITAL AUDIO OUT (white) Audio cord (not supplied) (white) (red) (red) A INPUT L AUDIO R to AUDIO OUT (L/R) AV amplifier (receiver) AUDIO OUT COMPONENT VIDEO OUT S VIDEO ... input to coaxial digital input AV amplifier (receiver) with a decoder B [Speakers] Rear (R) Front (R) Subwoofer : Signal flow ,continued 17 This will enable you to listen to DVD audio tracks through your AV amplifier (receiver). Hookups and Settings Step 4: Connecting to Your AV Amplifier (Receiver) Select one of the following patterns A or B, according...

Operating Instructions
Page 26
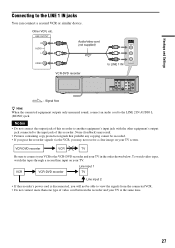
... With a Timer (Synchro Rec)" on the front panel Connect other VCR or similar recording device to the LINE IN jacks of this recorder. Other VCR, etc. If the equipment has an S video jack, you can connect a second DVD player and record DVDs. OUTPUT S VIDEO VIDEO AUDIO L R S video cord (not ...cord (not supplied) S VIDEO LINE 2 IN VIDEO L AUDIO R (MONO) DV IN to LINE 2 IN VCR-DVD recorder : Signal flow Notes • You cannot dub a copy guard DVD VIDEO to this DVD recorder. • Do not connect the yellow LINE IN (VIDEO) jack when using the Synchro Rec function. You ...
... With a Timer (Synchro Rec)" on the front panel Connect other VCR or similar recording device to the LINE IN jacks of this recorder. Other VCR, etc. If the equipment has an S video jack, you can connect a second DVD player and record DVDs. OUTPUT S VIDEO VIDEO AUDIO L R S video cord (not ...cord (not supplied) S VIDEO LINE 2 IN VIDEO L AUDIO R (MONO) DV IN to LINE 2 IN VCR-DVD recorder : Signal flow Notes • You cannot dub a copy guard DVD VIDEO to this DVD recorder. • Do not connect the yellow LINE IN (VIDEO) jack when using the Synchro Rec function. You ...
Operating Instructions
Page 27
...VCR, etc. Line input 1 VCR VCR-DVD recorder TV Line input 2 • If the recorder's power cord is disconnected, you will not be recorded. • If you pass the recorder signals via the VCR, you may not receive a clear image on your TV in the order shown below. VCR-DVD recorder VCR TV Be sure to connect your VCR to the VCR-DVD recorder... and your TV. Notes • Do not connect the output jack of this recorder to another equipment's input jack with the other...
...VCR, etc. Line input 1 VCR VCR-DVD recorder TV Line input 2 • If the recorder's power cord is disconnected, you will not be recorded. • If you pass the recorder signals via the VCR, you may not receive a clear image on your TV in the order shown below. VCR-DVD recorder VCR TV Be sure to connect your VCR to the VCR-DVD recorder... and your TV. Notes • Do not connect the output jack of this recorder to another equipment's input jack with the other...

Operating Instructions
Page 45
... be a possible choice. Note that the disc has enough available space for both the DVD recorder and the VCR. To record only SAP sound, set "Tuner Audio" of VCRs, this recorder on various discs types. Recording mode Like the SP or EP recording mode of "Audio" to the time and picture quality you can free up in the...
... be a possible choice. Note that the disc has enough available space for both the DVD recorder and the VCR. To record only SAP sound, set "Tuner Audio" of VCRs, this recorder on various discs types. Recording mode Like the SP or EP recording mode of "Audio" to the time and picture quality you can free up in the...

Operating Instructions
Page 47
... the VCR, insert a tape, then press H PLAY. To restart recording, press X PAUSE again. 5 Press REC MODE repeatedly to leave it on. Recording continues until the counter appears in the front panel display. Notes • Recording may be erased. Checking the disc status while recording You can set the recorder to record in 30-minute increments. 1 Press DVD to...
... the VCR, insert a tape, then press H PLAY. To restart recording, press X PAUSE again. 5 Press REC MODE repeatedly to leave it on. Recording continues until the counter appears in the front panel display. Notes • Recording may be erased. Checking the disc status while recording You can set the recorder to record in 30-minute increments. 1 Press DVD to...

Operating Instructions
Page 48
... the display. z Hint You can set each timer recording item. Note that TIME/TEXT does not work during a timer recording. This may prevent the accurate recording of a program. Follow the steps below to one month in "DVD Auto Chapter" of 12 programs together with DVD and VCR timer recording, up to set the timer for a single title...
... the display. z Hint You can set each timer recording item. Note that TIME/TEXT does not work during a timer recording. This may prevent the accurate recording of a program. Follow the steps below to one month in "DVD Auto Chapter" of 12 programs together with DVD and VCR timer recording, up to set the timer for a single title...

Operating Instructions
Page 73
... the front panel display. To record on the VCR. The sound will start recording... • This VCR records in EP (×3) mode by this VCR are played back on . Recording a stereo/SAP program The recorder can receive and record stereo/SAP programs. Stereo programs When a stereo program is available for both the DVD recorder and the VCR. To record only SAP sound, set...
... the front panel display. To record on the VCR. The sound will start recording... • This VCR records in EP (×3) mode by this VCR are played back on . Recording a stereo/SAP program The recorder can receive and record stereo/SAP programs. Stereo programs When a stereo program is available for both the DVD recorder and the VCR. To record only SAP sound, set...

Operating Instructions
Page 74
...; If you press z REC. "REC" appears in place. 3 Press CH +/- To pause recording Press X PAUSE. If you want to record. 4 Press REC MODE repeatedly to set the duration. VCR Recording Without the Timer DVD DISPLAY TV/DVD·VIDEO switch VIDEO CH +/- Recording using the INPUT SELECT button. • Tape information displayed on the TV screen will...
...; If you press z REC. "REC" appears in place. 3 Press CH +/- To pause recording Press X PAUSE. If you want to record. 4 Press REC MODE repeatedly to set the duration. VCR Recording Without the Timer DVD DISPLAY TV/DVD·VIDEO switch VIDEO CH +/- Recording using the INPUT SELECT button. • Tape information displayed on the TV screen will...

Operating Instructions
Page 77
...the program is recorded to both the DVD disc and the VHS tape. • You can also turn on page 79. When setting the timer, select "AUTO" in the front panel display. • The recorder automatically turns off To change or cancel timer recording See "Changing or Canceling VCR Timer Settings ... 10:00 Program 2 will be cut . 7:00 8:00 9:00 10:00 Program 1 Notes • To record a cable or satellite program, turn on . Program 2 will be cut off the menu. VCR Recording 6 Press SYSTEM MENU to select "Timer," and select "Timer-Standard." 77 To use the Rec Mode Adjust function...
...the program is recorded to both the DVD disc and the VHS tape. • You can also turn on page 79. When setting the timer, select "AUTO" in the front panel display. • The recorder automatically turns off To change or cancel timer recording See "Changing or Canceling VCR Timer Settings ... 10:00 Program 2 will be cut . 7:00 8:00 9:00 10:00 Program 1 Notes • To record a cable or satellite program, turn on . Program 2 will be cut off the menu. VCR Recording 6 Press SYSTEM MENU to select "Timer," and select "Timer-Standard." 77 To use the Rec Mode Adjust function...

Operating Instructions
Page 106
...is defective. , Check the audio cord connection. The picture rolls vertically during picture search. , Adjust the vertical hold control on a DVD with enough space for the VCR. Select a channel number when recording TV programs; The tape is ejected when z REC is poor. , Adjust the TV antenna. Contents previously... on the TV screen. , Make sure the TV is set to be charged). VCR Recording The channel cannot be erased from the wall outlet for the VCR. Clean the video heads using a Sony video head cleaning cassette. The tape starts playing as soon as it to video input...
...is defective. , Check the audio cord connection. The picture rolls vertically during picture search. , Adjust the vertical hold control on a DVD with enough space for the VCR. Select a channel number when recording TV programs; The tape is ejected when z REC is poor. , Adjust the TV antenna. Contents previously... on the TV screen. , Make sure the TV is set to be charged). VCR Recording The channel cannot be erased from the wall outlet for the VCR. Clean the video heads using a Sony video head cleaning cassette. The tape starts playing as soon as it to video input...

Quick Start Guide
Page 2
...ENTER. Title List(Original) 1/4 No. The Easy Setup display automatically appears on your TV screen when you turn on your recorder for about a minute in the VCR-DVD recorder's front panel display. The channel number appears in place. The Title List menu appears. Title List (Original) 1/4 No.... make a mistake, press RETURN. 1 Turn on your cable box to the VCR-DVD recorder's antenna input jack, select channel 2, 3 or 4, whichever channel is inserted. 4 Press REC. The recorder starts recording. Playback starts. Title 01 CH 23 02 CH 66 03 CH 95 04 CH 97...
...ENTER. Title List(Original) 1/4 No. The Easy Setup display automatically appears on your TV screen when you turn on your recorder for about a minute in the VCR-DVD recorder's front panel display. The channel number appears in place. The Title List menu appears. Title List (Original) 1/4 No.... make a mistake, press RETURN. 1 Turn on your cable box to the VCR-DVD recorder's antenna input jack, select channel 2, 3 or 4, whichever channel is inserted. 4 Press REC. The recorder starts recording. Playback starts. Title 01 CH 23 02 CH 66 03 CH 95 04 CH 97...


