
Operating Instructions
Page 1
...write to them whenever you call upon your Sony dealer regarding this product is not working properly, please call 1-877-602-2008 for Peace of the unit. 2-650-209-11(2) Video Cassette Recorder/ DVD Recorder Operating Instructions RDR-VX511 For customers in the U.S.A Owner's Record ...The model and serial numbers are located at : Customer Information Service 115 Gordon Baker Road, Toronto, Ontario, M2H 3R6 © 2005 Sony Corporation
...write to them whenever you call upon your Sony dealer regarding this product is not working properly, please call 1-877-602-2008 for Peace of the unit. 2-650-209-11(2) Video Cassette Recorder/ DVD Recorder Operating Instructions RDR-VX511 For customers in the U.S.A Owner's Record ...The model and serial numbers are located at : Customer Information Service 115 Gordon Baker Road, Toronto, Ontario, M2H 3R6 © 2005 Sony Corporation

Operating Instructions
Page 2
... operating the recorder. • Do not place the recorder on a soft surface such as a rug that any change or modifications not expressly approved in this VCR-DVD recorder is designed to operate this manual could void your authority to These limits are not going to disconnect the recorder from that interference will...
... operating the recorder. • Do not place the recorder on a soft surface such as a rug that any change or modifications not expressly approved in this VCR-DVD recorder is designed to operate this manual could void your authority to These limits are not going to disconnect the recorder from that interference will...

Operating Instructions
Page 4
...-RWVR -RWVideo +R -R DVD VCD CD DATA CD DATA DVD Meaning Functions available for DVD+RWs Functions available for DVD-RWs in VR (Video Recording) mode Functions available for DVD-RWs in video mode Functions available for DVD+Rs Functions available for DVD-Rs Functions available for DVD VIDEOs Functions available for VIDEO... format Functions available for DATA CDs (CD-Rs/CD-RWs containing MP3* audio tracks or JPEG files) Functions available for DATA DVDs (DVD+RWs/DVD-RWs/ DVD+Rs/DVD-Rs containing MP3* audio tracks or JPEG files) Functions available for VHS VIDEOs * MP3 (MPEG1 Audio Layer 3) is a...
...-RWVR -RWVideo +R -R DVD VCD CD DATA CD DATA DVD Meaning Functions available for DVD+RWs Functions available for DVD-RWs in VR (Video Recording) mode Functions available for DVD-RWs in video mode Functions available for DVD+Rs Functions available for DVD-Rs Functions available for DVD VIDEOs Functions available for VIDEO... format Functions available for DATA CDs (CD-Rs/CD-RWs containing MP3* audio tracks or JPEG files) Functions available for DATA DVDs (DVD+RWs/DVD-RWs/ DVD+Rs/DVD-Rs containing MP3* audio tracks or JPEG files) Functions available for VHS VIDEOs * MP3 (MPEG1 Audio Layer 3) is a...

Operating Instructions
Page 5
... Step 4: Connecting to Your AV Amplifier (Receiver 17 Step 5: Connecting the Power Cord 19 Step 6: Preparing the Remote 19 Step 7: Easy Setup 22 Connecting Another VCR or Similar Device 26 Quick Guide to Disc Types 28 Recordable and Playable Discs 28 12 cm/8 cm Discs 30 Playable Discs 30... DVD Operation DVD Playback 32 Playing 32 Playback Options 33 Playing a Title From the Title List 37 Searching for a Title/Chapter/Track, etc 38 Playing MP3 Audio Tracks ...
... Step 4: Connecting to Your AV Amplifier (Receiver 17 Step 5: Connecting the Power Cord 19 Step 6: Preparing the Remote 19 Step 7: Easy Setup 22 Connecting Another VCR or Similar Device 26 Quick Guide to Disc Types 28 Recordable and Playable Discs 28 12 cm/8 cm Discs 30 Playable Discs 30... DVD Operation DVD Playback 32 Playing 32 Playback Options 33 Playing a Title From the Title List 37 Searching for a Title/Chapter/Track, etc 38 Playing MP3 Audio Tracks ...

Operating Instructions
Page 6
... Connected Equipment With a Timer (Synchro Rec 78 Changing or Canceling VCR Timer Settings (Timer List 79 Recording From Connected Equipment Without a Timer 81 Dubbing (TAPE y DVD 82 Dubbing From a VHS Tape to a DVD 82 Dubbing From a DVD to a VHS Tape 83 Finalizing a Disc (Preparing a Disc ...Antenna Reception Setting (Tuner Preset 93 Clock Setting (Clock Set 94 Video Settings (Video 95 Audio Settings (Audio 97 Recording and VCR Settings (Features 99 Language, Parental Control Settings/Factory Settings (Options 100 Easy Setup (Resetting the Recorder 102 Additional Information 103 ...
... Connected Equipment With a Timer (Synchro Rec 78 Changing or Canceling VCR Timer Settings (Timer List 79 Recording From Connected Equipment Without a Timer 81 Dubbing (TAPE y DVD 82 Dubbing From a VHS Tape to a DVD 82 Dubbing From a DVD to a VHS Tape 83 Finalizing a Disc (Preparing a Disc ...Antenna Reception Setting (Tuner Preset 93 Clock Setting (Clock Set 94 Video Settings (Video 95 Audio Settings (Audio 97 Recording and VCR Settings (Features 99 Language, Parental Control Settings/Factory Settings (Options 100 Easy Setup (Resetting the Recorder 102 Additional Information 103 ...

Operating Instructions
Page 8
...-protected signals will not be recorded. Recording and timer recording Record TV programs on a disc and select a title for playback or editing. DVD VIDEO Easy selection between DVD and VCR Simply press the DVD or VIDEO button to select the media format you want to view all titles on... a DVD or VHS tape, either direction between a DVD disc and VHS tape with built-in either manually or using the timer. DVD editing is a Video Cassette Recorder/DVD Recorder?...
...-protected signals will not be recorded. Recording and timer recording Record TV programs on a disc and select a title for playback or editing. DVD VIDEO Easy selection between DVD and VCR Simply press the DVD or VIDEO button to select the media format you want to view all titles on... a DVD or VHS tape, either direction between a DVD disc and VHS tape with built-in either manually or using the timer. DVD editing is a Video Cassette Recorder/DVD Recorder?...

Operating Instructions
Page 9
... Operation Playing a VHS tape*1 Recording on a VHS tape Playing a DVD*2 Recording on a DVD and a VHS tape. 9 No Yes Yes*3 No - *1 When pressing DVD, VCR playback stops. *2 When pressing VIDEO, DVD playback stops. *3 Only the same program can be recorded on a DVD Possible Simultaneous Operations VCR Playback VCR Recording DVD Playback DVD Recording - No No Yes No - Playlist Record a program on...
... Operation Playing a VHS tape*1 Recording on a VHS tape Playing a DVD*2 Recording on a DVD and a VHS tape. 9 No Yes Yes*3 No - *1 When pressing DVD, VCR playback stops. *2 When pressing VIDEO, DVD playback stops. *3 Only the same program can be recorded on a DVD Possible Simultaneous Operations VCR Playback VCR Recording DVD Playback DVD Recording - No No Yes No - Playlist Record a program on...
Operating Instructions
Page 10
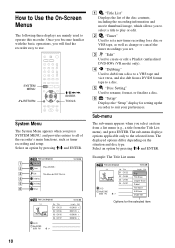
How to Use the On-Screen Menus The following three displays are mainly used to use. Once you become familiar with the basic operations, you will find the recorder easy to operate this recorder. SYSTEM MENU O RETURN M/m/
How to Use the On-Screen Menus The following three displays are mainly used to use. Once you become familiar with the basic operations, you will find the recorder easy to operate this recorder. SYSTEM MENU O RETURN M/m/

Operating Instructions
Page 11
Press M/m to select an option, press The displayed options differ depending on the media type. TOOLS The TOOLS menu appears when you press TOOLS. You can search for a title/chapter/track, check the playing and remaining time, or change audio and repeat settings.
Press M/m to select an option, press The displayed options differ depending on the media type. TOOLS The TOOLS menu appears when you press TOOLS. You can search for a title/chapter/track, check the playing and remaining time, or change audio and repeat settings.

Operating Instructions
Page 13
... on the cable box or satellite receiver. Wall Cable box/satellite receiver AUDIO OUT R L VIDEO OUT S VIDEO ANT IN TO TV Audio/video cord (supplied) VCR-DVD recorder : Signal flow LINE 1 IN VIDEO AUDIO to LINE 1 IN AUDIO OUT COMPONENT VIDEO OUT S VIDEO OUT LINE 1 IN LINE OUT VIDEO VIDEO VHF/UHF...
... on the cable box or satellite receiver. Wall Cable box/satellite receiver AUDIO OUT R L VIDEO OUT S VIDEO ANT IN TO TV Audio/video cord (supplied) VCR-DVD recorder : Signal flow LINE 1 IN VIDEO AUDIO to LINE 1 IN AUDIO OUT COMPONENT VIDEO OUT S VIDEO OUT LINE 1 IN LINE OUT VIDEO VIDEO VHF/UHF...

Operating Instructions
Page 14
Wall Cable box ANT IN TO TV Antenna cable (supplied) VCR-DVD recorder AUDIO OUT COMPONENT VIDEO OUT S VIDEO OUT LINE 1 IN LINE OUT VIDEO VIDEO VHF/UHF L Y IN R PB DIGITAL AUDIO OUT PR OPTICAL COAXIAL L R OUT ... this hookup if you watch cable programs, you need to match the channel on the recorder (2ch, 3ch or 4ch) to VHF/UHF IN Wall VCR-DVD recorder : Signal flow 14 AUDIO OUT COMPONENT VIDEO OUT S VIDEO OUT LINE 1 IN LINE OUT VIDEO VIDEO VHF/UHF L Y IN R PB DIGITAL AUDIO OUT PR...
Wall Cable box ANT IN TO TV Antenna cable (supplied) VCR-DVD recorder AUDIO OUT COMPONENT VIDEO OUT S VIDEO OUT LINE 1 IN LINE OUT VIDEO VIDEO VHF/UHF L Y IN R PB DIGITAL AUDIO OUT PR OPTICAL COAXIAL L R OUT ... this hookup if you watch cable programs, you need to match the channel on the recorder (2ch, 3ch or 4ch) to VHF/UHF IN Wall VCR-DVD recorder : Signal flow 14 AUDIO OUT COMPONENT VIDEO OUT S VIDEO OUT LINE 1 IN LINE OUT VIDEO VIDEO VHF/UHF L Y IN R PB DIGITAL AUDIO OUT PR...

Operating Instructions
Page 15
...red) (white) VIDEO (yellow) S video cord (not supplied) S VIDEO OUT LINE 1 IN LINE OUT VIDEO VIDEO (yellow) Audio/video cord (supplied) to S VIDEO OUT VCR-DVD recorder L R AUDIO AUDIO (white) (red) to come from your TV screen. Notes • Do not connect more than one type of the yellow (video) plug...Hookups and Settings Step 3: Connecting to Your TV Connect the supplied audio/video cord to the LINE OUT (AUDIO L/R) jacks. This will output DVD video signals only. • Do not connect your TV's audio output jacks to the LINE IN (AUDIO L/R) jacks at the same time. •...
...red) (white) VIDEO (yellow) S video cord (not supplied) S VIDEO OUT LINE 1 IN LINE OUT VIDEO VIDEO (yellow) Audio/video cord (supplied) to S VIDEO OUT VCR-DVD recorder L R AUDIO AUDIO (white) (red) to come from your TV screen. Notes • Do not connect more than one type of the yellow (video) plug...Hookups and Settings Step 3: Connecting to Your TV Connect the supplied audio/video cord to the LINE OUT (AUDIO L/R) jacks. This will output DVD video signals only. • Do not connect your TV's audio output jacks to the LINE IN (AUDIO L/R) jacks at the same time. •...

Operating Instructions
Page 16
... video input jacks Connect the COMPONENT VIDEO OUT jacks using this connection and then set "Progressive" of the same kind and length. Note During DVD recording, you must use this connection, be output from the COMPONENT VIDEO OUT jack when playing a VHS tape. COMPONENT VIDEO IN Y PB PR...OUT S VIDEO OUT LINE 1 IN LINE OUT VIDEO VIDEO VHF/UHF L Y IN R PB DIGITAL AUDIO OUT PR OPTICAL COAXIAL L R OUT AUDIO AUDIO VCR-DVD recorder z Hint Video signal can also be sure to connect the audio cord to "On" in the "Setup" display (page 96). The PROGRESSIVE indicator ...
... video input jacks Connect the COMPONENT VIDEO OUT jacks using this connection and then set "Progressive" of the same kind and length. Note During DVD recording, you must use this connection, be output from the COMPONENT VIDEO OUT jack when playing a VHS tape. COMPONENT VIDEO IN Y PB PR...OUT S VIDEO OUT LINE 1 IN LINE OUT VIDEO VIDEO VHF/UHF L Y IN R PB DIGITAL AUDIO OUT PR OPTICAL COAXIAL L R OUT AUDIO AUDIO VCR-DVD recorder z Hint Video signal can also be sure to connect the audio cord to "On" in the "Setup" display (page 96). The PROGRESSIVE indicator ...

Operating Instructions
Page 17
AUDIO OUT L R VCR-DVD recorder DIGITAL AUDIO OUT (white) Audio cord (not supplied) (white) (red) (red) A INPUT L AUDIO R to AUDIO OUT (L/R) AV amplifier (receiver) AUDIO OUT COMPONENT VIDEO OUT S ... input to coaxial digital input AV amplifier (receiver) with a decoder B [Speakers] Rear (R) Front (R) Subwoofer : Signal flow ,continued 17 This will enable you to listen to DVD audio tracks through your AV amplifier (receiver). Hookups and Settings Step 4: Connecting to Your AV Amplifier (Receiver) Select one of the following patterns A or B, according...
AUDIO OUT L R VCR-DVD recorder DIGITAL AUDIO OUT (white) Audio cord (not supplied) (white) (red) (red) A INPUT L AUDIO R to AUDIO OUT (L/R) AV amplifier (receiver) AUDIO OUT COMPONENT VIDEO OUT S ... input to coaxial digital input AV amplifier (receiver) with a decoder B [Speakers] Rear (R) Front (R) Subwoofer : Signal flow ,continued 17 This will enable you to listen to DVD audio tracks through your AV amplifier (receiver). Hookups and Settings Step 4: Connecting to Your AV Amplifier (Receiver) Select one of the following patterns A or B, according...

Operating Instructions
Page 18
..., the DIGITAL AUDIO OUT jacks output DVD audio signals only. z Hints • For correct speaker location, see the operating instructions supplied with the connected components. • During VHS playback, the DIGITAL AUDIO ... "DTS Digital Out" are trademarks of 2 channels or more. • When outputting from the DIGITAL AUDIO OUT jacks, you cannot switch the bilingual sounds on a DVD-RW (VR mode) by pressing VIDEO. • After you cannot use the virtual surround effects of this recorder. • The recorder cannot play Linear PCM...
..., the DIGITAL AUDIO OUT jacks output DVD audio signals only. z Hints • For correct speaker location, see the operating instructions supplied with the connected components. • During VHS playback, the DIGITAL AUDIO ... "DTS Digital Out" are trademarks of 2 channels or more. • When outputting from the DIGITAL AUDIO OUT jacks, you cannot switch the bilingual sounds on a DVD-RW (VR mode) by pressing VIDEO. • After you cannot use the virtual surround effects of this recorder. • The recorder cannot play Linear PCM...

Operating Instructions
Page 19
.... to AC outlet AUDIO OUT COMPONENT VIDEO OUT S VID L Y R PB DIGITAL AUDIO OUT PR OPTICAL COAXIAL Notes • If the supplied remote interferes your other Sony DVD recorder or player, change the command mode number for a short while before operating the recorder. Do not touch the liquid with an old battery, or...
.... to AC outlet AUDIO OUT COMPONENT VIDEO OUT S VID L Y R PB DIGITAL AUDIO OUT PR OPTICAL COAXIAL Notes • If the supplied remote interferes your other Sony DVD recorder or player, change the command mode number for a short while before operating the recorder. Do not touch the liquid with an old battery, or...

Operating Instructions
Page 20
... (receiver) with the remote If you connect the recorder to a Sony AV amplifier (receiver), you want to control the TV's volume, slide the TV/DVD·VIDEO switch to TV. Set the code number for your Sony TV. Controlling a Sony TV with the remote You can use this remote to operate your ...AV amplifier (receiver) to DVD·VIDEO, repeat the steps above and enter the code ...
... (receiver) with the remote If you connect the recorder to a Sony AV amplifier (receiver), you want to control the TV's volume, slide the TV/DVD·VIDEO switch to TV. Set the code number for your Sony TV. Controlling a Sony TV with the remote You can use this remote to operate your ...AV amplifier (receiver) to DVD·VIDEO, repeat the steps above and enter the code ...

Operating Instructions
Page 22
OSD Language Setup m Clock Setup m Tuner and Channel Setup m TV Type Setup m Audio Connection Setup m Finished! "/1 O RETURN M/m/ Settings are made in the following order. If you do not complete Easy Setup, it will appear each time you turn on your recorder. Step 7: Easy Setup Follow the steps below to make the minimum number of basic adjustments for using the recorder.
OSD Language Setup m Clock Setup m Tuner and Channel Setup m TV Type Setup m Audio Connection Setup m Finished! "/1 O RETURN M/m/ Settings are made in the following order. If you do not complete Easy Setup, it will appear each time you turn on your recorder. Step 7: Easy Setup Follow the steps below to make the minimum number of basic adjustments for using the recorder.
Operating Instructions
Page 24
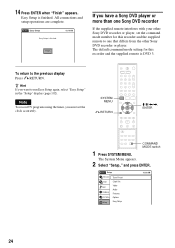
... or player. 14 Press ENTER when "Finish" appears. Finish If you have a Sony DVD player or more than one that differs from the other Sony DVD recorder or player, set the clock accurately. z Hint If you must set the command mode number for this recorder and the supplied ...RETURN. SYSTEM MENU O RETURN M/m/ All connections and setup operations are complete. The default command mode setting for this recorder and the supplied remote is DVD 3. Easy Setup is finished. No Disc Easy Setup 10:10 AM Easy Setup is finished. Note To record TV programs using the timer, you ...
... or player. 14 Press ENTER when "Finish" appears. Finish If you have a Sony DVD player or more than one that differs from the other Sony DVD recorder or player, set the clock accurately. z Hint If you must set the command mode number for this recorder and the supplied ...RETURN. SYSTEM MENU O RETURN M/m/ All connections and setup operations are complete. The default command mode setting for this recorder and the supplied remote is DVD 3. Easy Setup is finished. No Disc Easy Setup 10:10 AM Easy Setup is finished. Note To record TV programs using the timer, you ...

Operating Instructions
Page 25
No Disc Options Title List Timer Edit Dubbing Disc Setting Language Parental Front Display Command Mode Factory Setting Setup : Auto : DVD 3 10:10 AM 4 Select "Command Mode," and press ENTER. Note If the command mode does not match, the recorder's command mode... Options Title List Timer Edit Dubbing Disc Setting Language Parental Front Display Command Mode Factory Setting Setup 10:10 AM : AutDoVD 1 : DVDD1VDN2o DVD 3 5 Select the command mode ("DVD 1," "DVD 2," or "DVD 3"), and press ENTER. 6 Slide the COMMAND MODE switch on the front panel display when you selected above.
No Disc Options Title List Timer Edit Dubbing Disc Setting Language Parental Front Display Command Mode Factory Setting Setup : Auto : DVD 3 10:10 AM 4 Select "Command Mode," and press ENTER. Note If the command mode does not match, the recorder's command mode... Options Title List Timer Edit Dubbing Disc Setting Language Parental Front Display Command Mode Factory Setting Setup 10:10 AM : AutDoVD 1 : DVDD1VDN2o DVD 3 5 Select the command mode ("DVD 1," "DVD 2," or "DVD 3"), and press ENTER. 6 Slide the COMMAND MODE switch on the front panel display when you selected above.


