
Limited Warranty (CD/DVD Player)
Page 1
... not available from the date of purchase, if this Product (including any accessories) against defects in the United States. 3-977-330-13 ® CD/DVD Player LIMITED WARRANTY Sony Electronics Inc. ("Sony") warrants this Product is within 90 days of the date of protection, to you. LABOR: For a period of one (1) year. Some states...
... not available from the date of purchase, if this Product (including any accessories) against defects in the United States. 3-977-330-13 ® CD/DVD Player LIMITED WARRANTY Sony Electronics Inc. ("Sony") warrants this Product is within 90 days of the date of protection, to you. LABOR: For a period of one (1) year. Some states...
Operating Instructions (primary manual)
Page 3
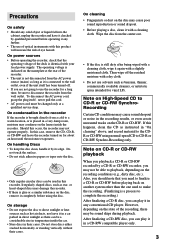
... into the cabinet, unplug the recorder and have it checked by qualified personnel before operating it any conventional CD player. The operating voltage is indicated on the state of the deck is identical with your local power supply. Should this recorder. On storage • Do ...discs may cause sound dropout or noise in temperature inside the recorder. On power sources • Before operating the recorder, check that you may not operate properly. Irregularly shaped discs, such as instructed in a CD-RW compatible player only. 3 Do not store discs either stacked horizontally or...
... into the cabinet, unplug the recorder and have it checked by qualified personnel before operating it any conventional CD player. The operating voltage is indicated on the state of the deck is identical with your local power supply. Should this recorder. On storage • Do ...discs may cause sound dropout or noise in temperature inside the recorder. On power sources • Before operating the recorder, check that you may not operate properly. Irregularly shaped discs, such as instructed in a CD-RW compatible player only. 3 Do not store discs either stacked horizontally or...
Operating Instructions (primary manual)
Page 4
Contents Getting Started Unpacking 5 Hooking Up the System 5 This Recorder Can Use the Following Discs 6 Basic Operations Playing a CD 7 Using the display 8 Locating a Specific Track 10 Locating a Particular Point in a Track 11 Playing Tracks Repeatedly (Repeat Play ... Play 14 Recording on CDR Recording a CD to CD-R or CD-RW disc 15 Recording a CD to CD-R or CD-RW disc at High Speed .......... 16 Recording on a CD-R or CD-RW disc Manually 18 Finalizing a CD-R or CD-RW disc ..... 20 Unfinalizing a CD-RW disc 21 Erasing a single track of CD-RW disc 22 Erasing an Entire CD-RW disc ...
Contents Getting Started Unpacking 5 Hooking Up the System 5 This Recorder Can Use the Following Discs 6 Basic Operations Playing a CD 7 Using the display 8 Locating a Specific Track 10 Locating a Particular Point in a Track 11 Playing Tracks Repeatedly (Repeat Play ... Play 14 Recording on CDR Recording a CD to CD-R or CD-RW disc 15 Recording a CD to CD-R or CD-RW disc at High Speed .......... 16 Recording on a CD-R or CD-RW disc Manually 18 Finalizing a CD-R or CD-RW disc ..... 20 Unfinalizing a CD-RW disc 21 Erasing a single track of CD-RW disc 22 Erasing an Entire CD-RW disc ...
Operating Instructions (primary manual)
Page 5
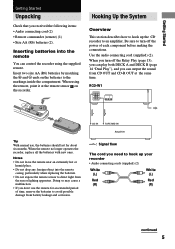
...and corrosion. Doing so may cause a malfunction. • If you need to hook up the CD recorder to direct light from CD OUT and CD-R OUT at the remote sensor on the batteries to hook up your recorder • Audio connecting cords (supplied) (2) White (L) White (L) Red Red (R) (R) continued 5... remote no longer operates the recorder, replace all the batteries with new ones. CD IN TAPE/MD IN Amplifier l: Signal flow The cord you don't use , the batteries should last for an extended period of each component before making the connections. RCD-W1 Tip With normal use the ...
...and corrosion. Doing so may cause a malfunction. • If you need to hook up the CD recorder to direct light from CD OUT and CD-R OUT at the remote sensor on the batteries to hook up your recorder • Audio connecting cords (supplied) (2) White (L) White (L) Red Red (R) (R) continued 5... remote no longer operates the recorder, replace all the batteries with new ones. CD IN TAPE/MD IN Amplifier l: Signal flow The cord you don't use , the batteries should last for an extended period of each component before making the connections. RCD-W1 Tip With normal use the ...
Operating Instructions (primary manual)
Page 6
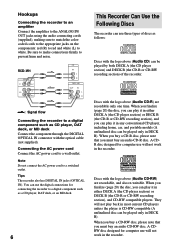
... power cord Connect the AC power cord to a switched outlet. RCD-W1 ANALOG RL CD OUT IN CDR OUT CD IN L R TAPE / MD OUT IN L R l: Signal flow Connecting the recorder to a digital component such as a CD player, DAT deck, or an MD deck. 6 This Recorder Can Use the Following Discs The recorder can use the digital connections for connecting the...
... power cord Connect the AC power cord to a switched outlet. RCD-W1 ANALOG RL CD OUT IN CDR OUT CD IN L R TAPE / MD OUT IN L R l: Signal flow Connecting the recorder to a digital component such as a CD player, DAT deck, or an MD deck. 6 This Recorder Can Use the Following Discs The recorder can use the digital connections for connecting the...
Operating Instructions (primary manual)
Page 7
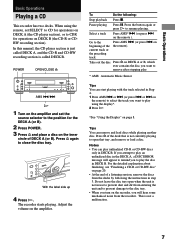
...page 8. Pause playing Press X. Go to CDR for operations on page 20. • At the end of DECK A (or B). Notes • You can play using the remote, set the source selector to open when the unit is called DECK A, and the CD-R and CD-RW recording section is not in Step 4. 1 Press... AMS . This is not currently playing to the position for operations on DECK A (the CD player section), or to the beginning of the deck that tray, and remove or...
...page 8. Pause playing Press X. Go to CDR for operations on page 20. • At the end of DECK A (or B). Notes • You can play using the remote, set the source selector to open when the unit is called DECK A, and the CD-R and CD-RW recording section is not in Step 4. 1 Press... AMS . This is not currently playing to the position for operations on DECK A (the CD player section), or to the beginning of the deck that tray, and remove or...
Operating Instructions (primary manual)
Page 8
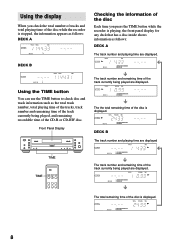
... B The track number and playing time are displayed TIME TIME The track number and remaining time of the track currently being played, and remaining recordable time of the CD-R or CD-RW disc. Using the display When you check the total number of tracks and total playing time of the disc while the... recorder is stopped, the information appears as follows: DECK A Checking the information of the disc Each time you press the TIME button while the recorder is playing...
... B The track number and playing time are displayed TIME TIME The track number and remaining time of the track currently being played, and remaining recordable time of the CD-R or CD-RW disc. Using the display When you check the total number of tracks and total playing time of the disc while the... recorder is stopped, the information appears as follows: DECK A Checking the information of the disc Each time you press the TIME button while the recorder is playing...
Operating Instructions (primary manual)
Page 9
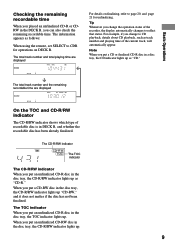
... B. When you put an unfinalized CD-R disc in DECK B, and whether the recordable disc has been already finalized. Note When you put an unfinalized CD-R disc in the disc tray, the CD-R/RW indicator lights up . The CD-R/RW indicator The TOC indicator The CD-R/RW indicator When you change to CDR for unfinalizing. The information appears...
... B. When you put an unfinalized CD-R disc in DECK B, and whether the recordable disc has been already finalized. Note When you put an unfinalized CD-R disc in the disc tray, the CD-R/RW indicator lights up . The CD-R/RW indicator The TOC indicator The CD-R/RW indicator When you change to CDR for unfinalizing. The information appears...

Operating Instructions (primary manual)
Page 10
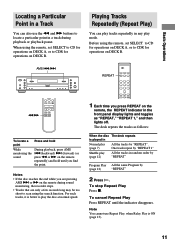
... you press 1 (or 2 ,etc.), "1--" appears on the deck, . A specific track Press the number button(s) on the directly remote to CDR for operations on DECK B. When using the remote, set SELECT to CD for operations on DECK A, or to enter the track number. * AMS: Automatic Music Sensor Tips To pause playing at the...
... you press 1 (or 2 ,etc.), "1--" appears on the deck, . A specific track Press the number button(s) on the directly remote to CDR for operations on DECK B. When using the remote, set SELECT to CD for operations on DECK A, or to enter the track number. * AMS: Automatic Music Sensor Tips To pause playing at the...
Operating Instructions (primary manual)
Page 11
...tracks in Normal play mode. When using the remote, set SELECT to CD for operations on DECK A, or to CDR for operations on DECK B. Before using the remote, set SELECT to CD for operations on DECK A, or to CDR for operations on the remote, the REPEAT indicator in the front panel ...display lights and toggles as follows: When the disc The deck repeats is better to play tracks repeatedly in a track during sound monitoring, the recorder stops. • ...
...tracks in Normal play mode. When using the remote, set SELECT to CD for operations on DECK A, or to CDR for operations on DECK B. Before using the remote, set SELECT to CD for operations on DECK A, or to CDR for operations on the remote, the REPEAT indicator in the front panel ...display lights and toggles as follows: When the disc The deck repeats is better to play tracks repeatedly in a track during sound monitoring, the recorder stops. • ...
Operating Instructions (primary manual)
Page 12
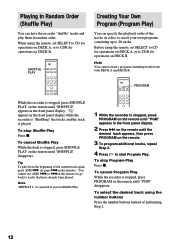
... Program (Program Play) You can have already been played. Before using the remote, set SELECT to CD for operations on DECK B. You cannot use AMS .(or .on the remote) to go back to CDR for operations on DECK A, or to 20 tracks. When using the number buttons Press the number buttons...the beginning of the current track again, press AMS . (or press .on the remote until "SHUFFLE" appears in the front panel display. PROGRAM While the recorder is stopped, press PROGRAM on the remote until "PGM" appears in the front panel display. 2 Press > on the remote until the desired track appears,...
... Program (Program Play) You can have already been played. Before using the remote, set SELECT to CD for operations on DECK B. You cannot use AMS .(or .on the remote) to go back to CDR for operations on DECK A, or to 20 tracks. When using the number buttons Press the number buttons...the beginning of the current track again, press AMS . (or press .on the remote until "SHUFFLE" appears in the front panel display. PROGRAM While the recorder is stopped, press PROGRAM on the remote until "PGM" appears in the front panel display. 2 Press > on the remote until the desired track appears,...
Operating Instructions (primary manual)
Page 13
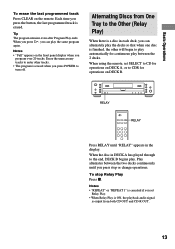
Alternating Discs from both CD OUT and CD-R OUT. 13 Play alternates between the two decks continuously until "RELAY" appears in DECK A...) When there is a disc in each deck, you press stop Relay Play Press x. Each time you set SELECT to CD for operations on DECK B. When you press H, you program over 20 tracks. RELAY RELAY Press RELAY until you can play... display when you can alternately play the decks so that when one disc is erased when you press POWER to CDR for operations on the remote. Basic Operations To erase the last programmed track Press CLEAR on DECK A, or to...
Alternating Discs from both CD OUT and CD-R OUT. 13 Play alternates between the two decks continuously until "RELAY" appears in DECK A...) When there is a disc in each deck, you press stop Relay Play Press x. Each time you set SELECT to CD for operations on DECK B. When you press H, you program over 20 tracks. RELAY RELAY Press RELAY until you can play... display when you can alternately play the decks so that when one disc is erased when you press POWER to CDR for operations on the remote. Basic Operations To erase the last programmed track Press CLEAR on DECK A, or to...
Operating Instructions (primary manual)
Page 14
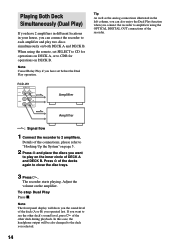
... in the left column, you can connect the recorder to amplifiers using the remote, set before the Dual Play operation. Note The front panel display will be also changed to CDR for operations on DECK B. RCD-W1 ANALOG RL CD OUT IN CDR OUT Amplifier Tip As well as the analog connections... illustrated in your house, you can also enjoy the Dual Play function when you connect the recorder to each amplifier and play on ...
... in the left column, you can connect the recorder to amplifiers using the remote, set before the Dual Play operation. Note The front panel display will be also changed to CDR for operations on DECK B. RCD-W1 ANALOG RL CD OUT IN CDR OUT Amplifier Tip As well as the analog connections... illustrated in your house, you can also enjoy the Dual Play function when you connect the recorder to each amplifier and play on ...
Operating Instructions (primary manual)
Page 15
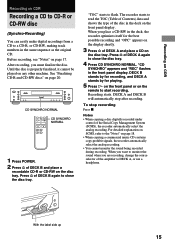
... is properly finalized, it cannot be played on CDR Recording a CD to CD-R or CD-RW disc (Synchro-Recording) You can easily make digital recordings from a CD to a CD-R, or CD-RW, making track numbers in the deck, the recorder optimizes itself for playing. 5 Press H on the front panel or on page 17. The recorder starts to the "Notes" on page 20...
... is properly finalized, it cannot be played on CDR Recording a CD to CD-R or CD-RW disc (Synchro-Recording) You can easily make digital recordings from a CD to a CD-R, or CD-RW, making track numbers in the deck, the recorder optimizes itself for playing. 5 Press H on the front panel or on page 17. The recorder starts to the "Notes" on page 20...
Operating Instructions (primary manual)
Page 16
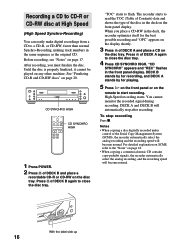
... to close the disc tray. You cannot monitor the recorded signal during recording. After recording, you place a CD-RW in the same sequence as the original CD. DECK B stands by for recording, and DECK A stands by for the best possible recording and "OPC" appears on the display shortly. 3.... Press A of DECK B and place a recordable CD-R or CD-RW on page 17. High-Speed recording starts. Recording a CD to CD-R or CD-RW disc at High Speed (High Speed Synchro-Recording) You can easily make digital recordings from a CD to flash. The recorder starts to read the TOC (Table of Contents...
... to close the disc tray. You cannot monitor the recorded signal during recording. After recording, you place a CD-RW in the same sequence as the original CD. DECK B stands by for recording, and DECK A stands by for the best possible recording and "OPC" appears on the display shortly. 3.... Press A of DECK B and place a recordable CD-R or CD-RW on page 17. High-Speed recording starts. Recording a CD to CD-R or CD-RW disc at High Speed (High Speed Synchro-Recording) You can easily make digital recordings from a CD to flash. The recorder starts to read the TOC (Table of Contents...
Operating Instructions (primary manual)
Page 17
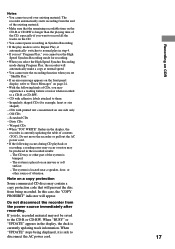
...disconnect the AC power cord. 17 Dirty CDs - The system is set to Repeat Play, it is bumped. - Recording on one side only - Old CDs - The recorder automatically starts recording from the end of vibration. Scratched CDs - The CD tray or other source of the existing... material. • Make sure that will appear. CD with printed text concentrated on CDR Notes • You cannot record ...
...disconnect the AC power cord. 17 Dirty CDs - The system is set to Repeat Play, it is bumped. - Recording on one side only - Old CDs - The recorder automatically starts recording from the end of vibration. Scratched CDs - The CD tray or other source of the existing... material. • Make sure that will appear. CD with printed text concentrated on CDR Notes • You cannot record ...
Operating Instructions (primary manual)
Page 18
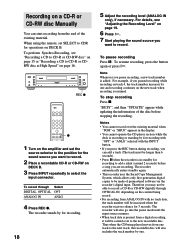
...SHUF" appears in the display. • You cannot operate the CD player section while the deck is recording or standing by one and recording continues on DECK B. 3 Press INPUT repeatedly to the new recordable disc. Notes • You cannot record over to select the input connector. REC z z 1 Turn...first-generation digital copies to add a silent (around 2 seconds) before stopping the recording. The recorder stands by one. Note Whenever you want to CDR for 3 seconds. To stop recording Press x. The recorder will also go into the pause mode until the input source resumes. • ...
...SHUF" appears in the display. • You cannot operate the CD player section while the deck is recording or standing by one and recording continues on DECK B. 3 Press INPUT repeatedly to the new recordable disc. Notes • You cannot record over to select the input connector. REC z z 1 Turn...first-generation digital copies to add a silent (around 2 seconds) before stopping the recording. The recorder stands by one. Note Whenever you want to CDR for 3 seconds. To stop recording Press x. The recorder will also go into the pause mode until the input source resumes. • ...
Operating Instructions (primary manual)
Page 19
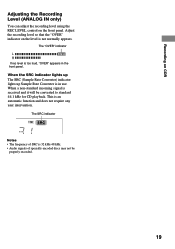
...48 kHz. • Audio signals of SRC is received and it will be properly recorded. 19 The SRC indicator Notes • The frequency of specially encoded discs may not be converted to standard 44.1 kHz for CD playback. When the SRC indicator lights up The SRC (Sample Rate Converter) indicator ... so that the "OVER" indicator on the front panel. This is too loud, "OVER" appears in use. Recording on CDR Adjusting the Recording Level (ANALOG IN only) You can adjust the recording level using the REC LEVEL control on the level is in the front panel. The "OVER" indicator If rec level...
...48 kHz. • Audio signals of SRC is received and it will be properly recorded. 19 The SRC indicator Notes • The frequency of specially encoded discs may not be converted to standard 44.1 kHz for CD playback. When the SRC indicator lights up The SRC (Sample Rate Converter) indicator ... so that the "OVER" indicator on the front panel. This is too loud, "OVER" appears in use. Recording on CDR Adjusting the Recording Level (ANALOG IN only) You can adjust the recording level using the REC LEVEL control on the level is in the front panel. The "OVER" indicator If rec level...
Operating Instructions (primary manual)
Page 20
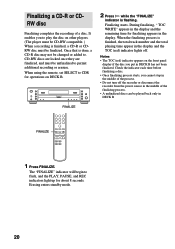
... erasure. When the finalizing process is done, a CD-R disc may not be unfinalized to CDR for operations on the front panel display if the disc you to play the disc on other players. (The player must be finalized. Finalizing starts. Finalizing a CD-R or CDRW disc Finalizing completes the recording of the finalizing process. • A unfinalized discs...
... erasure. When the finalizing process is done, a CD-R disc may not be unfinalized to CDR for operations on the front panel display if the disc you to play the disc on other players. (The player must be finalized. Finalizing starts. Finalizing a CD-R or CDRW disc Finalizing completes the recording of the finalizing process. • A unfinalized discs...
Operating Instructions (primary manual)
Page 21
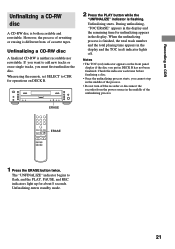
... CDR for unfinalizing appears in the display. If you want to add new tracks or erase single tracks, you cannot stop in the middle of cassette tapes. Unfinalizing starts. Unfinalizing a CD-RW disc A finalized CD-RW is different from the power source in the middle of rewriting or erasing is neither recordable nor rewritable. Recording...
... CDR for unfinalizing appears in the display. If you want to add new tracks or erase single tracks, you cannot stop in the middle of cassette tapes. Unfinalizing starts. Unfinalizing a CD-RW disc A finalized CD-RW is different from the power source in the middle of rewriting or erasing is neither recordable nor rewritable. Recording...


