
Operating Instructions (primary manual)
Page 3
... a CD-RW compatible player only. 3 If this case, remove the CD, CD-R, or CD-RW and leave the recorder turned on the disc, remove it in "On cleaning" above, and record material to disconnect the recorder from the AC power source (mains) as long as hot air ducts, nor leave it by a CD-R or CD-RW recorder, you playback a CD-R or CD-RW recorded by...
... a CD-RW compatible player only. 3 If this case, remove the CD, CD-R, or CD-RW and leave the recorder turned on the disc, remove it in "On cleaning" above, and record material to disconnect the recorder from the AC power source (mains) as long as hot air ducts, nor leave it by a CD-R or CD-RW recorder, you playback a CD-R or CD-RW recorded by...
Operating Instructions (primary manual)
Page 4
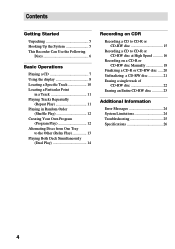
... 13 Playing Both Deck Simultaneously (Dual Play 14 Recording on CDR Recording a CD to CD-R or CD-RW disc 15 Recording a CD to CD-R or CD-RW disc at High Speed .......... 16 Recording on a CD-R or CD-RW disc Manually 18 Finalizing a CD-R or CD-RW disc ..... 20 Unfinalizing a CD-RW disc 21 Erasing a single track of CD-RW disc 22 Erasing an Entire CD-RW disc 23 Additional Information Error Messages 24 System Limitations...
... 13 Playing Both Deck Simultaneously (Dual Play 14 Recording on CDR Recording a CD to CD-R or CD-RW disc 15 Recording a CD to CD-R or CD-RW disc at High Speed .......... 16 Recording on a CD-R or CD-RW disc Manually 18 Finalizing a CD-R or CD-RW disc ..... 20 Unfinalizing a CD-RW disc 21 Erasing a single track of CD-RW disc 22 Erasing an Entire CD-RW disc 23 Additional Information Error Messages 24 System Limitations...
Operating Instructions (primary manual)
Page 6
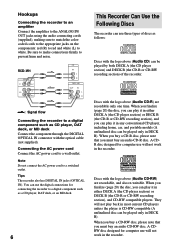
... (not supplied). RCD-W1 ANALOG RL CD OUT IN CDR OUT CD IN L R TAPE / MD OUT IN L R l: Signal flow Connecting the recorder to a digital component such as a CD player, DAT deck, or an MD deck. 6 This Recorder Can Use the Following Discs The recorder can be played only in either DECK A (the CD player section) or DECK B (the CD-R or CD-RW recording section), and you...
... (not supplied). RCD-W1 ANALOG RL CD OUT IN CDR OUT CD IN L R TAPE / MD OUT IN L R l: Signal flow Connecting the recorder to a digital component such as a CD player, DAT deck, or an MD deck. 6 This Recorder Can Use the Following Discs The recorder can be played only in either DECK A (the CD player section) or DECK B (the CD-R or CD-RW recording section), and you...
Operating Instructions (primary manual)
Page 7
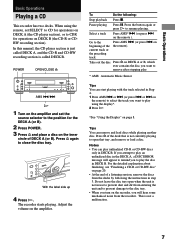
... ./> H 1 Turn on the amplifier and set SELECT to CD for operations on DECK A (the CD player section), or to the beginning of the deck that tray, and remove or load a disc. The recorder starts playing. Notes • You can remove and load discs while playing another disc. Go to CDR for the DECK A (or B). 2 Press POWER. 3 Press A and...
... ./> H 1 Turn on the amplifier and set SELECT to CD for operations on DECK A (the CD player section), or to the beginning of the deck that tray, and remove or load a disc. The recorder starts playing. Notes • You can remove and load discs while playing another disc. Go to CDR for the DECK A (or B). 2 Press POWER. 3 Press A and...
Operating Instructions (primary manual)
Page 8
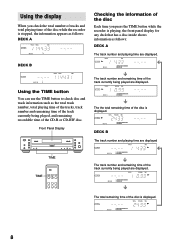
... track number and remaining time of the track currently being played, and remaining recordable time of the CD-R or CD-RW disc. Using the display When you check the total number of tracks and total playing time of the disc while the recorder is stopped, the information appears as follows: DECK A Checking the information of the...
... track number and remaining time of the track currently being played, and remaining recordable time of the CD-R or CD-RW disc. Using the display When you check the total number of tracks and total playing time of the disc while the recorder is stopped, the information appears as follows: DECK A Checking the information of the...
Operating Instructions (primary manual)
Page 9
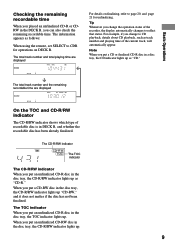
... 21 for unfinalizing. When you put a CD or finalized CD-R disc in the disc tray, the CD-R/RW indicator lights up as follows: When using the remote, set SELECT to CDR for operations on finalizing, refer to CD playback, details about CD playback, such as "CD." The total track number and the remaining recordable time are displayed For details on...
... 21 for unfinalizing. When you put a CD or finalized CD-R disc in the disc tray, the CD-R/RW indicator lights up as follows: When using the remote, set SELECT to CDR for operations on finalizing, refer to CD playback, details about CD playback, such as "CD." The total track number and the remaining recordable time are displayed For details on...
Operating Instructions (primary manual)
Page 11
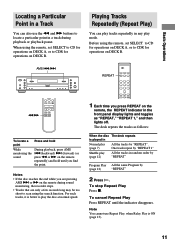
...pause. Note You cannot use the m and M buttons to play the disc at normal speed. 1 Each time you find the point. Before using the remote, set SELECT to CD for operations on DECK A, or to CDR for operations on the remote repeatedly) and hold While monitoring the sound ...panel display lights and toggles as follows: When the disc The deck repeats is better to locate a particular point in a track during sound monitoring, the recorder stops. • Tracks that are only a few seconds long may be too short to CDR for operations on DECK B. Basic Operations Locating a Particular...
...pause. Note You cannot use the m and M buttons to play the disc at normal speed. 1 Each time you find the point. Before using the remote, set SELECT to CD for operations on DECK A, or to CDR for operations on the remote repeatedly) and hold While monitoring the sound ...panel display lights and toggles as follows: When the disc The deck repeats is better to locate a particular point in a track during sound monitoring, the recorder stops. • Tracks that are only a few seconds long may be too short to CDR for operations on DECK B. Basic Operations Locating a Particular...
Operating Instructions (primary manual)
Page 12
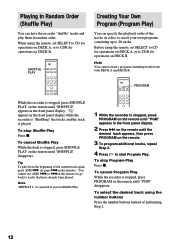
... panel display. To select the desired track using the remote, set SELECT to CD for operations on DECK A, or to CDR for operations on DECK B. When using the remote, set SELECT to CD for operations on DECK A, or to CDR for operations on DECK B. Note You cannot create a program containing tracks from...Random Order (Shuffle Play) You can specify the playback order of the tracks on a disc to create your own programs containing up to 20 tracks. Tip To play them in the front panel display while the recorder is "Shuffling" the tracks, and the track is stopped, press SHUFFLE PLAY on ...
... panel display. To select the desired track using the remote, set SELECT to CD for operations on DECK A, or to CDR for operations on DECK B. When using the remote, set SELECT to CD for operations on DECK A, or to CDR for operations on DECK B. Note You cannot create a program containing tracks from...Random Order (Shuffle Play) You can specify the playback order of the tracks on a disc to create your own programs containing up to 20 tracks. Tip To play them in the front panel display while the recorder is "Shuffling" the tracks, and the track is stopped, press SHUFFLE PLAY on ...
Operating Instructions (primary manual)
Page 14
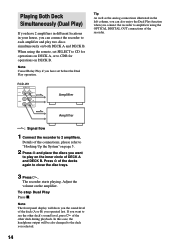
...Adjust the volume on both DECK A and DECK B. RCD-W1 ANALOG RL CD OUT IN CDR OUT Amplifier Tip As well as the analog connections illustrated in your house, you can also enjoy the Dual Play function when you connect the recorder to amplifiers using the remote, set before the Dual Play...on DECK B. To stop Dual Play Press x. When using the OPTICAL DIGITAL OUT connections of the decks again to play two discs simultaneously on the amplifier. Press A of the recorder. Details of the deck (A or B) you want to 2 amplifiers. In this case, the headphone output will show you ...
...Adjust the volume on both DECK A and DECK B. RCD-W1 ANALOG RL CD OUT IN CDR OUT Amplifier Tip As well as the analog connections illustrated in your house, you can also enjoy the Dual Play function when you connect the recorder to amplifiers using the remote, set before the Dual Play...on DECK B. To stop Dual Play Press x. When using the OPTICAL DIGITAL OUT connections of the decks again to play two discs simultaneously on the amplifier. Press A of the recorder. Details of the deck (A or B) you want to 2 amplifiers. In this case, the headphone output will show you ...
Operating Instructions (primary manual)
Page 15
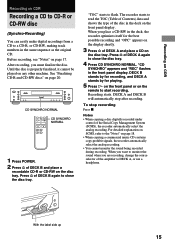
Recording on CDR Recording on CDR Recording a CD to CD-R or CD-RW disc (Synchro-Recording) You can easily make digital recordings from a CD to flash. The recorder starts to read the TOC (Table of Contents) data and shows the type of DECK A again to DECK A, or use a headphone. Press A of the disc in the same sequence as the original CD. Recording starts. With the label side...
Recording on CDR Recording on CDR Recording a CD to CD-R or CD-RW disc (Synchro-Recording) You can easily make digital recordings from a CD to flash. The recorder starts to read the TOC (Table of Contents) data and shows the type of DECK A again to DECK A, or use a headphone. Press A of the disc in the same sequence as the original CD. Recording starts. With the label side...
Operating Instructions (primary manual)
Page 16
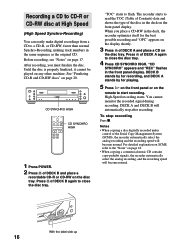
... to close the disc tray. The recorder starts to a CD-R, or CD-RW, faster than normal Synchro-Recording, making track numbers in the same sequence as the original CD. High-Speed recording starts. You cannot monitor the recorded signal during recording. Recording a CD to CD-R or CD-RW disc at High Speed (High Speed Synchro-Recording) You can easily make digital recordings from a CD to read the...
... to close the disc tray. The recorder starts to a CD-R, or CD-RW, faster than normal Synchro-Recording, making track numbers in the same sequence as the original CD. High-Speed recording starts. You cannot monitor the recorded signal during recording. Recording a CD to CD-R or CD-RW disc at High Speed (High Speed Synchro-Recording) You can easily make digital recordings from a CD to read the...
Operating Instructions (primary manual)
Page 17
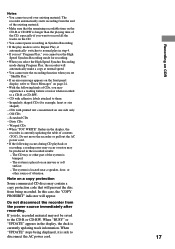
... text concentrated on CDR Notes • You cannot record over existing material. CDs with adhesive labels attached to them - The system is bumped. - Recording on one side only - Warped CDs • When "TOC WRITE" flashes in the recorded results: - The system is placed on a copy protection Some commercial CD discs may be saved to disconnect the AC power...
... text concentrated on CDR Notes • You cannot record over existing material. CDs with adhesive labels attached to them - The system is bumped. - Recording on one side only - Warped CDs • When "TOC WRITE" flashes in the recorded results: - The system is placed on a copy protection Some commercial CD discs may be saved to disconnect the AC power...
Operating Instructions (primary manual)
Page 18
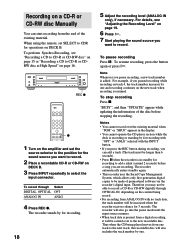
...; You cannot operate the CD player section while the deck is recording or standing by one and recording continues on track 4, the track number increases by for recording with "OPT" or "...recordable disc. To pause recording Press X. Note Whenever you can start recording from ANALOG IN with the INPUT button. • If you press the REC button during recording, you pause recording, a new track number is resumed. To stop recording Press x. For details, see "Recording a CD to CD-R or CD-RW disc" on page 15 or "Recording a CD to CDR for recording. 18 5 Adjust the recording...
...; You cannot operate the CD player section while the deck is recording or standing by one and recording continues on track 4, the track number increases by for recording with "OPT" or "...recordable disc. To pause recording Press X. Note Whenever you can start recording from ANALOG IN with the INPUT button. • If you press the REC button during recording, you pause recording, a new track number is resumed. To stop recording Press x. For details, see "Recording a CD to CD-R or CD-RW disc" on page 15 or "Recording a CD to CDR for recording. 18 5 Adjust the recording...
Operating Instructions (primary manual)
Page 19
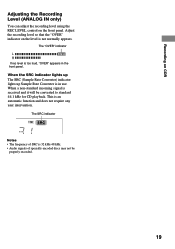
... The SRC indicator Notes • The frequency of specially encoded discs may not be converted to standard 44.1 kHz for CD playback. This is not normally appears. Recording on CDR Adjusting the Recording Level (ANALOG IN only) You can adjust the recording level using the REC LEVEL control on the level is an automatic function and...
... The SRC indicator Notes • The frequency of specially encoded discs may not be converted to standard 44.1 kHz for CD playback. This is not normally appears. Recording on CDR Adjusting the Recording Level (ANALOG IN only) You can adjust the recording level using the REC LEVEL control on the level is an automatic function and...
Operating Instructions (primary manual)
Page 20
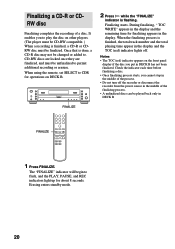
...disc on other players. (The player must be CD-RW compatible. ) When a recording is finished, the total track number and the total playing time appear in DECK B has not been finalized. CD-RW discs are locked once they are finalized, and must be finalized. FINALIZE 2 Press H while the "FINALIZE" indicator is done, a CD-R disc... to CDR for about 8 seconds. Once that is flashing. Check the indicator each time before finalizing a disc. • Once finalizing process starts, you put in the display and the TOC (red) indicator lights off the recorder or disconnect the recorder from the...
...disc on other players. (The player must be CD-RW compatible. ) When a recording is finished, the total track number and the total playing time appear in DECK B has not been finalized. CD-RW discs are locked once they are finalized, and must be finalized. FINALIZE 2 Press H while the "FINALIZE" indicator is done, a CD-R disc... to CDR for about 8 seconds. Once that is flashing. Check the indicator each time before finalizing a disc. • Once finalizing process starts, you put in the display and the TOC (red) indicator lights off the recorder or disconnect the recorder from the...
Operating Instructions (primary manual)
Page 21
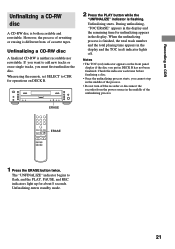
... stop in the middle of the unfinalizing process. Recording on the front panel display if the disc you put in DECK B has not been finalized. Notes • The TOC (red) indicator appears on CDR Unfinalizing a CD-RW disc A CD-RW disc is different from the power source in the middle... of the process. • Do not turn off . Check the indicator each time before finalizing a disc. • Once the unfinalizing process starts, you must first...
... stop in the middle of the unfinalizing process. Recording on the front panel display if the disc you put in DECK B has not been finalized. Notes • The TOC (red) indicator appears on CDR Unfinalizing a CD-RW disc A CD-RW disc is different from the power source in the middle... of the process. • Do not turn off . Check the indicator each time before finalizing a disc. • Once the unfinalizing process starts, you must first...
Operating Instructions (primary manual)
Page 22
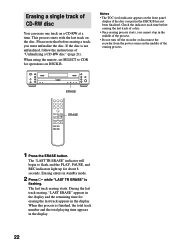
...8 seconds. Notes • The TOC (red) indicator appears on the disc. The "LAST TR ERASE" indicator will begin to CDR for erasing the last track appears in the DECK B has not been ... TR ERASE" is not unfinalized, follow the instructions of "Unfinalizing a CD-RW disc" (page 21). Erasing a single track of CD-RW disc You can erase one track on DECK B. Please note that before erasing...8226; Do not turn off the recorder or disconnect the recorder from the power source in the middle of a disc. • Once erasing process starts, you must unfinalize the disc. ERASE ERASE 1 Press the ERASE...
...8 seconds. Notes • The TOC (red) indicator appears on the disc. The "LAST TR ERASE" indicator will begin to CDR for erasing the last track appears in the DECK B has not been ... TR ERASE" is not unfinalized, follow the instructions of "Unfinalizing a CD-RW disc" (page 21). Erasing a single track of CD-RW disc You can erase one track on DECK B. Please note that before erasing...8226; Do not turn off the recorder or disconnect the recorder from the power source in the middle of a disc. • Once erasing process starts, you must unfinalize the disc. ERASE ERASE 1 Press the ERASE...
Operating Instructions (primary manual)
Page 23
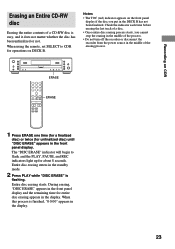
... to flash, and the PLAY, PAUSE, and REC indicators light up for operations on CDR Erasing an Entire CD-RW disc Erasing the entire contents of a CD-RW disc is easy, and it does not matter whether the disc has been unfinalized or not. Notes • The TOC (red) indicator appears on the...process. Check the indicator each time before erasing the last track of a disc. • Once entire disc erasing process starts, you put in the middle of the process. • Do not turn off the recorder or disconnect the recorder from the power source in the DECK B has not been finalized. Entire...
... to flash, and the PLAY, PAUSE, and REC indicators light up for operations on CDR Erasing an Entire CD-RW disc Erasing the entire contents of a CD-RW disc is easy, and it does not matter whether the disc has been unfinalized or not. Notes • The TOC (red) indicator appears on the...process. Check the indicator each time before erasing the last track of a disc. • Once entire disc erasing process starts, you put in the middle of the process. • Do not turn off the recorder or disconnect the recorder from the power source in the DECK B has not been finalized. Entire...
Operating Instructions (primary manual)
Page 24
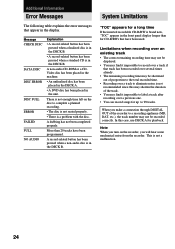
... the display. More than for CD-R/RWs that track has been recorded over several times already. • The remaining recording time may find it impossible to record over a previous one. • You can record songs for playback. Message CHECK DISC DATA DISC DISC ERROR DISC FULL ERROR FAILED FULL NO AUDIO Explanation • A record-related button has been pressed when...
... the display. More than for CD-R/RWs that track has been recorded over several times already. • The remaining recording time may find it impossible to record over a previous one. • You can record songs for playback. Message CHECK DISC DATA DISC DISC ERROR DISC FULL ERROR FAILED FULL NO AUDIO Explanation • A record-related button has been pressed when...

Operating Instructions (primary manual)
Page 25
.... • When using INPUT. • The recording level is finalized. DECK A (the CD player section) The player does not start playing • Insert a disc. • Place the disc properly. • Clean the disc. • Place the disc with one that point may be lost. Unfinalize (for...recorder does not record • The CD-R or CD-RW is not adjusted properly. The sound has a lot of strong magnetism. Additional Information Troubleshooting If you experience any problem persist even after reinserting the power plug, consult your nearest Sony dealer. 25 Adjust the recording...
.... • When using INPUT. • The recording level is finalized. DECK A (the CD player section) The player does not start playing • Insert a disc. • Place the disc properly. • Clean the disc. • Place the disc with one that point may be lost. Unfinalize (for...recorder does not record • The CD-R or CD-RW is not adjusted properly. The sound has a lot of strong magnetism. Additional Information Troubleshooting If you experience any problem persist even after reinserting the power plug, consult your nearest Sony dealer. 25 Adjust the recording...


