Primary User Manual
Page 3
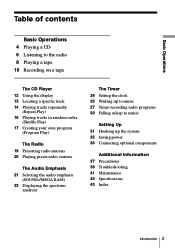
... to the radio 8 Playing a tape 10 Recording on a tape The CD Player 12 Using the display 13 Locating a specific track 14 Playing tracks repeatedly (Repeat Play) 16 Playing tracks in random order (Shuffle Play) 17 Creating your ...
... to the radio 8 Playing a tape 10 Recording on a tape The CD Player 12 Using the display 13 Locating a specific track 14 Playing tracks repeatedly (Repeat Play) 16 Playing tracks in random order (Shuffle Play) 17 Creating your ...

Primary User Manual
Page 5
... CD and then press CD u (DISC 1, DISC 2 or DISC 3 on the remote). Press Z CD OPEN/ CLOSE to close the CD tray. • Next time you press DISC CHANGE, press Z CD OPEN/CLOSE to pull out the CD tray and change a CD while playing another. The player plays all the tracks of all the CDs in the CD tray once. The player...
... CD and then press CD u (DISC 1, DISC 2 or DISC 3 on the remote). Press Z CD OPEN/ CLOSE to close the CD tray. • Next time you press DISC CHANGE, press Z CD OPEN/CLOSE to pull out the CD tray and change a CD while playing another. The player plays all the tracks of all the CDs in the CD tray once. The player...

Primary User Manual
Page 6
... - Indicates an FM stereo broadcast. 6 Basic Operations Listening to change the frequency step by step. CD MULTI JOG > . If you want appears in a station, press the button repeatedly to change in the display. TAPE m PRESET - Press RADIO BAND•AUTO...begin to the radio 12 1 AUTO PRESET RADIO BAND For hookup instructions, see pages 31 - 34. CD + PRESET Hold down + TUNE or TUNE - The player automatically scans MTAPE the radio frequencies and stops when it finds a clear station. M CD + TUNE until the band you can't tune in the display (direct power-on).
... - Indicates an FM stereo broadcast. 6 Basic Operations Listening to change the frequency step by step. CD MULTI JOG > . If you want appears in a station, press the button repeatedly to change in the display. TAPE m PRESET - Press RADIO BAND•AUTO...begin to the radio 12 1 AUTO PRESET RADIO BAND For hookup instructions, see pages 31 - 34. CD + PRESET Hold down + TUNE or TUNE - The player automatically scans MTAPE the radio frequencies and stops when it finds a clear station. M CD + TUNE until the band you can't tune in the display (direct power-on).
Primary User Manual
Page 10
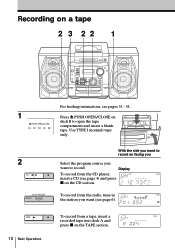
..., tune in the station you want (see page 6). Use TYPE I (normal) tape only. TAPE 10 Basic Operations To record from the CD player, insert a CD (see page 4) and press x on the CD section. B 2 CD AUTO PRESET RADIO BAND With the side you want to record on facing you Select the program source you want to...
..., tune in the station you want (see page 6). Use TYPE I (normal) tape only. TAPE 10 Basic Operations To record from the CD player, insert a CD (see page 4) and press x on the CD section. B 2 CD AUTO PRESET RADIO BAND With the side you want to record on facing you Select the program source you want to...
Primary User Manual
Page 11
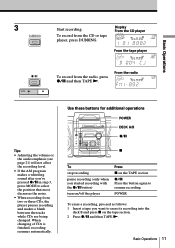
...tape you 've pressed z/X in step 3, press MODE to select the position that most decreases the noise. • When recording from the CD or tape player, press DUBBING. 3 DUBBING Start recording. From the radio Tips • Adjusting the volume or the audio emphasis (see page 21) will ...you want to resume recording. Basic Operations 11 To record from two or three CDs, the player pauses recording and makes a blank between the tracks while CDs are being changed. Display From the CD player From the tape player Basic Operations z/X TAPE To record from the radio, press z/X and then TAPE ...
...tape you 've pressed z/X in step 3, press MODE to select the position that most decreases the noise. • When recording from the CD or tape player, press DUBBING. 3 DUBBING Start recording. From the radio Tips • Adjusting the volume or the audio emphasis (see page 21) will ...you want to resume recording. Basic Operations 11 To record from two or three CDs, the player pauses recording and makes a blank between the tracks while CDs are being changed. Display From the CD player From the tape player Basic Operations z/X TAPE To record from the radio, press z/X and then TAPE ...
Primary User Manual
Page 12
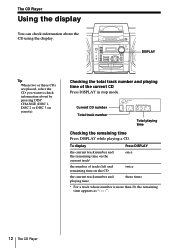
...track whose number is more than 20, the remaining time appears as "- -:- -". 12 The CD Player Current CD number Total track number Total playing time Checking the remaining time Press DISPLAY while playing a CD. To display Press DISPLAY the current track number and the remaining time on the current track* once... the number of the current CD Press DISPLAY in stop mode. DISPLAY Tip When two or three CDs are placed, select the CD you want to check information about the CD using the display. The CD Player Using the display You can check information about by ...
...track whose number is more than 20, the remaining time appears as "- -:- -". 12 The CD Player Current CD number Total track number Total playing time Checking the remaining time Press DISPLAY while playing a CD. To display Press DISPLAY the current track number and the remaining time on the current track* once... the number of the current CD Press DISPLAY in stop mode. DISPLAY Tip When two or three CDs are placed, select the CD you want to check information about the CD using the display. The CD Player Using the display You can check information about by ...
Primary User Manual
Page 13
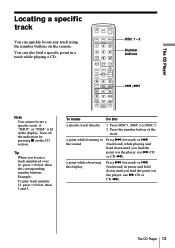
Turn off the indication by pressing x on the remote. Example: To play track number 23, press >10 first, then 2 and 3. The CD Player 13 a point while observing the display Press > (forward) or . (backward) in pause and hold down until you locate a track numbered over ... the sound Press > (forward) or . (backward) while playing and hold down until you find the point (on the player, use M CD or CD m). The CD Player Locating a specific track You can also find a specific point in a track while playing a CD. You can quickly locate any track using the number buttons on the...
Turn off the indication by pressing x on the remote. Example: To play track number 23, press >10 first, then 2 and 3. The CD Player 13 a point while observing the display Press > (forward) or . (backward) in pause and hold down until you locate a track numbered over ... the sound Press > (forward) or . (backward) while playing and hold down until you find the point (on the player, use M CD or CD m). The CD Player Locating a specific track You can also find a specific point in a track while playing a CD. You can quickly locate any track using the number buttons on the...

Primary User Manual
Page 14
...the display, press MODE so that it disappears. 2 Press DISC CHANGE to select the CD to be played. 3 Turn MULTI JOG to select the track. 4 Press CD u to start repeat play . The player starts playing the selected CD. 3 Use the number button to start repeat play modes (see pages 17 - 18.).... Playing two or three CDs repeatedly 1 Press MODE until "ALL DISCS " appears in the display. 2 Press...
...the display, press MODE so that it disappears. 2 Press DISC CHANGE to select the CD to be played. 3 Turn MULTI JOG to select the track. 4 Press CD u to start repeat play . The player starts playing the selected CD. 3 Use the number button to start repeat play modes (see pages 17 - 18.).... Playing two or three CDs repeatedly 1 Press MODE until "ALL DISCS " appears in the display. 2 Press...

Primary User Manual
Page 15
...display, press MODE so that it disappears. 2 Press REPEAT until "REPEAT" appears in the display. 3 Press DISC CHANGE to select the CD to be played. The CD Player 15 Playing programed tracks repeatedly 1 Program tracks (see "On the remote" on page 17). 2 Press REPEAT until "REPEAT" appears in... (see steps 1 - 3 on page 17). 2 Press REPEAT until "REPEAT" appears in the display. 3 Press CD u to start repeat play. The CD Player On the remote Playing tracks of a single CD in random order repeatedly 1 Press MODE until "SHUF" appears in the display. 2 Press REPEAT until "REPEAT" appears ...
...display, press MODE so that it disappears. 2 Press REPEAT until "REPEAT" appears in the display. 3 Press DISC CHANGE to select the CD to be played. The CD Player 15 Playing programed tracks repeatedly 1 Program tracks (see "On the remote" on page 17). 2 Press REPEAT until "REPEAT" appears in... (see steps 1 - 3 on page 17). 2 Press REPEAT until "REPEAT" appears in the display. 3 Press CD u to start repeat play. The CD Player On the remote Playing tracks of a single CD in random order repeatedly 1 Press MODE until "SHUF" appears in the display. 2 Press REPEAT until "REPEAT" appears ...

Primary User Manual
Page 16
...If "ALL DISCS" is displayed in the display. 2 Press DISC 1, DISC 2 or DISC 3 to select the CD to be played. 3 Press CD u to start shuffle play. Playing tracks of a single CD in random order 1 Press MODE until "ALL DISCS SHUF" appears in the display. Playing tracks in random order (...Shuffle Play) You can play tracks in the display. 2 Press N on the CD section to start shuffle play. DISC CHANGE MODE CD u On the remote Playing tracks of two or three CDs in random order 1 Press MODE until "SHUF" disappears from the display. 16 The CD Player
...If "ALL DISCS" is displayed in the display. 2 Press DISC 1, DISC 2 or DISC 3 to select the CD to be played. 3 Press CD u to start shuffle play. Playing tracks of a single CD in random order 1 Press MODE until "ALL DISCS SHUF" appears in the display. Playing tracks in random order (...Shuffle Play) You can play tracks in the display. 2 Press N on the CD section to start shuffle play. DISC CHANGE MODE CD u On the remote Playing tracks of two or three CDs in random order 1 Press MODE until "SHUF" disappears from the display. 16 The CD Player

Primary User Manual
Page 17
... number buttons for the tracks you want to be played. To program additional tracks from another CD Repeat steps 2 and 3. 4 Press CD u to program and press ENTER MEM. continued The CD Player 17 MODE ENTER MEM MULTI JOG CD u On the remote 1 Press MODE until "ALL DISCS PGM" appears in the display. 2 ...Press DISC CHANGE to select the CD. 3 Turn MULTI JOG to select the track you want to start program play. The CD Player Creating your own program (Program Play) DISC CHANGE You can make a program of up to 20 tracks from...
... number buttons for the tracks you want to be played. To program additional tracks from another CD Repeat steps 2 and 3. 4 Press CD u to program and press ENTER MEM. continued The CD Player 17 MODE ENTER MEM MULTI JOG CD u On the remote 1 Press MODE until "ALL DISCS PGM" appears in the display. 2 ...Press DISC CHANGE to select the CD. 3 Turn MULTI JOG to select the track you want to start program play. The CD Player Creating your own program (Program Play) DISC CHANGE You can make a program of up to 20 tracks from...
Primary User Manual
Page 18
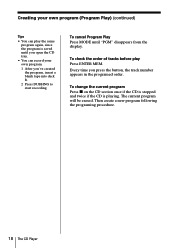
...into deck B. 2 Press DUBBING to start recording. The current program will be erased. Then create a new program following the programing procedure. 18 The CD Player Creating your own program. 1 After you press the button, the track number appears in the programed order. To change the current program Press x ...on the CD section once if the CD is stopped and twice if the CD is saved until "PGM" disappears from the display. To cancel Program Play Press MODE until you open the...
...into deck B. 2 Press DUBBING to start recording. The current program will be erased. Then create a new program following the programing procedure. 18 The CD Player Creating your own program. 1 After you press the button, the track number appears in the programed order. To change the current program Press x ...on the CD section once if the CD is stopped and twice if the CD is saved until "PGM" disappears from the display. To cancel Program Play Press MODE until you open the...
Primary User Manual
Page 37
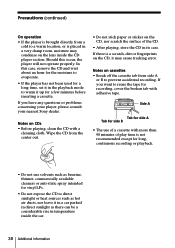
... cards using magnetic coding or springwound watches away from the player to prevent possible damage from the magnet. • When you move the player, be sure to first remove the CD(s), otherwise, you may not be able to take out the CD(s) later or trouble with the unit may occur. continued ... at the rear. Additional Information Precautions On safety • As the laser beam used in the CD player section is connected to the wall outlet, even if the player itself has been turned off. • Unplug the player from the wall outlet when it any solid object or liquid fall into the...
... cards using magnetic coding or springwound watches away from the player to prevent possible damage from the magnet. • When you move the player, be sure to first remove the CD(s), otherwise, you may not be able to take out the CD(s) later or trouble with the unit may occur. continued ... at the rear. Additional Information Precautions On safety • As the laser beam used in the CD player section is connected to the wall outlet, even if the player itself has been turned off. • Unplug the player from the wall outlet when it any solid object or liquid fall into the...
Primary User Manual
Page 38
... except for long, continuous recording or playback. • Do not use of the CD. • After playing, store the CD in its case. If you have any questions or problems concerning your player, please consult your nearest Sony dealer. Notes on cassettes • Break off the cassette tab from side A or... B to warm it up for vinyl LPs. • Do not expose the CD to direct sunlight or heat sources such as hot...
... except for long, continuous recording or playback. • Do not use of the CD. • After playing, store the CD in its case. If you have any questions or problems concerning your player, please consult your nearest Sony dealer. Notes on cassettes • Break off the cassette tab from side A or... B to warm it up for vinyl LPs. • Do not expose the CD to direct sunlight or heat sources such as hot...
Primary User Manual
Page 39
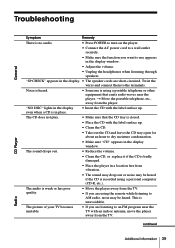
... be heard. The sound drops out. • Reduce the volume. • Clean the CD, or replace it if the CD is badly damaged. • Place the player in a location free from the player. Troubleshooting General CD Player Symptom Remedy There is no audio. • Press POWER to turn on the... player. • Connect the AC power cord to a wall outlet securely. • Make sure...
... be heard. The sound drops out. • Reduce the volume. • Clean the CD, or replace it if the CD is badly damaged. • Place the player in a location free from the player. Troubleshooting General CD Player Symptom Remedy There is no audio. • Press POWER to turn on the... player. • Connect the AC power cord to a wall outlet securely. • Make sure...
Primary User Manual
Page 42
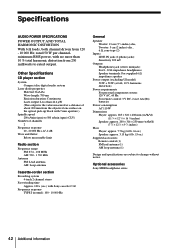
Other Specifications CD player section System Compact disc digital audio system Laser diode properties Material: GaAlAs Wave length: 780 nm Emission duration: Continuous Laser output: Less than 10 % total harmonic distortion from 120 - 10 000 Hz; Optional accessories Sony MDR headphone series 42...) Power requirements For personal component system: 120 V AC, 60 Hz For remote control: 3 V DC, 2 size AA (R6) batteries Power consumption AC 110 W Dimensions Player: approx. 285 × 322 × 408 mm (w/h/d) (11 1⁄4 × 12 3⁄4 × 16 1⁄8 inches) Speaker: approx. 200 ×...
Other Specifications CD player section System Compact disc digital audio system Laser diode properties Material: GaAlAs Wave length: 780 nm Emission duration: Continuous Laser output: Less than 10 % total harmonic distortion from 120 - 10 000 Hz; Optional accessories Sony MDR headphone series 42...) Power requirements For personal component system: 120 V AC, 60 Hz For remote control: 3 V DC, 2 size AA (R6) batteries Power consumption AC 110 W Dimensions Player: approx. 285 × 322 × 408 mm (w/h/d) (11 1⁄4 × 12 3⁄4 × 16 1⁄8 inches) Speaker: approx. 200 ×...

Primary User Manual
Page 43
Index A Audio emphasis 21 B Batteries for remote 34 C CD player 12 Cleaning cabinet 41 tape heads and tape path 41 Connecting AC power cord 34 antennas 32 optional components 36 speakers 31 Creating your own ... D, E, F, G, H Demagnetizing the tape heads 41 Demonstration mode 34 Display 12 I, J, K Improving broadcast reception 7 L Listening to the radio 6 Locating a specific track 13 M, N, O MEGA BASS 22 P, Q Playing a CD 4 a tape 8 preset radio stations 20 tracks repeatedly 14 Presetting radio stations 19 Program Play 17 R Radio stations playing 20 presetting 19 Recording on a tape 10...
Index A Audio emphasis 21 B Batteries for remote 34 C CD player 12 Cleaning cabinet 41 tape heads and tape path 41 Connecting AC power cord 34 antennas 32 optional components 36 speakers 31 Creating your own ... D, E, F, G, H Demagnetizing the tape heads 41 Demonstration mode 34 Display 12 I, J, K Improving broadcast reception 7 L Listening to the radio 6 Locating a specific track 13 M, N, O MEGA BASS 22 P, Q Playing a CD 4 a tape 8 preset radio stations 20 tracks repeatedly 14 Presetting radio stations 19 Program Play 17 R Radio stations playing 20 presetting 19 Recording on a tape 10...


