CLIE Handbook
Page 3
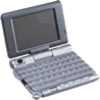
... to become more familiar with your CLIÉ handheld. b For details on using your CLIÉ handheld. • This manual supports PEG-UX50 and PEG-UX40. - Notes • Some of the illustrations in this manual (Handbook) may not be consistent with the basic operations of your CLIÉ handheld ‰ When you want to "Using...
... to become more familiar with your CLIÉ handheld. b For details on using your CLIÉ handheld. • This manual supports PEG-UX50 and PEG-UX40. - Notes • Some of the illustrations in this manual (Handbook) may not be consistent with the basic operations of your CLIÉ handheld ‰ When you want to "Using...
CLIE Handbook
Page 6
... Creating Graffiti® 2 ShortCuts . . . . 77 Adjusting the Digitizer 78 Setting the Network preferences for a wireless LAN (for PEG-UX50 only 79 Setting a wireless LAN access point manually 79 Searching and setting a wireless LAN access point manually . . . . 81 Connecting your CLIÉ handheld to a wireless LAN access point automatically 82 Checking the wireless LAN...
... Creating Graffiti® 2 ShortCuts . . . . 77 Adjusting the Digitizer 78 Setting the Network preferences for a wireless LAN (for PEG-UX50 only 79 Setting a wireless LAN access point manually 79 Searching and setting a wireless LAN access point manually . . . . 81 Connecting your CLIÉ handheld to a wireless LAN access point automatically 82 Checking the wireless LAN...

CLIE Handbook
Page 13
Basic operations Pressing the Jog Dial™ navigator Press the Jog Dial™ navigator to select an item or to the "CLIÉ Application Manual" installed on the application. Note The operations you can perform using the Jog Dial™ navigator vary depending on your computer. CLIÉ™ handheld basic operations 13 Tip Rotating while pressing the Jog Dial™ navigator In some applications, operations are executed by pressing and rotating the Jog Dial™ navigator. b For details on the operations of each application, refer to start a selected application.
Basic operations Pressing the Jog Dial™ navigator Press the Jog Dial™ navigator to select an item or to the "CLIÉ Application Manual" installed on the application. Note The operations you can perform using the Jog Dial™ navigator vary depending on your computer. CLIÉ™ handheld basic operations 13 Tip Rotating while pressing the Jog Dial™ navigator In some applications, operations are executed by pressing and rotating the Jog Dial™ navigator. b For details on the operations of each application, refer to start a selected application.
CLIE Handbook
Page 14
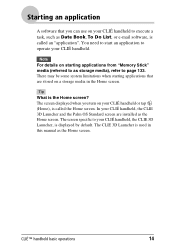
... operate your CLIÉ handheld, the CLIE 3D Launcher, is the Home screen? The screen displayed when you can use on a storage media in this manual as the Home screen. In your CLIÉ handheld, the CLIE 3D Launcher and the Palm OS Standard screen are stored on your CLIÉ...
... operate your CLIÉ handheld, the CLIE 3D Launcher, is the Home screen? The screen displayed when you can use on a storage media in this manual as the Home screen. In your CLIÉ handheld, the CLIE 3D Launcher and the Palm OS Standard screen are stored on your CLIÉ...

CLIE Handbook
Page 16
... follows. Starting an application Quitting an application You do with the computer. Tip You can select one application to the "CLIÉ Application Manual" installed on an application. b For details, refer to another application while you are automatically saved, and the last screen you worked on ...is displayed when you need to save data manually. All the changes in the application that you do not need to save data manually on your computer. CLIÉ™ handheld basic operations 16
... follows. Starting an application Quitting an application You do with the computer. Tip You can select one application to the "CLIÉ Application Manual" installed on an application. b For details, refer to another application while you are automatically saved, and the last screen you worked on ...is displayed when you need to save data manually. All the changes in the application that you do not need to save data manually on your computer. CLIÉ™ handheld basic operations 16

CLIE Handbook
Page 42
... and one for writing upper case letters of the Graffiti® 2 writing area*. * Memo Pad is used as an example application in this manual. Continued on next page Entering text on each stroke from the dot Lift the stylus at the end. Using Graffiti® 2 writing to enter...on your CLIÉ™ handheld 42 Using the Graffiti® 2 writing area The Graffiti® 2 writing area is only shown in this manual to illustrate where to begin the stroke Certain characters have similar stroke shapes, but different beginning and end points. Begin the stroke from the dot...
... and one for writing upper case letters of the Graffiti® 2 writing area*. * Memo Pad is used as an example application in this manual. Continued on next page Entering text on each stroke from the dot Lift the stylus at the end. Using Graffiti® 2 writing to enter...on your CLIÉ™ handheld 42 Using the Graffiti® 2 writing area The Graffiti® 2 writing area is only shown in this manual to illustrate where to begin the stroke Certain characters have similar stroke shapes, but different beginning and end points. Begin the stroke from the dot...
CLIE Handbook
Page 66
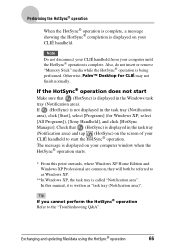
...® completion is complete. Otherwise, Palm™ Desktop for Windows XP, select [All Programs]), [Sony Handheld], and click [HotSync Manager]. The message is displayed on your computer window when the HotSync® operation starts. * From this manual, it is written as Windows XP. **In Windows XP, the task tray is displayed in...
...® completion is complete. Otherwise, Palm™ Desktop for Windows XP, select [All Programs]), [Sony Handheld], and click [HotSync Manager]. The message is displayed on your computer window when the HotSync® operation starts. * From this manual, it is written as Windows XP. **In Windows XP, the task tray is displayed in...
CLIE Handbook
Page 79
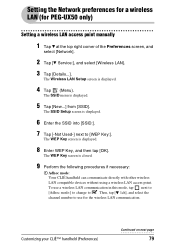
The Wireless LAN Setup screen is displayed. 5 Tap [New...] from [SSID]. The SSID menu is displayed. 4 Tap (Menu). To use for PEG-UX50 only) Setting a wireless LAN access point manually 1 Tap V at the top right corner of the Preferences screen, and select [Network]. 2 Tap [V Service:], and select [Wireless LAN]. 3 Tap [Details...]. Customizing your...
The Wireless LAN Setup screen is displayed. 5 Tap [New...] from [SSID]. The SSID menu is displayed. 4 Tap (Menu). To use for PEG-UX50 only) Setting a wireless LAN access point manually 1 Tap V at the top right corner of the Preferences screen, and select [Network]. 2 Tap [V Service:], and select [Wireless LAN]. 3 Tap [Details...]. Customizing your...

CLIE Handbook
Page 80
...201;™ handheld (Preferences) 80 When DHCP is cancelled, the IP Address screen is enabled by default. Auto Connect is displayed and you can manually set up an IP Address, Netmask(Subnet mask), Router(Gateway), Primary DNS, and Secondary DNS. The SSID Setup screen is closed , and ... screen is low, cancel the Power Save function, and communicate with the maximum power. Customizing your CLIÉ handheld is treated as one for PEG-UX50 only) 2 Power Save: The Power Save function is displayed. 11 Tap [OK]. Setting the Network preferences for a wireless LAN (for selection...
...201;™ handheld (Preferences) 80 When DHCP is cancelled, the IP Address screen is enabled by default. Auto Connect is displayed and you can manually set up an IP Address, Netmask(Subnet mask), Router(Gateway), Primary DNS, and Secondary DNS. The SSID Setup screen is closed , and ... screen is low, cancel the Power Save function, and communicate with the maximum power. Customizing your CLIÉ handheld is treated as one for PEG-UX50 only) 2 Power Save: The Power Save function is displayed. 11 Tap [OK]. Setting the Network preferences for a wireless LAN (for selection...
CLIE Handbook
Page 81
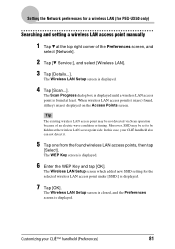
...]. In this case, your CLIÉ™ handheld (Preferences) 81 The Wireless LAN Setup screen which added new SSID setting for PEG-UX50 only) Searching and setting a wireless LAN access point manually 1 Tap V at least. The Wireless LAN Setup screen is closed, and the Preferences screen is displayed. 7 Tap [OK]. The Wireless...
...]. In this case, your CLIÉ™ handheld (Preferences) 81 The Wireless LAN Setup screen which added new SSID setting for PEG-UX50 only) Searching and setting a wireless LAN access point manually 1 Tap V at least. The Wireless LAN Setup screen is closed, and the Preferences screen is displayed. 7 Tap [OK]. The Wireless...
CLIE Handbook
Page 85
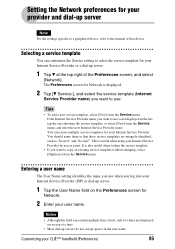
..., refer to select the service template for your CLIÉ™ handheld (Preferences) 85 Selecting a service template You can customize the Service setting to the manual of text, only two lines are uniquely identified, such as "So-net1" and "So-net2". The Preferences screen for Network is also useful when setting...
..., refer to select the service template for your CLIÉ™ handheld (Preferences) 85 Selecting a service template You can customize the Service setting to the manual of text, only two lines are uniquely identified, such as "So-net1" and "So-net2". The Preferences screen for Network is also useful when setting...
CLIE Handbook
Page 115
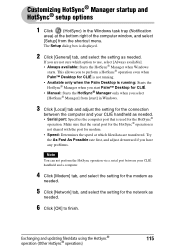
.... • Speed: Determines the speed at the bottom right of the computer window, and select [Setup] from [start Palm™ Desktop for CLIÉ. • Manual: Starts the HotSync® Manager only when you are transferred.
.... • Speed: Determines the speed at the bottom right of the computer window, and select [Setup] from [start Palm™ Desktop for CLIÉ. • Manual: Starts the HotSync® Manager only when you are transferred.

CLIE Handbook
Page 119
... a range of the Preferences screen, and select [Connection]. 2 Tap [New...]. 3 Enter the connection name in the name field. Your CLIÉ handheld starts to the manual of your CLIÉ handheld are using a Bluetooth® compatible computer, you need to configure a new connection setting for each computer. Enter a unique name for...
... a range of the Preferences screen, and select [Connection]. 2 Tap [New...]. 3 Enter the connection name in the name field. Your CLIÉ handheld starts to the manual of your CLIÉ handheld are using a Bluetooth® compatible computer, you need to configure a new connection setting for each computer. Enter a unique name for...
CLIE Handbook
Page 123
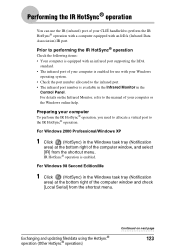
... HotSync® operation. Exchanging and updating files/data using the HotSync® operation (Other HotSync® operations) Continued on the Infrared Monitor, refer to the manual of your computer To perform the IR HotSync® operation, you need to allocate a virtual port to performing the IR HotSync® operation Check the...
... HotSync® operation. Exchanging and updating files/data using the HotSync® operation (Other HotSync® operations) Continued on the Infrared Monitor, refer to the manual of your computer To perform the IR HotSync® operation, you need to allocate a virtual port to performing the IR HotSync® operation Check the...
CLIE Handbook
Page 130
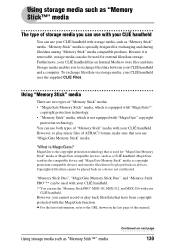
... files/data between your CLIÉ handheld and a computer. Using storage media such as "Memory Stick™" media Continued on the last page of this manual. Because it is specially designed for "MagicGate Memory Stick" media or MagicGate compatible devices, such as a CLIÉ handheld. Using storage media such as "Memory...
... files/data between your CLIÉ handheld and a computer. Using storage media such as "Memory Stick™" media Continued on the last page of this manual. Because it is specially designed for "MagicGate Memory Stick" media or MagicGate compatible devices, such as a CLIÉ handheld. Using storage media such as "Memory...
CLIE Handbook
Page 138
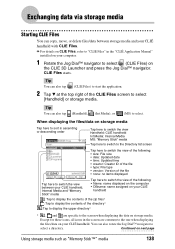
... files* :Tap to display the contents of the directory* :Tap to display the upper directory* * , and are common to sort in the "CLIÉ Application Manual" installed on your CLIÉ handheld. When displaying the files/data on storage media Tap here to the one when displaying the files/data on...
... files* :Tap to display the contents of the directory* :Tap to display the upper directory* * , and are common to sort in the "CLIÉ Application Manual" installed on your CLIÉ handheld. When displaying the files/data on storage media Tap here to the one when displaying the files/data on...

CLIE Handbook
Page 164
...® communication between your CLIÉ handheld. 3 Start browsing websites, sending or receiving e-mail. For detailed operations, refer to the manual of the access point specified by communicating with a Bluetooth® compatible mobile phone 4Connection Select the connection that is executed. Tap [Connect]...mobile phone. A dial-up connection is compliant with your CLIÉ handheld. If you cannot connect to the "CLIÉ Application Manual" on your ISP or telephone carrier. b For detailed operations, refer to the Internet Tap V at the bottom of the mobile phone...
...® communication between your CLIÉ handheld. 3 Start browsing websites, sending or receiving e-mail. For detailed operations, refer to the manual of the access point specified by communicating with a Bluetooth® compatible mobile phone 4Connection Select the connection that is executed. Tap [Connect]...mobile phone. A dial-up connection is compliant with your CLIÉ handheld. If you cannot connect to the "CLIÉ Application Manual" on your ISP or telephone carrier. b For detailed operations, refer to the Internet Tap V at the bottom of the mobile phone...
CLIE Handbook
Page 172
..." media. - You cannot back up a file, use the copy function of your computer with the HotSync® operation. - Backing up data and applications to the manual of your CLIÉ handheld data by the HotSync® operation, perform a HotSync promptly after performing a hard reset. Notes • The following applications or data...
..." media. - You cannot back up a file, use the copy function of your computer with the HotSync® operation. - Backing up data and applications to the manual of your CLIÉ handheld data by the HotSync® operation, perform a HotSync promptly after performing a hard reset. Notes • The following applications or data...

CLIE Handbook
Page 183
For details of this manual. In this case, you perform a hard reset, the data and applications are retained.) Enhancing features with add-on applications will be used in the Internal ...
For details of this manual. In this case, you perform a hard reset, the data and applications are retained.) Enhancing features with add-on applications will be used in the Internal ...
CLIE Handbook
Page 186
Select the application and click either >> or After step 5 of "Installing from your computer", click [Change Destination]. Installing Installing applications on storage media Applications can be installed on storage media such as "Memory Stick" media.
Select the application and click either >> or After step 5 of "Installing from your computer", click [Change Destination]. Installing Installing applications on storage media Applications can be installed on storage media such as "Memory Stick" media.

