CLIE Handbook
Page 3
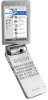
... Instructions) Explains the following: • Setting up your CLIÉ handheld and computer • Basic operations • What you can do with your CLIÉ handheld. Refer to the following together with using the supplied applications ‰ When you may have problems Troubleshooting Q&A Helps in solving common problems that you want to install additional applications CLIÉ Application Manual...
... Instructions) Explains the following: • Setting up your CLIÉ handheld and computer • Basic operations • What you can do with your CLIÉ handheld. Refer to the following together with using the supplied applications ‰ When you may have problems Troubleshooting Q&A Helps in solving common problems that you want to install additional applications CLIÉ Application Manual...

CLIE Handbook
Page 6
... off 91 Changing the Network preferences 92 Selecting a service template . . . . 92 Entering a user name 93 Entering a password 93 Selecting a connection 94 Adding detailed information to a service template 94 Creating additional service templates 96 Creating log-in scripts 97 Using the Network preferences menus 100 Creating Graffiti® ShortCuts . . . . . 101 Exchanging and updating files/data using the HotSync® operation (Other HotSync® operations...
... off 91 Changing the Network preferences 92 Selecting a service template . . . . 92 Entering a user name 93 Entering a password 93 Selecting a connection 94 Adding detailed information to a service template 94 Creating additional service templates 96 Creating log-in scripts 97 Using the Network preferences menus 100 Creating Graffiti® ShortCuts . . . . . 101 Exchanging and updating files/data using the HotSync® operation (Other HotSync® operations...
CLIE Handbook
Page 7
... Beaming between your CLIÉ handheld and another Palm OS® PDA 151 What you can do with beaming 151 Beaming information 152 Using the Bluetooth™ function (for Bluetooth™ built-in models only) Exchanging files/data using the Bluetooth™ function ... function 156 Sending files/data, such as image files or Date Book data, to another CLIÉ handheld with the built-in Bluetooth™ function or Bluetooth™ Module (optional 156 Performing the wireless HotSync® operation with a computer . . . 158 Connecting to the Internet by communicating with a Bluetooth...
... Beaming between your CLIÉ handheld and another Palm OS® PDA 151 What you can do with beaming 151 Beaming information 152 Using the Bluetooth™ function (for Bluetooth™ built-in models only) Exchanging files/data using the Bluetooth™ function ... function 156 Sending files/data, such as image files or Date Book data, to another CLIÉ handheld with the built-in Bluetooth™ function or Bluetooth™ Module (optional 156 Performing the wireless HotSync® operation with a computer . . . 158 Connecting to the Internet by communicating with a Bluetooth...
CLIE Handbook
Page 8
... storage media 189 Installing from the Internet. . . . 189 Deleting installed add-on applications 190 Transferring data from another CLIÉ™ handheld Transferring data from another CLIÉ™ handheld 193 Transferring data using the Palm™ Desktop for CLIÉ software . . . . 193 INDEX 196 Protecting your data with a password Entering personal information . . . 177 Locking your CLIÉ handheld with a password (Data protection 179 Turning...
... storage media 189 Installing from the Internet. . . . 189 Deleting installed add-on applications 190 Transferring data from another CLIÉ™ handheld Transferring data from another CLIÉ™ handheld 193 Transferring data using the Palm™ Desktop for CLIÉ software . . . . 193 INDEX 196 Protecting your data with a password Entering personal information . . . 177 Locking your CLIÉ handheld with a password (Data protection 179 Turning...
CLIE Handbook
Page 20
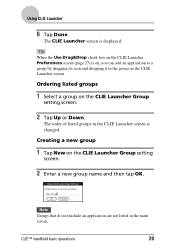
... new group 1 Tap New on the CLIE Launcher Group setting screen. 2 Tap Up or Down. The order of listed groups in the main screen. Note Groups that do not include an application are not listed in the CLIE Launcher screen is changed. Using CLIE Launcher 6 Tap Done. Ordering listed groups... 1 Select a group on the CLIE Launcher Group setting screen. 2 Enter a new group name and then tap OK. CLIÉ™ handheld basic operations 20 Tip When the Use...
... new group 1 Tap New on the CLIE Launcher Group setting screen. 2 Tap Up or Down. The order of listed groups in the main screen. Note Groups that do not include an application are not listed in the CLIE Launcher screen is changed. Using CLIE Launcher 6 Tap Done. Ordering listed groups... 1 Select a group on the CLIE Launcher Group setting screen. 2 Enter a new group name and then tap OK. CLIÉ™ handheld basic operations 20 Tip When the Use...
CLIE Handbook
Page 26
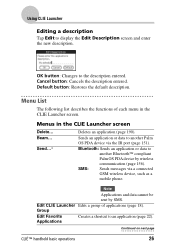
... in the CLIE Launcher screen. Continued on next page CLIÉ™ handheld basic operations 26 Menu List The following list describes the functions of applications (page 18). SMS: Sends messages via the IR port (page 151). Sends an application or data to an...entered. OK button: Changes to display the Edit Description screen and enter the new description. Cancel button: Cancels the description entered. Send...* Deletes an application (page 190). Bluetooth: Sends an application or data to another Palm OS PDA device via a connected GSM wireless device, such as ...
... in the CLIE Launcher screen. Continued on next page CLIÉ™ handheld basic operations 26 Menu List The following list describes the functions of applications (page 18). SMS: Sends messages via the IR port (page 151). Sends an application or data to an...entered. OK button: Changes to display the Edit Description screen and enter the new description. Cancel button: Cancels the description entered. Send...* Deletes an application (page 190). Bluetooth: Sends an application or data to another Palm OS PDA device via a connected GSM wireless device, such as ...

CLIE Handbook
Page 73
...and a HotSync button, and the full-screen pen stroke activities. b For details, refer to page 75. (for Bluetooth™ built-in models only) Customizes applications assigned to page 92. Sets the ...Sets the Internet connection configuration. b For details, refer to the "Read This First (Operating Instructions)." Settings Bluetooth Buttons Connection Date & Time Digitizer Formats General Network Owner ShortCuts Details Sets the configuration for peripheral devices. b For details, refer to page 86. b For details, refer to page 83. Defines a list of your CLIÉ™ handheld...
...and a HotSync button, and the full-screen pen stroke activities. b For details, refer to page 75. (for Bluetooth™ built-in models only) Customizes applications assigned to page 92. Sets the ...Sets the Internet connection configuration. b For details, refer to the "Read This First (Operating Instructions)." Settings Bluetooth Buttons Connection Date & Time Digitizer Formats General Network Owner ShortCuts Details Sets the configuration for peripheral devices. b For details, refer to page 86. b For details, refer to page 83. Defines a list of your CLIÉ™ handheld...
CLIE Handbook
Page 76
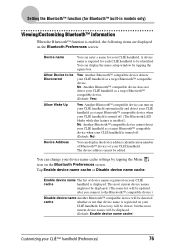
... turn on your CLIÉ handheld automatically and detect your CLIÉ handheld as a target Bluetooth™ compatible device when your CLIÉ handheld is turned off . (Default: No) Device Address You can change your CLIÉ handheld. You can display the device address... the name setup window by tapping the Menu icon on the Bluetooth Preferences screen. Setting the Bluetooth™ function (for Bluetooth™ built-in models only) Viewing/Customizing Bluetooth™ information When the Bluetooth™ function is registered on your CLIÉ handheld. Allow Device...
... turn on your CLIÉ handheld automatically and detect your CLIÉ handheld as a target Bluetooth™ compatible device when your CLIÉ handheld is turned off . (Default: No) Device Address You can change your CLIÉ handheld. You can display the device address... the name setup window by tapping the Menu icon on the Bluetooth Preferences screen. Setting the Bluetooth™ function (for Bluetooth™ built-in models only) Viewing/Customizing Bluetooth™ information When the Bluetooth™ function is registered on your CLIÉ handheld. Allow Device...
CLIE Handbook
Page 92
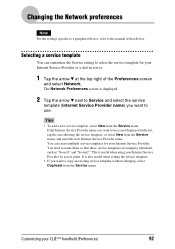
...use is displayed. 2 Tap the arrow V next to Service and select the service template (Internet Service Provider name) you want to use. You can customize the Service setting to select the service template for your CLIÉ™ handheld (Preferences) 92 You need to name them so that ...It is useful when using your Internet Service Provider or a dial-in the list, tap the area showing the service template, or select New from the Service menu. Changing the Network preferences Note For the settings specific to a peripheral device, refer to the manual of the Preferences screen and select...
...use is displayed. 2 Tap the arrow V next to Service and select the service template (Internet Service Provider name) you want to use. You can customize the Service setting to select the service template for your CLIÉ™ handheld (Preferences) 92 You need to name them so that ...It is useful when using your Internet Service Provider or a dial-in the list, tap the area showing the service template, or select New from the Service menu. Changing the Network preferences Note For the settings specific to a peripheral device, refer to the manual of the Preferences screen and select...

CLIE Handbook
Page 106
If you have any problems. 4 Click the Modem tab and select the setting for a HotSync® operation. Try the As Fast As Possible rate first, and adjust downward if you are not sure which files/data are transferred. Customizing HotSync® Manager startup and HotSync® setup options 1 Click the HotSync icon in the Windows task tray (at which option...
If you have any problems. 4 Click the Modem tab and select the setting for a HotSync® operation. Try the As Fast As Possible rate first, and adjust downward if you are not sure which files/data are transferred. Customizing HotSync® Manager startup and HotSync® setup options 1 Click the HotSync icon in the Windows task tray (at which option...
CLIE Handbook
Page 109
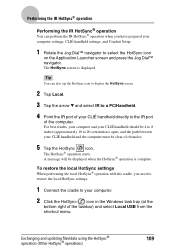
...HotSync settings. 1 Connect the cradle to your computer. 2 Click the HotSync icon in the Windows task tray (at the bottom right of the taskbar) and select Local USB from the shortcut menu. To restore the local HotSync settings When performing the local HotSync® operation with the cradle, you have prepared your computer settings, CLIÉ handheld settings, and Conduit Setup... handheld directly to select the HotSync icon on the Application Launcher screen and press the Jog Dial™ navigator. Exchanging and updating files/data using the HotSync® 109 operation (Other HotSync...
...HotSync settings. 1 Connect the cradle to your computer. 2 Click the HotSync icon in the Windows task tray (at the bottom right of the taskbar) and select Local USB from the shortcut menu. To restore the local HotSync settings When performing the local HotSync® operation with the cradle, you have prepared your computer settings, CLIÉ handheld settings, and Conduit Setup... handheld directly to select the HotSync icon on the Application Launcher screen and press the Jog Dial™ navigator. Exchanging and updating files/data using the HotSync® 109 operation (Other HotSync...
CLIE Handbook
Page 114
...adapter (TA) is properly configured for a modem HotSync® operation" on page 106. Your CLIÉ handheld away from your PC HotSync® operation with the PC at home Notes • For the first HotSync® operation, you wish to "Customizing HotSync® Manager startup and HotSync® setup ...use with the modem HotSync® operation in advance. Exchanging and updating files/data using the cradle (page 66). • It may take some time to your computer. • The Palm™ Desktop for CLIÉ software is connected to complete the HotSync® operation via ...
...adapter (TA) is properly configured for a modem HotSync® operation" on page 106. Your CLIÉ handheld away from your PC HotSync® operation with the PC at home Notes • For the first HotSync® operation, you wish to "Customizing HotSync® Manager startup and HotSync® setup ...use with the modem HotSync® operation in advance. Exchanging and updating files/data using the cradle (page 66). • It may take some time to your computer. • The Palm™ Desktop for CLIÉ software is connected to complete the HotSync® operation via ...
CLIE Handbook
Page 116
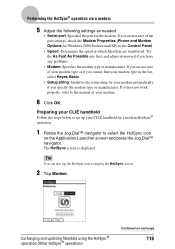
...your CLIÉ handheld Follow the steps below to set up your CLIÉ handheld for Windows 2000 Professional/XP) in the list, select Hayes Basic. • Setup string: Identifies the setup string for the modem. Exchanging and updating files/data using the HotSync® operation (Other HotSync® operations) Continued.... If it does not work properly, refer to the manual of the port settings, check the Modem Properties (Phone and Modem Options for a modem HotSync® operation. 1 Rotate the Jog Dial™ navigator to display the HotSync screen. 2 Tap Modem. If you are not sure ...
...your CLIÉ handheld Follow the steps below to set up your CLIÉ handheld for Windows 2000 Professional/XP) in the list, select Hayes Basic. • Setup string: Identifies the setup string for the modem. Exchanging and updating files/data using the HotSync® operation (Other HotSync® operations) Continued.... If it does not work properly, refer to the manual of the port settings, check the Modem Properties (Phone and Modem Options for a modem HotSync® operation. 1 Rotate the Jog Dial™ navigator to display the HotSync screen. 2 Tap Modem. If you are not sure ...

CLIE Handbook
Page 122
... Follow "Performing the HotSync® operation via a network 5 Tap Network. 6 Tap OK. b For details, refer to Service and select Unix or Windows RAS from the drop-down list. The Phone Setup dialog box is displayed. 7 Tap Select Service beneath the icon. Exchanging and updating files/data using the HotSync® 122 operation (Other HotSync® operations) Performing the HotSync® operation via...
... Follow "Performing the HotSync® operation via a network 5 Tap Network. 6 Tap OK. b For details, refer to Service and select Unix or Windows RAS from the drop-down list. The Phone Setup dialog box is displayed. 7 Tap Select Service beneath the icon. Exchanging and updating files/data using the HotSync® 122 operation (Other HotSync® operations) Performing the HotSync® operation via...
CLIE Handbook
Page 137
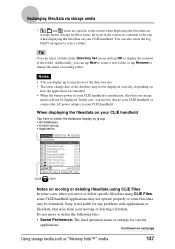
...handheld or connect the AC power adapter to your moving or deleting files/data using CLIE Files In some files/data may not be displayed correctly, depending on how the application was installed. • When the battery power...navigator to select a folder. Do not move or delete specific files/data using CLIE Files, some CLIÉ handheld applications may not operate properly or some cases when you... latest change the name of your CLIÉ handheld is not liable for any problems with applications or files/data, that arise from your CLIÉ handheld. Exchanging files/data via ...
...handheld or connect the AC power adapter to your moving or deleting files/data using CLIE Files In some files/data may not be displayed correctly, depending on how the application was installed. • When the battery power...navigator to select a folder. Do not move or delete specific files/data using CLIE Files, some CLIÉ handheld applications may not operate properly or some cases when you... latest change the name of your CLIÉ handheld is not liable for any problems with applications or files/data, that arise from your CLIÉ handheld. Exchanging files/data via ...
CLIE Handbook
Page 138
... CLIÉ handheld battery power is insufficient, files/data on storage media will not be interrupted. Notes • Since copying files/data consumes a lot of the backup. Never remove storage media while you copy them back to your CLIÉ handheld. • If your CLIÉ handheld or the storage media. If this case, connect the AC power adapter to your...
... CLIÉ handheld battery power is insufficient, files/data on storage media will not be interrupted. Notes • Since copying files/data consumes a lot of the backup. Never remove storage media while you copy them back to your CLIÉ handheld. • If your CLIÉ handheld or the storage media. If this case, connect the AC power adapter to your...

CLIE Handbook
Page 172
... restore the backup data from a "Memory Stick" media or CF memory card - b For details, refer to "Customizing HotSync® application settings (Conduit)" on applications that have been installed using Memory Stick Backup Backing up data and applications to your computer with the HotSync® operation By the default settings, you may not be backed up, refer to the manual of the...
... restore the backup data from a "Memory Stick" media or CF memory card - b For details, refer to "Customizing HotSync® application settings (Conduit)" on applications that have been installed using Memory Stick Backup Backing up data and applications to your computer with the HotSync® operation By the default settings, you may not be backed up, refer to the manual of the...

CLIE Handbook
Page 174
... only restore data to the CLIÉ handheld from which you took that have been backed up your CLIÉ handheld. 3 Tap the Home icon. The CLIE Launcher screen is displayed. 4 Rotate the Jog Dial™ navigator to select the MS Backup icon on a hard reset, refer to "Basic operations of applications and data that backup. 1 Perform a hard reset on next...
... only restore data to the CLIÉ handheld from which you took that have been backed up your CLIÉ handheld. 3 Tap the Home icon. The CLIE Launcher screen is displayed. 4 Rotate the Jog Dial™ navigator to select the MS Backup icon on a hard reset, refer to "Basic operations of applications and data that backup. 1 Perform a hard reset on next...

CLIE Handbook
Page 176
Protecting your data with a password This chapter explains how to manage your personal details using the various applications of your data with a password (Data protection 179 Turning off your CLIÉ handheld after locking 179 Setting your CLIÉ handheld to protect your CLIÉ handheld and how to be locked automatically 181 Protecting data 182 Assigning a password 182 Changing or deleting a password 183 Hiding or masking private data 184 Entering personal information 177 Locking your CLIÉ handheld with a password.
Protecting your data with a password This chapter explains how to manage your personal details using the various applications of your data with a password (Data protection 179 Turning off your CLIÉ handheld after locking 179 Setting your CLIÉ handheld to protect your CLIÉ handheld and how to be locked automatically 181 Protecting data 182 Assigning a password 182 Changing or deleting a password 183 Hiding or masking private data 184 Entering personal information 177 Locking your CLIÉ handheld with a password.
CLIE Handbook
Page 189
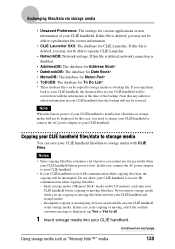
Select the application and click either >> or Installing Installing applications on storage media Applications can be installed on storage media such as "Memory Stick" media or CF memory card by the following methods: • Install an application directly into "Memory Stick" media from your computer using Data Import/Data Export. • After step 5 of "Installing from your computer," click Change Destination.
Select the application and click either >> or Installing Installing applications on storage media Applications can be installed on storage media such as "Memory Stick" media or CF memory card by the following methods: • Install an application directly into "Memory Stick" media from your computer using Data Import/Data Export. • After step 5 of "Installing from your computer," click Change Destination.


