Quick Start Guide
Page 2
... FROM ANY DESCRIBED WEB SITE. Some of Sony. Subscriptions to DVD, DVgate Plus, PictureGear, Giga Pocket, MagicGate, Memory Stick, the Memory Stick logo, SonicStage, ATRAC3, and i.LINK are trademarks or registered trademarks of their respective owners. 2 Financial services may require prior arrangements with this computer may apply). Sony, VAIO, the VAIO logo, Click to online service providers...
... FROM ANY DESCRIBED WEB SITE. Some of Sony. Subscriptions to DVD, DVgate Plus, PictureGear, Giga Pocket, MagicGate, Memory Stick, the Memory Stick logo, SonicStage, ATRAC3, and i.LINK are trademarks or registered trademarks of their respective owners. 2 Financial services may require prior arrangements with this computer may apply). Sony, VAIO, the VAIO logo, Click to online service providers...

Quick Start Guide
Page 19
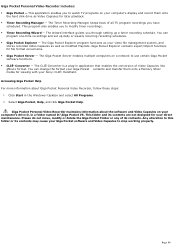
... Light is green while the power is on and amber when the computer is in Stand by mode. * The remote control is supplied with models that are equipped with Giga Pocket® Personal Video Recorder features. About the Front Panel 4 Memory Stick® media access indicator Light is amber when the... Memory Stick media slot is in use. 5 Power button Press the power button in from the right side only, to avoid damage to this control. Press the power button in from the right side, to the desired viewing angle. 19 Handling the attached LCD monitor Your VAIO® computer has ...
... Light is green while the power is on and amber when the computer is in Stand by mode. * The remote control is supplied with models that are equipped with Giga Pocket® Personal Video Recorder features. About the Front Panel 4 Memory Stick® media access indicator Light is amber when the... Memory Stick media slot is in use. 5 Power button Press the power button in from the right side only, to avoid damage to this control. Press the power button in from the right side, to the desired viewing angle. 19 Handling the attached LCD monitor Your VAIO® computer has ...

Quick Start Guide
Page 20
... disc from and to a Memory Stick media. 4 PC Card slot A PC card (PCMCIA card) can be inserted into this slot to locate and identify the appropriate jack or port. VAIO Computer Quick Start About the Side Panels The side panels of your computer's functional capabilities. 20 The ...icons on the side panel help to increase your computer provide the connections for optical drive information. 3 Memory Stick® media slot Reads and...
... disc from and to a Memory Stick media. 4 PC Card slot A PC card (PCMCIA card) can be inserted into this slot to locate and identify the appropriate jack or port. VAIO Computer Quick Start About the Side Panels The side panels of your computer's functional capabilities. 20 The ...icons on the side panel help to increase your computer provide the connections for optical drive information. 3 Memory Stick® media slot Reads and...

VAIO User Guide (primary manual)
Page 15
About the Front Panel The front panel of your VAIO® computer is s upplied with models that are equipped with indicator lights and built-in speakers. Page 15 Front panel 1 Stereo speakers (built-in) The stereo speakers ... access indicator Light is amber while reading and writing data. 4 Memory Stick® media access indicator Light is amber when the Memory Stick media slot is in use. 5 Power button Press the power button in from the right side, to turn the computer on and off. 6 Power indicator Light is green while the...
About the Front Panel The front panel of your VAIO® computer is s upplied with models that are equipped with indicator lights and built-in speakers. Page 15 Front panel 1 Stereo speakers (built-in) The stereo speakers ... access indicator Light is amber while reading and writing data. 4 Memory Stick® media access indicator Light is amber when the Memory Stick media slot is in use. 5 Power button Press the power button in from the right side, to turn the computer on and off. 6 Power indicator Light is green while the...

VAIO User Guide (primary manual)
Page 17
About the Front Panel The front panel of your VAIO® computer is s upplied with models that are equipped with indicator lights and built-in speakers. Front panel 1 Stereo speakers (built-in) The stereo speakers provide sound ... access indicator Light is amber while reading and writing data. 4 Memory Stick® media access indicator Light is amber when the Memory Stick media slot is in use. 5 Power button Press the power button in from the right side, to turn the computer on and off. 6 Power indicator Light is green while the...
About the Front Panel The front panel of your VAIO® computer is s upplied with models that are equipped with indicator lights and built-in speakers. Front panel 1 Stereo speakers (built-in) The stereo speakers provide sound ... access indicator Light is amber while reading and writing data. 4 Memory Stick® media access indicator Light is amber when the Memory Stick media slot is in use. 5 Power button Press the power button in from the right side, to turn the computer on and off. 6 Power indicator Light is green while the...

VAIO User Guide (primary manual)
Page 19
... specifications sheet for optical drive information. 3 Memory Stick® media slot Reads and writes data from and to a Memory Stick media. 4 PC Card slot A PC card (PCMCIA card) can be inserted into this slot to increase your computer provide the connections for supplied and optional accessories.... Left panel Page 19 The icons on the side panel help you locate and identify the appropriate jack or port. About the Side Panels The side panels of your computer's functional capabilities.
... specifications sheet for optical drive information. 3 Memory Stick® media slot Reads and writes data from and to a Memory Stick media. 4 PC Card slot A PC card (PCMCIA card) can be inserted into this slot to increase your computer provide the connections for supplied and optional accessories.... Left panel Page 19 The icons on the side panel help you locate and identify the appropriate jack or port. About the Side Panels The side panels of your computer's functional capabilities.
VAIO User Guide (primary manual)
Page 56
...timer recordings. Timer Recording Wizard - You can change the format your Giga Pocket contents and transfer them onto a Memory Stick® media for your computer's display and record them onto the hard disk drive as modified Playlists. Accessing Giga Pocket Help For more information about the ..., and click Giga Pocket Help. Please do not move, modify or delete the Giga Pocket Folder or any of its contents may cause your Sony® CLIÉ® Handheld. This program also enables you to use certain Giga Pocket software functions. CLIÉ® Converter ...
...timer recordings. Timer Recording Wizard - You can change the format your Giga Pocket contents and transfer them onto a Memory Stick® media for your computer's display and record them onto the hard disk drive as modified Playlists. Accessing Giga Pocket Help For more information about the ..., and click Giga Pocket Help. Please do not move, modify or delete the Giga Pocket Folder or any of its contents may cause your Sony® CLIÉ® Handheld. This program also enables you to use certain Giga Pocket software functions. CLIÉ® Converter ...

VAIO User Guide (primary manual)
Page 93
The Sony CLIÉ Handheld personal entertainment organizers provide a rich and compelling handheld computing experience. Page 93 CLIÉ Converter The CLIÉ® Converter is ready to deliver music and video with amazing clarity. Powered by the Palm ... use the CLIÉ Converter plug-in application that enables the conversion of Video Capsules. For more information on this exciting device, go to your Sony® CLIÉ® Handheld. You can convert your Giga Pocket® Video Capsules and save to...
The Sony CLIÉ Handheld personal entertainment organizers provide a rich and compelling handheld computing experience. Page 93 CLIÉ Converter The CLIÉ® Converter is ready to deliver music and video with amazing clarity. Powered by the Palm ... use the CLIÉ Converter plug-in application that enables the conversion of Video Capsules. For more information on this exciting device, go to your Sony® CLIÉ® Handheld. You can convert your Giga Pocket® Video Capsules and save to...

VAIO User Guide (primary manual)
Page 96
... box appears. 4. Your converted video files can be played back on your computer. 2. Page 96 Insert a Memory Stick® media into the Memory Stick media slot on CLIÉ Handhelds that support the use of a Memory Stick media. From the Giga Pocket -> CLIÉ Converter main window, ...click to select the videos you want to transfer to a Memory Stick media 1. During transfer, the Forwarding dialog box appears, displaying the transfer status...
... box appears. 4. Your converted video files can be played back on your computer. 2. Page 96 Insert a Memory Stick® media into the Memory Stick media slot on CLIÉ Handhelds that support the use of a Memory Stick media. From the Giga Pocket -> CLIÉ Converter main window, ...click to select the videos you want to transfer to a Memory Stick media 1. During transfer, the Forwarding dialog box appears, displaying the transfer status...

VAIO User Guide (primary manual)
Page 102
Configuring Your VAIO Computer This section provides basic information about using i.LINK devices, Memory Stick media, PC Cards, and changing default settings. About i.LINK Compatibility VAIO Action Setup About the Memory Stick Media Slot About the PC Card Slot Page 102
Configuring Your VAIO Computer This section provides basic information about using i.LINK devices, Memory Stick media, PC Cards, and changing default settings. About i.LINK Compatibility VAIO Action Setup About the Memory Stick Media Slot About the PC Card Slot Page 102

VAIO User Guide (primary manual)
Page 109
... Protected content can store different data formats on a single Memory Stick media. You can store different data formats on Memory Stick® media. Sony suggests using Sony® MagicGate technology. Authentication ensures that protected content is equipped with SonicStage or OpenMG software. VAIO® computers support Memory Stick PRO media for exchanging and sharing digital data with...
... Protected content can store different data formats on a single Memory Stick media. You can store different data formats on Memory Stick® media. Sony suggests using Sony® MagicGate technology. Authentication ensures that protected content is equipped with SonicStage or OpenMG software. VAIO® computers support Memory Stick PRO media for exchanging and sharing digital data with...

VAIO User Guide (primary manual)
Page 110
... to store and transfer any data created with the new Memory Stick PRO media. Visit the Sony Online Support Web site at http://www.sony.com/pcsupport regularly for data storage purposes only. VAIO® computers support Memory Stick PRO media for the latest information on a single Memory Stick media. You can store different data formats on...
... to store and transfer any data created with the new Memory Stick PRO media. Visit the Sony Online Support Web site at http://www.sony.com/pcsupport regularly for data storage purposes only. VAIO® computers support Memory Stick PRO media for the latest information on a single Memory Stick media. You can store different data formats on...

VAIO User Guide (primary manual)
Page 111
If the media does not insert easily, remove it from the slot and verify that it into the Memory Stick media slot, located on the right panel. Carefully reinsert the Memory Stick media, but do not force it is not upside-down or backwards. Page 111 To insert a Memory Stick media 1. Inserting a Mem ory Stick m edia 2. Insert the Memory Stick® media into the slot.
If the media does not insert easily, remove it from the slot and verify that it into the Memory Stick media slot, located on the right panel. Carefully reinsert the Memory Stick media, but do not force it is not upside-down or backwards. Page 111 To insert a Memory Stick media 1. Inserting a Mem ory Stick m edia 2. Insert the Memory Stick® media into the slot.

VAIO User Guide (primary manual)
Page 112
Carefully remove the Memory Stick media from the Memory Stick slot. Rem ov ing a Mem ory Stick Media 2. To remove a Memory Stick media A small portion of the Memory Stick® media remains extended when it is on. The media or its data may become damaged. Do not remove the Memory Stick media while the media access indicator light is inserted into the Memory Stick media slot. 1. Page 112 Press the extended Memory Stick media to grasp it from the slot. The media extends further, enabling you to release it .
Carefully remove the Memory Stick media from the Memory Stick slot. Rem ov ing a Mem ory Stick Media 2. To remove a Memory Stick media A small portion of the Memory Stick® media remains extended when it is on. The media or its data may become damaged. Do not remove the Memory Stick media while the media access indicator light is inserted into the Memory Stick media slot. 1. Page 112 Press the extended Memory Stick media to grasp it from the slot. The media extends further, enabling you to release it .

VAIO User Guide (primary manual)
Page 113
When you slide the tab to the un-LOCK position, you slide the write-protect tab to the LOCK position, your Memory Stick media is in the LOCK position. Locking the Mem ory Stick Media Page 113 The write-protect tab prevents accidental changes to or modify your Memory Stick media. You cannot delete, copy, or save information on the media while the write-protect tab is write-protected. Protecting data on your Memory Stick media's contents. When you can write to information recorded on Memory Stick media Memory Stick media contain a write-protect tab.
When you slide the tab to the un-LOCK position, you slide the write-protect tab to the LOCK position, your Memory Stick media is in the LOCK position. Locking the Mem ory Stick Media Page 113 The write-protect tab prevents accidental changes to or modify your Memory Stick media. You cannot delete, copy, or save information on the media while the write-protect tab is write-protected. Protecting data on your Memory Stick media's contents. When you can write to information recorded on Memory Stick media Memory Stick media contain a write-protect tab.

VAIO User Guide (primary manual)
Page 117
This section provides information about upgrading your VAIO® computer. Upgrading and Maintaining Your VAIO Computer In the future you may want to increase the functionality of your system. Overview Installing Memory Replacing the Lithium Battery Replacing a Hard Disk Drive Page 117
This section provides information about upgrading your VAIO® computer. Upgrading and Maintaining Your VAIO Computer In the future you may want to increase the functionality of your system. Overview Installing Memory Replacing the Lithium Battery Replacing a Hard Disk Drive Page 117

VAIO User Guide (primary manual)
Page 119
...to the integrated circuits in this section. To view the specific hardware configuration for your computer on the computer purchased. Follow the procedures described here only at http://www.sony.com/pcsupport, for example, cellophane wrappers). Otherwise, damage may result in a carpeted ...119 Always turn the power off before you plan to disconnect your system, see the online specifications sheet. Installing Memory The amount of preinstalled memory can damage disk drives, add-on the system configuration purchased. Electrostatic discharge (ESD) can vary, depending on ...
...to the integrated circuits in this section. To view the specific hardware configuration for your computer on the computer purchased. Follow the procedures described here only at http://www.sony.com/pcsupport, for example, cellophane wrappers). Otherwise, damage may result in a carpeted ...119 Always turn the power off before you plan to disconnect your system, see the online specifications sheet. Installing Memory The amount of preinstalled memory can damage disk drives, add-on the system configuration purchased. Electrostatic discharge (ESD) can vary, depending on ...

VAIO User Guide (primary manual)
Page 120
... any procedures described in your computer. Before upgrading your computer on the Sony Online Support Web site at an ESD workstation. Your computer may result in your computer to temporarily remove add-on ...cards or other components. See the specifications sheet for your computer Disconnect the computer from the illustrations, depending on the system configuration purchased. To view the specific hardware configuration for details about the memory...
... any procedures described in your computer. Before upgrading your computer on the Sony Online Support Web site at an ESD workstation. Your computer may result in your computer to temporarily remove add-on ...cards or other components. See the specifications sheet for your computer Disconnect the computer from the illustrations, depending on the system configuration purchased. To view the specific hardware configuration for details about the memory...

VAIO User Guide (primary manual)
Page 122
The work surface must be free of the memory cover and disengage the memory cover tabs from the notches on a table or other flat surface. Remove the memory cover to access the memory module slots. Gently place the system unit on a flat and stable surface, with the LCD screen facing down on the chassis. Rem ov ing the m em ory cov er 3. Page 122 Removing the memory cover 1. Lift the lower edge of dirt or debris that may damage the screen. 2. Use caution when placing the LCD screen face-down .
The work surface must be free of the memory cover and disengage the memory cover tabs from the notches on a table or other flat surface. Remove the memory cover to access the memory module slots. Gently place the system unit on a flat and stable surface, with the LCD screen facing down on the chassis. Rem ov ing the m em ory cov er 3. Page 122 Removing the memory cover 1. Lift the lower edge of dirt or debris that may damage the screen. 2. Use caution when placing the LCD screen face-down .

VAIO User Guide (primary manual)
Page 123
Rem ov ing a m em ory m odule 3. Page 123 Push down on the latches, located on both sides of the module, to remove. 2. Grasp the memory module by the sides and remove from the slot. Removing a memory module 1. Store the module in a static-free bag. Locate the memory module(s) you wish to gently eject it from the system unit.
Rem ov ing a m em ory m odule 3. Page 123 Push down on the latches, located on both sides of the module, to remove. 2. Grasp the memory module by the sides and remove from the slot. Removing a memory module 1. Store the module in a static-free bag. Locate the memory module(s) you wish to gently eject it from the system unit.


