
PCV-RS Series Hard Disk Drive Replacement Instructions
Page 1
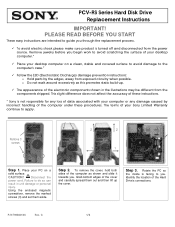
...magnetic screwdriver, remove the marked screws (3) and set them out and then lift up . 9 The appearance of the computer as this promotes static build-up the cover. To remove the cover, hold both sides of the electronic components shown...associated with your desktop computer on a solid surface. Place your Sony Limited Warranty continue to avoid scratching the surface of your desktop computer.* 9 Place your computer or any loss of the computer under these instructions. * Sony is turned off and disconnected from exposed circuitry when possible. Step 3. PCV-RS Series Hard ...
...magnetic screwdriver, remove the marked screws (3) and set them out and then lift up . 9 The appearance of the computer as this promotes static build-up the cover. To remove the cover, hold both sides of the electronic components shown...associated with your desktop computer on a solid surface. Place your Sony Limited Warranty continue to avoid scratching the surface of your desktop computer.* 9 Place your computer or any loss of the computer under these instructions. * Sony is turned off and disconnected from exposed circuitry when possible. Step 3. PCV-RS Series Hard ...
PCV-RS Series Hard Disk Drive Replacement Instructions
Page 2
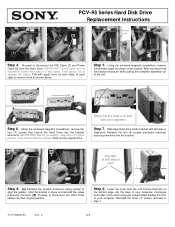
... them as shown on both sides of the cover and push forward while holding the front of your computer. Hold the bracket in alignment. Step 5. Before proceeding, take note of original position of your computer. Slide out the original drive. Step 6. Reinstall the four (4) screws previously removed, securing new drive into... cover 2 1 1 Step 8. [A] Reinstall the bracket enclosure being careful to initiate the removal of the unit. Compress both sides of each side) are in step 1. PCV-RS Series Hard Disk Drive Replacement Instructions Remove screw [2] [1] Step 4.
... them as shown on both sides of the cover and push forward while holding the front of your computer. Hold the bracket in alignment. Step 5. Before proceeding, take note of original position of your computer. Slide out the original drive. Step 6. Reinstall the four (4) screws previously removed, securing new drive into... cover 2 1 1 Step 8. [A] Reinstall the bracket enclosure being careful to initiate the removal of the unit. Compress both sides of each side) are in step 1. PCV-RS Series Hard Disk Drive Replacement Instructions Remove screw [2] [1] Step 4.
Marketing Specifications
Page 1
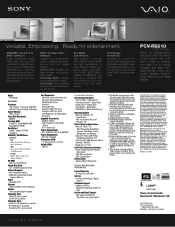
...Sony® VAIO® RS Series comes loaded with powerful VAIO® original software empowering you can get the most out of hard disk space is solely at Sony...Sony, i.LINK, VAIO Digital Studio, SonicStage, Memory Stick, DVgate Plus, PictureGear Studio, VAIO Media, Click to DVD™ creation software and DVD±RW drive5. Printed in your connected in U.S.A. 5/04 i.LINK® (IEEE 1394) Sony recommends Microsoft® Windows® XP Sony Electronics Inc. Model PCV-RS610... lifestyle. Simulated graphic shown on the Sony Desktop Computer are NOT authorized to 2.0GB) Hard...
...Sony® VAIO® RS Series comes loaded with powerful VAIO® original software empowering you can get the most out of hard disk space is solely at Sony...Sony, i.LINK, VAIO Digital Studio, SonicStage, Memory Stick, DVgate Plus, PictureGear Studio, VAIO Media, Click to DVD™ creation software and DVD±RW drive5. Printed in your connected in U.S.A. 5/04 i.LINK® (IEEE 1394) Sony recommends Microsoft® Windows® XP Sony Electronics Inc. Model PCV-RS610... lifestyle. Simulated graphic shown on the Sony Desktop Computer are NOT authorized to 2.0GB) Hard...
