
Analog PCLink Operating Instructions
Page 19
... reception, which can radiate radio frequency energy and, if not installed and used in accordance with Part 15 of Conformity Trade Name: XITEL Model No.: MD-Port AN1 Responsible Party: Xitel Pty. Ltd. Mitchell Act. 2911 Australia Telephone No.: (02) 6241-8272 This device complies with the instructions, may cause undesired...
... reception, which can radiate radio frequency energy and, if not installed and used in accordance with Part 15 of Conformity Trade Name: XITEL Model No.: MD-Port AN1 Responsible Party: Xitel Pty. Ltd. Mitchell Act. 2911 Australia Telephone No.: (02) 6241-8272 This device complies with the instructions, may cause undesired...

Digital PCLink Operating Instructions
Page 19
... harmful interference, and (2) this equipment. 19 This equipment generates, uses, and can be determined by one or more of Conformity Trade Name: XITEL Model No.: MD-Port DG2/DG1 Responsible Party: Xitel Pty. If this equipment does cause harmful interference to provide reasonable protection against harmful interference in accordance with Part...
... harmful interference, and (2) this equipment. 19 This equipment generates, uses, and can be determined by one or more of Conformity Trade Name: XITEL Model No.: MD-Port DG2/DG1 Responsible Party: Xitel Pty. If this equipment does cause harmful interference to provide reasonable protection against harmful interference in accordance with Part...

Operating Instructions
Page 6
Table of contents Looking at the controls 8 Getting started 11 Recording an MD right away 14 Playing an MD right away 18 Various ways of recording Two ways of connecting to a sound source 21 Recording with analog input (line cable required 23 Recording for ...
Table of contents Looking at the controls 8 Getting started 11 Recording an MD right away 14 Playing an MD right away 18 Various ways of recording Two ways of connecting to a sound source 21 Recording with analog input (line cable required 23 Recording for ...

Operating Instructions
Page 7
Additional information Precautions 51 Troubleshooting 56 System limitations 58 Messages 60 Specifications 63 What is an MD 65 7
Additional information Precautions 51 Troubleshooting 56 System limitations 58 Messages 60 Specifications 63 What is an MD 65 7

Operating Instructions
Page 9
... (15) Lights up along with the remaining time of the track, the remaining time of the MD, or the remaining number of tracks. When flashing, the recorder is rotating for recording, playing or editing an MD. 9 J REC REMAIN/ REMAIN (remaining time/ tracks) indication (32) (36) Lights up ... the disc is in record standby mode. B Play mode indication (34) Shows the play mode of the MD being played or recorded. E Mega bass indication (35) F Level meter (30) Shows the volume of the MD. The display window A B C D E F GHI J K A Character information display (32) (34) Displays the ...
... (15) Lights up along with the remaining time of the track, the remaining time of the MD, or the remaining number of tracks. When flashing, the recorder is rotating for recording, playing or editing an MD. 9 J REC REMAIN/ REMAIN (remaining time/ tracks) indication (32) (36) Lights up ... the disc is in record standby mode. B Play mode indication (34) Shows the play mode of the MD being played or recorded. E Mega bass indication (35) F Level meter (30) Shows the volume of the MD. The display window A B C D E F GHI J K A Character information display (32) (34) Displays the ...

Operating Instructions
Page 12
HOLD to i 1 Connect the supplied headphones/earphones with the remote control to i. 2 Slide HOLD in the opposite direction of the arrow (.) to unlock the controls. 4 Insert an MD. (Use a recordable MD for recording.) 1 Press OPEN to open the lid. 2 Insert an MD with the label side facing front, and press the lid down to close. 12 3 Make connections and unlock the control.
HOLD to i 1 Connect the supplied headphones/earphones with the remote control to i. 2 Slide HOLD in the opposite direction of the arrow (.) to unlock the controls. 4 Insert an MD. (Use a recordable MD for recording.) 1 Press OPEN to open the lid. 2 Insert an MD with the label side facing front, and press the lid down to close. 12 3 Make connections and unlock the control.

Operating Instructions
Page 14
...sampling rates, such as a DAT deck or a BS tuner, using an optical cable (supplied) to a wall outlet AC power adaptor (supplied) CD player, MD player, DVD video player, etc. Optical plug to DIGITAL OUT (OPTICAL) Optical cable (supplied)* Optical miniplug to DC IN 3V to LINE IN (OPTICAL) &#...supplied cable consists of one or the other of the plugs on the supplied cable may differ, depending on digital recording" (page 54). Recording an MD right away! Connect to a digital source using the built-in sampling rate converter. Portable CD player, etc. Using the AC power adaptor (supplied...
...sampling rates, such as a DAT deck or a BS tuner, using an optical cable (supplied) to a wall outlet AC power adaptor (supplied) CD player, MD player, DVD video player, etc. Optical plug to DIGITAL OUT (OPTICAL) Optical cable (supplied)* Optical miniplug to DC IN 3V to LINE IN (OPTICAL) &#...supplied cable consists of one or the other of the plugs on the supplied cable may differ, depending on digital recording" (page 54). Recording an MD right away! Connect to a digital source using the built-in sampling rate converter. Portable CD player, etc. Using the AC power adaptor (supplied...

Operating Instructions
Page 15
... indication is being recorded. Then press and slide REC. about 10 seconds when using AC power adaptor. - X2) Press X again to the right. 2 Record an MD. REC indication lights up in the display. To Record from the end of recording and press x to record. N, > or . After you want to stop recording...
... indication is being recorded. Then press and slide REC. about 10 seconds when using AC power adaptor. - X2) Press X again to the right. 2 Record an MD. REC indication lights up in the display. To Record from the end of recording and press x to record. N, > or . After you want to stop recording...

Operating Instructions
Page 16
...8226; If the power supply is not record-protected (page 54). • Premastered MDs cannot be counted as ESP*) on the display. Check the point to resume recording...adaptor If the AC power adaptor does not fit the wall outlet, use the AC plug adaptor. To Remove the MD Press x and open the lid.3) (The lid does not open while "TOC Edit" flashing in the display, ...then it will always start • Make sure the recorder is not locked (page 38). • Make sure the MD is disrupted (i.e. If the recording does not start from a portable CD player: -Some portable CD players may not be...
...8226; If the power supply is not record-protected (page 54). • Premastered MDs cannot be counted as ESP*) on the display. Check the point to resume recording...adaptor If the AC power adaptor does not fit the wall outlet, use the AC plug adaptor. To Remove the MD Press x and open the lid.3) (The lid does not open while "TOC Edit" flashing in the display, ...then it will always start • Make sure the recorder is not locked (page 38). • Make sure the MD is disrupted (i.e. If the recording does not start from a portable CD player: -Some portable CD players may not be...

Operating Instructions
Page 18
... x. to adjust the volume. Playback starts from the point you press x, the recorder will be shown in parentheses. 1 Play an MD. N >/N x VOL +/- x VOL +/- 1 Press N (flip the lever towards >/N). Playing an MD right away! about 10 seconds when using AC power adaptor. - After you last stopped playing. To use the buttons and control...
... x. to adjust the volume. Playback starts from the point you press x, the recorder will be shown in parentheses. 1 Play an MD. N >/N x VOL +/- x VOL +/- 1 Press N (flip the lever towards >/N). Playing an MD right away! about 10 seconds when using AC power adaptor. - After you last stopped playing. To use the buttons and control...

Operating Instructions
Page 19
Go forward while playing1) hold the lever towards >/N). Remove the MD x (a long beep) and open the lid, the point to start play will change to resume play. or >/N on the remote control). 2) You can turn off ...
Go forward while playing1) hold the lever towards >/N). Remove the MD x (a long beep) and open the lid, the point to start play will change to resume play. or >/N on the remote control). 2) You can turn off ...
Operating Instructions
Page 20
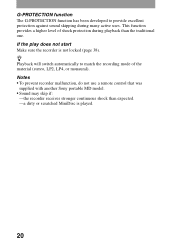
... recording mode of shock protection during many active uses. Notes • To prevent recorder malfunction, do not use a remote control that was supplied with another Sony portable MD model. • Sound may skip if: -the recorder receives stronger continuous shock than the traditional one. If the play does not start Make sure...
... recording mode of shock protection during many active uses. Notes • To prevent recorder malfunction, do not use a remote control that was supplied with another Sony portable MD model. • Sound may skip if: -the recorder receives stronger continuous shock than the traditional one. If the play does not start Make sure...

Operating Instructions
Page 21
...) (page 23) Signal from the source Digital Analog Even when a digital source (such as both digital and analog input jacks. To record, see "Recording an MD right away!" (page 14) to record using analog (line) input. Various ways of recording Two ways of connecting to a sound source The input jack of...
...) (page 23) Signal from the source Digital Analog Even when a digital source (such as both digital and analog input jacks. To record, see "Recording an MD right away!" (page 14) to record using analog (line) input. Various ways of recording Two ways of connecting to a sound source The input jack of...
Operating Instructions
Page 22
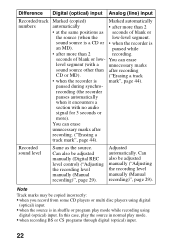
...). Adjusted automatically. Recorded sound level Same as the source (when the sound source is a CD or an MD). • after more than 2 seconds of blank or lowlevel segment (with a sound source other than CD or MD). • when the recorder is paused during synchrorecording (the recorder pauses automatically when it encounters a section...
...). Adjusted automatically. Recorded sound level Same as the source (when the sound source is a CD or an MD). • after more than 2 seconds of blank or lowlevel segment (with a sound source other than CD or MD). • when the recorder is paused during synchrorecording (the recorder pauses automatically when it encounters a section...

Operating Instructions
Page 23
... analog input. The recording continues from a portable CD player, set the CD player to pause and then start recording. For recording operations, see "Recording an MD right away!" (page 14). Note If you temporarily stop a recording operation by pressing X, a track mark will be added at that point when you want to...
... analog input. The recording continues from a portable CD player, set the CD player to pause and then start recording. For recording operations, see "Recording an MD right away!" (page 14). Note If you temporarily stop a recording operation by pressing X, a track mark will be added at that point when you want to...

Operating Instructions
Page 24
...right. 24 Each time you record a stereo source in monaural, LP2, or LP4 mode can be mixed. 3) When using an 80-minute recordable MD 2 Press and slide REC to select the desired recording mode. Monaural2) MONO Approx. 160 min. 1) For better sound quality, record in normal stereo...2 times (LP2) or 4 times (LP4) the normal recording time. LP2 stereo LP2 Approx. 160 min. MDs recorded in monaural, the sounds from left and right will be played back only on MD players or recorders with a monaural, LP2, or LP4 playback mode. Recording mode1) Display Recording time3) Stereo (...
...right. 24 Each time you record a stereo source in monaural, LP2, or LP4 mode can be mixed. 3) When using an 80-minute recordable MD 2 Press and slide REC to select the desired recording mode. Monaural2) MONO Approx. 160 min. 1) For better sound quality, record in normal stereo...2 times (LP2) or 4 times (LP4) the normal recording time. LP2 stereo LP2 Approx. 160 min. MDs recorded in monaural, the sounds from left and right will be played back only on MD players or recorders with a monaural, LP2, or LP4 playback mode. Recording mode1) Display Recording time3) Stereo (...

Operating Instructions
Page 25
...than normal. If noise is produced, it is because of the recording mode when you try to play an MD recorded in LP2 or LP4 on the display. • Sound recorded through headphones/earphones, etc. • ...source with certain sound sources. To start and "LP:" will appear on MD players or recorders that you record in sync with the source player (Synchro-recording) You can be produced...recordings of a digital source on very rare occasions with a digital cable, and insert a recordable MD. This is recommended that do not support these modes, playback will not start /stop recording,...
...than normal. If noise is produced, it is because of the recording mode when you try to play an MD recorded in LP2 or LP4 on the display. • Sound recorded through headphones/earphones, etc. • ...source with certain sound sources. To start and "LP:" will appear on MD players or recorders that you record in sync with the source player (Synchro-recording) You can be produced...recordings of a digital source on very rare occasions with a digital cable, and insert a recordable MD. This is recommended that do not support these modes, playback will not start /stop recording,...
Operating Instructions
Page 26
2 Press
2 Press
Operating Instructions
Page 27
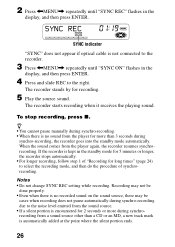
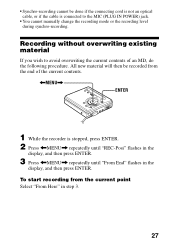
Recording without overwriting existing material If you wish to the MIC (PLUG IN POWER) jack. • You cannot manually change the recording mode or the recording level during synchro-recording. • Synchro-recording cannot be recorded from the end of an MD, do the following procedure. All new material will then be done if the connecting cord is not an optical cable, or if the cable is connected to avoid overwriting the current contents of the current contents.
Recording without overwriting existing material If you wish to the MIC (PLUG IN POWER) jack. • You cannot manually change the recording mode or the recording level during synchro-recording. • Synchro-recording cannot be recorded from the end of an MD, do the following procedure. All new material will then be done if the connecting cord is not an optical cable, or if the cable is connected to avoid overwriting the current contents of the current contents.
Operating Instructions
Page 28
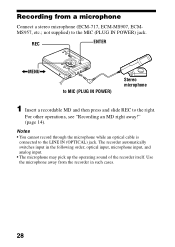
REC ENTER Recording from a microphone Connect a stereo microphone (ECM-717, ECM-MS907, ECMMS957, etc.; not supplied) to the MIC (PLUG IN POWER) jack.
REC ENTER Recording from a microphone Connect a stereo microphone (ECM-717, ECM-MS907, ECMMS957, etc.; not supplied) to the MIC (PLUG IN POWER) jack.


