
Operating Instructions
Page 6
... reproducing fine images. The lens for this may render the discs unusable or image data breakdown, damage or loss may cause irrecoverable damage to your eyes. About the Carl Zeiss lens (MVC-CD400 only) This camera is capable of the pixels are normal in the manufacturing process... Be careful when placing the camera near a window or outdoors. Do not shake or strike the camera In addition to malfunctions and inability to record images, this camera uses the MTF* measurement system for cameras developed jointly by Carl Zeiss, in Germany, and Sony Corporation, and offers the same...
... reproducing fine images. The lens for this may render the discs unusable or image data breakdown, damage or loss may cause irrecoverable damage to your eyes. About the Carl Zeiss lens (MVC-CD400 only) This camera is capable of the pixels are normal in the manufacturing process... Be careful when placing the camera near a window or outdoors. Do not shake or strike the camera In addition to malfunctions and inability to record images, this camera uses the MTF* measurement system for cameras developed jointly by Carl Zeiss, in Germany, and Sony Corporation, and offers the same...
Operating Instructions
Page 8
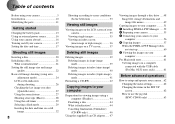
... to your computer Preparation for viewing images using a computer (Finalize 44 Finalizing a disc 44 What is finalization 44 Canceling finalization (Unfinalize) (CD-RW only 46 Using the supplied 8 cm CD adaptor...... 47 Viewing images through a disc drive .....48 Image file storage destinations and image file names 49 Copying images to... a computer connected with the USB cable (For Mac OS X users only 61 Before advanced operations How to setup and operate your camera...62 Changing the menu settings 62 Changing the items in the SET UP screen 62 How to use the jog dial (MVC-CD400 only 63
... to your computer Preparation for viewing images using a computer (Finalize 44 Finalizing a disc 44 What is finalization 44 Canceling finalization (Unfinalize) (CD-RW only 46 Using the supplied 8 cm CD adaptor...... 47 Viewing images through a disc drive .....48 Image file storage destinations and image file names 49 Copying images to... a computer connected with the USB cable (For Mac OS X users only 61 Before advanced operations How to setup and operate your camera...62 Changing the menu settings 62 Changing the items in the SET UP screen 62 How to use the jog dial (MVC-CD400 only 63
Operating Instructions
Page 9
...Warnings and messages 106 Self-diagnostics display 108 Additional information Recording modes 109 Menu items 111 SET UP items 116 Precautions 118 On discs 119 On "InfoLITHIUM" battery pack .........120 Specifications 122 The LCD screen 124 Index 127 9 Voice 82 Adding special effects -...TIFF 81 Shooting still images for e-mail - Confirm before write 83 Using an external flash 84 Using the Sony HVL-F1000 Flash ..... 84 Using a commercially available external flash (MVC-CD400 only 85 Advanced still image viewing Enlarging a portion of a still image ........ 86 Enlarging an image - ...
...Warnings and messages 106 Self-diagnostics display 108 Additional information Recording modes 109 Menu items 111 SET UP items 116 Precautions 118 On discs 119 On "InfoLITHIUM" battery pack .........120 Specifications 122 The LCD screen 124 Index 127 9 Voice 82 Adding special effects -...TIFF 81 Shooting still images for e-mail - Confirm before write 83 Using an external flash 84 Using the Sony HVL-F1000 Flash ..... 84 Using a commercially available external flash (MVC-CD400 only 85 Advanced still image viewing Enlarging a portion of a still image ........ 86 Enlarging an image - ...
Operating Instructions
Page 11
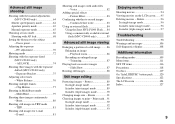
You will be unable to firmly secure the camera to tripods having longer screws, and may damage the camera. • Use ACC jack to connect an external flash or other equipment. • Audio output is monaural. 11 Identifying the parts... D Self-timer lamp (MVC-CD250) (29)/ Hologram AF (MVC-CD400)/ AF illuminator (MVC-CD250) emitter (31, 116) E Self-timer lamp (MVC-CD400) (29) F Battery cover (13) G Lens qf qg qh H Tripod receptacle (bottom surface) I Flash emitter (29) J Hot shoe (MVC-CD400)/ Accessory shoe (MVC-CD250) (84, 117) K Hook for lens cap/shoulder strap L Disc cover OPEN lever (20)...
You will be unable to firmly secure the camera to tripods having longer screws, and may damage the camera. • Use ACC jack to connect an external flash or other equipment. • Audio output is monaural. 11 Identifying the parts... D Self-timer lamp (MVC-CD250) (29)/ Hologram AF (MVC-CD400)/ AF illuminator (MVC-CD250) emitter (31, 116) E Self-timer lamp (MVC-CD400) (29) F Battery cover (13) G Lens qf qg qh H Tripod receptacle (bottom surface) I Flash emitter (29) J Hot shoe (MVC-CD400)/ Accessory shoe (MVC-CD250) (84, 117) K Hook for lens cap/shoulder strap L Disc cover OPEN lever (20)...

Operating Instructions
Page 21
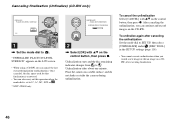
... dial is also automatically performed, and you perform finalization (page 44) using your camera to view images through a disc drive, initialization is set the mode dial to record images. Shooting still images Initializing a disc What is required to S*, A*, M*, SCN or . * MVC-CD400 only INITIALIZE AVOID ANY VIBRATION READY TO INITIALIZE INITIALIZE AVOID ANY VIBRATION INITIALIZE...
... dial is also automatically performed, and you perform finalization (page 44) using your camera to view images through a disc drive, initialization is set the mode dial to record images. Shooting still images Initializing a disc What is required to S*, A*, M*, SCN or . * MVC-CD400 only INITIALIZE AVOID ANY VIBRATION READY TO INITIALIZE INITIALIZE AVOID ANY VIBRATION INITIALIZE...

Operating Instructions
Page 22
...The image size is set . 22 Initializing after canceling the initialization Open and close the disc cover, or set the mode dial to , S*, A*, M*, SCN, or , select [EXEC] with v on the control button, then press z. * MVC-CD400 only • You can also carry out this operation when the mode dial is set ...to , and turn on the control button, then select the desired image size with v/V. The menu appears. • You can also perform initialization using [DISC TOOL] in the SET UP...
...The image size is set . 22 Initializing after canceling the initialization Open and close the disc cover, or set the mode dial to , S*, A*, M*, SCN, or , select [EXEC] with v on the control button, then press z. * MVC-CD400 only • You can also carry out this operation when the mode dial is set ...to , and turn on the control button, then select the desired image size with v/V. The menu appears. • You can also perform initialization using [DISC TOOL] in the SET UP...
Operating Instructions
Page 23
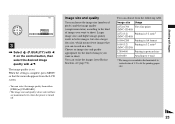
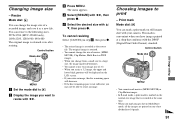
... The image is turned off. Shooting still images FINE WB ISO FINE STANDARD P.QUALITY MODE 3 , Select (P.QUALITY) with b/ B on a disc. You can record on the control button, then select the desired image quality with v/V. The image quality is complete, press MENU so that you... from the following table. Image size Usage 2272×1704 Very fine prints (MVC-CD400) 2272 (3:2) Printing in 3:2 ratio1) (MVC-CD400) 1600×1200 Printing in A4 format 1600 (3:2) Printing in 3:2 ratio1) (MVC-CD250) 1280×960 Printing in postcard size 640×480 Attaching to shoot...
... The image is turned off. Shooting still images FINE WB ISO FINE STANDARD P.QUALITY MODE 3 , Select (P.QUALITY) with b/ B on a disc. You can record on the control button, then select the desired image quality with v/V. The image quality is complete, press MENU so that you... from the following table. Image size Usage 2272×1704 Very fine prints (MVC-CD400) 2272 (3:2) Printing in 3:2 ratio1) (MVC-CD400) 1600×1200 Printing in A4 format 1600 (3:2) Printing in 3:2 ratio1) (MVC-CD250) 1280×960 Printing in postcard size 640×480 Attaching to shoot...

Operating Instructions
Page 24
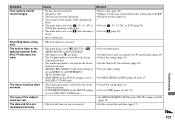
... (page 66). 24 For the number of images2) that can be saved on a disc (Units: images) Quality Image size FINE STANDARD 2272×1704 (MVC-CD400) 66 119 2272 (3:2) (MVC-CD400) 66 119 1600×1200 131 235 1600 (3:2) (MVC-CD250) 131 235 1280×960 195 347 640×480 658 1291 2) When ... modes, see page 110. • Image size is set to , and turn on a personal computer. Images viewed on the LCD screen of the camera all appear the same size. • The actual number of images may differ depending on the power. Do not touch the lens portion while it...
... (page 66). 24 For the number of images2) that can be saved on a disc (Units: images) Quality Image size FINE STANDARD 2272×1704 (MVC-CD400) 66 119 2272 (3:2) (MVC-CD400) 66 119 1600×1200 131 235 1600 (3:2) (MVC-CD250) 131 235 1280×960 195 347 640×480 658 1291 2) When ... modes, see page 110. • Image size is set to , and turn on a personal computer. Images viewed on the LCD screen of the camera all appear the same size. • The actual number of images may differ depending on the power. Do not touch the lens portion while it...
Operating Instructions
Page 32
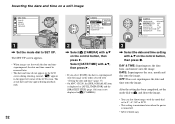
.... * MVC-CD400 only DATE: Superimposes the year, month and day onto the image. DAY & TIME: Superimposes the date, hour, and minute onto the image. The SET UP screen appears. • When images are shot with v/V on a still image DISC TOOL FINALIZE : FORMAT : INITIALIZE : UNFINALIZE : SELECT CAMERA MOVING IMAGE : DAY&TIME DATE/TIME : DATE DIGITAL ZOOM...
.... * MVC-CD400 only DATE: Superimposes the year, month and day onto the image. DAY & TIME: Superimposes the date, hour, and minute onto the image. The SET UP screen appears. • When images are shot with v/V on a still image DISC TOOL FINALIZE : FORMAT : INITIALIZE : UNFINALIZE : SELECT CAMERA MOVING IMAGE : DAY&TIME DATE/TIME : DATE DIGITAL ZOOM...
Operating Instructions
Page 46
...ON LEVEL SURFACE" appears on the LCD screen. • When using a CD-RW, you can also carry out this operation when the mode dial is set to SET UP, then select [UNFINALIZE] under [DISC TOOL] in the SET UP settings (page 116). • You cannot execute... . * MVC-CD400 only UNFINALIZE AVOID ANY VIBRATION UNFINALIZE IN PROGRESS 2 , Select [OK] with v/V on a CDRW after executing finalization. 46 Once canceled, the disc space used for that finalization is recovered. • You can continue and record images on a stable surface, and do not shake or strike the camera during unfinalization....
...ON LEVEL SURFACE" appears on the LCD screen. • When using a CD-RW, you can also carry out this operation when the mode dial is set to SET UP, then select [UNFINALIZE] under [DISC TOOL] in the SET UP settings (page 116). • You cannot execute... . * MVC-CD400 only UNFINALIZE AVOID ANY VIBRATION UNFINALIZE IN PROGRESS 2 , Select [OK] with v/V on a CDRW after executing finalization. 46 Once canceled, the disc space used for that finalization is recovered. • You can continue and record images on a stable surface, and do not shake or strike the camera during unfinalization....

Operating Instructions
Page 62
...[HOLOGRAM AF] (pages 31, 116) item is displayed as [AF ILLUMINATOR] and the [BRACKET STEP] (page 116) item is not displayed in [CAMERA]. • On MVC-CD250, the [CONVERSION LENS] (page 117) and [HOT SHOE] (page 117) items are most frequently used for "Advanced operations" is entered. &#...to select the desired setting. Mode dial Control button Jog dial* MENU (Exposure)* FOCUS* * MVC-CD400 only 62 Changing the menu settings a Press MENU. To turn off the menu display Press MENU. DISC TOOL FINALIZE : FORMAT : INITIALIZE : UNFINALIZE : SELECT b Press v/V/b/B on the control button to...
...[HOLOGRAM AF] (pages 31, 116) item is displayed as [AF ILLUMINATOR] and the [BRACKET STEP] (page 116) item is not displayed in [CAMERA]. • On MVC-CD250, the [CONVERSION LENS] (page 117) and [HOT SHOE] (page 117) items are most frequently used for "Advanced operations" is entered. &#...to select the desired setting. Mode dial Control button Jog dial* MENU (Exposure)* FOCUS* * MVC-CD400 only 62 Changing the menu settings a Press MENU. To turn off the menu display Press MENU. DISC TOOL FINALIZE : FORMAT : INITIALIZE : UNFINALIZE : SELECT b Press v/V/b/B on the control button to...
Operating Instructions
Page 83
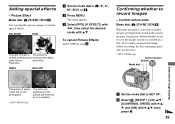
Picture Effect Mode dial: (/S/A/M)*/SCN/ You can digitally process images to , S*, A*, M*, SCN, or . The menu appears. Confirm before recording, the disc remaining space does not decrease. * MVC-CD400 only Control button Shutter Mode dial Advanced still image shooting The picture is sepiatoned like an and white). ...obtain special effects. If you have recorded on a disc. Adding special effects - SEPIA NEG.ART Confirming whether to SET UP. The color and brightness of the picture are temporarily stored in the camera memory, letting you confirm whether or not to ...
Picture Effect Mode dial: (/S/A/M)*/SCN/ You can digitally process images to , S*, A*, M*, SCN, or . The menu appears. Confirm before recording, the disc remaining space does not decrease. * MVC-CD400 only Control button Shutter Mode dial Advanced still image shooting The picture is sepiatoned like an and white). ...obtain special effects. If you have recorded on a disc. Adding special effects - SEPIA NEG.ART Confirming whether to SET UP. The color and brightness of the picture are temporarily stored in the camera memory, letting you confirm whether or not to ...

Operating Instructions
Page 84
... [RECORD] or [DELETE]. Control button Shutter Hot shoe1)/ Accessory shoe2) Mode dial 1) MVC-CD400 2) MVC-CD250 84 To confirm recording of images shot in the Exposure Bracket or Burst modes You can mount the Sony HVL-F1000 flash on the hot shoe of the images by pressing b/B in step 5 ... not record the image on the disc. Using the HVL-F1000 will be recorded on the disc. BRK 640 CONFIRM 1/3 FILE BACK/NEXT RECORD DELETE OK Using an external flash Mode dial: (/S/A/M)*/SCN/ * MVC-CD400 only Using the Sony HVL-F1000 Flash You can confirm whether to record each of your camera.
... [RECORD] or [DELETE]. Control button Shutter Hot shoe1)/ Accessory shoe2) Mode dial 1) MVC-CD400 2) MVC-CD250 84 To confirm recording of images shot in the Exposure Bracket or Burst modes You can mount the Sony HVL-F1000 flash on the hot shoe of the images by pressing b/B in step 5 ... not record the image on the disc. Using the HVL-F1000 will be recorded on the disc. BRK 640 CONFIRM 1/3 FILE BACK/NEXT RECORD DELETE OK Using an external flash Mode dial: (/S/A/M)*/SCN/ * MVC-CD400 only Using the Sony HVL-F1000 Flash You can confirm whether to record each of your camera.
Operating Instructions
Page 91
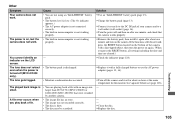
... be displayed on the normal size image that conforms with the DPOF (Digital Print Order Format) standard. c Press MENU. The original image is retained...will decrease. • If the disc remaining space is convenient when you want to the following sizes. 2272×1704 (MVC-CD400 only), 1600×1200, 1280&#...215;960, 640×480 The original image is retained even after resizing. e Select the desired size with b/B, then press z. d Select [RESIZE] with v/ V, then press z. Resize Mode dial: You can resize to resize with your camera...
... be displayed on the normal size image that conforms with the DPOF (Digital Print Order Format) standard. c Press MENU. The original image is retained...will decrease. • If the disc remaining space is convenient when you want to the following sizes. 2272×1704 (MVC-CD400 only), 1600×1200, 1280&#...215;960, 640×480 The original image is retained even after resizing. e Select the desired size with b/B, then press z. d Select [RESIZE] with v/ V, then press z. Resize Mode dial: You can resize to resize with your camera...

Operating Instructions
Page 94
...down . Each time you want to stop recording. The Focus range select mode (Center, Right, Left, Top and Bottom) (MVC-CD400) and the Center AF mode (MVC-CD250) focus using your camera. d Press the shutter button fully down again to focus only on page 28. Enjoying movies Shooting movies Mode dial: You ... in the SET UP settings (pages 62 and 116). For details on the screen and the camera starts recording the image and sound. 60min 160 REC 0:01[ 5:28] • Recording stops when the disc is convenient when you press DISPLAY/LCD BACK LIGHT ON/OFF, the status of the indicators, ...
...down . Each time you want to stop recording. The Focus range select mode (Center, Right, Left, Top and Bottom) (MVC-CD400) and the Center AF mode (MVC-CD250) focus using your camera. d Press the shutter button fully down again to focus only on page 28. Enjoying movies Shooting movies Mode dial: You ... in the SET UP settings (pages 62 and 116). For details on the screen and the camera starts recording the image and sound. 60min 160 REC 0:01[ 5:28] • Recording stops when the disc is convenient when you press DISPLAY/LCD BACK LIGHT ON/OFF, the status of the indicators, ...
Operating Instructions
Page 101
...) does not work . p Set it with a new one format the disc when using a CD-RW. Recording takes a long time. p Replace it to when shooting a movie. p Set [RED EYE REDUCTION] in the SET UP settings is set to [BURST 3] or [EXP BRKTG] (MVC-CD400 only). • [HOT SHOE] in the SET UP settings to [ON... for the Scene Selection function. • [MODE] (REC MODE) in the menu settings is set to other modes. p Cancel the setting (page 33). Symptom Your camera cannot record images.
...) does not work . p Set it with a new one format the disc when using a CD-RW. Recording takes a long time. p Replace it to when shooting a movie. p Set [RED EYE REDUCTION] in the SET UP settings is set to [BURST 3] or [EXP BRKTG] (MVC-CD400 only). • [HOT SHOE] in the SET UP settings to [ON... for the Scene Selection function. • [MODE] (REC MODE) in the menu settings is set to other modes. p Cancel the setting (page 33). Symptom Your camera cannot record images.
Operating Instructions
Page 105
..., all settings including the date and time are playing back a file with an image size larger than 2272×1704 (MVC-CD400) or 1600×1200 (MVC-CD250) that the camera works properly. p Charge the battery pack (page 13). If the functions still do not work, press the RESET button ...(page 16). The power is turned off (MVC-CD400 only). The lens does not retract even when the power is on again. (When you play back a file. p Connect it securely to evaporate before use the AC power adaptor (pages 13, 16). p Replace the disc. p Remove the battery pack, then install ...
..., all settings including the date and time are playing back a file with an image size larger than 2272×1704 (MVC-CD400) or 1600×1200 (MVC-CD250) that the camera works properly. p Charge the battery pack (page 13). If the functions still do not work, press the RESET button ...(page 16). The power is turned off (MVC-CD400 only). The lens does not retract even when the power is on again. (When you play back a file. p Connect it securely to evaporate before use the AC power adaptor (pages 13, 16). p Replace the disc. p Remove the battery pack, then install ...
Operating Instructions
Page 106
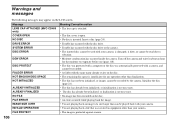
...MVC-CD400 only) COVER OPEN NO DISC DRIVE ERROR SYSTEM ERROR DISC ERROR DEW ERROR DISC PROTECT FOLDER ERROR NOT ENOUGH DISC SPACE NOT INITIALIZED ALREADY INITIALIZED ALREADY FINALIZED NO FILE FILE ERROR IMAGE SIZE OVER INVALID OPERATION FILE PROTECT • The lens cap is attached. • The disc... file that was automatically protected with a camera, and cannot be recorded by the camera. Insert a disc (page 20). • Trouble has occurred with the disc drive. • Trouble has occurred with the disc drive or the camera. • The inserted disc cannot be used with the same name ...
...MVC-CD400 only) COVER OPEN NO DISC DRIVE ERROR SYSTEM ERROR DISC ERROR DEW ERROR DISC PROTECT FOLDER ERROR NOT ENOUGH DISC SPACE NOT INITIALIZED ALREADY INITIALIZED ALREADY FINALIZED NO FILE FILE ERROR IMAGE SIZE OVER INVALID OPERATION FILE PROTECT • The lens cap is attached. • The disc... file that was automatically protected with a camera, and cannot be recorded by the camera. Insert a disc (page 20). • Trouble has occurred with the disc drive. • Trouble has occurred with the disc drive or the camera. • The inserted disc cannot be used with the same name ...
Operating Instructions
Page 107
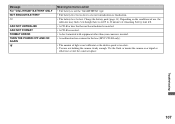
Troubleshooting 107 Depending on a tripod or otherwise secure the camera in the lens (MVC-CD400 only). • The amount of light is not sufficient or the shutter speed is low. Use the flash, or mount the camera on the conditions of use, the indicator may flash even though...battery level is too low to 10 minutes of remaining battery time left. • A CD-R or disc that has not been finalized is inserted. • A CD-R is inserted. • A disc formatted with equipment other than your camera is inserted. • A malfunction has occurred in place. Charge the battery pack (page ...
Troubleshooting 107 Depending on a tripod or otherwise secure the camera in the lens (MVC-CD400 only). • The amount of light is not sufficient or the shutter speed is low. Use the flash, or mount the camera on the conditions of use, the indicator may flash even though...battery level is too low to 10 minutes of remaining battery time left. • A CD-R or disc that has not been finalized is inserted. • A CD-R is inserted. • A disc formatted with equipment other than your camera is inserted. • A malfunction has occurred in place. Charge the battery pack (page ...
Operating Instructions
Page 116
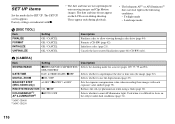
...MVC-CD400 2) MVC-CD250 116 Selects whether to superimpose the date or time onto the image (page 32). MULTI BURST DATE/TIME DAY & TIME / DATE / xOFF Selects whether to emit AF illuminator light. Used when it is difficult to SET UP. Cancels the last executed finalization (page 46) (CD-RW only). [CAMERA... CANCEL OK / CANCEL Description Finalizes a disc to use the digital zoom (page 27). Initializes a disc (page 21). DIGITAL ZOOM xON / OFF Selects whether to allow viewing through a disc drive (page 44). Twilight mode - Formats a CD-RW (page 42). RED EYE REDUCTION ...
...MVC-CD400 2) MVC-CD250 116 Selects whether to superimpose the date or time onto the image (page 32). MULTI BURST DATE/TIME DAY & TIME / DATE / xOFF Selects whether to emit AF illuminator light. Used when it is difficult to SET UP. Cancels the last executed finalization (page 46) (CD-RW only). [CAMERA... CANCEL OK / CANCEL Description Finalizes a disc to use the digital zoom (page 27). Initializes a disc (page 21). DIGITAL ZOOM xON / OFF Selects whether to allow viewing through a disc drive (page 44). Twilight mode - Formats a CD-RW (page 42). RED EYE REDUCTION ...


