Operating Instructions
Page 1
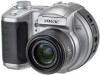
...The model and serial numbers are located on the bottom. Refer to your Sony dealer regarding this manual thoroughly, and retain it for future reference. MVC-CD400/CD250 © 2002 Sony Corporation 3-075-356-12(1) Getting started Shooting still images Viewing still images...Advanced still image shooting Advanced still image viewing Still image editing Enjoying movies Troubleshooting Additional information Index MVC-CD400/CD250 Serial No. Model No. Digital Still Camera Operating Instructions Before operating the unit, please read this product. Record the serial number in the...
...The model and serial numbers are located on the bottom. Refer to your Sony dealer regarding this manual thoroughly, and retain it for future reference. MVC-CD400/CD250 © 2002 Sony Corporation 3-075-356-12(1) Getting started Shooting still images Viewing still images...Advanced still image shooting Advanced still image viewing Still image editing Enjoying movies Troubleshooting Additional information Index MVC-CD400/CD250 Serial No. Model No. Digital Still Camera Operating Instructions Before operating the unit, please read this product. Record the serial number in the...

Operating Instructions
Page 2
... interference received, including interference that may be of sufficient magnitude to constitute a risk of electric shock to persons. Declaration of Conformity Trade Name: SONY Model No.: MVC-CD400 Responsible Party: Sony Electronics Inc. Use of controls or adjustments or performance of the FCC Rules. Address: 680 Kinderkamack Road, Oradell, NJ 07649 USA Telephone No...
... interference received, including interference that may be of sufficient magnitude to constitute a risk of electric shock to persons. Declaration of Conformity Trade Name: SONY Model No.: MVC-CD400 Responsible Party: Sony Electronics Inc. Use of controls or adjustments or performance of the FCC Rules. Address: 680 Kinderkamack Road, Oradell, NJ 07649 USA Telephone No...

Operating Instructions
Page 6
...Carl Zeiss, in Germany, and Sony Corporation, and offers the same quality as in a car parked in color) that constantly appear on the LCD screen and the LCD finder. Exposing the LCD screen, the finder or the lens to direct sunlight for MVC-CD400 only) This camera uses a movable lens. The ... battery pack to temperatures above 60°C (140°F), such as other bright light This may occur. About the Carl Zeiss lens (MVC-CD400 only) This camera is equipped with an LCD finder) and lens • The LCD screen and the LCD finder are manufactured using extremely high-precision technology...
...Carl Zeiss, in Germany, and Sony Corporation, and offers the same quality as in a car parked in color) that constantly appear on the LCD screen and the LCD finder. Exposing the LCD screen, the finder or the lens to direct sunlight for MVC-CD400 only) This camera uses a movable lens. The ... battery pack to temperatures above 60°C (140°F), such as other bright light This may occur. About the Carl Zeiss lens (MVC-CD400 only) This camera is equipped with an LCD finder) and lens • The LCD screen and the LCD finder are manufactured using extremely high-precision technology...
Operating Instructions
Page 7
... of Apple Computer, Inc. • In addition, system and product names used in all cases in this manual. 7 Microsoft Corporation in this camera. On illustrations Illustrations used in this manual are not used in the United States and other countries. • Macintosh, Mac OS, and QuickTime,... 118 and follow the instructions on how to remove it before using this manual are not actual images shot using the camera. Trademarks • "InfoLITHIUM" is a trademark of Sony Corporation. • Microsoft and Windows are registered trademarks of the MVC-CD400 unless noted otherwise.
... of Apple Computer, Inc. • In addition, system and product names used in all cases in this manual. 7 Microsoft Corporation in this camera. On illustrations Illustrations used in this manual are not used in the United States and other countries. • Macintosh, Mac OS, and QuickTime,... 118 and follow the instructions on how to remove it before using this manual are not actual images shot using the camera. Trademarks • "InfoLITHIUM" is a trademark of Sony Corporation. • Microsoft and Windows are registered trademarks of the MVC-CD400 unless noted otherwise.
Operating Instructions
Page 8
... Deleting images in singe-image mode 39 Deleting images in index (nine-image) mode 40 Deleting images in index (triple-image) mode 41 Formatting a CD-RW 42 Copying images to your computer Preparation for viewing images using a computer (Finalize 44 Finalizing a disc 44 What is finalization 44 Canceling finalization (... Viewing images on a computer connected with the USB cable (For Mac OS X users only 61 Before advanced operations How to setup and operate your camera...62 Changing the menu settings 62 Changing the items in the SET UP screen 62 How to use the jog dial (MVC-CD400 only 63
... Deleting images in singe-image mode 39 Deleting images in index (nine-image) mode 40 Deleting images in index (triple-image) mode 41 Formatting a CD-RW 42 Copying images to your computer Preparation for viewing images using a computer (Finalize 44 Finalizing a disc 44 What is finalization 44 Canceling finalization (... Viewing images on a computer connected with the USB cable (For Mac OS X users only 61 Before advanced operations How to setup and operate your camera...62 Changing the menu settings 62 Changing the items in the SET UP screen 62 How to use the jog dial (MVC-CD400 only 63
Operating Instructions
Page 9
... still images in Multi Burst mode - Confirm before write 83 Using an external flash 84 Using the Sony HVL-F1000 Flash ..... 84 Using a commercially available external flash (MVC-CD400 only 85 Advanced still image viewing Enlarging a portion of a still image ........ 86 Enlarging an image ...Shooting in TIFF mode - Picture Effect 83 Confirming whether to the subject - E-mail 81 Shooting still images with the exposure fixed (MVC-CD400 only) - Voice 82 Adding special effects - Trimming 87 Playing back successive images - Resize 91 Choosing images to print - Delete 96...
... still images in Multi Burst mode - Confirm before write 83 Using an external flash 84 Using the Sony HVL-F1000 Flash ..... 84 Using a commercially available external flash (MVC-CD400 only 85 Advanced still image viewing Enlarging a portion of a still image ........ 86 Enlarging an image ...Shooting in TIFF mode - Picture Effect 83 Confirming whether to the subject - E-mail 81 Shooting still images with the exposure fixed (MVC-CD400 only) - Voice 82 Adding special effects - Trimming 87 Playing back successive images - Resize 91 Choosing images to print - Delete 96...
Operating Instructions
Page 11
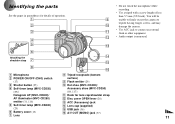
...Attaching the shoulder strap 7 8 A Microphone B POWER ON/OFF (CHG) switch (17) C Shutter button (25) D Self-timer lamp (MVC-CD250) (29)/ Hologram AF (MVC-CD400)/ AF illuminator (MVC-CD250) emitter (31, 116) E Self-timer lamp (MVC-CD400) (29) F Battery cover (13) G Lens qf qg qh H Tripod receptacle (bottom surface) I Flash emitter (29) J Hot shoe... a screw length of less than 5.5 mm (7/32 inch). You will be unable to firmly secure the camera to tripods having longer screws, and may damage the camera. • Use ACC jack to connect an external flash or other equipment. • Audio output is ...
...Attaching the shoulder strap 7 8 A Microphone B POWER ON/OFF (CHG) switch (17) C Shutter button (25) D Self-timer lamp (MVC-CD250) (29)/ Hologram AF (MVC-CD400)/ AF illuminator (MVC-CD250) emitter (31, 116) E Self-timer lamp (MVC-CD400) (29) F Battery cover (13) G Lens qf qg qh H Tripod receptacle (bottom surface) I Flash emitter (29) J Hot shoe... a screw length of less than 5.5 mm (7/32 inch). You will be unable to firmly secure the camera to tripods having longer screws, and may damage the camera. • Use ACC jack to connect an external flash or other equipment. • Audio output is ...

Operating Instructions
Page 15
... NP-FM50 battery pack When you use it warm, then insert the battery pack into the camera just before shooting. The camera has been turned ON and OFF many times - Shooting still images* MVC-CD400 Image size 2272×1704 640×480 NP-FM50 (supplied) Battery life No. The ... power is low - of (min.) images Approx. 120 Approx. 2300 Approx. 120 Approx. 2400 * Shooting at about 3-second intervals Viewing still images** MVC-CD400 Image size 2272×1704 NP-FM50 (supplied) Battery life No. of (min.) images Approx. 170 Approx. 1100 640×480 Approx. 170 Approx....
... NP-FM50 battery pack When you use it warm, then insert the battery pack into the camera just before shooting. The camera has been turned ON and OFF many times - Shooting still images* MVC-CD400 Image size 2272×1704 640×480 NP-FM50 (supplied) Battery life No. The ... power is low - of (min.) images Approx. 120 Approx. 2300 Approx. 120 Approx. 2400 * Shooting at about 3-second intervals Viewing still images** MVC-CD400 Image size 2272×1704 NP-FM50 (supplied) Battery life No. of (min.) images Approx. 170 Approx. 1100 640×480 Approx. 170 Approx....

Operating Instructions
Page 17
...prevent wearing down the battery. The auto power-off function only operates when the camera is operating. The auto power-off function also will not operate in [SETUP 1] (page 117), and perform the procedure from step 3. * MVC-CD400 only 17 Do not touch the lens portion while it is operating using a... battery pack. The POWER lamp (green) lights up and the power is plugged into the USB jack or the A/V OUT jack. Getting started Turning on/off your camera for about 20 minutes ...
...prevent wearing down the battery. The auto power-off function only operates when the camera is operating. The auto power-off function also will not operate in [SETUP 1] (page 117), and perform the procedure from step 3. * MVC-CD400 only 17 Do not touch the lens portion while it is operating using a... battery pack. The POWER lamp (green) lights up and the power is plugged into the USB jack or the A/V OUT jack. Getting started Turning on/off your camera for about 20 minutes ...

Operating Instructions
Page 21
... button, then press z. Do not shake or strike the camera during initialization. Initialization is set the mode dial to record images on the power. "INITIALIZE PLACE ON LEVEL SURFACE" appears on the LCD screen. • You can continue to S*, A*, M*, SCN or . * MVC-CD400 only INITIALIZE AVOID ANY VIBRATION READY TO INITIALIZE INITIALIZE AVOID...
... button, then press z. Do not shake or strike the camera during initialization. Initialization is set the mode dial to record images on the power. "INITIALIZE PLACE ON LEVEL SURFACE" appears on the LCD screen. • You can continue to S*, A*, M*, SCN or . * MVC-CD400 only INITIALIZE AVOID ANY VIBRATION READY TO INITIALIZE INITIALIZE AVOID...

Operating Instructions
Page 22
... operation when the mode dial is set to S*, A*, M* or SCN. • (EV), 9 (FOCUS) and (SPOT METER) are displayed on the MVC-CD250 menu (page 62). * MVC-CD400 only 2272×1704 2272 (3 : 2) 1600×1200 1280×960 640 × 480 ISO IMAGESIZE 1600×1200 1600 (3 : 2) 1280×...;960 640 × 480 IMAGE SIZE MVC-CD400 MVC-CD250 2 , Select (IMAGE SIZE) with b/ B on the control button, then select the desired image size with v on the power, then press MENU. Initializing after...
... operation when the mode dial is set to S*, A*, M* or SCN. • (EV), 9 (FOCUS) and (SPOT METER) are displayed on the MVC-CD250 menu (page 62). * MVC-CD400 only 2272×1704 2272 (3 : 2) 1600×1200 1280×960 640 × 480 ISO IMAGESIZE 1600×1200 1600 (3 : 2) 1280×...;960 640 × 480 IMAGE SIZE MVC-CD400 MVC-CD250 2 , Select (IMAGE SIZE) with b/ B on the control button, then select the desired image size with v on the power, then press MENU. Initializing after...
Operating Instructions
Page 23
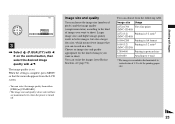
... can select the image quality from the following table. Image size Usage 2272×1704 Very fine prints (MVC-CD400) 2272 (3:2) Printing in 3:2 ratio1) (MVC-CD400) 1600×1200 Printing in A4 format 1600 (3:2) Printing in 3:2 ratio1) (MVC-CD250) 1280×960 Printing in the horizontal to vertical ratio of 3:2 to e-mail 1) The image is...
... can select the image quality from the following table. Image size Usage 2272×1704 Very fine prints (MVC-CD400) 2272 (3:2) Printing in 3:2 ratio1) (MVC-CD400) 1600×1200 Printing in A4 format 1600 (3:2) Printing in 3:2 ratio1) (MVC-CD250) 1280×960 Printing in the horizontal to vertical ratio of 3:2 to e-mail 1) The image is...

Operating Instructions
Page 24
... The lens portion moves when you turn on the power or use the zoom (page 27), the lens portion moves (MVC-CD400 only). Images viewed on the LCD screen of the camera all appear the same size. • The actual number of images may differ depending on the shooting conditions. • ...can choose either Multipoint AF or Focus range select mode (MVC-CD400), or Multipoint AF mode or Center AF (MVC-CD250) as the AF mode (page 66). 24 Remove the lens cap. • Still images are adjusted automatically. 2 , Hold the camera steadily with both hands and position the subject in other modes...
... The lens portion moves when you turn on the power or use the zoom (page 27), the lens portion moves (MVC-CD400 only). Images viewed on the LCD screen of the camera all appear the same size. • The actual number of images may differ depending on the shooting conditions. • ...can choose either Multipoint AF or Focus range select mode (MVC-CD400), or Multipoint AF mode or Center AF (MVC-CD250) as the AF mode (page 66). 24 Remove the lens cap. • Still images are adjusted automatically. 2 , Hold the camera steadily with both hands and position the subject in other modes...

Operating Instructions
Page 26
In such cases, release the shutter button, then recompose the shot and focus again. • The subject is distant from the camera and dark. • The contrast between the subject and its background is poor. • The subject is useful for extending the battery...indicators during shooting Indicators off r All indicators on 60min 640 4 • For a detailed description of the indicators, see page 124. • Indicators on . (MVC-CD400 only)) DISPLAY/LCD BACK LIGHT ON/OFF This is seen through glass, such as a window. • A fast-moving subject. • The subject reflects or ...
In such cases, release the shutter button, then recompose the shot and focus again. • The subject is distant from the camera and dark. • The contrast between the subject and its background is poor. • The subject is useful for extending the battery...indicators during shooting Indicators off r All indicators on 60min 640 4 • For a detailed description of the indicators, see page 124. • Indicators on . (MVC-CD400 only)) DISPLAY/LCD BACK LIGHT ON/OFF This is seen through glass, such as a window. • A fast-moving subject. • The subject reflects or ...

Operating Instructions
Page 27
... T side: About 50 cm (19 3/4 inches) (MVC-CD400) About 80 cm (31 1/2 inches) (MVC-CD250) • The lens portion moves during zoom operation (MVC-CD400 only). Digital zooming deteriorates the image quality, so when digital zoom is set [DIGITAL ZOOM] to the normal shooting mode, press lightly on ...60min 640 W T 4 60min 640 W T 4 100-0029 2002 7 4 10:30PM , Press b (7) on the LCD screen. • Digital zoom does not work for movies (page 94) (MVC-CD400 only). Do not touch the lens portion while it is deleted. , Press the zoom button to display the menu. 2 Select [DELETE...
... T side: About 50 cm (19 3/4 inches) (MVC-CD400) About 80 cm (31 1/2 inches) (MVC-CD250) • The lens portion moves during zoom operation (MVC-CD400 only). Digital zooming deteriorates the image quality, so when digital zoom is set [DIGITAL ZOOM] to the normal shooting mode, press lightly on ...60min 640 W T 4 60min 640 W T 4 100-0029 2002 7 4 10:30PM , Press b (7) on the LCD screen. • Digital zoom does not work for movies (page 94) (MVC-CD400 only). Do not touch the lens portion while it is deleted. , Press the zoom button to display the menu. 2 Select [DELETE...

Operating Instructions
Page 28
To return to S*, A*, M*, SCN (other than landscape mode) (page 33), or . * MVC-CD400 only 2 , Center the subject in the frame, and shoot the image. The (macro) indicator appears on the LCD screen. • If the menu is currently ... out this operation when the mode dial is set all the way to the W side: Approx. 4 cm (1 5/8 inches) from the lens surface (MVC-CD400) Approx. 3 cm (1 3/16 inches) from the lens surface (MVC-CD250) When the zoom is set all the way to the T side: Approx. 20 cm (7 7/8 inches) from the lens surface...
To return to S*, A*, M*, SCN (other than landscape mode) (page 33), or . * MVC-CD400 only 2 , Center the subject in the frame, and shoot the image. The (macro) indicator appears on the LCD screen. • If the menu is currently ... out this operation when the mode dial is set all the way to the W side: Approx. 4 cm (1 5/8 inches) from the lens surface (MVC-CD400) Approx. 3 cm (1 3/16 inches) from the lens surface (MVC-CD250) When the zoom is set all the way to the T side: Approx. 20 cm (7 7/8 inches) from the lens surface...

Operating Instructions
Page 29
...): The flash does not strobe. 29 Each time you press the shutter button while standing in front of the camera, the focus and the exposure may not be correctly set to S*, A*, M*, SCN, or . * MVC-CD400 only 2 , Center the subject in the middle of the surrounding brightness. The self-timer lamp (page 11) flashes...
...): The flash does not strobe. 29 Each time you press the shutter button while standing in front of the camera, the focus and the exposure may not be correctly set to S*, A*, M*, SCN, or . * MVC-CD400 only 2 , Center the subject in the middle of the surrounding brightness. The self-timer lamp (page 11) flashes...

Operating Instructions
Page 30
... [FLASH LEVEL] in the menu settings (page 112). • When using a commercially available external flash, set [HOT SHOE] to [ON] in the SET UP settings (MVC-CD400 only). • Two types of external flash can be used: the optional HVL-F1000 flash and commercially available flashes that supports hot shoe (not supplied...
... [FLASH LEVEL] in the menu settings (page 112). • When using a commercially available external flash, set [HOT SHOE] to [ON] in the SET UP settings (MVC-CD400 only). • Two types of external flash can be used: the optional HVL-F1000 flash and commercially available flashes that supports hot shoe (not supplied...
Operating Instructions
Page 31
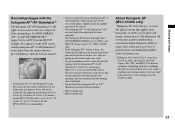
... dry cloth. • No safety problems will be achieved. (An approximate distance of 0.5 to 4.0 m (19 3/4 inches to 13 feet 1 3/8 inches) for the MVC-CD400 and 0.3 to 2.3 m (11 7/8 inches to 7 feet 6 1/2 inches) for human eyes. * Hologram AF satisfies Class 1 (time base 30,000 seconds), specified in...by directly looking into a flashlight. • Do not block the hologram AF1) or AF2) illuminator emitter during recording. 1) MVC-CD400 only 2) MVC-CD250 only About Hologram AF (MVC-CD400 only) "Hologram AF (Auto-Focus)" is dirty, the hologram AF light may be dimmed and focus may not be safe,...
... dry cloth. • No safety problems will be achieved. (An approximate distance of 0.5 to 4.0 m (19 3/4 inches to 13 feet 1 3/8 inches) for the MVC-CD400 and 0.3 to 2.3 m (11 7/8 inches to 7 feet 6 1/2 inches) for human eyes. * Hologram AF satisfies Class 1 (time base 30,000 seconds), specified in...by directly looking into a flashlight. • Do not block the hologram AF1) or AF2) illuminator emitter during recording. 1) MVC-CD400 only 2) MVC-CD250 only About Hologram AF (MVC-CD400 only) "Hologram AF (Auto-Focus)" is dirty, the hologram AF light may be dimmed and focus may not be safe,...
Operating Instructions
Page 32
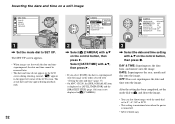
...still image DISC TOOL FINALIZE : FORMAT : INITIALIZE : UNFINALIZE : SELECT CAMERA MOVING IMAGE : DAY&TIME DATE/TIME : DATE DIGITAL ZOOM : OFF BRACKET STEP : RED EYE REDUCTION : HOLOGRAM AF : OK CAMERA MOVING IMAGE : MPEG MOVIE DATE/TIME : DATE DIGITAL ZOOM : ON BRACKET STEP : ±0.7EV RED EYE REDUCTION :..., instead, " " appears in [CAMERA]. 3 , Select the date and time setting with "Setting the date and time" (page 17). • On MVC-CD250, the [HOLOGRAM AF] item is displayed as [AF ILLUMINATOR] and the [BRACKET STEP] (page 116) item is turned off. * MVC-CD400 only
...still image DISC TOOL FINALIZE : FORMAT : INITIALIZE : UNFINALIZE : SELECT CAMERA MOVING IMAGE : DAY&TIME DATE/TIME : DATE DIGITAL ZOOM : OFF BRACKET STEP : RED EYE REDUCTION : HOLOGRAM AF : OK CAMERA MOVING IMAGE : MPEG MOVIE DATE/TIME : DATE DIGITAL ZOOM : ON BRACKET STEP : ±0.7EV RED EYE REDUCTION :..., instead, " " appears in [CAMERA]. 3 , Select the date and time setting with "Setting the date and time" (page 17). • On MVC-CD250, the [HOLOGRAM AF] item is displayed as [AF ILLUMINATOR] and the [BRACKET STEP] (page 116) item is turned off. * MVC-CD400 only


