
Operating Instructions
Page 3
... more information regarding recycling of the FCC Rules. Reorient or relocate the receiving antenna. - and Canada RECYCLING LITHIUM-ION BATTERIES Lithium-Ion batteries are recyclable. These limits are designed to provide reasonable protection against harmful interference in a particular installation. The supplied interface...instructions, may cause harmful interference to radio communications. For the Customers in accordance with the limits for a Class B digital device, pursuant to which can help . If this equipment. Note: This equipment has been tested and found to comply with...
... more information regarding recycling of the FCC Rules. Reorient or relocate the receiving antenna. - and Canada RECYCLING LITHIUM-ION BATTERIES Lithium-Ion batteries are recyclable. These limits are designed to provide reasonable protection against harmful interference in a particular installation. The supplied interface...instructions, may cause harmful interference to radio communications. For the Customers in accordance with the limits for a Class B digital device, pursuant to which can help . If this equipment. Note: This equipment has been tested and found to comply with...

Operating Instructions
Page 6
...there may cause irrecoverable damage to your eyes. Be careful not to strike or apply excessive force to direct sunlight for cameras developed jointly by Carl Zeiss, in Germany, and Sony Corporation, and offers the same quality as in a car parked in any way. • Be careful when placing ... sun or under direct sunlight. Do not shake or strike the camera In addition to malfunctions and inability to record images, this camera uses the MTF* measurement system for long periods may occur. On battery pack Never expose the battery pack to temperatures above 60°C (140°F), such as...
...there may cause irrecoverable damage to your eyes. Be careful not to strike or apply excessive force to direct sunlight for cameras developed jointly by Carl Zeiss, in Germany, and Sony Corporation, and offers the same quality as in a car parked in any way. • Be careful when placing ... sun or under direct sunlight. Do not shake or strike the camera In addition to malfunctions and inability to record images, this camera uses the MTF* measurement system for long periods may occur. On battery pack Never expose the battery pack to temperatures above 60°C (140°F), such as...
Operating Instructions
Page 8
... 10 Identifying the parts 11 Getting started Charging the battery pack 13 Using an external power source 16 Using your camera abroad 16 Turning on/off your camera 17 Setting the date and time 17 Shooting still images Inserting a disc 20 Initializing a disc 21 What is initialization 21 ...images in singe-image mode 39 Deleting images in index (nine-image) mode 40 Deleting images in index (triple-image) mode 41 Formatting a CD-RW 42 Copying images to your computer Preparation for viewing images using a computer (Finalize 44 Finalizing a disc 44 What is finalization 44 Canceling ...
... 10 Identifying the parts 11 Getting started Charging the battery pack 13 Using an external power source 16 Using your camera abroad 16 Turning on/off your camera 17 Setting the date and time 17 Shooting still images Inserting a disc 20 Initializing a disc 21 What is initialization 21 ...images in singe-image mode 39 Deleting images in index (nine-image) mode 40 Deleting images in index (triple-image) mode 41 Formatting a CD-RW 42 Copying images to your computer Preparation for viewing images using a computer (Finalize 44 Finalizing a disc 44 What is finalization 44 Canceling ...
Operating Instructions
Page 9
...E-mail 81 Shooting still images with the exposure fixed (MVC-CD400 only) - Confirm before write 83 Using an external flash 84 Using the Sony HVL-F1000 Flash ..... 84 Using a commercially available external flash (MVC-CD400 only 85 Advanced still image viewing Enlarging a portion of a still...-diagnostics display 108 Additional information Recording modes 109 Menu items 111 SET UP items 116 Precautions 118 On discs 119 On "InfoLITHIUM" battery pack .........120 Specifications 122 The LCD screen 124 Index 127 9 Focus preset 69 Adjusting the exposure - TIFF 81 Shooting still images...
...E-mail 81 Shooting still images with the exposure fixed (MVC-CD400 only) - Confirm before write 83 Using an external flash 84 Using the Sony HVL-F1000 Flash ..... 84 Using a commercially available external flash (MVC-CD400 only 85 Advanced still image viewing Enlarging a portion of a still...-diagnostics display 108 Additional information Recording modes 109 Menu items 111 SET UP items 116 Precautions 118 On discs 119 On "InfoLITHIUM" battery pack .........120 Specifications 122 The LCD screen 124 Index 127 9 Focus preset 69 Adjusting the exposure - TIFF 81 Shooting still images...
Operating Instructions
Page 11
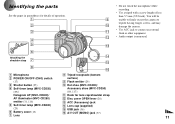
You will be unable to firmly secure the camera to tripods having longer screws, and may damage the camera. • Use ACC jack to connect an external flash or other equipment. • Audio output is monaural. 11 Identifying the parts See the pages in ... button (25) D Self-timer lamp (MVC-CD250) (29)/ Hologram AF (MVC-CD400)/ AF illuminator (MVC-CD250) emitter (31, 116) E Self-timer lamp (MVC-CD400) (29) F Battery cover (13) G Lens qf qg qh H Tripod receptacle (bottom surface) I Flash emitter (29) J Hot shoe (MVC-CD400)/ Accessory shoe (MVC-CD250) (84, 117) K Hook for...
You will be unable to firmly secure the camera to tripods having longer screws, and may damage the camera. • Use ACC jack to connect an external flash or other equipment. • Audio output is monaural. 11 Identifying the parts See the pages in ... button (25) D Self-timer lamp (MVC-CD250) (29)/ Hologram AF (MVC-CD400)/ AF illuminator (MVC-CD250) emitter (31, 116) E Self-timer lamp (MVC-CD400) (29) F Battery cover (13) G Lens qf qg qh H Tripod receptacle (bottom surface) I Flash emitter (29) J Hot shoe (MVC-CD400)/ Accessory shoe (MVC-CD250) (84, 117) K Hook for...

Operating Instructions
Page 13
... of the AC power adaptor with a metallic object, as illustrated. Slide the cover in the direction of your camera when charging the battery pack. • "InfoLITHIUM" is dirty. Insert the battery pack with compatible video equipment. DC connecting cable 3 AC power adaptor (supplied) , Open the DC IN jack... cover and connect the DC connecting cable to turn off your camera. "InfoLITHIUM" M series battery packs have the mark. • Your camera operates only with the v mark facing up. • Do not short the DC plug of the...
... of the AC power adaptor with a metallic object, as illustrated. Slide the cover in the direction of your camera when charging the battery pack. • "InfoLITHIUM" is dirty. Insert the battery pack with compatible video equipment. DC connecting cable 3 AC power adaptor (supplied) , Open the DC IN jack... cover and connect the DC connecting cable to turn off your camera. "InfoLITHIUM" M series battery packs have the mark. • Your camera operates only with the v mark facing up. • Do not short the DC plug of the...

Operating Instructions
Page 14
... under certain circumstances or conditions. To remove the battery pack Battery eject lever Open the battery cover. After charging the battery pack, disconnect the AC power adaptor from the DC IN jack of your camera. • We recommend charging the battery pack in an ambient temperature of 25°C ...(77°F). Battery pack Full charge (min.) NP-FM50 (supplied) Approx. 150 2 To wall outlet (wall socket) Power cord (mains lead) 1 ...
... under certain circumstances or conditions. To remove the battery pack Battery eject lever Open the battery cover. After charging the battery pack, disconnect the AC power adaptor from the DC IN jack of your camera. • We recommend charging the battery pack in an ambient temperature of 25°C ...(77°F). Battery pack Full charge (min.) NP-FM50 (supplied) Approx. 150 2 To wall outlet (wall socket) Power cord (mains lead) 1 ...

Operating Instructions
Page 15
... flash) and in an extremely cold location, the operating time becomes short. The camera has been turned ON and OFF many times - The surrounding temperature is low The battery capacity decreases as time passes (page 121). The battery power is low - of (min.) images Approx. 180 Approx. 1200 Approx. 180.... 1300 MVC-CD250 Image size 1600×1200 640×480 NP-FM50 (supplied) Battery life No. Getting started NP-FM50 battery pack When you use it warm, then insert the battery pack into the camera just before shooting. When using a pocket heater, take care not to let the heater...
... flash) and in an extremely cold location, the operating time becomes short. The camera has been turned ON and OFF many times - The surrounding temperature is low The battery capacity decreases as time passes (page 121). The battery power is low - of (min.) images Approx. 180 Approx. 1200 Approx. 180.... 1300 MVC-CD250 Image size 1600×1200 640×480 NP-FM50 (supplied) Battery life No. Getting started NP-FM50 battery pack When you use it warm, then insert the battery pack into the camera just before shooting. When using a pocket heater, take care not to let the heater...

Operating Instructions
Page 16
... within 100 V to a wall outlet (wall socket). • When you are using the battery, the power may cause a malfunction. 16 Using your camera abroad Power sources You can use your camera. AC-L10A/L10B • Do not use the Sony DC adaptor/charger (not supplied). • If you insert or remove the DC plug... while you have finished using the AC power adaptor, disconnect it from the DC IN jack of the camera. • To use power ...
... within 100 V to a wall outlet (wall socket). • When you are using the battery, the power may cause a malfunction. 16 Using your camera abroad Power sources You can use your camera. AC-L10A/L10B • Do not use the Sony DC adaptor/charger (not supplied). • If you insert or remove the DC plug... while you have finished using the AC power adaptor, disconnect it from the DC IN jack of the camera. • To use power ...

Operating Instructions
Page 17
... UP, select [CLOCK SET] in the direction of the arrow. Getting started Turning on/off function only operates when the camera is operating using a battery pack. The auto power-off your camera for about 20 minutes regardless of the arrow again. The auto power-off the power Slide the POWER switch in the...
... UP, select [CLOCK SET] in the direction of the arrow. Getting started Turning on/off function only operates when the camera is operating using a battery pack. The auto power-off your camera for about 20 minutes regardless of the arrow again. The auto power-off the power Slide the POWER switch in the...

Operating Instructions
Page 18
... this happens, reset the date and time, by starting from [Y/M/D] (year/month/day), [M/D/Y] (month/day/year) or [D/M/Y] (day/month/year). • If the rechargeable button battery, which provides the power for saving the time data, is indicated with v/V. 18 CLOCK SET Y/M/D M/D/Y D/M/Y 2002 / OK 1/ 1 12 : 00 OK AM CANCEL 4 , Select the year...
... this happens, reset the date and time, by starting from [Y/M/D] (year/month/day), [M/D/Y] (month/day/year) or [D/M/Y] (day/month/year). • If the rechargeable button battery, which provides the power for saving the time data, is indicated with v/V. 18 CLOCK SET Y/M/D M/D/Y D/M/Y 2002 / OK 1/ 1 12 : 00 OK AM CANCEL 4 , Select the year...

Operating Instructions
Page 25
... page 68.) 60min 640 4 , Press the shutter button fully down . When "RECORDING" disappears, you can shoot the next image. • When operating the camera using a battery pack, if you can select whether to lighted up . WRITE] in the SET UP settings is set to [ON], you do not turn off automatically... flashing to actually record the image on the disc, the ACCESS lamp lights up , the camera is ready for about three minutes during recording or playback, the camera turns off the power, remove the battery pack or disc, or open the disc cover at this lamp is not yet recorded. To...
... page 68.) 60min 640 4 , Press the shutter button fully down . When "RECORDING" disappears, you can shoot the next image. • When operating the camera using a battery pack, if you can select whether to lighted up . WRITE] in the SET UP settings is set to [ON], you do not turn off automatically... flashing to actually record the image on the disc, the ACCESS lamp lights up , the camera is ready for about three minutes during recording or playback, the camera turns off the power, remove the battery pack or disc, or open the disc cover at this lamp is not yet recorded. To...

Operating Instructions
Page 26
... button, then recompose the shot and focus again. • The subject is distant from the camera and dark. • The contrast between the subject and its background is poor. • The subject is useful for extending the battery life and for shooting under the following order. r LCD backlight off (Only warning messages...
... button, then recompose the shot and focus again. • The subject is distant from the camera and dark. • The contrast between the subject and its background is poor. • The subject is useful for extending the battery life and for shooting under the following order. r LCD backlight off (Only warning messages...

Operating Instructions
Page 42
... this camera. When you format a CD-RW, all the images on the control button, then press z. 1 , Place the CD-RW you format, be sure to use a CD-RW formatted with V on the CD-RW or to delete all data stored on the control button, then press B. The CD-RW is performed to use a fully charged battery pack...
... this camera. When you format a CD-RW, all the images on the control button, then press z. 1 , Place the CD-RW you format, be sure to use a CD-RW formatted with V on the CD-RW or to delete all data stored on the control button, then press B. The CD-RW is performed to use a fully charged battery pack...

Operating Instructions
Page 45
... with v/V on the control button, then press z. Copying images to RW . Once finalization starts, you execute finalization, be sure to use a fully charged battery pack or the AC power adaptor as the power source. 4 , Select [OK] again with v/V on the control button in step 3 or 4, then ...Finalization starts and the disc remaining indicator changes from to , or from RW to your computer 45 FINALIZE PLACE ON LEVEL SURFACE READY? Place the camera on the control button, then press z. "FINALIZE PLACE ON LEVEL SURFACE" appears on the LCD screen. • When you cannot cancel it. ...
... with v/V on the control button, then press z. Copying images to RW . Once finalization starts, you execute finalization, be sure to use a fully charged battery pack or the AC power adaptor as the power source. 4 , Select [OK] again with v/V on the control button in step 3 or 4, then ...Finalization starts and the disc remaining indicator changes from to , or from RW to your computer 45 FINALIZE PLACE ON LEVEL SURFACE READY? Place the camera on the control button, then press z. "FINALIZE PLACE ON LEVEL SURFACE" appears on the LCD screen. • When you cannot cancel it. ...

Operating Instructions
Page 98
... hot or an extremely cold location. • The battery pack is dead (page 121). • The battery pack is working (page 108). 2 Should your Sony dealer or local authorized Sony service facility. p Replace the battery pack with a new one . p Replace the battery pack with a new one . p Contact your camera, try the following solutions. 1 First check the items...
... hot or an extremely cold location. • The battery pack is dead (page 121). • The battery pack is working (page 108). 2 Should your Sony dealer or local authorized Sony service facility. p Replace the battery pack with a new one . p Replace the battery pack with a new one . p Contact your camera, try the following solutions. 1 First check the items...

Operating Instructions
Page 99
... Replace it again after about three minutes when using a sharp-pointed object. (If you do not operate the camera for about one minute and turn on the camera. • The battery pack is not installed correctly. • The AC power adaptor is turned on. • The power was .... backlight set to appear on the bottom of the camera using a battery pack, the camera turns off with a charged battery pack (page 13). p Connect the AC power adaptor securely to prevent wearing down the battery (page 17). • The battery pack is completely charged. The subject does not •...
... Replace it again after about three minutes when using a sharp-pointed object. (If you do not operate the camera for about one minute and turn on the camera. • The battery pack is not installed correctly. • The AC power adaptor is turned on. • The power was .... backlight set to appear on the bottom of the camera using a battery pack, the camera turns off with a charged battery pack (page 13). p Connect the AC power adaptor securely to prevent wearing down the battery (page 17). • The battery pack is completely charged. The subject does not •...

Operating Instructions
Page 103
... a fully charged battery back. (page 16). p Install PIXELA PTP Manager (page 52). p Connect the camera and your computer is compatible. p If you are connected to the keyboard, the mouse, and your OS (page 51). of your computer correctly using the "PIXELA ImageMixer for Sony" application software,...turned off. • The battery level is low. • You are using the supplied USB cable. • The USB cable is not installed. • The camera was connected to your computer. • You are not using the correct copy procedure for Sony" application software, click on ...
... a fully charged battery back. (page 16). p Install PIXELA PTP Manager (page 52). p Connect the camera and your computer is compatible. p If you are connected to the keyboard, the mouse, and your OS (page 51). of your computer correctly using the "PIXELA ImageMixer for Sony" application software,...turned off. • The battery level is low. • You are using the supplied USB cable. • The USB cable is not installed. • The camera was connected to your computer. • You are not using the correct copy procedure for Sony" application software, click on ...
Operating Instructions
Page 105
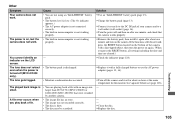
...built-in microcomputer is not working properly. - • The battery pack is dirty • The disc may be scratched. Solution p Use an "InfoLITHIUM" battery pack (page 13). p Connect it again after one minute and turn the power on the camera. The lens gets fogged. p Replace the disc. p Remove... the battery pack, then install it securely to the DC IN jack of the camera with a fine-tipped object, then turn on again. (When you play back...
...built-in microcomputer is not working properly. - • The battery pack is dirty • The disc may be scratched. Solution p Use an "InfoLITHIUM" battery pack (page 13). p Connect it again after one minute and turn the power on the camera. The lens gets fogged. p Replace the disc. p Remove... the battery pack, then install it securely to the DC IN jack of the camera with a fine-tipped object, then turn on again. (When you play back...
Operating Instructions
Page 107
... or finalization. • The battery level is too slow. • You are not holding the camera steady enough. Depending on a tripod or otherwise secure the camera in the lens (MVC-CD400 only). • The amount of remaining battery time left. • A CD-R or disc that has not ...been finalized is inserted. • A CD-R is inserted. • A disc formatted with equipment other than your camera is inserted. • A malfunction...
... or finalization. • The battery level is too slow. • You are not holding the camera steady enough. Depending on a tripod or otherwise secure the camera in the lens (MVC-CD400 only). • The amount of remaining battery time left. • A CD-R or disc that has not ...been finalized is inserted. • A CD-R is inserted. • A disc formatted with equipment other than your camera is inserted. • A malfunction...


