
Operating Instructions
Page 4
... the EMC regulations when used under the lens. If static electricity or electromagnetism causes data transfer to this equipment for your nearest Sony service station. The electromagnetic fields at the specific frequencies may influence the picture and sound of this equipment has a detachable fuse ...fuse cover. This statement is fitted to discontinue midway (fail), restart the application or disconnect and connect the USB cable again. 4 If the plug supplied with this camera. Should the fuse in Europe This product has been tested and found compliant with the limits sets out on...
... the EMC regulations when used under the lens. If static electricity or electromagnetism causes data transfer to this equipment for your nearest Sony service station. The electromagnetic fields at the specific frequencies may influence the picture and sound of this equipment has a detachable fuse ...fuse cover. This statement is fitted to discontinue midway (fail), restart the application or disconnect and connect the USB cable again. 4 If the plug supplied with this camera. Should the fuse in Europe This product has been tested and found compliant with the limits sets out on...
Operating Instructions
Page 8
... images in singe-image mode 39 Deleting images in index (nine-image) mode 40 Deleting images in index (triple-image) mode 41 Formatting a CD-RW 42 Copying images to your computer Preparation for viewing images using a computer (Finalize 44 Finalizing a disc 44 What is finalization 44 Canceling finalization... on your computer 61 For Macintosh users 61 Viewing images on a computer connected with the USB cable (For Mac OS X users only 61 Before advanced operations How to setup and operate your camera...62 Changing the menu settings 62 Changing the items in the SET UP screen 62 How ...
... images in singe-image mode 39 Deleting images in index (nine-image) mode 40 Deleting images in index (triple-image) mode 41 Formatting a CD-RW 42 Copying images to your computer Preparation for viewing images using a computer (Finalize 44 Finalizing a disc 44 What is finalization 44 Canceling finalization... on your computer 61 For Macintosh users 61 Viewing images on a computer connected with the USB cable (For Mac OS X users only 61 Before advanced operations How to setup and operate your camera...62 Changing the menu settings 62 Changing the items in the SET UP screen 62 How ...

Operating Instructions
Page 10
...(page 44). 10 Flow chart for disc operations Start A new disc : CD-R : CD-RW [ ] : Required time Initialize (page 21) Preparation for viewing recorded images through a disc drive is complete. View on the camera (page 35) Record Disc preparation for viewing recorded images on a disc. Blank... disc Format [About 7 min] (page 42) The disc space is complete. Recording is fully available. Introduction This digital still camera is restored. View through the USB cable (pages 51, 61) The disc status is complete. Unfinalize [About 1 min] (page 46) About 13 MB disc ...
...(page 44). 10 Flow chart for disc operations Start A new disc : CD-R : CD-RW [ ] : Required time Initialize (page 21) Preparation for viewing recorded images through a disc drive is complete. View on the camera (page 35) Record Disc preparation for viewing recorded images on a disc. Blank... disc Format [About 7 min] (page 42) The disc space is complete. Recording is fully available. Introduction This digital still camera is restored. View through the USB cable (pages 51, 61) The disc status is complete. Unfinalize [About 1 min] (page 46) About 13 MB disc ...

Operating Instructions
Page 56
... removing the disc from the jack on the LCD screen. 3 Connecting your camera to your computer USB MODE PTP a a a a 1 , Open the jack cover, and connect the supplied USB cable to recognize your camera. Then, connect the other end of the USB cable to your camera during USB connection For Windows 98, 98SE, 2000 or Me users 1 Click "Cancel" and...
... removing the disc from the jack on the LCD screen. 3 Connecting your camera to your computer USB MODE PTP a a a a 1 , Open the jack cover, and connect the supplied USB cable to recognize your camera. Then, connect the other end of the USB cable to your camera during USB connection For Windows 98, 98SE, 2000 or Me users 1 Click "Cancel" and...

Operating Instructions
Page 60
... to remove the driver. Try PIXELA PTP Manager installation again using the supplied CD-ROM (page 52). 60 The wizard closes. • To continue copying other images, disconnect the USB cable and reconnect it . 1 Click " Sony PTP." 2 Click "Delete." When the PIXELA PTP Manager does not start ...Property" screen appears. 2 Check whether a device is already installed. 1 Click "Device Manager." 2 Double-click " Other Devices." 3 Check for a " Sony PTP" with these pictures," then click "Next." The "Completing the Scanner and Camera Wizard" screen appears. 5 Click here , Click "Finish."
... to remove the driver. Try PIXELA PTP Manager installation again using the supplied CD-ROM (page 52). 60 The wizard closes. • To continue copying other images, disconnect the USB cable and reconnect it . 1 Click " Sony PTP." 2 Click "Delete." When the PIXELA PTP Manager does not start ...Property" screen appears. 2 Check whether a device is already installed. 1 Click "Device Manager." 2 Double-click " Other Devices." 3 Check for a " Sony PTP" with these pictures," then click "Next." The "Completing the Scanner and Camera Wizard" screen appears. 5 Click here , Click "Finish."
Operating Instructions
Page 61
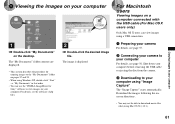
Shut down your computer before removing the USB cable or ejecting the disc from the camera. 3 Downloading to your computer. The "My Documents" folder contents are displayed. • This section describes the procedure for Sony" software to view images on your computer using Mac OS X (v.10.1). 61 For Macintosh users Viewing images on a computer connected...
Shut down your computer before removing the USB cable or ejecting the disc from the camera. 3 Downloading to your computer. The "My Documents" folder contents are displayed. • This section describes the procedure for Sony" software to view images on your computer using Mac OS X (v.10.1). 61 For Macintosh users Viewing images on a computer connected...

Operating Instructions
Page 103
... install PIXELA PTP Manager (pages 52 and 60). p Turn on HELP. p Use the AC power adaptor or a fully charged battery back. (page 16). p Disconnect the USB cables except for Sony" application software, click on the camera (page 17). Computers Symptom Cause Solution You do not know if the OS - p Use the supplied...
... install PIXELA PTP Manager (pages 52 and 60). p Turn on HELP. p Use the AC power adaptor or a fully charged battery back. (page 16). p Disconnect the USB cables except for Sony" application software, click on the camera (page 17). Computers Symptom Cause Solution You do not know if the OS - p Use the supplied...

Operating Instructions
Page 104
... Finalize the disc (page 44). p Consult the computer or software manufacturer. p Check the printer settings. CD-ROM Symptom You cannot record on the HELP files for the "PIXELA ImageMixer for Sony" application software. Symptom The image cannot be played back through the disc drive of your computer. p Consult... occurred. • You are interrupted by noise when you connect the camera to the hard disk of your computer and then play back the file from the disc. - Solution p Replace it with the USB cable. The image and sound are playing back the file directly from the hard...
... Finalize the disc (page 44). p Consult the computer or software manufacturer. p Check the printer settings. CD-ROM Symptom You cannot record on the HELP files for the "PIXELA ImageMixer for Sony" application software. Symptom The image cannot be played back through the disc drive of your computer. p Consult... occurred. • You are interrupted by noise when you connect the camera to the hard disk of your computer and then play back the file from the disc. - Solution p Replace it with the USB cable. The image and sound are playing back the file directly from the hard...
Operating Instructions
Page 123
... • AC-L10A/L10B AC power adaptor (1) • Power cord (mains lead) (1) • USB cable (1) • NP-FM50 battery pack (1) • A/V connecting cable (1) • 8 cm CD adaptor (1) • Mavica disc (7) (CD-R (6), CD-RW (1)) • Shoulder strap (1) • Lens cap (1) • Lens cap strap (1) • CD-ROM (SPVD-009) (1) • Operating instructions (1) Design and specifications are subject to change...
... • AC-L10A/L10B AC power adaptor (1) • Power cord (mains lead) (1) • USB cable (1) • NP-FM50 battery pack (1) • A/V connecting cable (1) • 8 cm CD adaptor (1) • Mavica disc (7) (CD-R (6), CD-RW (1)) • Shoulder strap (1) • Lens cap (1) • Lens cap strap (1) • CD-ROM (SPVD-009) (1) • Operating instructions (1) Design and specifications are subject to change...

Operating Instructions
Page 127
... 77 Clock set 17 Computer copying images 51, 57, 61 PIXELA PTP Manager 52 USB cable 56, 61 Confirm before write 83, 117 Control button 12, 62 Conversion lens 117 Copying images 51, 57, 61 D Deleting 39, 96 Digital zoom 27 Disc cleaning 119 finalizing 44 formatting 42 initializing 21 inserting 20 number... 24, 66 AF range select mode 66 Center AF mode 66 focus preset 69 Multipoint AF 66 shooting (using auto adjustment mode 24, 66 Formatting a CD-RW 42 127
... 77 Clock set 17 Computer copying images 51, 57, 61 PIXELA PTP Manager 52 USB cable 56, 61 Confirm before write 83, 117 Control button 12, 62 Conversion lens 117 Copying images 51, 57, 61 D Deleting 39, 96 Digital zoom 27 Disc cleaning 119 finalizing 44 formatting 42 initializing 21 inserting 20 number... 24, 66 AF range select mode 66 Center AF mode 66 focus preset 69 Multipoint AF 66 shooting (using auto adjustment mode 24, 66 Formatting a CD-RW 42 127


