
Operating Instructions
Page 1
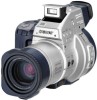
Owner's Record The model and serial numbers are located on the bottom. Model No. Record the serial number in the space provided below. MVC-CD1000 Serial No MVC-CD1000 ©2000 Sony Corporation Refer to these numbers whenever you call upon your Sony dealer regarding this manual thoroughly, and retain it for future reference. 3-062-473-12(1) Digital Still Camera Operating Instructions Before operating the unit, please read this product.
Owner's Record The model and serial numbers are located on the bottom. Model No. Record the serial number in the space provided below. MVC-CD1000 Serial No MVC-CD1000 ©2000 Sony Corporation Refer to these numbers whenever you call upon your Sony dealer regarding this manual thoroughly, and retain it for future reference. 3-062-473-12(1) Digital Still Camera Operating Instructions Before operating the unit, please read this product.

Operating Instructions
Page 2
.... Refer servicing to comply with Part 15 of Conformity Trade name: SONY Model No.: MVC-CD1000 Responsible Party:Sony Electronics Inc. Operation is no guarantee that may be determined by one... harmful interference in this equipment. For the Customers in this manual could void your authority to operate this camera is encouraged to try to correct the interference by turning the... approved in the U.S.A. Address: 1 Sony Drive, Park Ridge, NJ 07656 USA Telephone No.: 201-930-6972 This device complies with the limits for a Class B digital device, pursuant to rain or moisture....
.... Refer servicing to comply with Part 15 of Conformity Trade name: SONY Model No.: MVC-CD1000 Responsible Party:Sony Electronics Inc. Operation is no guarantee that may be determined by one... harmful interference in this equipment. For the Customers in this manual could void your authority to operate this camera is encouraged to try to correct the interference by turning the... approved in the U.S.A. Address: 1 Sony Drive, Park Ridge, NJ 07656 USA Telephone No.: 201-930-6972 This device complies with the limits for a Class B digital device, pursuant to rain or moisture....

Operating Instructions
Page 3
... In some areas the disposal of this camera. 3 Connect the equipment into an outlet on a circuit different from that to your nearest Sony service station. and Canada DISPOSAL OF LITHIUM...supplied with the limits for a digital device pursuant to attach the fuse cover after you should lose the fuse cover, please contact your nearest Sony Service Center or Factory Service Center...SONY (Canada only) Caution: Do not handle damaged or leaking lithium ion battery. For the Customers in the United Kingdom A moulded plug complying with or mark) must be used with this equipment in this manual...
... In some areas the disposal of this camera. 3 Connect the equipment into an outlet on a circuit different from that to your nearest Sony service station. and Canada DISPOSAL OF LITHIUM...supplied with the limits for a digital device pursuant to attach the fuse cover after you should lose the fuse cover, please contact your nearest Sony Service Center or Factory Service Center...SONY (Canada only) Caution: Do not handle damaged or leaking lithium ion battery. For the Customers in the United Kingdom A moulded plug complying with or mark) must be used with this equipment in this manual...

Operating Instructions
Page 4
...start reading this camera with the Mavica logo. When this manual, buttons and settings on image data compatibility This camera conforms with the Design Rules for effective use this manual and operating the unit, check the model number. Note on the camera are operational for Camera File Systems universal...Development Association). Do not get the camera wet. Be sure to read the following before using the camera. Before you read this may render the discs unusable or image data breakdown, damage or loss may cause malfunctions. e.g. This digital still camera uses 8 cm CD-Rs as...
...start reading this camera with the Mavica logo. When this manual, buttons and settings on image data compatibility This camera conforms with the Design Rules for effective use this manual and operating the unit, check the model number. Note on the camera are operational for Camera File Systems universal...Development Association). Do not get the camera wet. Be sure to read the following before using the camera. Before you read this may render the discs unusable or image data breakdown, damage or loss may cause malfunctions. e.g. This digital still camera uses 8 cm CD-Rs as...

Operating Instructions
Page 5
...to still images (VOICE 48 Recording text documents (TEXT) 49 Recording uncompressed images (TIFF 49 Recording images in macro ...........50 Focusing manually 50 Using the PROGRAM AE function 51 Using the Spot light-metering function 52 Adjusting the exposure (EXPOSURE 53 Adjusting the white balance ...RESIZE 62 Selecting still images to print (PRINT MARK 62 Additional information Precautions 64 On discs 66 Using your camera abroad 67 Troubleshooting 68 Warning and notice messages .......72 Self-diagnosis display 73 Specifications 74 LCD screen/viewfinder indicators .75 Index 77 5
...to still images (VOICE 48 Recording text documents (TEXT) 49 Recording uncompressed images (TIFF 49 Recording images in macro ...........50 Focusing manually 50 Using the PROGRAM AE function 51 Using the Spot light-metering function 52 Adjusting the exposure (EXPOSURE 53 Adjusting the white balance ...RESIZE 62 Selecting still images to print (PRINT MARK 62 Additional information Precautions 64 On discs 66 Using your camera abroad 67 Troubleshooting 68 Warning and notice messages .......72 Self-diagnosis display 73 Specifications 74 LCD screen/viewfinder indicators .75 Index 77 5

Operating Instructions
Page 6
... 4 qf 5 qg 6 qh 7 qj 8 qk 9 ql 0 w; U PROGRAM AE +/- wa A Flash (22) B Built-in parentheses for flash Do not block while recording. G Focus ring (50) H Lens I DIGITAL I/O jack (34) J PROGRAM AE button (51) K WHITE BALANCE button (53) L Accessory shoe M OPEN (FLASH) button (22) N (One-push white balance) button (53) O (External flash) jack... P Disc cover OPEN lever (15) Q Lens cap (supplied) R STEADY SHOT ON/OFF switch (21) S FOCUS AUTO/MANUAL switch (50) T A/V OUT (MONO) jack (59) Audio output is monaural.
... 4 qf 5 qg 6 qh 7 qj 8 qk 9 ql 0 w; U PROGRAM AE +/- wa A Flash (22) B Built-in parentheses for flash Do not block while recording. G Focus ring (50) H Lens I DIGITAL I/O jack (34) J PROGRAM AE button (51) K WHITE BALANCE button (53) L Accessory shoe M OPEN (FLASH) button (22) N (One-push white balance) button (53) O (External flash) jack... P Disc cover OPEN lever (15) Q Lens cap (supplied) R STEADY SHOT ON/OFF switch (21) S FOCUS AUTO/MANUAL switch (50) T A/V OUT (MONO) jack (59) Audio output is monaural.

Operating Instructions
Page 18
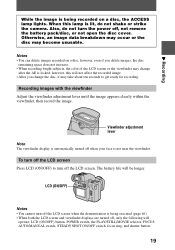
...After "RECORDING" goes off, you can do another recording. ∗ The exposure and focus are automatically adjusted. The focus is not automatically adjusted when the camera is not yet recorded. For the number of images you can record on a disc See page 47. 18 Recording still images To record still images, ... button fully down and check the image. While the AE lock indicator z (green) is flashing, the image is frozen, however, the image is in manual focus mode. The shutter clicks and the image is ready for recording. To cancel the recording, release the shutter button. When the...
...After "RECORDING" goes off, you can do another recording. ∗ The exposure and focus are automatically adjusted. The focus is not automatically adjusted when the camera is not yet recorded. For the number of images you can record on a disc See page 47. 18 Recording still images To record still images, ... button fully down and check the image. While the AE lock indicator z (green) is flashing, the image is frozen, however, the image is in manual focus mode. The shutter clicks and the image is ready for recording. To cancel the recording, release the shutter button. When the...
Operating Instructions
Page 19
... within the viewfinder, then record the image. The battery life will operate: LCD (ON/OFF) button, POWER switch, the PLAY/STILL/MOVIE selector, FOCUS AUTO/MANUAL switch, STEADY SHOT ON/OFF switch, focus ring, and shutter button. 19 LCD (ON/OFF) Notes • You cannot turn off the LCD screen when...). • When both the LCD screen and viewfinder displays are turned off, only the following will be longer. Also, do not shake or strike the camera.
... within the viewfinder, then record the image. The battery life will operate: LCD (ON/OFF) button, POWER switch, the PLAY/STILL/MOVIE selector, FOCUS AUTO/MANUAL switch, STEADY SHOT ON/OFF switch, focus ring, and shutter button. 19 LCD (ON/OFF) Notes • You cannot turn off the LCD screen when...). • When both the LCD screen and viewfinder displays are turned off, only the following will be longer. Also, do not shake or strike the camera.

Operating Instructions
Page 28
Be sure to also see the operation manuals for viewing images on using your personal computer. - Still image in TEXT mode: GIF... software, DirectCD included in the following formats. Viewing images using a personal computer You can view data with your camera on your application software, the file size may increase when you open a still image file. • When... to open the file. 28 You have to finalize the disc. This section describes the general method for your camera is stored in the supplied CD-ROM. B Viewing images with a personal computer connected with a CD-ROM drive...
Be sure to also see the operation manuals for viewing images on using your personal computer. - Still image in TEXT mode: GIF... software, DirectCD included in the following formats. Viewing images using a personal computer You can view data with your camera on your application software, the file size may increase when you open a still image file. • When... to open the file. 28 You have to finalize the disc. This section describes the general method for your camera is stored in the supplied CD-ROM. B Viewing images with a personal computer connected with a CD-ROM drive...

Operating Instructions
Page 29
You have to execute the finalization to view new images on the viewfinder. 2 Select [FILE] with this manual. We recommend that has not been executed the finalization cannot be the trademarks or registered trademarks of their respective companies. INDEX DELETE FILE... of Microsoft Corporation in the United States and /or other countries. • Macintosh and Mac OS, QuickTime are not mentioned in each case in this camera on CD-ROM drives. Furthermore, "™" and "®" are trademarks of Apple Computer, Inc. • DirectCD is required to execute the finalization before...
You have to execute the finalization to view new images on the viewfinder. 2 Select [FILE] with this manual. We recommend that has not been executed the finalization cannot be the trademarks or registered trademarks of their respective companies. INDEX DELETE FILE... of Microsoft Corporation in the United States and /or other countries. • Macintosh and Mac OS, QuickTime are not mentioned in each case in this camera on CD-ROM drives. Furthermore, "™" and "®" are trademarks of Apple Computer, Inc. • DirectCD is required to execute the finalization before...

Operating Instructions
Page 41
... selected image changes from the LCD screen or on the INDEX screen (page 56). The color of the selected item or the frame of this manual refers to execute each function. INDEX DELETE FILE TOOL SETUP SELECT OK MENU BAR OFF Menu bar Selecting items or images on the LCD screen...
... selected image changes from the LCD screen or on the INDEX screen (page 56). The color of the selected item or the frame of this manual refers to execute each function. INDEX DELETE FILE TOOL SETUP SELECT OK MENU BAR OFF Menu bar Selecting items or images on the LCD screen...

Operating Instructions
Page 50
...mode Press again. The range is about 13/16 inch (2 cm) away from 13/16 inch (2 cm) to AUTO. 3 Press (macro). Focusing manually Normally the focus is being adjusted. Notes • You cannot record images in macro with the following PROGRAM AE modes: -Landscape mode -Panfocus mode ... 1 Set the PLAY/STILL/MOVIE selector to MOVIE or STILL. 2 Set the FOCUS AUTO/ MANUAL switch to ∞ (infinity). ∗ When using the digital zoom function, the enlarged image will be less than double size. The 9 (manual focus) indicator appears on the LCD screen or on the viewfinder. 3 Turn the focus ring...
...mode Press again. The range is about 13/16 inch (2 cm) away from 13/16 inch (2 cm) to AUTO. 3 Press (macro). Focusing manually Normally the focus is being adjusted. Notes • You cannot record images in macro with the following PROGRAM AE modes: -Landscape mode -Panfocus mode ... 1 Set the PLAY/STILL/MOVIE selector to MOVIE or STILL. 2 Set the FOCUS AUTO/ MANUAL switch to ∞ (infinity). ∗ When using the digital zoom function, the enlarged image will be less than double size. The 9 (manual focus) indicator appears on the LCD screen or on the viewfinder. 3 Turn the focus ring...

Operating Instructions
Page 51
... shoot a subject within 31 1/2 inches (0.8 m) while the zoom lever is set to the W side until the indicator stops flashing. • You cannot adjust the focus manually if you can record the subject without losing the dark atmosphere of a moving subject. Move the zoom lever to T side, you cannot get a clear focus...
... shoot a subject within 31 1/2 inches (0.8 m) while the zoom lever is set to the W side until the indicator stops flashing. • You cannot adjust the focus manually if you can record the subject without losing the dark atmosphere of a moving subject. Move the zoom lever to T side, you cannot get a clear focus...

Operating Instructions
Page 71
... is dead. t Turn on the camera. • The battery level is displayed on the LCD screen or on the viewfinder (page 34). • The USB connectors on your personal computer are connected to auto focus mode (page 50). • PROGRAM AE is in manual focus mode. Make sure that "PC... MODE" is low. t Cancel the Panfocus mode (page 51). • This function does not work . The shutter cannot be marked on a moving image nor on a TEXT image. • The camera is not connected firmly. t Disconnect the USB ...
... is dead. t Turn on the camera. • The battery level is displayed on the LCD screen or on the viewfinder (page 34). • The USB connectors on your personal computer are connected to auto focus mode (page 50). • PROGRAM AE is in manual focus mode. Make sure that "PC... MODE" is low. t Cancel the Panfocus mode (page 51). • This function does not work . The shutter cannot be marked on a moving image nor on a TEXT image. • The camera is not connected firmly. t Disconnect the USB ...

Operating Instructions
Page 77
...10 BEEP 46 C Charging 9 Cleaning 64 CLOCK SET 12 Control button 40 D DELETE 61 DEMO 46 DIGITAL ZOOM 45 Disc Finalize 29 Initialize 16 Inserting 14 Number of recordable , , images 47 48 49 Usable...viewfinder .... 75 "InfoLITHIUM" battery pack 8 INITIALIZE 16 J JPEG 28 M Macro recording 50 Manual focusing 50 Menu 42 Moisture condensation..... 64 Moving image Playback 26 , Recording 24 MPEG 24 28... Playback 25 Recording 18 T TEXT mode 49 U Using flash 22 Using your camera abroad 67 V Viewfinder 19 Viewing images using a personal computer ....... 28 VOICE 48 W ...
...10 BEEP 46 C Charging 9 Cleaning 64 CLOCK SET 12 Control button 40 D DELETE 61 DEMO 46 DIGITAL ZOOM 45 Disc Finalize 29 Initialize 16 Inserting 14 Number of recordable , , images 47 48 49 Usable...viewfinder .... 75 "InfoLITHIUM" battery pack 8 INITIALIZE 16 J JPEG 28 M Macro recording 50 Manual focusing 50 Menu 42 Moisture condensation..... 64 Moving image Playback 26 , Recording 24 MPEG 24 28... Playback 25 Recording 18 T TEXT mode 49 U Using flash 22 Using your camera abroad 67 V Viewfinder 19 Viewing images using a personal computer ....... 28 VOICE 48 W ...


