
Operating Instructions
Page 6
...cannot insert a disc. Tips • The player turns on/off , you want to play a DVD and other discs just after reading Quick Review. Tip Steps 3 to select "VIDEO 4." Note Even ...the POWER button on the player is already inserted, press u to turn on . Each time you use this system for the first time. OPEN 5 Insert the disc (labeled side up . 3 Press (INPUT) on the..., press (POWER) on the remote commander or on the player until the green light of the player. 6 For details, refer to the connection diagram in the following sequence: VIDEO 1* c VIDEO 2* c VIDEO 3* c VIDEO 4 ...
...cannot insert a disc. Tips • The player turns on/off , you want to play a DVD and other discs just after reading Quick Review. Tip Steps 3 to select "VIDEO 4." Note Even ...the POWER button on the player is already inserted, press u to turn on . Each time you use this system for the first time. OPEN 5 Insert the disc (labeled side up . 3 Press (INPUT) on the..., press (POWER) on the remote commander or on the player until the green light of the player. 6 For details, refer to the connection diagram in the following sequence: VIDEO 1* c VIDEO 2* c VIDEO 3* c VIDEO 4 ...
Operating Instructions
Page 7
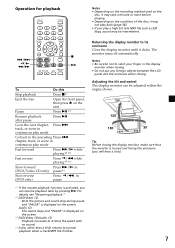
...or scene in continuous play mode Fast forward Press M/y while playing*3 *4 Fast reverse Press /m while playing*3 *4 Slow forward Press M/y in (DVD/Video CD only) pause*4 Slow reverse (DVD only) Press /m in continuous play back (page 38). • If you will hear a click). 7 Audio CD The sound stops and ...x u To Do this Stop playback Press x*1 Eject the disc Open the front panel, then press Z on the screen. For details, see "Resuming playback." *2 DVD/Video CD Both the picture and sound stop during pause and "PAUSE" is displayed on the condition of the disc, it clicks....
...or scene in continuous play mode Fast forward Press M/y while playing*3 *4 Fast reverse Press /m while playing*3 *4 Slow forward Press M/y in (DVD/Video CD only) pause*4 Slow reverse (DVD only) Press /m in continuous play back (page 38). • If you will hear a click). 7 Audio CD The sound stops and ...x u To Do this Stop playback Press x*1 Eject the disc Open the front panel, then press Z on the screen. For details, see "Resuming playback." *2 DVD/Video CD Both the picture and sound stop during pause and "PAUSE" is displayed on the condition of the disc, it clicks....

Operating Instructions
Page 8
... monitor do not turn off and this causes battery drain. 1 OPEN button 6, 12 To open the monitor. 2 Receptor for the card remote commander/Transmitter for details, refer to the installation/ connections manual) There are 3 ways to turn off the player and the monitor, after turning around 180 degrees, and images on...
... monitor do not turn off and this causes battery drain. 1 OPEN button 6, 12 To open the monitor. 2 Receptor for the card remote commander/Transmitter for details, refer to the installation/ connections manual) There are 3 ways to turn off the player and the monitor, after turning around 180 degrees, and images on...

Operating Instructions
Page 9
...describe how to next page t qf ANGLE button 23 To select the multiple angles of view while playing or pausing a DVD. qj u (play/pause) button qk x (stop) button ql MONITOR POWER (on/off) button* To turn on...control the same functions as those on /off the player. These buttons also work for optional Sony monitors other than XVM-R75 and XVM-H6. 9 continue to use the player and the ...monitor by chapter, title, or track. Tip Refer to "Replacing the lithium battery" for details on /off) button (9) is only for the player. Cautions about the MONITOR POWER (on/off) button (...
...describe how to next page t qf ANGLE button 23 To select the multiple angles of view while playing or pausing a DVD. qj u (play/pause) button qk x (stop) button ql MONITOR POWER (on/off) button* To turn on...control the same functions as those on /off the player. These buttons also work for optional Sony monitors other than XVM-R75 and XVM-H6. 9 continue to use the player and the ...monitor by chapter, title, or track. Tip Refer to "Replacing the lithium battery" for details on /off) button (9) is only for the player. Cautions about the MONITOR POWER (on/off) button (...

Operating Instructions
Page 10
... light of the button is turned on/off. 2 DISC IN light When a disc is in the player, the DISC IN light glows orange. 3 Receptor for details. 1 POWER (on/off) button 6 The player doesn't turn on, when the monitor is turned off. Turn on the player lights up. Note Even when the... player is turned off . • To turn on the player, press (POWER) on the monitor or (MONITOR POWER) on the card remote commander. DVD player MV-101 POWER DISC IN MV-101 POWER DISC IN RESET MV-101 Refer to the pages listed for the card remote commander 4 u (play...
... light of the button is turned on/off. 2 DISC IN light When a disc is in the player, the DISC IN light glows orange. 3 Receptor for details. 1 POWER (on/off) button 6 The player doesn't turn on, when the monitor is turned off. Turn on the player lights up. Note Even when the... player is turned off . • To turn on the player, press (POWER) on the monitor or (MONITOR POWER) on the card remote commander. DVD player MV-101 POWER DISC IN MV-101 POWER DISC IN RESET MV-101 Refer to the pages listed for the card remote commander 4 u (play...

Operating Instructions
Page 12
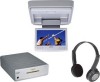
Operation for details, refer to its enclosure Close the display monitor until it clicks. Returning the display monitor to the installation/connections manual), be adjusted within the angles ...
Operation for details, refer to its enclosure Close the display monitor until it clicks. Returning the display monitor to the installation/connections manual), be adjusted within the angles ...

Operating Instructions
Page 13
... source indication "VIDEO 4" is selected: VIDEO1 NTSC 13 When NTSC Video is displayed. For details, refer to the connection diagram of installation/connection manual. 3 Press M or m to select the proper input mode. COLOR SYSTEM" (page 29). When PAL Video is turned on the player and the monitor. 2 Press... here for the monitor. INPUT POWER 1 Press (POWER). Each time you set the POWER SELECT switch to the B position (for details, refer to the installation/connections manual), be sure to select PAL or NTSC color system. Selecting the input source You can change the TV color...
... source indication "VIDEO 4" is selected: VIDEO1 NTSC 13 When NTSC Video is displayed. For details, refer to the connection diagram of installation/connection manual. 3 Press M or m to select the proper input mode. COLOR SYSTEM" (page 29). When PAL Video is turned on the player and the monitor. 2 Press... here for the monitor. INPUT POWER 1 Press (POWER). Each time you set the POWER SELECT switch to the B position (for details, refer to the installation/connections manual), be sure to select PAL or NTSC color system. Selecting the input source You can change the TV color...

Operating Instructions
Page 25
Most settings need to be set up and adjust this player. Changing Setup You can set when you first use this player using the on-screen setup menu. M/m
Most settings need to be set up and adjust this player. Changing Setup You can set when you first use this player using the on-screen setup menu. M/m
