
Operating Instructions
Page 1
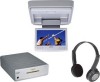
For installation and connections, see the supplied installation/connections manual. Model No. Record these numbers whenever you call upon your Sony dealer regarding this product. 3-255-990-11 (1) Mobile Video System Operating Instructions US Owner's Record The model and serial numbers are located on the bottom of the unit. MV-7101DS Serial No. MV-7101DS © 2003 Sony Corporation Refer to these numbers in the space provided below.
For installation and connections, see the supplied installation/connections manual. Model No. Record these numbers whenever you call upon your Sony dealer regarding this product. 3-255-990-11 (1) Mobile Video System Operating Instructions US Owner's Record The model and serial numbers are located on the bottom of the unit. MV-7101DS Serial No. MV-7101DS © 2003 Sony Corporation Refer to these numbers in the space provided below.

Operating Instructions
Page 2
... to alert the user to the presence of uninsulated "dangerous voltage" within the product's enclosure that any changes or modifications not expressly approved in this manual could void your authority to operate this product will increase eye hazard. This symbol is located on the drive unit's internal chassis. To prevent fire...
... to alert the user to the presence of uninsulated "dangerous voltage" within the product's enclosure that any changes or modifications not expressly approved in this manual could void your authority to operate this product will increase eye hazard. This symbol is located on the drive unit's internal chassis. To prevent fire...

Operating Instructions
Page 3
... 26 Displaying captions for viewers with the menu display ....... 19 Displaying running time 20 Changing the subtitle language 21 Using a DVD menu 21 Using the TOP MENU button 21 Using the MENU button 22 Changing the audio language 22 Changing angles 23 Changing ... DYNAMIC 28 Selecting the TV color system - COLOR SYSTEM 29 Selecting the audio language for MP3 files - AUDIO OUT 28 Selecting the compression setting for DVD - AUDIO 29 Displaying the subtitles for the sound - PASSWORD 32 Returning this manual 5 Quick Review Playing a DVD 6 Location of controls 8 Operation for...
... 26 Displaying captions for viewers with the menu display ....... 19 Displaying running time 20 Changing the subtitle language 21 Using a DVD menu 21 Using the TOP MENU button 21 Using the MENU button 22 Changing the audio language 22 Changing angles 23 Changing ... DYNAMIC 28 Selecting the TV color system - COLOR SYSTEM 29 Selecting the audio language for MP3 files - AUDIO OUT 28 Selecting the compression setting for DVD - AUDIO 29 Displaying the subtitles for the sound - PASSWORD 32 Returning this manual 5 Quick Review Playing a DVD 6 Location of controls 8 Operation for...

Operating Instructions
Page 5
...the monitor, and the cordless stereo headphone. • The icons below are used in this manual: Icon Meaning Indicates a DVD function. Indicates an Audio CD function. About this manual Conventions • Instructions in a very damp area, moisture condensation may occur inside the lenses.... Should this manual describe how to splash juice or other soft drinks onto the products or discs....
...the monitor, and the cordless stereo headphone. • The icons below are used in this manual: Icon Meaning Indicates a DVD function. Indicates an Audio CD function. About this manual Conventions • Instructions in a very damp area, moisture condensation may occur inside the lenses.... Should this manual describe how to splash juice or other soft drinks onto the products or discs....

Operating Instructions
Page 6
... player lights up or the surface you cannot insert a disc. Each time you use this system for the first time. Playing a DVD 1 Press (OPEN) to the connection diagram in the supplied installation/connection manual. 4 Open the front panel of the POWER button on the player until the green light ...of the player. 6 INPUT POWER 2 Press (POWER) to select "VIDEO 4." Quick Review You can eject a disc from the player, though you want to play a DVD and other discs ...
... player lights up or the surface you cannot insert a disc. Each time you use this system for the first time. Playing a DVD 1 Press (OPEN) to the connection diagram in the supplied installation/connection manual. 4 Open the front panel of the POWER button on the player until the green light ...of the player. 6 INPUT POWER 2 Press (POWER) to select "VIDEO 4." Quick Review You can eject a disc from the player, though you want to play a DVD and other discs ...

Operating Instructions
Page 8
... this causes battery drain. 1 OPEN button 6, 12 To open the monitor. 2 Receptor for the card remote commander/Transmitter for details, refer to the installation/ connections manual) There are 3 ways to press (POWER) on /off the player and the monitor. * The reverse position of controls Monitor XVM-R70 Warning when installing in...
... this causes battery drain. 1 OPEN button 6, 12 To open the monitor. 2 Receptor for the card remote commander/Transmitter for details, refer to the installation/ connections manual) There are 3 ways to press (POWER) on /off the player and the monitor. * The reverse position of controls Monitor XVM-R70 Warning when installing in...

Operating Instructions
Page 9
... language qh SETUP buttons 25 To enter or quit the setup menu. Instructions in this manual describe how to use the player and the monitor by chapter, title, or track. Tip Refer... to "Replacing the lithium battery" for optional Sony monitors other than XVM-R75 and XVM-H6. 9 continue to turn on the monitor (page 8).... specify a desired point on the monitor (page 8), or close the display panel of view while playing or pausing a DVD. w; Cautions about the POWER (on/off) button (9) The POWER (on /off the player and the monitor completely,...
... language qh SETUP buttons 25 To enter or quit the setup menu. Instructions in this manual describe how to use the player and the monitor by chapter, title, or track. Tip Refer... to "Replacing the lithium battery" for optional Sony monitors other than XVM-R75 and XVM-H6. 9 continue to turn on the monitor (page 8).... specify a desired point on the monitor (page 8), or close the display panel of view while playing or pausing a DVD. w; Cautions about the POWER (on/off) button (9) The POWER (on /off the player and the monitor completely,...

Operating Instructions
Page 12
... (POWER) to its enclosure Close the display monitor until it clicks. The monitor turns off the monitor. Operation for details, refer to the installation/connections manual), be adjusted within the angles shown. Opening the display monitor OPEN 120˚ 180˚ 30˚ Tips • Before closing . 12
... (POWER) to its enclosure Close the display monitor until it clicks. The monitor turns off the monitor. Operation for details, refer to the installation/connections manual), be adjusted within the angles shown. Opening the display monitor OPEN 120˚ 180˚ 30˚ Tips • Before closing . 12

Operating Instructions
Page 13
...the monitor. See "Selecting the TV color system - INPUT POWER 1 Press (POWER). Each time you set the POWER SELECT switch to the B position (for details, refer to the installation/connections manual), be sure to select PAL or NTSC color system. For details, refer to the connection diagram... of installation/connection manual. 3 Press M or m to select the proper input mode. When NTSC Video is ...
...the monitor. See "Selecting the TV color system - INPUT POWER 1 Press (POWER). Each time you set the POWER SELECT switch to the B position (for details, refer to the installation/connections manual), be sure to select PAL or NTSC color system. For details, refer to the connection diagram... of installation/connection manual. 3 Press M or m to select the proper input mode. When NTSC Video is ...

Operating Instructions
Page 14
...Picture c Brightness c Color c Hue*1 c Dimmer c Video Adjust c Mode c Blue Back c Menu OFF *1 "Hue" appears only when the NTSC color system is selected; Each time you are seated. Press m: to decrease the contrast. 14 Press M: to select "On." Changing the display settings You can adjust the... display settings manually if the display is selected; When "Color" is hard to the desired setting. The "Picture" screen appears. Hue CTR *2 Press Vv, ...
...Picture c Brightness c Color c Hue*1 c Dimmer c Video Adjust c Mode c Blue Back c Menu OFF *1 "Hue" appears only when the NTSC color system is selected; Each time you are seated. Press m: to decrease the contrast. 14 Press M: to select "On." Changing the display settings You can adjust the... display settings manually if the display is selected; When "Color" is hard to the desired setting. The "Picture" screen appears. Hue CTR *2 Press Vv, ...

Operating Instructions
Page 22
... or more comprehensive Menu that includes such things as "Press SELECT" in step 3. • The contents of the DVD menu differ, depending on the DVD. • Read the instruction manual supplied with a DVD. Notes • Some DVDs do not have multiple audio languages you can change to select the desired item. 3 Press (ENTER)*1 . *1 If additional...
... or more comprehensive Menu that includes such things as "Press SELECT" in step 3. • The contents of the DVD menu differ, depending on the DVD. • Read the instruction manual supplied with a DVD. Notes • Some DVDs do not have multiple audio languages you can change to select the desired item. 3 Press (ENTER)*1 . *1 If additional...

Operating Instructions
Page 24
... control) function During playback of a PBC compatible Video CD, you press (TOP MENU), the PBC menu function turns on or off. 2 Press u. Read the instruction manual supplied with the Video CD. 24 Depending on the Video CD. press ./> to go to change the item.
... control) function During playback of a PBC compatible Video CD, you press (TOP MENU), the PBC menu function turns on or off. 2 Press u. Read the instruction manual supplied with the Video CD. 24 Depending on the Video CD. press ./> to go to change the item.

Operating Instructions
Page 35
.... 1 Remove the old ear pad by battery leakage and subsequent corrosion. •Do not leave the cordless stereo headphones in this manual, please consult nearest Sony dealer. Ear pad 2 Place the new ear pad around you have any kind. If the ear pads become dirty or worn out, replace them ... the housing. The ear pad is recommended to use the headphones at your ears, lower the volume or discontinue use. 35 If you purchased this system, or at a temperature of between 5 ˚C and 35 ˚C (41 ˚F and 95 ˚F).) •Do not drop, hit or otherwise subject headphones to...
.... 1 Remove the old ear pad by battery leakage and subsequent corrosion. •Do not leave the cordless stereo headphones in this manual, please consult nearest Sony dealer. Ear pad 2 Place the new ear pad around you have any kind. If the ear pads become dirty or worn out, replace them ... the housing. The ear pad is recommended to use the headphones at your ears, lower the volume or discontinue use. 35 If you purchased this system, or at a temperature of between 5 ˚C and 35 ˚C (41 ˚F and 95 ˚F).) •Do not drop, hit or otherwise subject headphones to...

Operating Instructions
Page 40
Design and specifications are subject to change without notice. 40 Specifications DVD player MV-101 System Laser Signal format system Semiconductor laser NTSC Audio characteristics Frequency response Signal to noise ratio Hermonic distortion Dynamic range Wow ... size Picture segment Power requirements Current drain Dimensions Operating temperature Mass Supplied accessories Optional accessories Liquid crystal color display Manual flipdown panel TFT-LCD active matrix system 7 inches wide screen (16:9) 154 × 87 mm, 176 mm (6 1/8 × 3 1/2 in, 7 in) (w/h, d) 336,960 (w 1440 ×...
Design and specifications are subject to change without notice. 40 Specifications DVD player MV-101 System Laser Signal format system Semiconductor laser NTSC Audio characteristics Frequency response Signal to noise ratio Hermonic distortion Dynamic range Wow ... size Picture segment Power requirements Current drain Dimensions Operating temperature Mass Supplied accessories Optional accessories Liquid crystal color display Manual flipdown panel TFT-LCD active matrix system 7 inches wide screen (16:9) 154 × 87 mm, 176 mm (6 1/8 × 3 1/2 in, 7 in) (w/h, d) 336,960 (w 1440 ×...


