Operating Instructions
Page 3
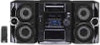
...the CD display 11 Tuner Presetting radio stations 11 Listening to music - Sleep Timer 21 Waking up the optional A/V components 22 Connecting a video game machine ...... 23 Additional Information Precautions 24 Troubleshooting 25 Messages 26 Specifications 27 * European model only ...3 Daily Timer 21 Optional Components Hooking up to the radio - Table of Contents Parts Identification Main unit 4 Remote Control 5 Getting Started Hooking up the system 6 Inserting two R6 (size AA) batteries into the remote 8 Setting the time 8 Saving the power in ...
...the CD display 11 Tuner Presetting radio stations 11 Listening to music - Sleep Timer 21 Waking up the optional A/V components 22 Connecting a video game machine ...... 23 Additional Information Precautions 24 Troubleshooting 25 Messages 26 Specifications 27 * European model only ...3 Daily Timer 21 Optional Components Hooking up to the radio - Table of Contents Parts Identification Main unit 4 Remote Control 5 Getting Started Hooking up the system 6 Inserting two R6 (size AA) batteries into the remote 8 Setting the time 8 Saving the power in ...
Operating Instructions
Page 5
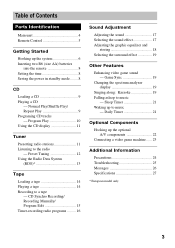
Parts Identification Remote Control 12 34 5 6 ql 7 qk qj 8 qh 9 qg 0 qf qd qa qs CD qj (10, 11, 15, 16) CLEAR 6 (10) CLOCK/TIMER SELECT 2 (17, 22) ...
Parts Identification Remote Control 12 34 5 6 ql 7 qk qj 8 qh 9 qg 0 qf qd qa qs CD qj (10, 11, 15, 16) CLEAR 6 (10) CLOCK/TIMER SELECT 2 (17, 22) ...
Operating Instructions
Page 8
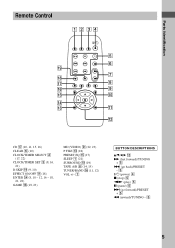
... hour. 6 Press B. Hooking up even in the Power Saving Mode. • The timer functions in the Power Saving Mode. When the remote no longer operates the system, replace both batteries with new ones. Each time you disconnect the power cord or if a power failure occurs. To cancel the Power Saving...SET CLOCK". Tip If you release the buttons, "LOCK" appears. 3 Unplug the AC power cord. Setting the time 1 Turn on the system. 2 Press CLOCK/TIMER SET on the remote. When you made a mistake or want to change the time, start over from the unit. 2 Hold down CD and then press ?/1 ...
... hour. 6 Press B. Hooking up even in the Power Saving Mode. • The timer functions in the Power Saving Mode. When the remote no longer operates the system, replace both batteries with new ones. Each time you disconnect the power cord or if a power failure occurs. To cancel the Power Saving...SET CLOCK". Tip If you release the buttons, "LOCK" appears. 3 Unplug the AC power cord. Setting the time 1 Turn on the system. 2 Press CLOCK/TIMER SET on the remote. When you made a mistake or want to change the time, start over from the unit. 2 Hold down CD and then press ?/1 ...

Operating Instructions
Page 9
... pause, press > (to go forward) or . (to go back). Press X. Release it on the disc tray. SHUFFLE ALL DISCS (Shuffle Play) The tracks on the remote). The disc tray opens. 2 Place a CD with the label side up on the inner circle of the tray. Press again to close the disc tray... disc tray. 3 Press Z OPEN/CLOSE to resume play modes. Getting Started/CD CD Loading a CD 1 Press Z OPEN/CLOSE. Normal Play/Shuffle Play/Repeat Play This system lets you play the CD in random order.
... pause, press > (to go forward) or . (to go back). Press X. Release it on the disc tray. SHUFFLE ALL DISCS (Shuffle Play) The tracks on the remote). The disc tray opens. 2 Place a CD with the label side up on the inner circle of the tray. Press again to close the disc tray... disc tray. 3 Press Z OPEN/CLOSE to resume play modes. Getting Started/CD CD Loading a CD 1 Press Z OPEN/CLOSE. Normal Play/Shuffle Play/Repeat Play This system lets you play the CD in random order.

Operating Instructions
Page 10
... mode cannot be changed while playing a disc. Press Z OPEN/CLOSE. Note The play until "PROGRAM" and "SHUFFLE" disappear. To program all the tracks on the remote in the display. Clear a track from another source Remove a CD Exchange other CDs while playing Play repeatedly (Repeat Play) Do this Cancel Program Play Press...
... mode cannot be changed while playing a disc. Press Z OPEN/CLOSE. Note The play until "PROGRAM" and "SHUFFLE" disappear. To program all the tracks on the remote in the display. Clear a track from another source Remove a CD Exchange other CDs while playing Play repeatedly (Repeat Play) Do this Cancel Program Play Press...
Operating Instructions
Page 11
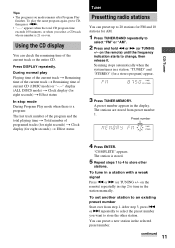
...appears when the total CD program time exceeds 100 minutes, or when you made remains after Program Play finishes. Scanning stops automatically when the system tunes in the display. "TUNED" and "STEREO" (for eight seconds) t Effect status Tuner Presetting radio stations You can check the... programed tracks (for eight seconds) t Clock display (for a stereo program) appear. 3 Press TUNER MEMORY. The stations are stored from step 1. on the remote) until the frequency indication starts to select "FM" or "AM". 2 Press and hold m or M (or TUNING +/- continued 11 Using the CD display...
...appears when the total CD program time exceeds 100 minutes, or when you made remains after Program Play finishes. Scanning stops automatically when the system tunes in the display. "TUNED" and "STEREO" (for eight seconds) t Effect status Tuner Presetting radio stations You can check the... programed tracks (for eight seconds) t Clock display (for a stereo program) appear. 3 Press TUNER MEMORY. The stations are stored from step 1. on the remote) until the frequency indication starts to select "FM" or "AM". 2 Press and hold m or M (or TUNING +/- continued 11 Using the CD display...
Operating Instructions
Page 12
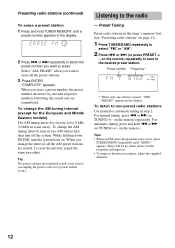
... 12 "COMPLETE" appears. When you want to select "FM" or "AM". 2 Press . Listening to tune in the desired preset station. on the remote). Tip The preset stations are retained for the European and Middle Eastern models) The AM tuning interval is preset, "ONE PRESET" appears in the display... stations" on . When you want to non-preset radio stations Use manual or automatic tuning in some areas). While holding down ENTER, turn off the system. or > (or press PRESET +/ - For automatic tuning, press and hold TUNER MEMORY until "MONO" appears. Tips • When an FM stereo ...
... 12 "COMPLETE" appears. When you want to select "FM" or "AM". 2 Press . Listening to tune in the desired preset station. on the remote). Tip The preset stations are retained for the European and Middle Eastern models) The AM tuning interval is preset, "ONE PRESET" appears in the display... stations" on . When you want to non-preset radio stations Use manual or automatic tuning in some areas). While holding down ENTER, turn off the system. or > (or press PRESET +/ - For automatic tuning, press and hold TUNER MEMORY until "MONO" appears. Tips • When an FM stereo ...

Operating Instructions
Page 16
Select j (or RELAY) to record on the remote. To timer-record, you have loaded a CD and pressed CD. Press v or V repeatedly to set the minute, then press ENTER. 16 The minute indication starts ...
Select j (or RELAY) to record on the remote. To timer-record, you have loaded a CD and pressed CD. Press v or V repeatedly to set the minute, then press ENTER. 16 The minute indication starts ...

Operating Instructions
Page 17
... video sources (movies, VCDs). Notes • If the system is on at the preset time, the recording will not be recorded (e.g., "TUNER FM 5"), then the original display appears. 6 Load a recordable tape into deck B. 7 Press ?/1 to turn on the remote) repeatedly to select the preset you press the button, the...EQ*, MOVIE EQ* or GAME EQ* (or PRESET EQ** on the system until the Sleep Timer turns it off the system. Then, press ENTER. To Check the setting Cancel the timer Do this Press CLOCK/TIMER SELECT on the remote and press v or V repeatedly to select "SEL REC". The preset ...
... video sources (movies, VCDs). Notes • If the system is on at the preset time, the recording will not be recorded (e.g., "TUNER FM 5"), then the original display appears. 6 Load a recordable tape into deck B. 7 Press ?/1 to turn on the remote) repeatedly to select the preset you press the button, the...EQ*, MOVIE EQ* or GAME EQ* (or PRESET EQ** on the system until the Sleep Timer turns it off the system. Then, press ENTER. To Check the setting Cancel the timer Do this Press CLOCK/TIMER SELECT on the remote and press v or V repeatedly to select "SEL REC". The preset ...
Operating Instructions
Page 19
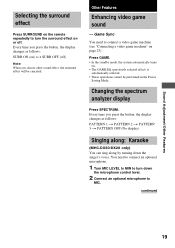
... on page 23). Sound Adjustment/Other Features Selecting the surround effect Press SURROUND on the remote repeatedly to turn down the singer's voice. Changing the spectrum analyzer display Press SPECTRUM. Other... Features Enhancing video game sound - Press GAME. • In the standby mode, the system automatically turns on or off ) Note When you press the button, the display changes as follows... PATTERN 1 t PATTERN 2 t PATTERN 3 t PATTERN OFF (No display) Singing along: Karaoke (MHC-DX30/DX20 only) You can sing along by turning down the microphone control level. 2 Connect an ...
... on page 23). Sound Adjustment/Other Features Selecting the surround effect Press SURROUND on the remote repeatedly to turn down the singer's voice. Changing the spectrum analyzer display Press SPECTRUM. Other... Features Enhancing video game sound - Press GAME. • In the standby mode, the system automatically turns on or off ) Note When you press the button, the display changes as follows... PATTERN 1 t PATTERN 2 t PATTERN 3 t PATTERN OFF (No display) Singing along: Karaoke (MHC-DX30/DX20 only) You can sing along by turning down the microphone control level. 2 Connect an ...

Operating Instructions
Page 20
... (howling) occurs, move the microphone away from TAPE A, press TAPE A/B repeatedly until "KARAOKE PON" disappears. only a few instruments are input, the system automatically adjusts the recording level to prevent distortion of the source you have finished Turn MIC LEVEL to record on one side. a duet is recorded...If you want to record on both sides. 5 Press REC PAUSE/START. Deck B stands by turning MIC LEVEL. the voice on the remote) or recall a sound effect, the karaoke mode is canceled. • The instrumental sound may not be recorded. Every time you desire.
... (howling) occurs, move the microphone away from TAPE A, press TAPE A/B repeatedly until "KARAOKE PON" disappears. only a few instruments are input, the system automatically adjusts the recording level to prevent distortion of the source you have finished Turn MIC LEVEL to record on one side. a duet is recorded...If you want to record on both sides. 5 Press REC PAUSE/START. Deck B stands by turning MIC LEVEL. the voice on the remote) or recall a sound effect, the karaoke mode is canceled. • The instrumental sound may not be recorded. Every time you desire.
Operating Instructions
Page 21
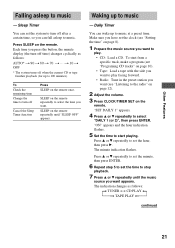
... to 100 minutes). SLEEP on the remote. Make sure you have set the system to turn off when the current CD or tape finishes playback (for up to select the time you want. The minute indication flashes. t 10 t OFF * The system turns off after a certain time, so you want appears. SLEEP on... a tape with the side you want to play facing forward. • Radio: Tune in the preset station you want (see "Setting the time" on the remote repeatedly until the music source you press the button, the minute display (the turn off time) changes cyclically as follows: t TUNER y CD PLAY T t TAPE...
... to 100 minutes). SLEEP on the remote. Make sure you have set the system to turn off when the current CD or tape finishes playback (for up to select the time you want. The minute indication flashes. t 10 t OFF * The system turns off after a certain time, so you want appears. SLEEP on... a tape with the side you want to play facing forward. • Radio: Tune in the preset station you want (see "Setting the time" on the remote repeatedly until the music source you press the button, the minute display (the turn off time) changes cyclically as follows: t TUNER y CD PLAY T t TAPE...
Operating Instructions
Page 22
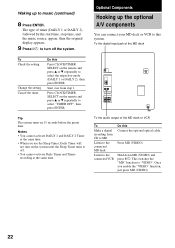
... Timerrecording at the same time. To Check the setting Change the setting Cancel the timer Do this Connect the optional optical cable. Tip The system turns on the remote and press v or V repeatedly to select the respective mode (DAILY 1 or DAILY 2), then press ENTER. Notes • You cannot activate... this Press CLOCK/TIMER SELECT on 15 seconds before the preset time. Optional Components Hooking up to music (continued) 8 Press ENTER. Waking up the optional A/V components You can connect your MD deck or VCR to this system. The type of the MD deck or VCR To Make a digital recording...
... Timerrecording at the same time. To Check the setting Change the setting Cancel the timer Do this Connect the optional optical cable. Tip The system turns on the remote and press v or V repeatedly to select the respective mode (DAILY 1 or DAILY 2), then press ENTER. Notes • You cannot activate... this Press CLOCK/TIMER SELECT on 15 seconds before the preset time. Optional Components Hooking up to music (continued) 8 Press ENTER. Waking up the optional A/V components You can connect your MD deck or VCR to this system. The type of the MD deck or VCR To Make a digital recording...
Operating Instructions
Page 25
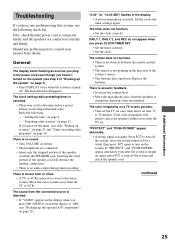
... "Presetting radio stations" on page 11 If you have any problem persist, consult your nearest Sony dealer. Inserting the vinyl portion of the microphone. Replace the batteries. continued Additional Information 25 First... system" on page 7). • Press DISPLAY twice when the system is not pointing in the power cord even though you haven't turned on the system (see "Hooking up the optional A/V components"...occurs longer than half a day. The remote does not function. • There is an obstacle between the remote and the system. • The remote is turned off the TV set .
... "Presetting radio stations" on page 11 If you have any problem persist, consult your nearest Sony dealer. Inserting the vinyl portion of the microphone. Replace the batteries. continued Additional Information 25 First... system" on page 7). • Press DISPLAY twice when the system is not pointing in the power cord even though you haven't turned on the system (see "Hooking up the optional A/V components"...occurs longer than half a day. The remote does not function. • There is an obstacle between the remote and the system. • The remote is turned off the TV set .
Operating Instructions
Page 29
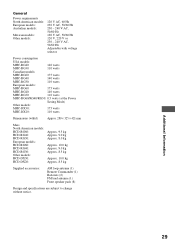
... MHC-RG40: 140 watts MHC-RG30: 110 watts Canadian models: MHC-RG60: 175 watts MHC-RG40: 140 watts MHC-RG30: 110 watts European models: MHC-RG60: 175 watts MHC-RG40: 140 watts MHC-RG30: 110 watts MHC-RG60/RG40/RG30: 0.5 watts (at the Power Saving Mode) Other models: MHC-DX30: 175 watts MHC-... HCD-RG40: HCD-RG30: European models: HCD-RG60: HCD-RG40: HCD-RG30: Other models: HCD-DX30: HCD-DX20: Approx. 9.5 kg Approx. 9.0 kg Approx. 8.0 kg Approx. 10.0 kg Approx. 9.0 kg Approx. 8.5 kg Approx. 10.0 kg Approx. 8.5 kg Supplied accessories: AM loop antenna (1) Remote Commander...
... MHC-RG40: 140 watts MHC-RG30: 110 watts Canadian models: MHC-RG60: 175 watts MHC-RG40: 140 watts MHC-RG30: 110 watts European models: MHC-RG60: 175 watts MHC-RG40: 140 watts MHC-RG30: 110 watts MHC-RG60/RG40/RG30: 0.5 watts (at the Power Saving Mode) Other models: MHC-DX30: 175 watts MHC-... HCD-RG40: HCD-RG30: European models: HCD-RG60: HCD-RG40: HCD-RG30: Other models: HCD-DX30: HCD-DX20: Approx. 9.5 kg Approx. 9.0 kg Approx. 8.0 kg Approx. 10.0 kg Approx. 9.0 kg Approx. 8.5 kg Approx. 10.0 kg Approx. 8.5 kg Supplied accessories: AM loop antenna (1) Remote Commander...


