Operating Instructions
Page 4
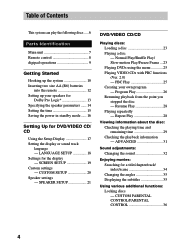
... program - Program Play 26 Resuming playback from the point you stopped the disc - CUSTOM PARENTAL CONTROL/PARENTAL CONTROL 36 4 CUSTOM SETUP 20 Speaker settings - SPEAKER SETUP 21 DVD/VIDEO CD/CD Playing discs: Loading a disc 23 Playing a disc - Normal Play/Shuffle Play/ Slow-motion Play/Freeze Frame ... 23 Playing DVDs using the menu 25 Playing VIDEO CDs with PBC functions (Ver. 2.0) - PBC Play 25 Creating your speakers for Dolby Pro Logic 13 Specifying the speaker parameters ...... 14 Setting the time 15 Saving the power in standby mode ...... 16 Setting...
... program - Program Play 26 Resuming playback from the point you stopped the disc - CUSTOM PARENTAL CONTROL/PARENTAL CONTROL 36 4 CUSTOM SETUP 20 Speaker settings - SPEAKER SETUP 21 DVD/VIDEO CD/CD Playing discs: Loading a disc 23 Playing a disc - Normal Play/Shuffle Play/ Slow-motion Play/Freeze Frame ... 23 Playing DVDs using the menu 25 Playing VIDEO CDs with PBC functions (Ver. 2.0) - PBC Play 25 Creating your speakers for Dolby Pro Logic 13 Specifying the speaker parameters ...... 14 Setting the time 15 Saving the power in standby mode ...... 16 Setting...
Operating Instructions
Page 5
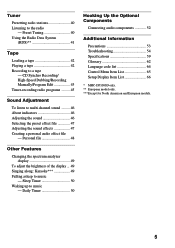
... multi channel sound ......... 46 About indicators 46 Adjusting the sound 46 Selecting the preset effect file 47 Adjusting the sound effects 47 Creating a personal audio effect file - Daily Timer 50 Hooking Up the Optional Components Connecting audio components 52 Additional Information Precautions 53 Troubleshooting 54 Specifications 59 Glossary 62 Language code list 64 Control Menu Item List 65 Setup Display Item List 66 * MHC-DP1000D only. ** European model only. ***Except for North American and European models. 5 Tuner Presetting radio stations...
... multi channel sound ......... 46 About indicators 46 Adjusting the sound 46 Selecting the preset effect file 47 Adjusting the sound effects 47 Creating a personal audio effect file - Daily Timer 50 Hooking Up the Optional Components Connecting audio components 52 Additional Information Precautions 53 Troubleshooting 54 Specifications 59 Glossary 62 Language code list 64 Control Menu Item List 65 Setup Display Item List 66 * MHC-DP1000D only. ** European model only. ***Except for North American and European models. 5 Tuner Presetting radio stations...
Operating Instructions
Page 6
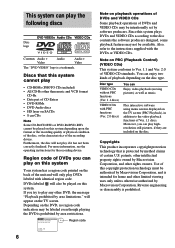
... code indication may be intentionally set by area limitations." XXXXX 6 Note on playback operations of DVDs and VIDEO CDs Some playback operations of DVDs and VIDEO CDs may not be played on this system cannot play the following discs DVD VIDEOs Audio CDs VIDEO CDs Disc logo Contents Audio + Video Audio Audio + Video The "DVD VIDEO" logo is a trademark. Play interactive software using menu screens displayed on the TV screen (PBC Playback), in addition to the instructions supplied with the DVDs or VIDEO...
... code indication may be intentionally set by area limitations." XXXXX 6 Note on playback operations of DVDs and VIDEO CDs Some playback operations of DVDs and VIDEO CDs may not be played on this system cannot play the following discs DVD VIDEOs Audio CDs VIDEO CDs Disc logo Contents Audio + Video Audio Audio + Video The "DVD VIDEO" logo is a trademark. Play interactive software using menu screens displayed on the TV screen (PBC Playback), in addition to the instructions supplied with the DVDs or VIDEO...
Operating Instructions
Page 12
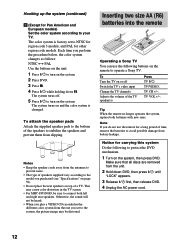
The color system is changed. TV VOL +/-. Notes • Keep the speaker cords away from slipping. Otherwise, the sound will not be heard. • When you play a VIDEO CD recorded in the TV screen. • For MHC-DP1000D, be distorted. TV/VIDEO. Tip When the remote no longer operates the system, replace both left and right rear speakers. Notice for carrying this system Do the following buttons on top of...
The color system is changed. TV VOL +/-. Notes • Keep the speaker cords away from slipping. Otherwise, the sound will not be heard. • When you play a VIDEO CD recorded in the TV screen. • For MHC-DP1000D, be distorted. TV/VIDEO. Tip When the remote no longer operates the system, replace both left and right rear speakers. Notice for carrying this system Do the following buttons on top of...
Operating Instructions
Page 14
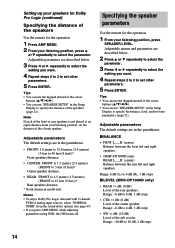
... SPEAKER LEVEL. Notes • To enjoy Dolby Pro Logic surround with 2 channel PCM or analog input sources, select "NORMAL SURR" from your listening position, press v or V repeatedly to specify the balance, level, and test tone parameters (page 21). Adjustable menus and parameters are in the Setup Display to select the parameter. Note If each of the speakers (page 21). Specifying the speaker parameters Use the remote for the operation. 1 Press AMP MENU. 2 From your listening position, set...
... SPEAKER LEVEL. Notes • To enjoy Dolby Pro Logic surround with 2 channel PCM or analog input sources, select "NORMAL SURR" from your listening position, press v or V repeatedly to specify the balance, level, and test tone parameters (page 21). Adjustable menus and parameters are in the Setup Display to select the parameter. Note If each of the speakers (page 21). Specifying the speaker parameters Use the remote for the operation. 1 Press AMP MENU. 2 From your listening position, set...

Operating Instructions
Page 15
... change the time, start over from the sub woofer. Range: OFF, 0.1 to attenuate the LFE signal. "MAX" provides a great compression of the LFE (Low Frequency Effect) channel output. Select "OFF" to turn off . or > repeatedly to set the hour. 6 Press ENTER. 7 Press . "0 dB" outputs the full LFE signal at the mix level determined by the recording engineer. "STD" reproduces the sound track with Dolby Digital sources only. • If you adjust the level of the LFE channel. x T.TONE (MHC-DP1000D...
... change the time, start over from the sub woofer. Range: OFF, 0.1 to attenuate the LFE signal. "MAX" provides a great compression of the LFE (Low Frequency Effect) channel output. Select "OFF" to turn off . or > repeatedly to set the hour. 6 Press ENTER. 7 Press . "0 dB" outputs the full LFE signal at the mix level determined by the recording engineer. "STD" reproduces the sound track with Dolby Digital sources only. • If you adjust the level of the LFE channel. x T.TONE (MHC-DP1000D...

Operating Instructions
Page 18
... resetting the system. • You can reset all of cursor buttons (v/V/b/B) when DVD is turned off. After you selected, the language code (4 digits) is displayed the next time you can use the digipad instead of the "SETUP" settings on the screen. LANGUAGE SETUP OSD: DVD MENU: AUDIO: SUBTITLE: ENGLISH ENGLISH ORIGINAL ENGLISH x OSD (on-screen Display) Switches the display language on -screen display or sound track. Select the language from the displayed list.* When you select "RESET" in "DVD MENU", "AUDIO", or "SUBTITLE", select...
... resetting the system. • You can reset all of cursor buttons (v/V/b/B) when DVD is turned off. After you selected, the language code (4 digits) is displayed the next time you can use the digipad instead of the "SETUP" settings on the screen. LANGUAGE SETUP OSD: DVD MENU: AUDIO: SUBTITLE: ENGLISH ENGLISH ORIGINAL ENGLISH x OSD (on-screen Display) Switches the display language on -screen display or sound track. Select the language from the displayed list.* When you select "RESET" in "DVD MENU", "AUDIO", or "SUBTITLE", select...

Operating Instructions
Page 19
... the system appears in the Setup Display. Note Depending on the entire screen and cuts off the screen saver. This setting displays the wide picture on the DVD, "4:3 LETTER BOX" may be selected automatically instead of the screen. Setting Up for DVD/VIDEO CD/CD Settings for more than 15 minutes. This setting displays a wide picture with a wide mode function. • 4:3 LETTER BOX: Select this when you connect a 4:3 screen TV. Select "SCREEN SETUP" in...
... the system appears in the Setup Display. Note Depending on the entire screen and cuts off the screen saver. This setting displays the wide picture on the DVD, "4:3 LETTER BOX" may be selected automatically instead of the screen. Setting Up for DVD/VIDEO CD/CD Settings for more than 15 minutes. This setting displays a wide picture with a wide mode function. • 4:3 LETTER BOX: Select this when you connect a 4:3 screen TV. Select "SCREEN SETUP" in...

Operating Instructions
Page 20
... "AUDIO" setting in "LANGUAGE SETUP" (page 18). • If PCM, DTS, MPEG audio, and Dolby Digital sound tracks have the same number of channels, the system selects PCM, DTS, MPEG audio, and Dolby Digital sound tracks in this case, you can change the color system of this position. • FRAME: A picture including subjects that move dynamically is output with priority may change the color system of channels when you set to the connected TV. Custom settings - x PAUSE MODE (DVD only) Select...
... "AUDIO" setting in "LANGUAGE SETUP" (page 18). • If PCM, DTS, MPEG audio, and Dolby Digital sound tracks have the same number of channels, the system selects PCM, DTS, MPEG audio, and Dolby Digital sound tracks in this case, you can change the color system of this position. • FRAME: A picture including subjects that move dynamically is output with priority may change the color system of channels when you set to the connected TV. Custom settings - x PAUSE MODE (DVD only) Select...
Operating Instructions
Page 21
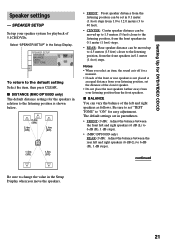
... place the rear speakers farther away from your speaker system for easy adjustment. x DISTANCE (MHC-DP1000D only) The default distance settings for DVD/VIDEO CD/CD Speaker settings - SPEAKER SETUP DISTANCE: BALANCE: LEVEL: TEST TONE: To return to change the value in the Setup Display. Be sure to set "TEST TONE" to 6 dB (R), 1 dB steps). • (MHC-DP1000D only) REAR (0 dB): Adjust the balance between the rear left and right speakers as follows. Notes • When you move the speakers. 21 SPEAKER SETUP Set up to...
... place the rear speakers farther away from your speaker system for easy adjustment. x DISTANCE (MHC-DP1000D only) The default distance settings for DVD/VIDEO CD/CD Speaker settings - SPEAKER SETUP DISTANCE: BALANCE: LEVEL: TEST TONE: To return to change the value in the Setup Display. Be sure to set "TEST TONE" to 6 dB (R), 1 dB steps). • (MHC-DP1000D only) REAR (0 dB): Adjust the balance between the rear left and right speakers as follows. Notes • When you move the speakers. 21 SPEAKER SETUP Set up to...
Operating Instructions
Page 22
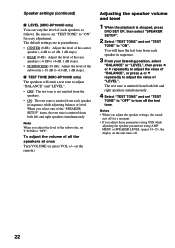
... DVD SET UP, then select "SPEAKER SETUP". 2 Select "TEST TONE" and set "TEST TONE" to "OFF" to "OFF". Note When you adjust these parameters using OSD while adjusting the speaker parameters using AMP MENU or SPEAKER LEVEL (pages 14-15), the display on the remote). x TEST TONE (MHC-DP1000D only) The speakers will hear the test tone from both left and right speakers simultaneously. 4 Select "TEST TONE" and set "TEST TONE" to adjust the value of "LEVEL". Speaker settings (continued) x LEVEL (MHC-DP1000D only) You can vary the level of all the speakers at once Turn VOLUME...
... DVD SET UP, then select "SPEAKER SETUP". 2 Select "TEST TONE" and set "TEST TONE" to "OFF" to "OFF". Note When you adjust these parameters using OSD while adjusting the speaker parameters using AMP MENU or SPEAKER LEVEL (pages 14-15), the display on the remote). x TEST TONE (MHC-DP1000D only) The speakers will hear the test tone from both left and right speakers simultaneously. 4 Select "TEST TONE" and set "TEST TONE" to adjust the value of "LEVEL". Speaker settings (continued) x LEVEL (MHC-DP1000D only) You can vary the level of all the speakers at once Turn VOLUME...

Operating Instructions
Page 24
... play DTS sound tracks on the DVD, digital recording may be done. CHANGE (or D.SKIP on the remote. Notes • Depending on this unit. When TAPE B is automatically set to "2CH". - Press 2CH/MULTI to switch the channel mode to "2CH" on the DVD or VIDEO CD, some disturbance in the desired direction. To return to "STEREO" using the AUDIO button when you press the button, the speed changes as the current function...
... play DTS sound tracks on the DVD, digital recording may be done. CHANGE (or D.SKIP on the remote. Notes • Depending on this unit. When TAPE B is automatically set to "2CH". - Press 2CH/MULTI to switch the channel mode to "2CH" on the DVD or VIDEO CD, some disturbance in the desired direction. To return to "STEREO" using the AUDIO button when you press the button, the speed changes as the current function...
Operating Instructions
Page 38
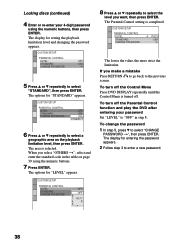
... change the password 1 In step 5, press V to select "CHANGE PASSWORD t", then press ENTER. The display for "STANDARD" appears. The options for setting the playback limitation level and changing the password appears. If you want, then press ENTER. To turn off the Control Menu Press DVD DISPLAY repeatedly until the Control Menu is turned off the Parental Control function and play the DVD after entering your 4-digit password using the numeric buttons. 7 Press ENTER. CUSTOM SETUP PARENTAL CONTROL LEVEL: STANDARD: CHANGE PASSWORD...
... change the password 1 In step 5, press V to select "CHANGE PASSWORD t", then press ENTER. The display for "STANDARD" appears. The options for setting the playback limitation level and changing the password appears. If you want, then press ENTER. To turn off the Control Menu Press DVD DISPLAY repeatedly until the Control Menu is turned off the Parental Control function and play the DVD after entering your 4-digit password using the numeric buttons. 7 Press ENTER. CUSTOM SETUP PARENTAL CONTROL LEVEL: STANDARD: CHANGE PASSWORD...

Operating Instructions
Page 40
The stations are retained for a stereo program) appear. The station is factory set another station to 9 kHz (10 kHz in some time may flash on the screen. • When DVD is selected as the current function and TUNER/BAND is no audio output. 40 or > repeatedly to select the preset number where you want . To change the AM tuning interval (Except for European and Middle Eastern models) The AM tuning interval is stored. 5 Repeat...
The stations are retained for a stereo program) appear. The station is factory set another station to 9 kHz (10 kHz in some time may flash on the screen. • When DVD is selected as the current function and TUNER/BAND is no audio output. 40 or > repeatedly to select the preset number where you want . To change the AM tuning interval (Except for European and Middle Eastern models) The AM tuning interval is stored. 5 Repeat...

Operating Instructions
Page 43
... select deck B and press nN to select TAPE A function. Press REC PAUSE/ START. Deck B stands by for the recording source. 3 Insert the disc you want to Insert the tape you set to "V.SEMI M.D.", "MULTI", or "V.M.DIMENS.", the setting automatically changes to record on one side. Recording starts. 7 Start playing the recording source. record into deck B. 2 Press DVD. tune in the display (except when recording from a DVD, VIDEO CD, CD, tape, radio or other sources...
... select deck B and press nN to select TAPE A function. Press REC PAUSE/ START. Deck B stands by for the recording source. 3 Insert the disc you want to Insert the tape you set to "V.SEMI M.D.", "MULTI", or "V.M.DIMENS.", the setting automatically changes to record on one side. Recording starts. 7 Start playing the recording source. record into deck B. 2 Press DVD. tune in the display (except when recording from a DVD, VIDEO CD, CD, tape, radio or other sources...

Operating Instructions
Page 46
This mode creates 5 sets of virtual speakers surrounding the listener at approximately a 30° angle of elevation. You cannot select other settings. • While decoding DTS signals, you are input. DIGITAL indicator (in a multi channel format. dts indicator (in the display): Light up when the unit is decoding signals recorded in the display): Lights up when DTS signals are listening to is fixed to output the center and rear channel signals. ; Adjusting the sound Press GROOVE. Sound Adjustment To listen to...
This mode creates 5 sets of virtual speakers surrounding the listener at approximately a 30° angle of elevation. You cannot select other settings. • While decoding DTS signals, you are input. DIGITAL indicator (in a multi channel format. dts indicator (in the display): Light up when the unit is decoding signals recorded in the display): Lights up when DTS signals are listening to is fixed to output the center and rear channel signals. ; Adjusting the sound Press GROOVE. Sound Adjustment To listen to...

Operating Instructions
Page 50
... recorded sound signal (Auto Level Control Function). Each time you can set the clock (see "Listening to music at a preset time, so you press the button, the minute display (the turn-off time) changes as follows: AUTO* t 90 t 80 t 70 t ... Singing along: Karaoke (continued) Mixing and recording sound 1 Do the procedure for "Singing along the music. Deck B stands by selecting the DVD function and not playing the disc. • When high level sound signals are input, the unit automatically adjusts...
... recorded sound signal (Auto Level Control Function). Each time you can set the clock (see "Listening to music at a preset time, so you press the button, the minute display (the turn-off time) changes as follows: AUTO* t 90 t 80 t 70 t ... Singing along: Karaoke (continued) Mixing and recording sound 1 Do the procedure for "Singing along the music. Deck B stands by selecting the DVD function and not playing the disc. • When high level sound signals are input, the unit automatically adjusts...

Operating Instructions
Page 55
... turn on the DVD, the output signal may not be the entire 5.1 channel but monaural or stereo even if the sound track is recorded in the display when you press MD (VIDEO), switch to hear when you play a VIDEO CD, or a CD. • Set "AUDIO" to normal play mode. • There is no sound. • Turn VOLUME clockwise. • The headphones are playing a Dolby Digital or MPEG audio sound track. • Make sure the DSP...
... turn on the DVD, the output signal may not be the entire 5.1 channel but monaural or stereo even if the sound track is recorded in the display when you press MD (VIDEO), switch to hear when you play a VIDEO CD, or a CD. • Set "AUDIO" to normal play mode. • There is no sound. • Turn VOLUME clockwise. • The headphones are playing a Dolby Digital or MPEG audio sound track. • Make sure the DSP...

Operating Instructions
Page 56
... the test tone. Refer to cancel these functions before playing a disc. • Resume Play has been selected. DVD/VIDEO CD/CD Player The disc tray does not close. • The disc is on the disc, the sound may contain an auto pause signal. When the playback is stopped, press x, then start playback from the rear speakers. • Make sure the DSP effect is no sound from the rear speakers. (MHC-DP1000D only) • Set the rear speakers level...
... the test tone. Refer to cancel these functions before playing a disc. • Resume Play has been selected. DVD/VIDEO CD/CD Player The disc tray does not close. • The disc is on the disc, the sound may contain an auto pause signal. When the playback is stopped, press x, then start playback from the rear speakers. • Make sure the DSP effect is no sound from the rear speakers. (MHC-DP1000D only) • Set the rear speakers level...

Operating Instructions
Page 58
..., reset the system as the preset stations, clock, and timer are magnetized (see "Demagnetizing the tape heads" on page 54). Self-diagnosis function (When letters/numbers appear in stereo. • Press FM MODE so that "MONO" disappears. The disc is reset to the factory settings except for DVD settings. To prevent a malfunction, the system has performed the selfdiagnosis function. , Contact your nearest Sony dealer or local authorized Sony service facility...
..., reset the system as the preset stations, clock, and timer are magnetized (see "Demagnetizing the tape heads" on page 54). Self-diagnosis function (When letters/numbers appear in stereo. • Press FM MODE so that "MONO" disappears. The disc is reset to the factory settings except for DVD settings. To prevent a malfunction, the system has performed the selfdiagnosis function. , Contact your nearest Sony dealer or local authorized Sony service facility...


